Dismap 定位是一个适用于内外网的资产发现和识别工具;其特色功能在于快速识别 Web 指纹信息,定位资产类型。辅助红队快速定位目标资产信息,辅助蓝队发现疑似脆弱点。
Dismap 拥有完善的指纹规则库,可轻松自定义新识别规则。
识别结果可直接丢给 Vulmap(>=0.8) 进行漏洞扫描实现简易联动。
项目地址:
https://github.com/zhzyker/dismap
工具最初定位为内网工具,自我感触在大型攻防活动中,经常由于精力有限略过内网网站,而靠内网数据库、弱口令、FTP、SMB 之类的目标来刷分,但多数内网往往分数达不到自己预期,故思理论上内网网站脆弱性肯定比外网高,实际上确不怎么打,还是内网精力分配的差异,又思搞一个快速识别网段(内网)所有 Web 资产类型出来的工具,岂不就能针对性逮好打的拿分了~
后续因测试需求经常在互联网(外网)中扫描识别测试,惊奇的发现这玩意扫整个外网网段时效果远远高于自己预期,往往一个 C 段 200 左右个存活 IP 几个 Tomcat、多少 Shiro、一堆 Spring、一些 Struts2 的网站清清楚楚摆在眼前,偶尔在蹦出来一堆其他 Web 应用,简直不要太快乐。
授权问题仅贴自己搭建环境的效果图:
下载链接:
https://github.com/zhzyker/dismap/releases
默认编译了以下支持的系统类型:
dismap-darwin-amd64 6.66 MB
dismap-darwin-arm64 6.48 MB
dismap-linux-amd64 6.78 MB
dismap-linux-x86 6.02 MB
dismap-windows-amd64.exe 6.77 MB
dismap-windows-x86.exe 6.07 MB
运行:
# Linux and MacOS[email protected]:~$ chmod +x dismap[email protected]:~$ ./dismap -h# WindowsC:\Users\zhzyker\Desktop> dismap.exe -h
功能和参数使用解读视频(Bilibili):
https://www.bilibili.com/video/BV13L411b79E
常规参数:
-file stringSelect a URL file for batch identification# 从文件中读取 Url 进行批量识别-ip stringNetwork segment [e.g. -ip 192.168.1.0/24 or -ip 192.168.1.1-10]# 指定一个网段,格式示例: 192.168.1.1/24 192.168.1.1-100 192.168.1.1-192.168.1.254-npNot use ICMP/PING to detect surviving hosts# 不进行主机存活检测,跳过存活检测直接识别 Url-output stringSave the scan results to the specified file (default "output.txt")# 自定义识别结果输出文件,默认追加到 output.txt 中-port stringCustom scan ports [e.g. -port 80,443 or -port 1-65535]# 自定义需要扫描的 Web 端口,默认端口在 /config/config.go 中-thread intNumber of concurrent threads, (adapted to two network segments 2x254) (default 508)# 多线程数量,默认508(两个C段的数量),线程越高存活和识别丢失率可能越高,不建议超过2000-timeout intResponse timeout time, the default is 5 seconds (default 5)# 主机存活探测和 Http 超时时间,默认均为5秒-url stringSpecify a target URL [e.g. -url https://example.com]# 识别单个 Url 时用该选项指定
规则库大致格式:
Rule:Name: name /* 定义规则名称 */Type: header|body|ico /* 支持识别的类型, header、body、ico 任意组合, ico 为单独请求 favicon.ico 并计算 MD5*/Mode: and|or /* 类型的判断逻辑关系 */RuleInBody: str /* 需要指定响应 Body 中存在 str 则命中 */InHeader: str /* 需要指定响应 Hedaer 中存在 str 则命中 */InIcoMd5: str_md5 /* favicon.ico 的 MD5 值 */Http:ReqMethod: GET|POST /* 自定义请求方法,目前支持 GET 和 POST */ReqPath: str /* 自定义请求 Web 路径 */ReqHeader: []str /* 自定义 Http 请求的 Header */ReqBody: str /* 自定义 POST 请求时的 Body */
简单示例:
# 即在响应Body中检查是否存在字符<flink-root></flink-root>{"Apahce Flink", "body", "", InStr{"(<flink-root></flink-root>)", "", ""}, ReqHttp{"", "", nil, ""}},# 自定义请求访问/myportal/control/main,判断自定义请求的结果中是否存在指定的 header 字符和 body 字符。可以发现均支持正则表达式{"Apache OFBiz", "body|header", "or", InStr{"(Apache OFBiz|apache.ofbiz)", "(Set-Cookie: OFBiz.Visitor=(.*))", ""}, ReqHttp{"GET", "/myportal/control/main", nil, ""}},
对于规则库的详细说明见 Github
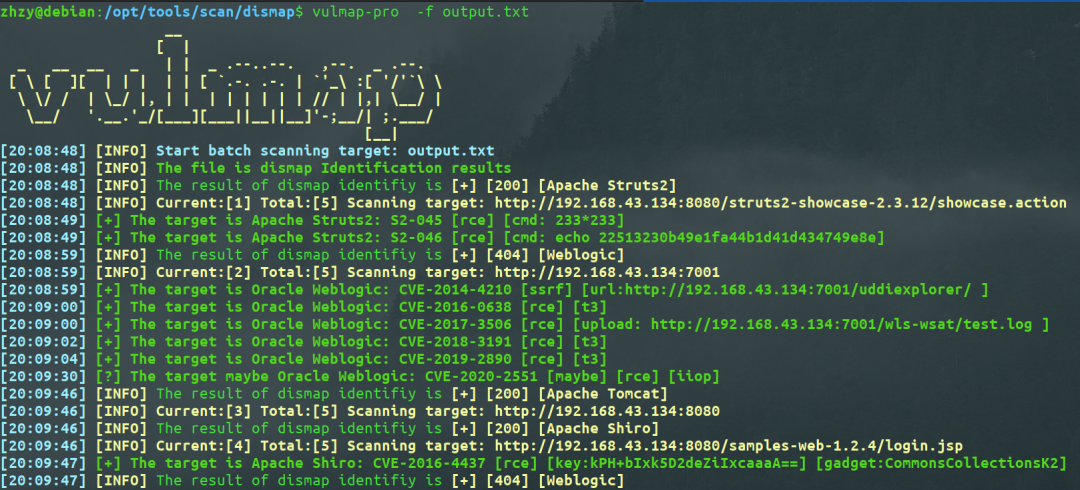
目前开源的两款工具(dismap v0.1 and vulmap >=0.8 )可进行简易联动使用,即把识别结果直接丢给漏洞扫描。
Dismap 默认会将扫描结果追加保存到 output.txt ,大致这个样子:
###### dismap 0.1 output file ############ asset discovery and identification tools ############ by:https://github.com/zhzyker/dismap ######[+] [200] [Apache Struts2] { http://192.168.43.134:8080/struts2-showcase-2.3.12/showcase.action } [Struts2 Showcase][+] [404] [Weblogic] { http://192.168.43.134:7001 } [None][-] [404] { http://192.168.43.134:8080/fast/ } [HTTP Status 404 – Not Found][+] [200] [Apache Tomcat] { http://192.168.43.134:8080 } [Apache Tomcat/8.5.56][+] [200] [Apache Shiro] { http://192.168.43.134:8080/samples-web-1.2.4/login.jsp } [None]
Vulmap 可以直接用 -f 选项指定该文件:
如有侵权请联系:admin#unsafe.sh