Intro
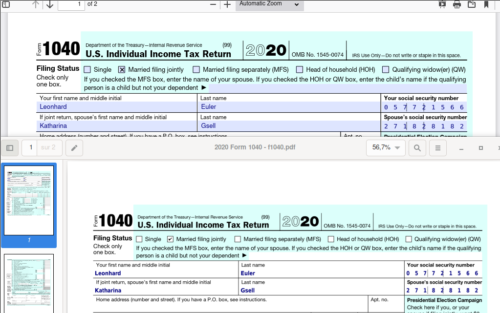
Last year, during lockdown, many discovered the importance of PDF forms when having to deal remotely with administrations and large organizations like banks. Firefox supported displaying PDF forms, but it didn’t support filling them: users had to print them, fill them by hand, and scan them back to digital form. We decided it was time to reinvest in the PDF viewer (PDF.js) and support filling PDF forms within Firefox to make our users’ lives easier.
While we invested more time in the PDF viewer, we also went through the backlog of work and prioritized improving the accessibility of our PDF reader for users of assistive technologies. Below we’ll describe how we implemented the form support, improved accessibility, and made sure we had no regressions along the way.
Brief Summary of the PDF.js Architecture
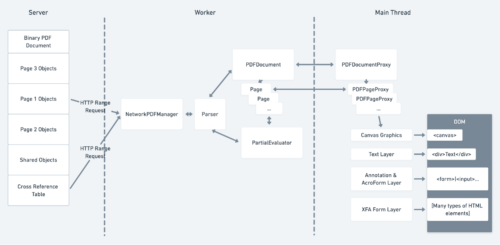
To understand how we added support for forms and tagged PDFs, it’s first important to understand some basics about how the PDF viewer (PDF.js) works in Firefox.
First, PDF.js will fetch and parse the document in a web worker. The parsed document will then generate drawing instructions. PDF.js sends them to the main thread and draws them on an HTML5 canvas element.
Besides the canvas, PDF.js potentially creates three more layers that are displayed on top of it. The first layer, the text layer, enables text selection and search. It contains span elements that are transparent and line up with the text drawn below them on the canvas. The other two layers are the Annotation/AcroForm layer and the XFA form layer. They support form filling and we will describe them in more detail below.
Filling Forms (AcroForms)
AcroForms are one of two types of forms that PDF supports, the most common type of form.
AcroForm structure
Within a PDF file, the form elements are stored in the annotation data. Annotations in PDF are separate elements from the main content of a document. They are often used for things like taking notes on a document or drawing on top of a document. AcroForm annotation elements support user input similar to HTML input e.g. text, check boxes, radio buttons.
AcroForm implementation
In PDF.js, we parse a PDF file and create the annotations in a web worker. Then, we send them out from the worker and render them in the main process using HTML elements inserted in a div (annotation layer). We render this annotation layer, composed of HTML elements, on top of the canvas layer.
The annotation layer works well for displaying the form elements in the browser, but it was not compatible with the way PDF.js supports printing. When printing a PDF, we draw its contents on a special printing canvas, insert it into the current document and send it to the printer. To support printing form elements with user input, we needed to draw them on the canvas.
By inspecting (with the help of the qpdf tool) the raw PDF data of forms saved using other tools, we discovered that we needed to save the appearance of a filled field by using some PDF drawing instructions, and that we could support both saving and printing with a common implementation.
To generate the field appearance, we needed to get the values entered by the user. We introduced an object called annotationStorage to store those values by using callback functions in the corresponding HTML elements. The annotationStorage is then passed to the worker when saving or printing, and the values for each annotation are used to create an appearance.
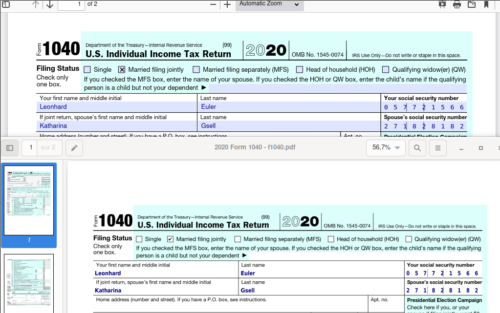
On top a filled form in Firefox and on bottom the printed PDF opened in Evince.
Safely Executing JavaScript within PDFs
Thanks to our Telemetry, we discovered that many forms contain and use embedded JavaScript code (yes, that’s a thing!).
JavaScript in PDFs can be used for many things, but is most commonly used to validate data entered by the user or automatically calculate formulas. For example, in this PDF, tax calculations are performed automatically starting from user input. Since this feature is common and helpful to users, we set out to implement it in PDF.js.
The alternatives
From the start of our JavaScript implementation, our main concern was security. We did not want PDF files to become a new vector for attacks. Embedded JS code must be executed when a PDF is loaded or on events generated by form elements (focus, input, …).
We investigated using the following:
- JS eval function
- JS engine compiled in WebAssembly with emscripten
- Firefox JS engine ComponentUtils.Sandbox
The first option, while simple, was immediately discarded since running untrusted code in eval is very unsafe.
Option two, using a JS engine compiled with WebAssembly, was a strong contender since it would work with the built-in Firefox PDF viewer and the version of PDF.js that can be used in regular websites. However, it would have been a large new attack surface to audit. It would have also considerably increased the size of PDF.js and it would have been slower.
The third option, sandboxes, is a feature exposed to privileged code in Firefox that allows JS execution in a special isolated environment. The sandbox is created with a null principal, which means that everything within the sandbox can only be accessed by it and can only access other things within the sandbox itself (and by privileged Firefox code).
Our final choice
We settled on using a ComponentUtils.Sandbox for the Firefox built-in viewer. ComponentUtils.Sandbox has been used for years now in WebExtensions, so this implementation is battle tested and very safe: executing a script from a PDF is at least as safe as executing one from a normal web page.
For the generic web viewer (where we can only use standard web APIs, so we know nothing about ComponentUtils.Sandbox) and the pdf.js test suite we used a WebAssembly version of QuickJS (see pdf.js.quickjs for details).
The implementation of the PDF sandbox in Firefox works as follows:
- We collect all the fields and their properties (including the JS actions associated with them) and then clone them into the sandbox;
- At build time, we generate a bundle with the JS code to implement the PDF JS API (totally different from the web API we are accustomed to!). We load it in the sandbox and then execute it with the data collected during the first step;
- In the HTML representation of the fields we added callbacks to handle the events (focus, input, …). The callbacks simply dispatch them into the sandbox through an object containing the field identifier and linked parameters. We execute the corresponding JS actions in the sandbox using eval (it’s safe in this case: we’re in a sandbox). Then, we clone the result and dispatch it outside the sandbox to update the states in the HTML representations of the fields.
We decided not to implement the PDF APIs related to I/O (network, disk, …) to avoid any security concerns.
Yet Another Form Format: XFA
Our Telemetry also informed us that another type of PDF forms, XFA, was fairly common. This format has been removed from the official PDF specification, but many PDFs with XFA still exist and are viewed by our users so we decided to implement it as well.
The XFA format
The XFA format is very different from what is usually in PDF files. A normal PDF is typically a list of drawing commands with all layout statically defined by the PDF generator. However, XFA is much closer to HTML and has a more dynamic layout that the PDF viewer must generate. In reality XFA is a totally different format that was bolted on to PDF.
The XFA entry in a PDF contains multiple XML streams: the most important being the template and datasets. The template XML contains all the information required to render the form: it contains the UI elements (e.g. text fields, checkboxes, …) and containers (subform, draw, …) which can have static or dynamic layouts. The datasets XML contains all the data used by the form itself (e.g. text field content, checkbox state, …). All these data are bound into the template (before layout) to set the values of the different UI elements.
Example Template
<template xmlns="http://www.xfa.org/schema/xfa-template/3.6/">
  <subform>
    <pageSet name="ps">
      <pageArea name="page1" id="Page1">
        <contentArea x="7.62mm" y="30.48mm" w="200.66mm" h="226.06mm"/>
        <medium stock="default" short="215.9mm" long="279.4mm"/>
      </pageArea>
    </pageSet>
    <subform>
      <draw name="Text1" y="10mm" x="50mm" w="200mm" h="7mm">
        <font size="15pt" typeface="Helvetica"/>
        <value>
          <text>Hello XFA & PDF.js world !</text>
        </value>
      </ draw>
    </subform>
  </subform>
</template>
Output From Template

The XFA implementation
In PDF.js we already had a pretty good XML parser to retrieve metadata about PDFs: it was a good start.
We decided to map every XML node to a JavaScript object, whose structure is used to validate the node (e.g. possible children and their different numbers). Once the XML is parsed and validated, the form data needs to be bound in the form template and some prototypes can be used with the help of SOM expressions (kind of XPath expressions).
The layout engine
In XFA, we can have different kinds of layouts and the final layout depends on the contents. We initially planned to piggyback on the Firefox layout engine, but we discovered that unfortunately we would need to lay everything out ourselves because XFA uses some layout features which don’t exist in Firefox. For example, when a container is overflowing the extra contents can be put in another container (often on a new page, but sometimes also in another subform). Moreover, some template elements don’t have any dimensions, which must be inferred based on their contents.
In the end we implemented a custom layout engine: we traverse the template tree from top to bottom and, following layout rules, check if an element fits into the available space. If it doesn’t, we flush all the elements layed out so far into the current content area, and we move to the next one.
During layout, we convert all the XML elements into JavaScript objects with a tree structure. Then, we send them to the main process to be converted into HTML elements and placed in the XFA layer.
The missing font problem
As mentioned above, the dimensions of some elements are not specified. We must compute them ourselves based on the font used in them. This is even more challenging because sometimes fonts are not embedded in the PDF file.
Not embedding fonts in a PDF is considered bad practice, but in reality many PDFs do not include some well-known fonts (e.g. the ones shipped by Acrobat or Windows: Arial, Calibri, …) as PDF creators simply expected them to be always available.
To have our output more closely match Adobe Acrobat, we decided to ship the Liberation fonts and glyph widths of well-known fonts. We used the widths to rescale the glyph drawing to have compatible font substitutions for all the well-known fonts.
On the left: default font without glyph rescaling. On the right: Liberation font with glyph rescaling to emulate MyriadPro.
The result
In the end the result turned out quite good, for example, you can now open PDFs such as 5704 – APPLICATION FOR A FISH EXPORT LICENCE in Firefox 93!
Making PDFs accessible
What is a Tagged PDF?
Early versions of PDFs were not a friendly format for accessibility tools such as screen readers. This was mainly because within a document, all text on a page is more or less absolutely positioned and there’s not a notion of a logical structure such as paragraphs, headings or sentences. There was also no way to provide a text description of images or figures. For example, some pseudo code for how a PDF may draw text:
showText(“This”, 0 /*x*/, 60 /*y*/);
showText(“is”, 0, 40);
showText(“a”, 0, 20);
showText(“Heading!”, 0, 0);
This would draw text as four separate lines, but a screen reader would have no idea that they were all part of one heading. To help with accessibility, later versions of the PDF specification introduced “Tagged PDF.” This allowed PDFs to create a logical structure that screen readers could then use. One can think of this as a similar concept to an HTML hierarchy of DOM nodes. Using the example above, one could add tags:
beginTag(“heading 1”);
showText(“This”, 0 /*x*/, 60 /*y*/);
showText(“is”, 0, 40);
showText(“a”, 0, 20);
showText(“Heading!”, 0, 0);
endTag(“heading 1”);
With the extra tag information, a screen reader knows that all of the lines are part of “heading 1” and can read it in a more natural fashion. The structure also allows screen readers to easily navigate to different parts of the document.
The above example is only about text, but tagged PDFs support many more features than this e.g. alt text for images, table data, lists, etc.
How we supported Tagged PDFs in PDF.js
For tagged PDFs we leveraged the existing “text layer” and the browsers built in HTML ARIA accessibility features. We can easily see this by a simple PDF example with one heading and one paragraph. First, we generate the logical structure and insert it into the canvas:
<canvas id="page1">
  <!-- This content is not visible,
  but available to screen readers   -->
  <span role="heading" aria-level="1" aria-owns="heading_id"></span>
  <span aria_owns="some_paragraph"></span>
</canvas>
In the text layer that overlays the canvas:
<div id="text_layer">
  <span id="heading_id">Some Heading</span>
  <span id="some_paragaph">Hello world!</span>
</div>
A screen reader would then walk the DOM accessibility tree in the canvas and use the `aria-owns` attributes to find the text content for each node. For the above example, a screen reader would announce:
Heading Level 1 Some Heading

Hello World!
For those not familiar with screen readers, having this extra structure also makes navigating around the PDF much easier: you can jump from heading to heading and read paragraphs without unneeded pauses.
Ensure there are no regressions at scale, meet reftests
Crawling for PDFs
Over the past few months, we have built a web crawler to retrieve PDFs from the web and, using a set of heuristics, collect statistics about them (e.g. are they XFA? What fonts are they using? What formats of images do they include?).
We have also used the crawler with its heuristics to retrieve PDFs of interest from the “stressful PDF corpus” published by the PDF association, which proved particularly interesting as they contained many corner cases we did not think could exist.
With the crawler, we were able to build a large corpus of Tagged PDFs (around 32000), PDFs using JS (around 1900), XFA PDFs (around 1200) which we could use for manual and automated testing. Kudos to our QA team for going through so many PDFs! They now know everything about asking for a fishing license in Canada, life skills!
Reftests for the win
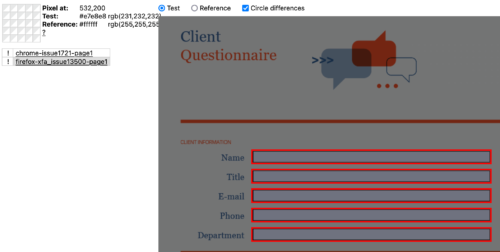
We did not only use the corpus for manual QA, but also added some of those PDFs to our list of reftests (reference tests).
A reftest is a test consisting of a test file and a reference file. The test file uses the pdf.js rendering engine, while the reference file doesn’t (to make sure it is consistent and can’t be affected by changes in the patch the test is validating). The reference file is simply a screenshot of the rendering of a given PDF from the “master” branch of pdf.js.
The reftest process
When a developer submits a change to the PDF.js repo, we run the reftests and ensure the rendering of the test file is exactly the same as the reference screenshot. If there are differences, we ensure that the differences are improvements rather than regressions.
After accepting and merging a change, we regenerate the references.
The reftest shortcomings
In some situations a test may have subtle differences in rendering compared to the reference due to, e.g., anti-aliasing. This introduces noise in the results, with “fake” regressions the developer and reviewer have to sift through. Sometimes, it is possible to miss real regressions because of the large number of differences to look at.
Another shortcoming of reftests is that they are often big. A regression in a reftest is not as easy to investigate as a failure of a unit test.
Despite these shortcomings, reftests are a very powerful regression prevention weapon in the pdf.js arsenal. The large number of reftests we have boosts our confidence when applying changes.
Conclusion
Support for AcroForms landed in Firefox v84. JavaScript execution in v88. Tagged PDFs in v89. XFA forms in v93 (tomorrow, October 5th, 2021!).
While all of these features have greatly improved form usability and accessibility, there are still more features we’d like to add. If you’re interested in helping, we’re always looking for more contributors and you can join us on element or github.
