A while back, I had to build an installer for NexThink Collector which could be deployed via Jam 2022-12-4 00:49:35 Author: derflounder.wordpress.com(查看原文) 阅读量:90 收藏
A while back, I had to build an installer for NexThink Collector which could be deployed via Jamf Pro. NexThink can be interesting to deploy because the installation process:
- Involves an application named csi.app, which has a command line tool.
- The referenced csi app’s command line tool configures and runs an installer package.
- The command line tool also needs to reference a license file, which NexThink refers to as a CustomerKey file.
The CustomerKey file should look similar to what’s shown below:
This file contains bidirectional Unicode text that may be interpreted or compiled differently than what appears below. To review, open the file in an editor that reveals hidden Unicode characters.
Learn more about bidirectional Unicode characters
All the needed components with the exception of the CustomerKey file, which is different for each customer, ship on a disk image.

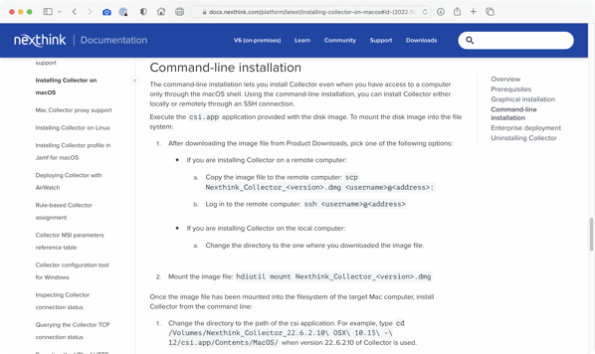
NexThink’s install documentation for the macOS version of the Collector software assumes that a human is doing one of the following:
Graphical installation: Mounting the disk image, double-clicking on the installer package and following the prompts, entering the correct configuration information were needed.


Command line installation: Mounting the disk image, opening the Terminal application and using the csi app’s command line tool to configure the installer package and run the installation process.


For the Enterprise Deployment section of the application, the NexThink documentation says they support it but doesn’t provide information on how to do it.

In my case, I decided to do the following to deploy it via Jamf Pro:
- Wrap the disk image and CustomerKey file inside a separate installer package.
- Use a postinstall script to perform the following actions:
A. Identify the location of the disk image stored inside the installer package.
B. Mount the disk image
C. Identify the location of the csi.app on the mounted disk image.
D. Identify the location of the CustomerKey file stored inside the installer package.
E. Use the csi app’s command line tool to configure and run the NexThink-provided installer package on the mounted disk image, to install the NexThink Collector software.
F. Unmount the disk image.
For more details, please see below the jump.
Note: The details of installing and configuring NexThink are going to vary between shops, because different shops are going to configure different options for NexThink. Please consider what’s shown below as a general example, not something that will work for all environments.
Pre-requisites:
- Packages
- Vendor-provided NexThink disk image with the NexThink Collector installer for macOS
- Vendor-provided CustomerKey text file
Before building the package, you’ll need to create a directory named CustomerKeys somewhere convenient.

Once the CustomerKeys directory has been created, add the CustomerKey file to it. The CustomerKey file is a plaintext file, where the filename must end in the .txt file extension. For this example, the CustomerKey file is named Company-Name-customer-key.txt.

Building the NexThink Collector installer
1. Set up a new Packages project and select Raw Package.

2. In this case, I’m naming the project NexThink Collector Install 22.9.1.14.

3. Once the Packages project opens, click on the Project tab. You’ll want to make sure that the your information is correctly set here (if you don’t know what to put in, check the Help menu for the Packages User Guide. The information you need is in Chapter 4 – Configuring a project.)

In this example, I’m not changing any of the options from what is set by default.
4. Next, click on the Settings tab. In the case of my project, I want to install with root privileges and not require a logout, restart or shutdown.
To accomplish this, I’m choosing the following options in the Settings section:
In the Tag section:
- Identifier: set as appropriate (for my installer, I’m using com.nexthink.pkg.collector)
- Version: set as appropriate (for my installer, I’m using 22.9.1.14 )
In the Post-installation Behavior section:
On Success: should be set to Do Nothing.
In the Options section:
- Require admin password for installation should be checked
- Relocatable should be unchecked
- Overwrite directory permissions should be unchecked
- Follow symbolic links should be unchecked

5. Select the Payload tab. Nothing here should be changed from the defaults.

6. Select the Scripts tab.
Under the Additional Resources section, add the following file and directory:
The NexThink disk image


The CustomerKeys directory containing the CustomerKey file.


The last part is telling the NexThink installer to run, using the csi app’s command line tool. For this, you’ll need a postinstall script.
Here’s the postinstall script being used for this example installer package:
This file contains bidirectional Unicode text that may be interpreted or compiled differently than what appears below. To review, open the file in an editor that reveals hidden Unicode characters.
Learn more about bidirectional Unicode characters
| #!/bin/bash | |
| # Description: Script to install the NexThink Collector agent using the csi.app's command-line | |
| # options to install and register the NextThink agent using your organization's Customer Key. | |
| ERROR=0 | |
| # File Paths | |
| if [[ -f "$(/usr/bin/find $(dirname $0) -maxdepth 1 \( -iname \*\.dmg \))" ]]; then | |
| dmgFile="$(/usr/bin/find $(dirname $0) -maxdepth 1 \( -iname \*\.dmg \))" | |
| fi | |
| dmgMount="$(/usr/bin/mktemp -d /tmp/NexThink_Collector.XXXX)" | |
| csiAppPath="$dmgMount/csi.app/Contents/MacOS/" | |
| # Remove the trailing slash from the csiAppPath variable if needed. | |
| csiAppPath=${csiAppPath%%/} | |
| #installer variables | |
| udpport="999" | |
| tcpport="443" | |
| tcpdata="enable" | |
| assignment="enable" | |
| tag_value="0" | |
| nexthink_address="nexthink.server.goes.here" | |
| customerKey="$(dirname $0)/CustomerKeys/*.txt" | |
| # Mount the DMG | |
| /usr/bin/hdiutil attach "$dmgFile" -mountpoint "$dmgMount" -nobrowse -noverify -noautoopen | |
| # Install the Nextthink Collector software | |
| # Define the parameters for csi.app for installing the Collector from the command line interface | |
| "$csiAppPath"/csi -address "$nexthink_address" -port "$udpport" -tcp_port "$tcpport" -key "$customerKey" -data_over_tcp "$tcpdata" -use_assignment "$assignment" -tag $"tag_value" | |
| #Disable/Enable Coordinator Service | |
| launchctl bootout system /Library/LaunchDaemons/com.nexthink.collector.nxtcoordinator.plist | |
| launchctl bootstrap system /Library/LaunchDaemons/com.nexthink.collector.nxtcoordinator.plist | |
| # Unmount the DMG | |
| hdiutil detach $dmgMount -force | |
| exit $ERROR |
If not already selected, select the postinstall script and add it to the project.


Note: The options shown in the postinstall script for configuring NexThink are not going to work for all shops, because different shops are going to configure different options for NexThink. Please consider what’s shown above as a general example, not something that will work for all environments.
For more details on the available configuration options, please see the Command-line installation section of the NexThink documentation available via the link below:
https://docs.nexthink.com/platform/latest/installing-collector-on-macos
7. Build the package. (If you don’t know to build, check the Help menu for the Packages User Guide. The information you need is in Chapter 3 – Creating a raw package project and Chapter 10 – Building a project.)
Testing the installer
Once the package has been built, test it by installing it on a test machine which has the following:
- Does not have the NexThink Collector software installed
The end result should be that the NexThink Collector software installs onto the Mac and is registered with the NexThink server.
如有侵权请联系:admin#unsafe.sh