大家好!这里是219攻防实验室!你一定没有听说过我们,因为我们刚成立不久。
219攻防实验室专注于前沿攻防研究、武器平台化、红队评估、攻防演练,虽然我们是新实验室,但我们的成员有深入操作系统多年的老牌程序员、有专注攻防领域10余年的老手、亦有攻防演练中崭露头角的新锐,我们热爱技术热爱分享,就像我们的名字一样,219 “爱依旧”,对技术的爱永远依旧。
0x00 WSMan 与 WinRM
什么是WSMan?
以下定义来自 DMTF WS-MAN 和 微软 WS-Management Protocol
先介绍几个核心的概念:
Schema and Message
Resource
Action
http://schemas.microsoft.com/wbem/wsman/1/windows/shell/cmd这个资源的新实例来实现命令执行。什么是WinRM?
winrm get winrm/config/client时WinRM客户端与服务端交互的消息,可以看到上面介绍的Resource以及Action。这个消息表示对资源http://schemas.microsoft.com/wbem/wsman/1/config/client进行Get操作。
<s:Envelopexmlns:s="http://www.w3.org/2003/05/soap-envelope"xmlns:a="http://schemas.xmlsoap.org/ws/2004/08/addressing"xmlns:w="http://schemas.dmtf.org/wbem/wsman/1/wsman.xsd"xmlns:p="http://schemas.microsoft.com/wbem/wsman/1/wsman.xsd"><s:Header><a:To>http://127.0.0.1:47001/wsman</a:To><w:ResourceURIs:mustUnderstand="true">http://schemas.microsoft.com/wbem/wsman/1/config/client</w:ResourceURI><a:ReplyTo><a:Addresss:mustUnderstand="true">http://schemas.xmlsoap.org/ws/2004/08/addressing/role/anonymous</a:Address></a:ReplyTo><a:Actions:mustUnderstand="true">http://schemas.xmlsoap.org/ws/2004/09/transfer/Get</a:Action>...</s:Header>...</s:Envelope>
WinRM服务返回200响应,附带如下SOAP响应消息:
<s:Envelope...><s:Header><a:Action>http://schemas.xmlsoap.org/ws/2004/09/transfer/GetResponse</a:Action><a:MessageID>uuid:D6A2FE78-BC98-4144-BF60-E425BC57BE58</a:MessageID><p:OperationIDs:mustUnderstand="false">uuid:1C91B382-5E0D-4F5D-A4AE-956B5E60F88D</p:OperationID><p:SequenceId>1</p:SequenceId><a:To>http://schemas.xmlsoap.org/ws/2004/08/addressing/role/anonymous</a:To><a:RelatesTo>uuid:3B8307A8-01C9-4C10-86D9-08E051E943F8</a:RelatesTo></s:Header>...</s:Envelope>
再来看winrm/config/client这个URI,通过winrm命令可以查询到它是一个别名。
PS> winrm help aliaseswmi = http://schemas.microsoft.com/wbem/wsman/1/wmiwmicimv2 = http://schemas.microsoft.com/wbem/wsman/1/wmi/root/cimv2cimv2 = http://schemas.dmtf.org/wbem/wscim/1/cim-schema/2winrm = http://schemas.microsoft.com/wbem/wsman/1wsman = http://schemas.microsoft.com/wbem/wsman/1shell = http://schemas.microsoft.com/wbem/wsman/1/windows/shell
0x01 在Windows中使用WinRM
本小节存在大量命令行实例,如未特别指定则默认在Powershell环境下进行测试。
配置WinRM
从Windows Server 2012 R2开始,WinRM服务默认自动启动,并监听0.0.0.0:5985和127.0.0.1:47001,更老的版本需要使用命令行进行配置。
使用winrm命令的quickconfig子命令快速配置winrm服务:
winrm quickconfig -q -force# -q[uiet] 安静模式,不提示确认操作# -force 已经配置过不提示确认
quickconfig主要改动的地方:
配置winrm服务为自启动;
启用对远程管理服务的防火墙例外;
添加默认端口的监听器。
Powershell中也有对应的cmdlet能够进行快速配置:
Set-WSManQuickConfig -Force
某些情况下也可以手动修改WinRM服务与相关注册表以及防火墙来达到和快速配置相同的目的:
# winrm服务自启动sc.exe config winrm start= auto# 添加HTTP的监听器,默认监听5985端口reg.exe add HKLM\SOFTWARE\Microsoft\Windows\CurrentVersion\WSMAN\Listener\*+HTTP /v Port /t reg_dword /d 5985 /f# 添加监听的url前缀,默认是wsmanreg.exe add HKLM\SOFTWARE\Microsoft\Windows\CurrentVersion\WSMAN\Listener\*+HTTP /v uriprefix /t reg_sz /d wsman /f# 启动服务sc.exe start winrm# 启用防火墙例外netsh advfirewall firewall set rule group="Windows 远程管理" new enable=yes
客户端侧,需要配置允许连接任意远程WinRM服务,否则将无法访问任何外部WinRM服务,本文的末尾会介绍如何绕过这一限制;Powershell中实现了一个名为WSMan的驱动器,能够如同操作注册表那样访问WinRM的配置。
# 透过PowershellSet-Item WSMan:\localhost\Client\TrustedHosts * -Force# 或者winrm set winrm/config/client '@{TrustedHosts="*"}'# 或者reg.exe add HKLM\SOFTWARE\Microsoft\Windows\CurrentVersion\WSMAN\Client /v trusted_hosts /t reg_sz /d * /f# 查看配置项列表Get-ChildItem WSMan:\localhost# 修改配置Set-Item WSMan:\localhost\Client\TrustedHosts * -Force# 读取配置,可用TAB键自动补全Get-Item WSMan:\localhost\Client\TrustedHosts
连接远程Powershell会话
# 创建会话New-PSSession -ComputerName 10.1.1.1 -Port 5985 -Name NicheSess# 从远端获取一个已有的会话Get-PSSession -ComputerName 10.1.1.1 -Port 5985# 进入会话,会话中exit退出后可通过此方式再次进入Enter-PSSession (Get-PSSession -ComputerName 10.1.1.1)Enter-PSSession -Name NicheSess# 通过GUID获取缓存会话Get-PSSession -InstanceId 'a7be4d04-d1d6-4ba7-b6b4-10b7bed6b5df'# 通过名称获取缓存会话Get-PSSession -Name NicheSess
执行命令
winrs.exe底层使用资源:http://schemas.microsoft.com/wbem/wsman/1/windows/shell/cmd
winrs.exe -r:127.0.0.1:47001 -u:Administrator -p:[email protected]321 -nop# -nop指定不加载目标用户的配置文件,建议渗透时使用此选项# 指定-un可使流量不加密,方便调试
访问WMI
winrm命令中使用enum枚举WMI对象,并使用invoke子命令调用对象上的方法:
# 获取进程列表winrm enum wmicimv2/Win32_Process# 创建进程winrm invoke create wmicimv2/Win32_Process '@{CommandLine="calc.exe"}'# 获取共享列表winrm enum wmicimv2/Win32_Share# 添加共享winrm invoke create wmicimv2/Win32_Share '@{Path="D:\Test";Name="ddd";Type="0"}'# 查询WQLwinrm enum wmicimv2/* -filter:'select * from Win32_Process where Name="CalculatorApp.exe"'
Powershell使用-Filter参数枚举WMI对象:
# 查询 lsass.exe 进程Get-WSManInstance -ComputerName 10.1.1.60 -Filter 'select Processid,commandline from Win32_Process where caption="lsass.exe"' -Enumerate -ResourceURI wmicimv2/*
0x02 WinRM插件
https://learn.microsoft.com/en-us/windows/win32/winrm/winrm-plugin-api
WinRM提供了插件机制,可加载native的dll作为插件来扩展WinRM的能力,用户注册自己的插件到WinRM以提供自定义资源。
reg query查询所有已注册插件:
PS> reg query HKLM\SOFTWARE\Microsoft\Windows\CurrentVersion\WSMAN\PluginHKEY_LOCAL_MACHINE\SOFTWARE\Microsoft\Windows\CurrentVersion\WSMAN\Plugin\Event Forwarding PluginHKEY_LOCAL_MACHINE\SOFTWARE\Microsoft\Windows\CurrentVersion\WSMAN\Plugin\Microsoft.PowerShellHKEY_LOCAL_MACHINE\SOFTWARE\Microsoft\Windows\CurrentVersion\WSMAN\Plugin\WMI Provider...PS> reg query HKLM\SOFTWARE\Microsoft\Windows\CurrentVersion\WSMAN\Plugin\Microsoft.PowerShellConfigXML REG_SZ <PlugInConfiguration...
wsmprovhost.exe中,如果为插件开启了进程共享,那么多个插件将运行在同一进程。
PS> ls WSMan:\localhost\Plugin\microsoft.powershell\WSManConfig:Microsoft.WSMan.Management\WSMan::localhost\Plugin\microsoft.powershellType Name SourceOfValue Value---- ---- ------------- -----System.String xmlns http://schemas.microsoft.com/wbem/wsman/1/config/Plug...System.String Name microsoft.powershellSystem.String Filename %windir%\system32\pwrshplugin.dllSystem.String Enabled trueSystem.String Architecture 64System.String UseSharedProcess falseSystem.String ProcessIdleTimeoutSec 0System.String AutoRestart false
利用场景
一个简单的插件
// 包含必要头文件#define WSMAN_API_VERSION_1_0#include <wsman.h>// 当客户端对资源调用Get操作时会调用服务端的WSManProvGet函数extern "C" __declspec(dllexport) void WSManProvGet(WSMAN_PLUGIN_REQUEST * request){WSMAN_DATA data;data.type = WSMAN_DATA_TYPE_TEXT;// 输出格式为XML,真的是很麻烦啊~data.text.buffer =L"<test:Test xmlns:test=\"http://schemas.evilcorp.com/test/Test\">\n""<Title>Test WinRMPlugin</Title>\n""<Username>Jonathan</Username>\n""<Message>Hello!</Message>\n""</test:Test>";data.text.bufferLength = 163;// 输出结果WSManPluginObjectResult(request, 0, &data);// 完成当前Get操作WSManPluginOperationComplete(request, 0, 0, nullptr);}
C:\Program Files\winrmplug.dll,注意:编译需要链接WSMSVC.lib,否则会报错找不到符号。注册插件
插件注册需要用到一个XML,这个XML中包含了WinRM服务需要的所有插件配置信息:
<PlugInConfiguration xmlns="http://schemas.microsoft.com/wbem/wsman/1/config/PluginConfiguration"Name="Test"Filename="C:\Program Files\winrmplug.dll"SDKVersion="1"XmlRenderingType="text"Architecture="64"UseSharedProcess="true"Enabled="true"><!-- 初始化参数,直接会传递给WSManPluginStartup函数的第三个参数extraInfo --><InitializationParameters></InitializationParameters><Resources><Resource ResourceUri="http://test.evilcorp.com/Test" SupportsOptions="true" ExactMatch="true"><!-- 可为每一个资源单独配置安全描述 --><Security Uri="http://test.evilcorp.com/Test" ExactMatch="true" Sddl="O:NSG:BAD:P(A;;GA;;;BA)(A;;GA;;;IU)(A;;GA;;;RM)S:P(AU;FA;GA;;;WD)(AU;SA;GXGW;;;WD)"/><!-- 定义当前资源上允许的动作 --><Capability Type="Get"/></Resource></Resources></PlugInConfiguration>
命令行注册命令为:
winrm create winrm/config/plugin?Name=Test -file:test.xml# 注册完成后需要重启winrm服务来应用更改,这是一个很大的缺陷sc.exe stop winrmsc.exe start winrm
执行winrm get http://test.evilcorp.com/Test验证:
插件的限制
插件DLL只能放在
%windir%\System32(32位在SysWOW64)和%ProgramFiles%或子目录;新插件注册需要重启WinRM服务(但是修改已有插件会自动应用修改);
解决:修改现有插件的注册表配置,将XML中的Filename修改到
c:\Program Files,编写DLL动态转发原DLL相关功能,并实现自己的目的。插件输入输出很麻烦,必须是XML格式,不利于工具开发;
解决:WsmSvc.dll提供了SHELL功能,能够直接收发二进制数据。
无法随WinRM服务自动启动,需有客户端访问才会加载插件DLL。
0x03 Remote PSSession 输入输出传递分析
WSMan.Automation
'Create an instance of the WSMAN.Automation Classset wsmanObj = CreateObject("WSMAN.Automation")
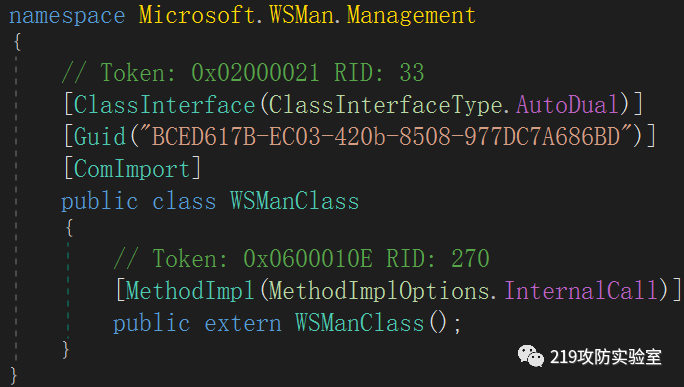
Microsoft.WSMan.Management中用到了{BCED617B-EC03-420b-8508-977DC7A686BD} COM,也就是WSMan.Automation的GUID:WsmSvc.dll!WSManSendShellInput
System.Management.Automation.Runspaces.Internal.ClientRemotePowerShell的构造函数中有这样一段:CreatePowerShellDataStructureHandler方法,调用了虚方法CreateClientCommandTransportManager:WSManClientSessionTransportManager类实现了CreateClientCommandTransportManager方法:WSManClientCommandTransportManager::SendData:WsmSvc.dll!WSManSendShellInput完成输入数据的传递,在MSDN可查询该函数的文档,同时Windows SDK也包含该函数的定义在wsman.h头文件中:0x04 实现远程连接命令执行的BOF
Github链接:https://github.com/219adlab/winrmsh
测试环境: CS4.5
0x05 总结
0x06 参考链接
https://learn.microsoft.com/en-us/windows/win32/winrm/about-windows-remote-management
https://learn.microsoft.com/en-us/powershell/module/microsoft.wsman.management/get-wsmaninstance?view=powershell-7.3
https://learn.microsoft.com/en-us/windows/win32/cimwin32prov/win32-process
https://learn.microsoft.com/en-us/windows/win32/winrm/wsman-service-plug-in-configuration
https://mez0.cc/posts/winrm-reflective-dll/
如有侵权请联系:admin#unsafe.sh