2023-4-21 22:22:47 Author: fortynorthsecurity.com(查看原文) 阅读量:37 收藏
21 April 2023
By Adam Rose
Recently, I was troubleshooting some Cobalt Strike C2 infrastructure in a Windows VM lab. To get a deeper understanding of the bugs I was seeing I needed to view all Beacon traffic egressing from my lab VM through Burp Suite. This guide will explain how to proxy all HTTP traffic from a Windows virtual machine (VM) through Burp Suite running on the host machine. I found it to be a simple and useful technique to test and analyze C2 traffic.
We will be using a Windows VM and the host machine running either macOS or Linux.
Prerequisites
1. A virtual machine running Windows
2. Burp Suite installed on the host machine
3. The IP address of the host machine
Configuring the Windows VM
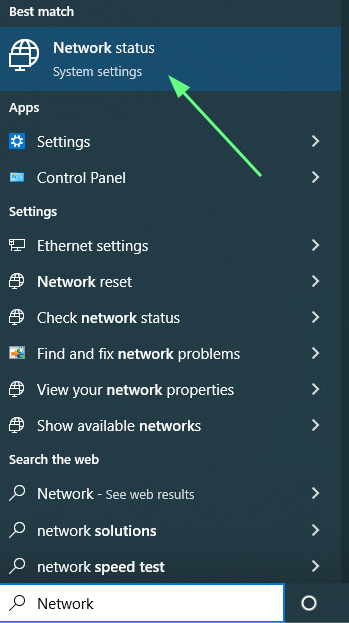
1. Open the Windows VM's Start Menu and navigate to "Network Status":

2. Click on "Proxy":

3. Scroll down a bit to "Manual proxy setup". Toggle it on. Under "Address" enter the local IP address of the host you will be running Burp Suite on. Under "Port", enter a port number that is unlikely to be used by any other services on the Burp Suite host. Click "Save".

4. Close the Setup window.
Burp Configuration
1. Launch Burp Suite and start a new project.
2. Under the "Proxy" tab, open "Proxy settings"

3. By default, Burp Suite has a proxy set to listen on port 8080. Currently it is set to exclusively listen to traffic from 127.0.0.1. We have to configure this proxy to listen on all of the host's network interfaces. Select the proxy and click "Edit"

(Note: if you do not already have an active proxy listener, click "Add" and follow the same configuration steps below.)
4. First, select the "All interfaces" option on under the "Binding" tab in the window that opens up. Then, select "OK", at which point a window will open up to ensure you really want to do this. Select "Yes" and exit out of the proxy settings.

Installing Burp Suite's SSL Certificate on the Windows Host
- At this point Burp Suite will start to capture traffic from your VM. Switch back to the Windows VM and navigate* to any webpage. You will likely encounter an SSL certificate error because your browser doesn't trust Burp Suite's SSL certificate.

2. In the browser, navigate to http://burpsuite. Click the "CA Certificate" link to download Burp Suite's SSL Certificate.


3. In Firefox*, navigate to about:settings and in the search bar type out "Certificates". Click the "View Certificates" button when it appears.

4. In the pop-up window, click "Import...", then navigate to the download location of the Burp Suite certificate we just saved and open it.

5. A dialogue window will pop up asking if you are sure you want to trust this certificate. Select "Trust this CA to identify websites" and click "OK". Exit out of the Firefox settings.

6. Try to navigate to a site using HTTPS and you should now be able to see the page.

That's it! We can now analyze all HTTP(S) traffic from our Windows VM in Burp Suite.

This is especially useful for viewing traffic from non-browser web services (like Cobalt Strike's Beacon). Happy Hacking!
* I am using Firefox here but the process is fundamentally the same for Chrome and Edge.
6. Enter the Burp Suite proxy address into the ‘Hostname or IP’ field.
7. Click ‘OK’.
8. Copy the certificate file that was generated.
9. Open Chrome and navigate to the ‘Settings’ page.
10. Select ‘Manage certificates’ under the ‘Advanced’ section.
11. Select the ‘Authorities’ tab and click ‘Import’.
12. Select the certificate file you copied and click ‘Open’.
13. Select ‘Trust this certificate for identifying websites’ and click ‘OK’.
14. Click ‘Close’ and ‘OK’ to save the changes.
如有侵权请联系:admin#unsafe.sh