read file error: read notes: is a directory 2023-5-3 05:21:49 Author: derflounder.wordpress.com(查看原文) 阅读量:42 收藏
Payload-free packages are something I’ve discussed from time to time, as I’ve found them to be very useful additions to my Mac admins toolkit. For those not familiar with the concept, payload-free installer packages are installer packages that exist only to run scripts. They don’t install any files, which would be referred to as the installer package’s payload. With no payload included with these installer packages, the installer packages built by this tool are referred to as payload-free.
A while back, I also wrote a tool that would let me easily create them from existing scripts named Payload-Free Package Creator.app. The general idea was that you could use this tool to select a script, and then Payload-Free Package Creator.app would create an unsigned payload-free installer package which would run the selected script.
I’m happy to say that my team at work has expanded on that idea and has both built and open-sourced a tool for building payload-free packages named Script2Pkg. Script2Pkg includes the following functions:
- Building an unsigned payload-free installer package
- Building a signed payload-free installer package
- Building a signed and notarized payload-free installer package
- Verifying signing and notarization status of any installer package
For more details, please see below the jump.
Using Script2Pkg
You can use the following procedure to create a payload-free installer package using Script2Pkg.
1. Launch the app.
2. Click the Select scripts button.

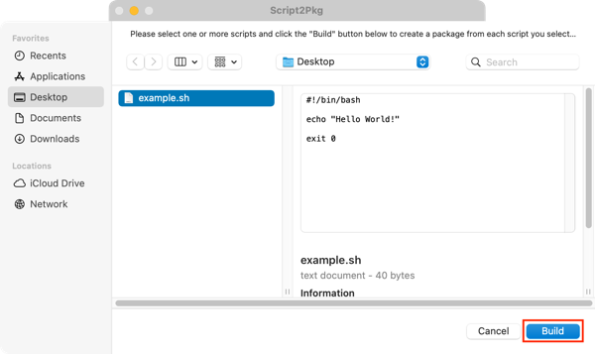
3. In the window which appears, select the script(s) you want to use and click the Build button.

Note: You can select multiple scripts. Script2Pkg will create one installer package per selected script.
New payload-free installer package(s) will be created and stored in the same location as the script(s) which were selected.

Each installer package will have the same name as the source script.

By default, installer packages created by Script2Pkg will have the following characteristics:
- Installer packages created by this tool will not leave an installer package receipt when the package is installed.
- Installer packages created by this tool will create the installer package in the same location as the selected script.
- Package version will be the following: 1.0.0
- Package identifier used by the app will begin with the following: corp.sap.Script2Pkg
Note: The remainder of the identifier will be a UUID. For example, using the default settings will may result in a package with the following package identifier:
corp.sap.Script2Pkg.5BA0E8CB-99B2-4FC2-85AE-0C1CC85ACC05
All of these characteristics can be changed, as Script2Pkg has the following configuration options:
- Notifying you when packages are created.
- Choosing where newly-created installer packages are stored.
- How to handle cases where an existing package has the same name as the package you’re creating.
- Setting a specific package identifier.
- Setting a specific package version.
- Choosing if the packages created by this tool will create an installer package receipt.
For more information on how to configure Script2Pkg, please see Script2Pkg‘s help files or the documentation available at the Script2Pkg wiki.

Creating signed payload-free packages
To sign an installer package using a code signing certificate, you will need a Developer ID Installer certificate installed in a keychain on your Mac. Once the Developer ID Installer certificate is installed in a keychain on your Mac, it should be listed next to Development team: in the main app window.

Once you have your Developer ID Installer singing certificate listed in the Script2Pkg window, check the Sign packages checkbox and subsequent installer packages created by Script2Pkg will be signed using the selected signing certificate.

For more details on configuring Script2Pkg for creating signed installer packages, please see Script2Pkg‘s help files or the documentation available at the Script2Pkg wiki.
Creating signed and notarized payload-free packages
To use notarization with Script2Pkg, you’ll need the following:
- Script2Pkg configured for installer package signing
- Script2Pkg configured for notarization
For more details on configuring Script2Pkg for to use notarization when creating installer packages, please see Script2Pkg‘s help files or the documentation available at the Script2Pkg wiki.
Once Script2Pkg has been configured for signing and notarization, check the Sign packages and the Notarize packages checkboxes. Subsequent installer packages created by Script2Pkg will be signed using the selected signing certificate and notarized.

Verifying installer packages
Script2Pkg is able to check any installer package and report on the following:
- If the installer package is signed with a valid code signing certificate
- If the installer package is signed with a valid code signing certificate and notarized
To check an installer package, using the following procedure to validate its status:
1. Under the File menu, select Validate Package Signature…

2. Select the package you want to check and click the Validate button.

Script2Pkg will then report back on the package signing and notarization status.
Package not signed or notarized

Package signed with a valid certificate and not notarized

Package signed with a valid certificate and notarized

如有侵权请联系:admin#unsafe.sh