2023-3-1 16:0:0 Author: msrc.microsoft.com(查看原文) 阅读量:7 收藏
This blog post runs you through how to enable and configure Linux audit logging on your Azure Kubernetes Service (AKS) Virtual Machine Scale Set (VMSS) using the Linux auditing subsystem, also known as auditd.
Unlike the Kubernetes control plane logs which give you visibility into your cluster’s high-level operation, enabling auditd logging on your cluster gives you visibility into your AKS worker node and container kernel level activity. This includes activity such as process creations, file access and command line activity which can be extremely valuable if you want to find unusual command line activity and programs executing on your cluster. Unlike container-level logging, this provides you with visibility into the workloads running on your underlying worker nodes, not just the containerized workloads running on top of them (including container escapes and other exploits). It is highly configurable and especially valuable if you are running a multi-tenant cluster.
To see examples of how Linux host-level audit logging (and Kubernetes control plane logging) can provide useful visibility into your cluster, check out the threat hunting queries we have provided in our Azure Kubernetes Service (AKS) threat hunting blog post and Jupyter notebook.
The host-level audit logging pipeline The host-level audit logging pipeline
Host level audit logging takes advantage of a number of Linux utilities to capture audit logs and ship them to your Log Analytics Workspace for review.
The components used to accomplish this include:
auditdis the Linux audit daemon for the Linux auditing system. The audit events written to disk by the daemon are configured by rules defined inauditd.rules.audispdaemon is the audit event multiplexer and can be used to distributeauditdevent data to a data collector server like syslog.- The syslog daemon forwards logs to the Log Analytics agent for Linux (OMS). The facilities and severities of events forwarded by syslog can be configured through the Azure Portal or managing configuration files on the hosts.
auomsis the Microsoft audit collection tool which can be configured to collect and filterauditd/audispevent data using the processing rules defined in theauomsconfiguration..- A Log Analytics Workspace is where you can explore telemetry from your Azure resources and services using the Kusto Query Language (KQL)
How to enable auditd logging on your AKS VMSS How to enable auditd logging on your AKS VMSS
-
Enable the Linux Operations Management Suite (OMS) Agent (auoms) on your AKS cluster VMSS by running the following
command:az vmss extension set \ --resource-group $RESOURCE_GROUP \ --vmss-name $VMSS_NAME \ --name OmsAgentForLinux \ --publisher Microsoft.EnterpriseCloud.Monitoring \ --protected-settings '{\"workspaceKey\":\"<KEY>\"}' \ --settings '{\"workspaceId\":\"<ID>",\"skipDockerProviderInstall\":true}'-
The
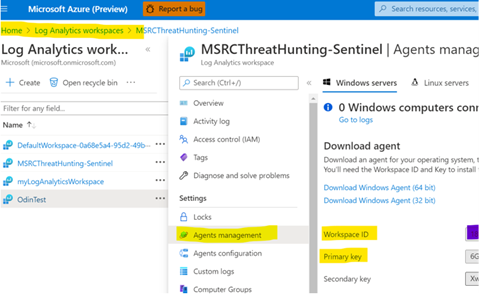
vmss-namefor your cluster will start withaks-agentpooland belong to the management resource group beginning withMC_, as shown in the screenshot below. -
Both the
workspaceIdandworkspaceKeycan be found in the Agents Management tab within your Log Analytics Workspace, as shown in the below screenshot. TheworkspaceKeycorresponds to the Primary Key highlighted below.
-
-
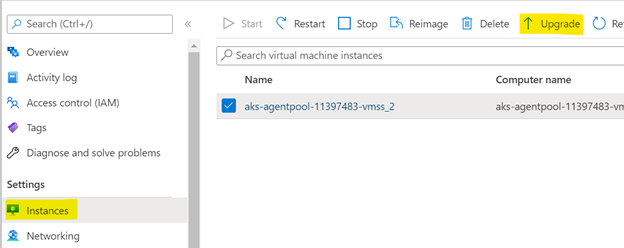
Trigger the VM update through the Azure Portal (select each instance and choose to upgrade).
-
Install
auditdon the VMSS worker nodes. To do this, you need to deploy or get a shell to a privileged pod running on your cluster that has access to the underlying worker node’s filesystem and process ID namespace. You can do this by:-
Deploying a Pod with a specification that mounts a hostPath volume into the container environment.
-
Include the securityContext field in the Pod specification and enable privileged mode.
-
Configure host process ID namespace sharing by including the hostPID field in the Pod specification and
enabling it.apiVersion: 1 kind: Pod metadata: name: privileged-pod spec: hostPID: true containers: - name: priv-host-mount image: alpine:latest command: - /bin/sh - -c - - args: - while true; do sleep 30; done; securityContext: privileged: true volumeMounts: - name: privmount mountPath: /workernode volumes: - name: privmount hostPath: path: / type: Directory -
Use kubectl exec to get an interactive shell to the running container on the Pod, use chroot to emulate access to the
underlying virtual machine and install auditd, as shown
below.kubectl exec -it $POD /bin/sh > chroot /workernode > apt-get update && apt-get install auditd -y
-
-
Configure the
auditdrules to your liking:-
Add a rule to monitor process executions. You can do this by creating a file called
10-procmon.rulesat the following path:/etc/audit/rules.d/10-procmon.rules, and adding the content below. More detailed information on this configuration can be found here.-a exit,always -F arch=b64 -S execve -k procmon -a exit,always -F arch=b32 -S execve -k procmon -
Update the
auditddaemon by runningsystemctl restart auditd
-
-
Update the syslog plugin facility settings to updated
audispto direct theauditdrecords to syslog. To do this, you need to update the configuration in/etc/audisp/plugins.d/syslog.confand set the active field to yes as shown in the screenshot below.- By default, the facility enabled for syslog is the
userfacility. If you want to change this, you can change the second parameter inARGS(the first parameter is the log level). For example, the following configuration changes the syslog Facility toauthpriv.
active = yes direction = out path = builtin_syslog type = builtin args = LOG_INFO LOG_AUTHPRIV format = string- Restart the
auditddaemon to apply the changes usingsystemctlrestartauditd.
- By default, the facility enabled for syslog is the
-
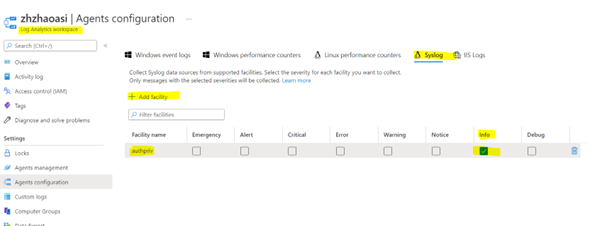
Go to your Log Analytics Workspace in the portal and configure the logging agents to accept syslog events for the
authprivfacility at theINFOlevel. To do this:- Navigate to Settings > Agents Configuration
- Select Syslog
- Select + Add facility
- Choose authpriv in the dropdown menu, as shown below.
如有侵权请联系:admin#unsafe.sh


