2023-11-8 17:35:44 Author: blogs.sap.com(查看原文) 阅读量:7 收藏
Hello folks, this is the part-3 of workflow configuration in Document and Reporting Compliance – Statutory reporting, here we are going to know on how to set up workflow in “Manage Workflows Statutory Reporting” application.
- Introduction of workflow and prerequisite configuration steps
- Creation of team in “Manage Teams and responsibilities” application
- Creation of workflow in “Manage Workflows Statutory Reporting” application
Follow the steps to create workflow for Statutory Reporting application:
To create to workflow, user should have SAP_BPC_EXPERT role in the respective frontend system.
- Navigate to ‘Manage workflow’ application:

- Click on ‘Add’ to create new workflow:

- Under Header enter a unique name:

- Enter optional details Under Step Properties:
- Important:
- Valid from/Valid to are the dates of current system dates. These dates not related to reporting task period.
- When the from and to dates provided are not valid, by default the workflow is valid from current system date.
- For example, if the validity dates are maintained as in above screen shot, then the workflow is valid only from 01’st April 2019 till 31’st March 2019.
- Important:
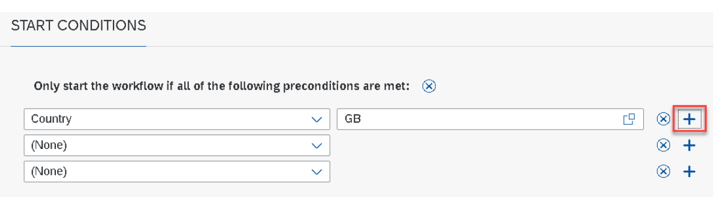
- Enter Start conditionsStart conditions defines the criteria to select the workflow in runtime for the specific report run.Select the required condition from the drop-down list.

On the F4 enabled input box of each condition, select the condition value.
User can choose add multiple conditions using Add Button at the end of each condition.

User can also add Alternate start condition (which is completely a new set OR conditions to the first set of conditions).

When adding Alternative Preconditions, please note that only one set of conditions would be considered for run time approval process.
For Example:

- From the above screenshot, the conditions below Only start the workflow if all of the following preconditions are met will be considered as first set of AND conditions.
- The conditions below or all of the following preconditions are met will be considered as the next set of AND Conditions.
- Hence during runtime, if either one set of conditions are met, then the report run would be considered valid for approval process.
Important: Start conditions are considered as ‘AND’ conjunction in runtime. i.e., multiple start conditions on same group are considered as ‘AND’ while checking against the report run.
- Add StepsSteps are the number of approval level for the given conditions. Under Step Sequence, click Add.

- Under Header section, add optional step name and choose Approve report from drop down as shown below

- Under Recipients choose the function, to which the approval should trigger.
Here in drop down, you can see the functions associated only to SRF Team category and team type.
- Define Step conditions(optional).Note: Defining conditions at this step is adding additional filter in workflow. Meaning in runtime for a specific report run, the above approval step is applicable only when the conditions are satisfied.

- Define Deadlines (optional).Deadlines are to prioritize the approval step based on conditions. For example, you can define a deadline such that the approval item should become ‘Overdue’ if it is pending with an approver for 3 days.Below are the allowed deadline conditions:

- Exceptional Handling (mandatory)Important:Exception handling is a crucial step in defining an approval step. Please keep the exception steps as showed below.

Do not make any other combination of exception handling as it could result in uncontrolled approval process.
Note: The ‘Sent for clarification’ with the above combination is to send the work item to the person who initiated the approval workflow to seek more information.
In this case, the person who initiated the workflow would receive a task to complete the clarification.
Once the task is completed by ‘Initiator’, the work item again goes back to the approver who had originally sent for clarification.
To create more steps (approval levels), repeat step 6.
- Under Header section, add optional step name and choose Approve report from drop down as shown below
- Activate the workflow.Finally save the workflow and activate to use it.
Conclusion: Configuring workflow in the Document and Reporting Compliance – Statutory Reporting framework is crucial for ensuring the validation and approval of Statutory Report Runs. By enabling workflow, organizations can streamline their internal approval processes, define approval levels based on preconditions, and have complete visibility into the approval flow. With the right roles and proper configuration using Fiori applications, users can effectively manage teams, responsibilities, and approvals within the framework.
如有侵权请联系:admin#unsafe.sh