2023-11-15 01:0:0 Author: securityboulevard.com(查看原文) 阅读量:12 收藏
According to OWASP, one of the top ten API security risks is “Unrestricted Resource Consumption.” We used to call it “Lack of Resources & Rate Limiting.” I’m not sure why we decided to rename it in the latest list.
However you like to refer to it, the security control typically put in place is some sort of API rate limiting… usually in the form of limiting the number of requests the client can make. The easiest way to control this is usually by restricting the number of requests that can come from an IP address over a period of time.
When this is the case, you can bypass the API rate limiting by simply changing your IP on each request. Of course, that’s not so simple. It’s not like you can change your router’s IP address every second to something new. And routing through different proxy servers isn’t practical, nor does it solve the problem of having unique IPs on each request. You just can’t do it that way.
Or can you?

Turns out, you can… with help from a dynamic API Gateway in AWS and a bit of extension magic in Burp Suite.
Let me show you how.

How it works
Consider this. You find an API endpoint and want to send a whole bunch of requests to it. Whenever you do, it sends you HTTP status codes like “429 Too Many Requests“, which tells you to slow down, usually with some Retry-After header telling you to wait several seconds or minutes.
If you push it too far, they may even block your IP address. Not good.
This prevents things like password brute forcing, password spraying, API rate limiting, and other forms of IP blocking, usually enforced by web application firewalls (WAFs) or API gateways.
So, how do you get around this?
AWS offers a cloud service called Amazon API Gateway. It is a fully managed service that makes it easy for developers to create, publish, maintain, monitor, and secure APIs at any scale. One of the benefits of the service is it uses a new, unique IP address each time it spins up.
Suppose you purposely create several API Gateways in different regions. In that case, they will have different IP ranges, meaning the more regions we spin up API Gateways in, the larger the pool of IPs we can cycle through.
If you force all traffic from the Burp proxy to the API Gateway front end, the requests will come from DIFFERENT addresses on each request as it exits the different regions across the Amazon datacenters.

So, let me show you how to set this all up.
Setting up AWS to work with Burp
To properly configure Burp Suite to use IP rotation, we are going to manipulate Amazon’s API Gateway cloud service to dynamically create new ephemeral IP addresses located all around the world. This way, any security controls limiting access by IP address will be bypassed when each request appears to be coming from a different IP in another region of AWS.
Here are the steps to set that up…
Step 1: Create a restricted user for the gateway
We are going to want to create a separate restricted service account with the least amount of privileges to our AWS account so it can’t be abused. This will be important since the Burp Suite extensions we use do not have a secure enclave for their settings, which means any creds used will be stored in a recoverable manner directly in the Burp preferences.
Here’s how to create that account in AWS:
- Log into the AWS management console as a root user or an administrator with permission to create other accounts.
- Go to “Identity & Access Management (IAM)”
- Click on “Users”
- Click “Create user”
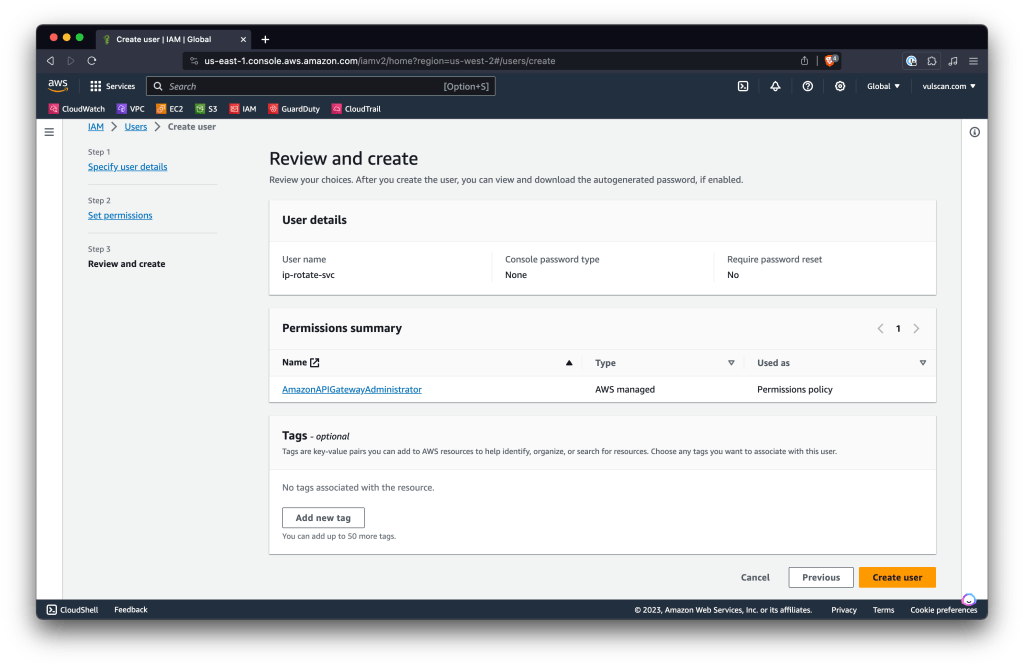
- Give the account a name that clearly articulates its purpose. I call mine “ip-rotate-svc”. Click “Next”.

- Under “Permissions Options” select “Attach policies directly”. Search for “AmazonAPIGatewayAdministrator” and select it to attach the policy to the user. Click “Next“.

- Review the settings to make sure they are correct, and then click “Create user“.

Step 2: Create security credentials
With the account created, we need to generate a secret access key that we can use in Burp to contact the AWS admin management APIs to create and destroy API Gateway instances as needed.
- Once the user is created, click “View user” to return to the account.
- Select the “Security credentials” tab and scroll down to “Access keys”. Click “Create access key“.

- Under “Access key best practices” select “Other“. Click “Next“.

- For auditing purposes, enter a helpful description. Then click “Create access key“.

- You will now be presented with an “Access key” and “Secret access key“. Store these somewhere safe, as the creds cannot be recovered once you leave this page.

Setting up Burp to work with AWS
Out of the box, Burp doesn’t support IP rotation. However, there is a free Burp extension written by Rhino Security Labs called ip-rotate that can do it.
You can find this extension in the BApp Store. You’ll need to ensure you have pre-configured Jython to work with Burp. Read these instructions if you don’t know how to do that. You might also wanna check out some of the other resources I have for setting up and learning Burp if it’s new to you.
Install ip-rotate
- Open up Burp Suite and click on the Extensions tab.
- Click on the BApp Store subtab.
- Search for “IP rot“. Select “IP Rotate“
- Click “Install“.

Configure ip-rotate
With the extension installed, you should see a new IP Rotate tab. Click on it to load the settings UI.
Enter your Access key and Secret access key creds that you created in AWS. Under “Target host“, enter the domain name of the host you want to attack to bypass rate limiting. When first verifying that this works, you might want to use an IP address echo service like https://ifconfig.co to test everything. That’s what I will do here for this article.
Do NOT click the “Enable” button just yet. We want to test that the configuration is working right.

Test ip-rotate
So before we enable IP rotation in Burp, let’s see what happens when it’s NOT enabled.
Open up Intruder and create a simple request to your favorite IP echo service. Set up one insertion parameter so we can force different requests to simulate an attack.
Here is an example for ifconfig.co:

Click on the Payloads tab and set up a simple payload of sequential numbers 1 to 5.

Go to the Settings tab and set up a “Grep – Extract” to echo out the IP address returned. In our case, the body is the IP address, so if we parse for the first line after “\r\n\r\n” (which represents the body in HTTP), we should be able to see the IP returned on each request.

Now click “Start attack“. You should see that every request came from the same IP.
Now go back to the ip-rotate extension and enable it. It will take a few moments as the extension contacts AWS to spin up the API Gateway.
When it says it’s enabled, return to Intruder and re-run your attack. You will now notice that a different IP was used for every request.

BOOM! Suck that API rate limiting controls!!
Things to consider
So this approach to IP rotation works really well in Burp Suite, as you can see. However, there are a few things to consider.
This won’t defeat session affinity configurations. If the API uses other forms of metadata to track your session (cookies, tokens, special headers, etc.), this doesn’t always work. It’s rare to see that, but modern secure coding practices are getting more resilient to this type of attack.
Of course, if you can detect that, you can modify your attacks in Burp to strip that metadata as required. 
However, when common API Gateways, WAFs, and load balancers are used, this will defeat normal API rate limiting based on IP address restrictions.
An added benefit is that this will defeat any other security controls based on IP blocking. This could be useful if you are doing any sort of bruteforce attack or enumeration that regularly gets you blocked.
Watch your cloud spend
So the benefit of using ip-rotate is that it automatically sets up and tears down AWS API Gateway instances, allowing you to get different virtual IPs in Amazon data centers from around the world.

Remember to disable the extension when you are done with your attacks. Otherwise, you may keep instances of the API Gateway running. Refer to the AWS API Gateway pricing page for what these costs may look like.
The good news is the free tier allows you 1 million API calls a month before you get charged. After that, it’s around $1 for each million requests. Check the pricing page for the breakdown of how this all plays out. The last thing you want is an unexpected AWS bill for resources you forgot about.
Conclusion
Bypassing API rate limiting using IP rotation in Burp Suite opens up a wealth of opportunities for conducting more effective and efficient testing. It’s a powerful way to mitigate the restrictions imposed by security measures such as IP blocking.

As we continue to evolve in the landscape of secure coding practices, the ability to adapt and leverage techniques like this becomes increasingly crucial. Harness the capabilities of Burp Suite and use it responsibly to glean meaningful insights from your testing efforts.
Have fun with it!
One last thing…

Have you joined The API Hacker Inner Circle yet? It’s my FREE weekly newsletter where I share articles like this, along with pro tips, industry insights, and community news that I don’t tend to share publicly. Subscribe at https://apihacker.blog.
The post Bypassing API rate limiting using IP rotation in Burp Suite appeared first on Dana Epp's Blog.
*** This is a Security Bloggers Network syndicated blog from Dana Epp's Blog authored by Dana Epp. Read the original post at: https://danaepp.com/bypassing-api-rate-limiting-using-ip-rotation-in-burp-suite
如有侵权请联系:admin#unsafe.sh