2023-11-22 07:36:31 Author: blogs.sap.com(查看原文) 阅读量:8 收藏
In this blog, I am going to provide a solution for a product gap using transient field in custom development.
Below requirement has been taken as an example to explain the Transient field’s usage in a custom development using C4C Cloud application studio.
Problem statement: Appointment is cancelled when one of the attendee cancels in C4C
Requirement: When an attendee cancels the appointment in C4C (synced teams meeting from outlook), system is cancelling the appointment and sending the cancellation notification to all attendees though he is not the organizer. This is a gap in the solution. Ideally only organizer should be able to cancel the appointment and not the attendees.
Challenge: As per the business custom logic this cannot be achieved from the SAP C4C UI. Only option is to do in SAP Cloud application studio. We need to develop the solution at the time of After-loading the appointment, but the challenge is custom KUT or standard SAP field’s can’t be modified because fields are read-only in after-loading event of the business object.
Solution: To achieve this requirement, create a Transient Element (Field created in SDK) type indicator in business object extension and development custom logic updating this transient field to ‘True’ or ‘False’. Now when an user open an appointment in the after-loading event our custom logic will run and update transient element accordingly. Based on this transient element we can create a validation rule in the adaptation and apply the rule to the standard actions.
Below are the detailed steps with screenshots provided to achieve this custom development through SDK.
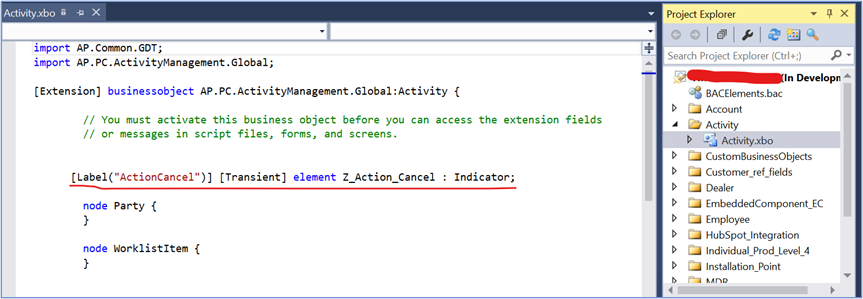
Step1: First open a solution in the SDK and we need to create a Business object extension for Activity management and then create a Transient Element type Indicator in the main node with proper naming.

Step2: Create an Event-AfterLoading.absl script file under Root.node and write the custom logic as per the requirement.

Step3: Here is the logic that I have used for this development.
import ABSL;
import AP.PC.IdentityManagement.Global;
import AP.Common.GDT;
import AP.FO.BusinessPartner.Global;

//development for hiding actions complete & cancel based on user loggedin with involved parties.
var lv_emp = Context.GetCurrentIdentityUUID();

if(!lv_emp.IsInitial())
{
 var query = Identity.QueryByElements;
 // 2. Selection
 var selectionParams = query.CreateSelectionParams();
 selectionParams.Add(query.UUID.content, "I", "EQ", Context.GetCurrentIdentityUUID().content);
 // Result
 var resultData = query.ExecuteDataOnly(selectionParams);
 if (resultData.Count() > 0)
 {
  var lv_query = Employee.QueryByIdentification;
  // 2. Selection
  var lv_selectionParams = lv_query.CreateSelectionParams();
  lv_selectionParams.Add(lv_query.UUID.content, "I", "EQ", resultData.GetFirst().BusinessPartnerUUID.content);
  // Result
  var lv_resultData = lv_query.Execute(lv_selectionParams);
  var empname;
  if(lv_resultData.CurrentCommon.GetFirst().IsSet())
  {
   if(!lv_resultData.CurrentCommon.GetFirst().BusinessPartnerFormattedName.IsInitial())
   {
    empname = lv_resultData.CurrentCommon.GetFirst().BusinessPartnerFormattedName;
   }
  }
   if(this.Party.GetFirst().IsSet())
   {
    var lv_x = this.Party.Where(n => n.PartyName == empname);
    if(this.Party.Count() > 0 && this.Party.Where(n => n.PartyName == empname).Count() > 0)
    {
	 if(lv_x.Where(n=>n.RoleCode == "36").Count() != 0 && lv_x.Where(n=>n.RoleCode == "35").Count() == 0 && lv_x.Where(n=>n.RoleCode == "39").Count() == 0 )
	 {
	  this.GetFirst().Z_Action_Cancel = true;
	 }
    }
	else
	{
	 this.GetFirst().Z_Action_Cancel = true;
	}
   }
 }
}
Step4: Now we need to add the transient field to the Appointment header using UI designer.
- Go to Administration >> Open UI Designer.
- Open COD_Appointment (TI screen) >> using Extensibility explorer add the transient field to the appointment header section( This field can be hidden from the frontend adaptation if not needed)
Step5: Now Save and Activate the Event-AfterLoading.absl and .XBO and entire solution. Till this step we have done from the SDK side and moving to SAP C4C UI.
Step6: Logon to SAP C4C with admin credentials >> Open Appointment’s Business object under activities >>Now open any Appointment and you will see the transient field which we have added at the header section(Default value as NO).
Step7: Now Open Adaptation mode and click on the action’s menu >> Select the ‘Set as Cancelled’ >> Now create a validation rule and assign it under the visibility of the ‘Action Cancelled’.
- The below images shows the logic that I have written in the Validation Rule.


Note: Transient field’s created from SDK can be extended to UI but are not visible in Validation Rule because transient field’s are not available at the database level, So I have copied the namespace of the transient field from the properties in UI Designer.
Step8: Now test the scenario in the SAP C4C.
Hope this blog is helpful and addresses one of the product gap in groupware integration. Please let me know for any queries in the comments section.
如有侵权请联系:admin#unsafe.sh