2023-11-29 16:18:32 Author: blogs.sap.com(查看原文) 阅读量:10 收藏
A comprehensive understanding of experience journeys is vital to the success of any business. With SAP Signavio Journey Modeler, you can manually input and visualize Net Promoter Score (NPS) metrics on each step of the journey, enabling you to gauge customer satisfaction accurately. The manual process of enriching customer journeys with operational and experience data can be time-consuming and error-prone. SAP Signavio Journey Modeler’s Customer Experience (CX) Metrics API offers a solution. By connecting your chosen system with SAP Signavio Journey Modeler, you can automate data updates, reducing potential human error, and saving both time and cost. This feature enables a seamless data feed, helping to keep your metrics up-to-date and facilitating data-driven journey modeling.
This blog will show you how to use SAP Cloud Integration to fetch data from a third party Customer Experience (CX) tool and input it to SAP Signavio Journey Modeler. You can use this flow as well as a blueprint for a script-based integration or for using a different middleware.
SAP Signavio Journey Modeler is an excellent understand, transform, and deliver improved experiences at scale. Customer experience metrics in SAP Signavio Journey Modeler can be used to visualize customer satisfaction (e.g. Net Promoter Score, NPS) in different stages. In most cases, these metrics are collected and analyzed in third party tools. Typically, these steps are needed to show NPS in Journey Models:
- Fetch NPS from the source system (e.g. one-time, periodically or event-based)
- Map data from source data model to SAP Signavio Journey Modeler’s data structure
- Push data to SAP Signavio Journey Modeler via API
An integration platform or middleware like SAP Cloud Integration offers all capabilities needed to perform those actions.
Architecture

Source-system for NPS data
A mock service is deployed on SAP Cloud Integration to keep the use case as general as possible. This mock service returns a sample JSON payload with NPS data which is then used for the integration use case.
Configuration in SAP Signavio Journey Modeler
Start by creating a new Journey Model or open an existing one and create a Metrics Section:

Specify Entry Source as “SAP Signavio API”, copy the Metrics ID and save the metric:

The widget will look like the following until the data is pushed via API:

Configuration in SAP Cloud Integration
An API token is required to use the Journey Modeler API. Create a user credential security material in SAP Cloud Integration to configure the credentials securely. The name is afterwards used within the Integration Flow to authenticate and fetch the token.

IFlow Development in SAP Cloud Integration
Two Integration Flows are necessary for this use case:
1. Mock NPS data

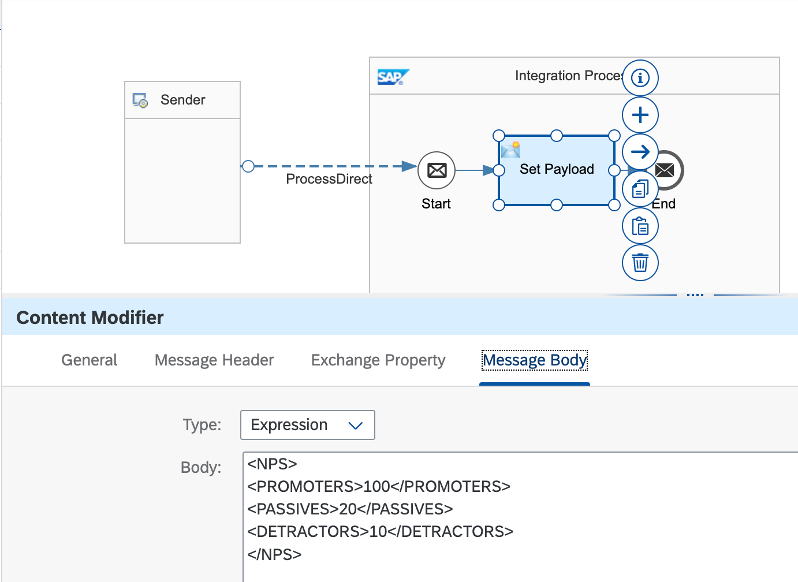
This Integration Flow is triggered via the ProcessDirect adapter and returns a static JSON payload. In a real scenario, this Integration Flow is replaced by the logic to extract data from a source system.
Specify the ProcessDirect Connection Address to “fake-nps-server”. This is later configured within the main flow:

Specify the following static XML payload to mock external NPS Data:

<NPS>
<PROMOTERS>100</PROMOTERS>
<PASSIVES>20</PASSIVES>
<DETRACTORS>10</DETRACTORS>
</NPS>
2. Replicate data to Journey Modeler

Start event: use a timer, which is scheduled once to test the integration. In a productive scenario, this Integration Flow might run periodically.

First, the HTTP headers are set in a Content Modifier for the Authentication API call to obtain the token. Please refer to the API documentation:

Second, create the parameters for the SAP Signavio tenant ID and credentials. They should be configured later to split between design-time (development) and runtime (configuration):

A small Groovy Script is needed to fetch the credentials from the Security Material set the HTTP body for the Authentication API Call:

import com.sap.gateway.ip.core.customdev.util.Message
import com.sap.it.api.ITApiFactory
import com.sap.it.api.securestore.SecureStoreService
import com.sap.it.api.securestore.UserCredential

def Message processData(Message message) {
     def credentialName = message.getProperty("signavioCredential")
     def signavioTenantId = message.getProperty("signavioTenantId")

     SecureStoreService secureStoreService = ITApiFactory.getService(SecureStoreService.class, null)
     UserCredential userCredential = secureStoreService.getUserCredential(credentialName)
     def username = userCredential.getUsername().toString()
     def password = userCredential.getPassword().toString()

    message.setBody("tokenonly=true&name=" + username + "&password=" + password + "&tenant=" + signavioTenantId)
    return message;
}
After that, specify the parameters to call the Authentication endpoint to fetch the token. Externalize the host-URL as a parameter to configure later and add the endpoint path needed as described in the API documentation.
Ensure that the HTTP method is POST and the specified HTTP headers are passed.

After the token is fetched, set the “Authorization” HTTP header to “Bearer <token>”, where <token> will be replaced by the body from the previous API call by using “${body}”. Furthermore, set the “Content-Type” HTTP header to “application/json”.

Now fetch the fake NPS payload from our mock server by using a ProcessDirect connection. Make sure the address matches the one you configured above. In a production use case, this logic is replaced by an API call to a real source system for NPS data.

Before pushing the NPS data from the mock service to SAP Siganvio Journey Modeler a mapping is needed to use the target data structure specified in the API documentation.
Use a Message Mapping to model the data flow from source to target.
Source Message: Convert the sample XML payload from the NPS mock server into XSD and upload the XSD-file into the mapping:
<xs:schema attributeFormDefault="unqualified" elementFormDefault="qualified" xmlns:xs="http://www.w3.org/2001/XMLSchema">
  <xs:element name="NPS">
    <xs:complexType>
      <xs:sequence>
        <xs:element type="xs:string" name="PROMOTERS"/>
        <xs:element type="xs:string" name="PASSIVES"/>
        <xs:element type="xs:string" name="DETRACTORS"/>
      </xs:sequence>
    </xs:complexType>
  </xs:element>
</xs:schema>

Target Message: Download the OpenAPI specification as JSON from the SAP Business Accelerator Hub and upload it into SAP Cloud Integration.

Map the source data structure to the target data structure:

Map the constant “NPS” to “type” field and a time function to the “time” field:

Configure the HTTP Call to push the data to the Journey Modeler API

Address: Reuse the externalized “host” parameter, add the endpoint according to the API documentation.
and externalize the parameters for the Journey ID as well as the Metrics ID. We will configure the parameters in the next step.
Method: POST
Make sure to allow the “Authorization” HTTP header.
Now we can continue configuring the customer-specific parameters.
Configure the Integration Flow in SAP Cloud Integration
Open the “Externalized Parameters” section in the Integration Flow to specify the specific values. The names of your parameters might differ.

Host: look up the correct host address for your environment in the API docs.
Journey ID: Copy the Journey ID from the browser URL of your Journey Model:

Metrics ID: Paste the Metrics ID you copied from the Journey Modeler UI while setting up the Metrics widget:

Signavio Credential: name of the Credential Material we deployed as Security Artefact.
Signavio Tenant ID: it is the unique Tenant ID of your SAP Signavio workspace.
Run the integration
After you specified all the necessary parameters, you can deploy both Integration Flows and check the monitoring:

You can find see the updated NPS data in the Journey Model:

This blog post provides a detailed step-by-step tutorial for you to fetch NPS data from an external system and upload it to SAP Signavio Journey Modeler via API. This helps to obtain a clear visibility on customer sentiment across various touchpoints by connecting the system of your choice with SAP Signavio Journey Modeler.
Please, do not hesitate to post your questions and feedback and tell us about your integration scenarios! If you want to learn more about other exciting updates from the November market release, please read our latest blog post.
如有侵权请联系:admin#unsafe.sh