Windows在vista版本时就已经提供了二进制代码签名机制,到win10版本时代码签名机制进化的更加全面,从当初的内核校验深入到硬件虚拟化层校验(vbs),管理员可以编写丰富的policy支持不同粒度的校验等级,可以说windows的代码签名要比ios更加细致与完善。
2.1 签名信息的等级
Ios及android的某些版本是通过比较二进制程序的hash值来做校验的,而windows提供了更加丰富的校验等级,在微软的WDAC文档中,提供了如下的等级分类:
可以看到除了使用hash值,还可以使用文件名、文件路径、证书的发布者等等种类进行校验。
2.2 签名的存储结构
Windows的签名信息可以存储在两个地方:PE文件和catalog文件。
2.2.1 PE文件签名信息
在PE文件的Optional header里加入一个Security Data Directory:
它指向Section末尾的Attribute Certificate Table存储签名信息,它的结构体在wintrust.h中定义:
typedef struct _WIN_CERTIFICATE {DWORD dwLength;WORD wRevision;WORD wCertificateType;BYTE bCertificate[ANYSIZE_ARRAY];} WIN_CERTIFICATE, *LPWIN_CERTIFICATE;
签名结构架构如下:
WIN_CERTIFICATE结构体的bCertificate指向具体的签名信息,它是一个pkcs#7结构。ContantInfo里保存了当前文件的hash值, windows支持两种格式的hash:一个是文件的整个hash值,另一种是已PAGE为单位的hash值。IOS的代码签名机制只允许以页为单位的hash值校验,那么当一个文件非常大时,签名信息里就要携带非常大的hash值,会使文件体积变得更大。在笔者的win10系统中,几乎所有的pe文件都只携带了文件的hash值。
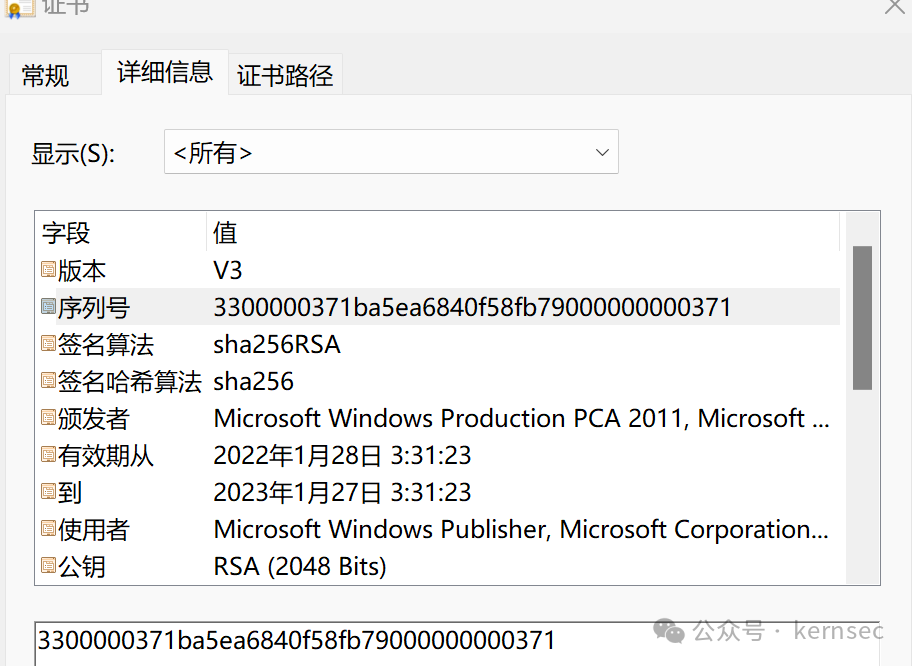
已smss.exe为例,右键点击属性,如果文件有签名信息,可以看到有数字签名一栏,点击查看证书信息:
序列号为文件的hash值,采用sha256算法。
在笔者的win10系统中,并不是所有的二进制都做了签名信息,微软公司只对重要的系统文件加了签名信息。
2.2.2 文件hash值的计算方法
文件hash值的计算并不是计算所有的文件内容,需要去掉pe文件中与签名有关的数据,以下算法来自微软的官方文档:
同时windows api还提供了一系列关于签名的辅助函数:
Image Integrity
The image integrity functions manage the set of certificates in an image file.
DigestFunction
ImageAddCertificate
ImageEnumerateCertificates
ImageGetCertificateData
ImageGetCertificateHeader
ImageGetDigestStream
ImageRemoveCertificate
2.2.3 Catalog文件
将文件签名信息保存在pe文件中,就会变得不是很灵活,为此微软公司提供了另一种签名信息的存储格式catalog文件类型,并提供了一些内核api可以动态增加或删除一个文件的签名信息, 结合前面提到的WDAC policy就会变得更加灵活,在稍后的章节中会详细介绍。
2.3 签名的校验逻辑
2.3.1 代码签名的初始化
由于win10启动了WDAC policy策略SIPolicy.p7b,它是一个pkcs#7格式的文件,它由windows loader加载并解析,然后在传给nt内核。德国bsi的安全研究人员已经对其启动过程做了详细的分析,强烈推荐大家仔细阅读,windows loader除了加载wdac policy外,还要加载ci.dll,因为Windows的签名代码逻辑基本都在ci.dll中实现。
可以看到它导出了以下函数:
cybereason.com的安全研究人员给出了一篇非常棒的paper解析了CiCheckSignedFile和CiValidateFileObject两个函数的用法,还原了它们的参数和部分数据结构体,同时在github提供了一个demo使得一个驱动程序链接ci.dll,调用上述两个函数对一个文件的签名信息进行校验的例子。
在笔者的win10系统中,没有发现内核有调用这两个接口,但是内核在初始化中调用了CiInitialize函数进行了代码签名的初始化工作:
InitBootProcessor->SeInitSystem->SepInitializationPhase1->SepInitializeCodeIntegrity:
__int64 SepInitializeCodeIntegrity(){unsigned int v0; // edi__int64 v1; // rbx__int64 v2; // rcxunsigned int *v3; // rdxv0 = 6;memset(&unk_140C373C4, 0, 0xECui64);v1 = 0i64;SeCiCallbacks = 0xF8;qword_140C374B0 = 0xA00000Ci64;if ( KeLoaderBlock_0 ){v2 = *(_QWORD *)(KeLoaderBlock_0 + 240);if ( v2 ){v3 = *(unsigned int **)(v2 + 2904);if ( v3 )v0 = *v3;}if ( *(_QWORD *)(KeLoaderBlock_0 + 216) && (unsigned int)SepIsOptionPresent() )SeCiDebugOptions |= 1u;if ( KeLoaderBlock_0 )v1 = KeLoaderBlock_0 + 48;}return CiInitialize(v0, v1, &SeCiCallbacks, &SeCiPrivateApis);}
Nt内核向ci.dll传递了SeCiCallbacks数组,写入了一系列回调函数:
__int64 __fastcall CipInitialize(__int64 a1, const UNICODE_STRING **a2, __int64 a3, __int64 a4){*(_QWORD *)(a3 + 0x20) = CiValidateImageHeader;*(_QWORD *)(a3 + 0x28) = CiValidateImageData;*(_QWORD *)(a3 + 24) = CiQueryInformation;*(_QWORD *)(a3 + 8) = CiSetFileCache;*(_QWORD *)(a3 + 16) = CiGetFileCache;*(_QWORD *)(a3 + 48) = CiHashMemory;*(_QWORD *)(a3 + 56) = KappxIsPackageFile;*(_QWORD *)(a3 + 64) = CiCompareSigningLevels;*(_QWORD *)(a3 + 72) = CiValidateFileAsImageType;*(_QWORD *)(a3 + 80) = CiRegisterSigningInformation;*(_QWORD *)(a3 + 88) = CiUnregisterSigningInformation;*(_QWORD *)(a3 + 96) = CiInitializePolicy;*(_QWORD *)(a3 + 0x88) = CipQueryPolicyInformation;*(_QWORD *)(a3 + 144) = CiQuerySecurityPolicy;*(_QWORD *)(a3 + 152) = CiRevalidateImage;*(_QWORD *)(a3 + 160) = CiSetInformation;*(_QWORD *)(a3 + 168) = CiSetInformationProcess;*(_QWORD *)(a3 + 176) = CiGetBuildExpiryTime;*(_QWORD *)(a3 + 184) = &CiCheckProcessDebugAccessPolicy;*(_QWORD *)(a3 + 192) = CiGetCodeIntegrityOriginClaimForFileObject;*(_QWORD *)(a3 + 200) = CiDeleteCodeIntegrityOriginClaimMembers;*(_QWORD *)(a3 + 208) = CiDeleteCodeIntegrityOriginClaimForFileObject;*(_QWORD *)(a3 + 224) = CiCompareExistingSePool;*(_QWORD *)(a3 + 232) = CiSetCachedOriginClaim;if ( !v19 ){*(_QWORD *)(a3 + 120) = CiGetStrongImageReference;*(_QWORD *)(a3 + 104) = CiReleaseContext;*(_QWORD *)(a3 + 128) = CiHvciSetImageBaseAddress;*(_QWORD *)(a3 + 216) = CiHvciReportMmIncompatibility;}
可以看到CiCheckSignedFile和CiValidateFileObject这两个函数并没有写入回调数组,说明nt在代码签名校验时是没有使用这两个函数的。相反,nt内核使用CiValidateImageHeader和CiValidateImageData两个函数做签名校验,一个用来做文件hash的完整性校验,一个用来做page的完整性校验。
2.3.2 文件hash校验逻辑
2.3.2.1 CiValidateImageHeader逻辑
在CiValidateImageHeader处下个断点:
3: kd> k# Child-SP RetAddr Call Site00 ffff940b`9de071b8 fffff803`74453ec1 CI!CiValidateImageHeader01 ffff940b`9de071c0 fffff803`7445435c nt!SeValidateImageHeader+0xd902 ffff940b`9de07270 fffff803`744f377c nt!MiValidateSectionCreate+0x43803 ffff940b`9de07450 fffff803`74458862 nt!MiValidateSectionSigningPolicy+0xac04 ffff940b`9de074b0 fffff803`744f59eb nt!MiCreateNewSection+0x59a05 ffff940b`9de07610 fffff803`744f5034 nt!MiCreateImageOrDataSection+0x2db06 ffff940b`9de07700 fffff803`744c7222 nt!MiCreateSection+0xf407 ffff940b`9de07880 fffff803`7458848d nt!MmCreateSpecialImageSection+0xc608 ffff940b`9de07930 fffff803`74588371 nt!PspLocateSystemDll+0xe109 ffff940b`9de079f0 fffff803`7483ebc7 nt!PsLocateSystemDlls+0x4d0a ffff940b`9de07a30 fffff803`74862301 nt!IoInitSystemPreDrivers+0xbe70b ffff940b`9de07b70 fffff803`745a86ab nt!IoInitSystem+0x150c ffff940b`9de07ba0 fffff803`74055485 nt!Phase1Initialization+0x3b0d ffff940b`9de07bd0 fffff803`74202cc8 nt!PspSystemThreadStartup+0x550e ffff940b`9de07c20 00000000`00000000 nt!KiStartSystemThread+0x28
MiCreateSection建立section的路径中会调用CiValidateImageHeader做文件hash校验,它的大致流程如下:
CiValidateImageHeader(){If (CipIsFileInUMCIExclusionPaths())Return ;ActionsForImage = CiGetActionsForImage(v93, (__int64)v28, v29, v32);if ( (ActionsForImage & 1) != 0 ){CipValidateFileInCache()}if ( (ActionsForImage & 0x40) != 0 ){nt!MmGetImageFileSignatureInformation()}if ( (ActionsForImage & 0x100) != 0 ){CipValidateImageHash(CipValidateFileHash,}if ( (ActionsForImage & 4) != 0 ){CipValidateImageHash(CipValidatePageHash,}}
首先调用CipIsFileInUMCIExclusionPaths,这个函数是win11新增的用于开发者模式的白名单功能,它维护了一个列表,在列表中的path可以不用做校验。
char __fastcall CipIsFileInUMCIExclusionPaths(__int64 a1){char result; // alchar v2; // blunsigned int v3; // ediconst UNICODE_STRING *v4; // rsiresult = g_CiExclusionListCount;v2 = 0;if ( g_CiExclusionListCount ){v3 = 0;if ( g_CiExclusionListCount ){v4 = (const UNICODE_STRING *)(a1 + 88);while ( !RtlPrefixUnicodeString((PCUNICODE_STRING)(g_CiExclusionList + 0x10i64 * v3), v4, 1u) ){if ( ++v3 >= g_CiExclusionListCount )return v2;}return 1;}return v2;}return result;}
在笔者的win11版本中,这个列表为空:
4: kd> pCI!CipIsFileInUMCIExclusionPaths+0xf:fffff801`7f6f7ac3 8b053795feff mov eax,dword ptr [CI!g_CiExclusionListCount (fffff801`7f6e1000)]4: kd>CI!CipIsFileInUMCIExclusionPaths+0x15:fffff801`7f6f7ac9 33db xor ebx,ebx4: kd> r raxrax=0000000000000000
然后调用CiGetActionsForImage得到要执行的动作,ActionsForImage & 1表示在签名的cache中校验,否则ActionsForImage & 0x40表示从文件中提取签名信息。进一步ActionsForImage & 0x100表示对文件hash做校验,ActionsForImage & 4表示对文件的page做hash校验。
同ios一样,在每次做完签名校验后,会把文件的签名信息加入到一个cache中,如前所述,以后每次优先从cache中获取签名信息,避免了解析文件获取签名信息的性能开销。
除了在内存维护一个cache,还要给文件打个标签,利用了ntfs的文件扩展属性,利用FsRtlSetKernelEaFile函数将文件扩展属性设置为“$Kernel.Purge.CIpCache”。
CiBuildEaCacheContents函数负责建立cache结构体,对其参数进行跟踪分析:
CI!CiBuildEaCacheContents:
1: kd> dq r9 L8fffffc0b`6767e8b0 ffff8686`3c08a600 0000800c`00000020fffffc0b`6767e8c0 ffff8686`37f28d48 00008004`00000014fffffc0b`6767e8d0 00000000`00000000 00000000`00000018fffffc0b`6767e8e0 fffffc0b`6767e8f0 00000000`00000010800c/8004是sha256/sha1的标志,微软采用了以下的标准:md2 0x8001md4 0x8002md5 0x8003sha1 0x8004sha256 0x800csha384 0x800dsha512 0x800e
所以进一步猜测黄色部分对应的地址应该为保存hash的地址,蓝色部分代表hash值的大小,sha256为0x20字节,sha1为0x14字节,确实没错。由此笔者推导出的cache结构体为:
struct FileEaCache {FILE_FULL_EA_INFORMATION eaInfo;struct unkown_struct1 {int struct_length;short a2;char a3;char a4;long long a5;long a6;long a7;} A1;struct unkown_struct2 {char struct_length;char a1;int hashType;char hashSize;void *hashValue;} A2[2];struct unkown_struct3 {short struct_length;int hashType;char hashSize;char hashValue1[16];char hashValue2[16];} A3[2];}
或者更合理的定义为:
struct unkown_struct1 {int struct_length;short a2;char a3;char a4;long long a5;long a6;long a7;};struct unkown_struct2 {char struct_length;char a1;int hashType;char hashSize;void *hashValue;};struct unkown_struct3 {short struct_length;int hashType;char hashSize;char hashValue1[16];char hashValue2[16];};struct FileEaCache {FILE_FULL_EA_INFORMATION eaInfo;struct unkown_struct1 a1;struct unkown_struct2 a2, a3;struct unkown_struct3 a4, a5;};
CiValidateImageHeader函数中还有一个重要的函数CipAllocateValidationContext,用于构造签名校验信息时统一用到的数据结构,这个结构体非常庞大,接近1k字节。笔者只推导出了其中几个关键成员结构:
Struct ValidateContext:+0x400 FileName+0x490 WIN_CERTIFATE+0x498 WIN_CERTIFATE_SIZE+0x578 FileNameInformation+0x580 FileObject+0xCf8 HashType+0xD40 Callbacks
至于CipValidateFileHash函数,太复杂了,大致操作就是验证签名信息本身是否正确,然后做hash的对比。
2.3.2.2 Catalog接口
前面提到文件签名信息除了可以保存在pe文件内,还可以保存在独立的catalog文件内,win11版本路径为:C:\Windows\SystemApps\Microsoft.UI.Xaml.CBS_8wekyb3d8bbwe\AppxMetadata\CodeIntegrity.cat
通过CiValidateImageHeader->CipFindFileHash->CI!CiVerifyFileHashInCatalogs路径进行调用。
微软还提供了动态添加和删除catlog文件的接口:CiAddDynamicCatalog和CiRemoveDynamicCatalogs。
__int64 __fastcall CiAddDynamicCatalog(WCHAR *a1, unsigned int a2){RtlCopyUnicodeString(v8, &SourceString);if ( *(_WORD *)(*(_QWORD *)(v6 + 16) + 2 * ((unsigned __int64)v8->Length >> 1) - 2) != 92 )RtlAppendUnicodeStringToString(v8, &Source);RtlAppendUnicodeStringToString(v8, &stru_1C00259B0);for ( i = (__int64 *)qword_1C0036880; i != &qword_1C0036880; i = (__int64 *)*i ){if ( (*(_DWORD *)(i - 3) & 0x10) != 0 && RtlEqualUnicodeString(v8, (PCUNICODE_STRING)i - 1, 1u) ){v7 = 0x40000000;goto LABEL_33;}}}
可以看到catalog文件名保存在一个链表中。
2.3.2.3 Pagefault处理
同ios一样,除了进程在建立时校验一次hash外,在程序运行中,如果触发了页异常错误,也要对造成异常的页面做一次hash值校验,包括当进程一个页面被换出到磁盘上,某个时刻又换回内存后,势必要进行一次hash校验。当前win11版本的页异常处理hash值校验路径为:
MmAccessFault->MiIssueHardFault->MiWaitForInPageComplete->MiValidateInPage->SeValidateImageData->CiValidateImageHeader
在页异常中处理hash校验会非常消耗性能,微软的代码中虽然有了这些代码逻辑,但是如前面的章节所述,文件的签名信息内只包含了文件的hash值,并没有包含文件的page hash值。
除了页异常,我们看到ios在两个内存物理页进行拷贝的函数中也加入了hash值校验,但是微软的工程师似乎忘记了这个路径。
2.3.2.4 动态代码签名
IOS使用了Entitlement机制,可以将一个app标记为可以使用动态代码内存,比如浏览器进程需要使用jit动态映射代码。Windows的做法是内核提供接口,可以设置文件的某个扩展属性,把它标记为Trust进程,可以使用动态代码,当签名校验时会判断是否为trust进程,就可以绕过签名校验。
__int64 __fastcall CiSetDynamicCodeTrustClaim(__int64 a1, __int64 a2){Pool2 = ExAllocatePool2(258i64, 45i64, 0x63734943i64);v6 = (void *)Pool2;if ( Pool2 ){*(_DWORD *)Pool2 = 0;*(_WORD *)(Pool2 + 4) = 6144;*(_WORD *)(Pool2 + 6) = 12;strcpy((char *)(Pool2 + 8), "$Kernel.Purge.TrustClaim");*(void **)(Pool2 + 33) = Object[0];*(_DWORD *)(Pool2 + 41) = 0;v4 = FsRtlSetKernelEaFile(v3, Pool2, 45i64);ExFreePoolWithTag(v6, 0x63734943u);}__int64 __fastcall CipQueryDynamicCodeTrustClaim(PFILE_OBJECT a1, _QWORD *a2){v6 = FsRtlQueryKernelEaFile(a1, Pool2 + 32, 48i64, 0i64, Pool2, 32, 0i64, 0, &v12);if ( v6 >= 0 ){v8 = *(unsigned __int8 *)(v7 + 5);String1.Buffer = (PCHAR)(v7 + 8);String1.Length = *(unsigned __int8 *)(v7 + 5);String1.MaximumLength = *(unsigned __int8 *)(v7 + 5);if ( RtlEqualString(&String1, &g_CiTrustClaimEaName, 1u) ){}
如有侵权请联系:admin#unsafe.sh