The Burp Suite proxy tool intercepts all network traffic passing through the proxy, such as client request data, server return information, etc. Burp Suite mainly intercepts the traffic of http and https protocols. Through interception, Burp Suite can perform various processing on client request data and server return in the form of a middleman to achieve the purpose of security assessment and testing.
In our daily work, our most commonly used web client is the web browser.

Burp Suite Proxy is a leading web application security testing solution, used by hackers, pentesters, and cybersecurity professionals alike. This tool acts as an intermediary between your browser and the target web application, allowing you to intercept, inspect, and modify the traffic flowing between them. With Burp Suite Proxy, you can:
- Intercept HTTP/S Traffic: Sniff out every byte of data passing between your browser and the target web application, gaining insight into requests, responses, cookies, and more.
- Modify Requests and Responses: Manipulate HTTP requests and responses in real-time, allowing you to tamper with parameters, headers, and payloads to exploit vulnerabilities or test security defenses.
- Spider Websites: Crawl through the depths of a website, mapping out its structure and identifying hidden directories, files, and endpoints.
- Scan for Vulnerabilities: Conduct automated vulnerability scans to identify common security flaws such as SQL injection, XSS, CSRF, and more.
- Session Management: Manage and manipulate user sessions, cookies, and authentication tokens to simulate different user scenarios and test authorization controls.
In the hands of a skilled hacker or pentester, Burp Suite Proxy becomes a weapon of unparalleled power, capable of uncovering vulnerabilities, exploiting weaknesses, and launching devastating attacks on web applications.
Burp Suite proxy and browser settings
The Burp Suite proxy tool intercepts all network traffic passing through the proxy, such as client request data, server return information, etc. Burp Suite mainly intercepts the traffic of http and https protocols. Through interception, Burp Suite can perform various processing on client request data and server return in the form of a middleman to achieve the purpose of security assessment and testing.
In our daily work, our most commonly used web client is the web browser. We can intercept the traffic of the web browser through proxy settings and process the traffic data that passes through the Burp Suite proxy.
Let’s take a look at how to configure the Burp Suite proxy in IE, Firefox, and Google Chrome respectively.
Burp Suite IE settings
When Burp Suite is started, the default assigned proxy address and port are 127.0.0.1:8080, which we can view from the options on the proxy tab of Burp Suite. we can complete the relevant configuration of IE through Burp Suite proxy by setting the following steps.
- Start Internet Explorer
- Click the [Tools] menu and select the [Internet] option
- Open the [Connection] tab and click [LAN Settings] to perform proxy settings.
- Fill in 127.0.0.1 in the address input box of the proxy server settings and 8080 for the port. Click [OK] to complete the proxy server settings.
- At this time, the IE settings have been completed. You can visit http://burp and you will see the welcome interface of Burp Suite.
FireFox settings
Similar to the settings of IE, in FireFox, we also need to set some parameters to transmit the communication traffic of the FireFox browser through the Burp Suite proxy. The detailed steps are as follows:
- Start the FireFox browser, click the [Tools] menu, and click [Options].
- In the newly opened about:preferences#advanced window, click [Advanced]-[Network], and we will see the setting options for FireFox to connect to the network.
- Click [Settings], in the pop-up [Connection Settings] dialog box, find “http proxy”, fill in 127.0.0.1, fill in the port 8080, and finally click [Confirm] to save the parameter settings and complete the FireFox proxy configuration.
Of course, you can add FireFox extensions to the FireFox browser to manage the proxy server. For example, FireX Proxy and Proxy Swither are very useful components. Interested readers can download and try them out.
Google Chrome settings
The configuration steps for Google Chrome to use Burp Suite as a proxy server are as follows:
- Start the Google Chrome browser, enter chrome://settings/ in the address bar, and press Enter to display the configuration interface of the Google Chrome browser.
- Click [Show advanced settings] at the bottom to display the advanced settings of Google Chrome.
- Of course, you can also directly enter “proxy” in the search box, and after pressing Enter, you will automatically be directed to the proxy server setting function.
- Click [Change proxy server settings], and the proxy settings of the IE browser will pop up under the Windows system. At this time, follow the settings steps of the IE browser to complete the proxy server configuration.
In addition to the three commonly used browsers mentioned above, there is also the Safari browser, which is also used by many users. Please click to read to view its proxy configuration.
How to use Burp Suite proxy
Burp Proxy is the core of Burp Suite’s user-driven testing process function. Through the proxy mode, we can intercept, view, and modify all data transmitted between the client and the server.
This section mainly talks about the following contents:
- Basic use of Burp Proxy
- Data interception and control
- Options configurationOptions
- History
Basic use of Burp Proxy
Through studying the previous section, we have a basic understanding of Burp Suite proxy mode and browser proxy settings. The use of Burp Proxy is a step-by-step process. When you first start using it, you may not be able to get the results you expect quickly. Gradually, when you become familiar with its functions and usage, you will be able to use it well. Conduct a security capability assessment on a product system. Generally, when using Burp Proxy, the general steps involved are as follows:
- First, confirm that JRE has been installed, Burp Suite can be started and running normally, and the browser’s proxy server configuration has been completed.
- Open the Intercept tab in the Proxy function and confirm that the interception function is in the “Interception is on” state. If “Intercept is off” is displayed, click it to turn on the interception function.
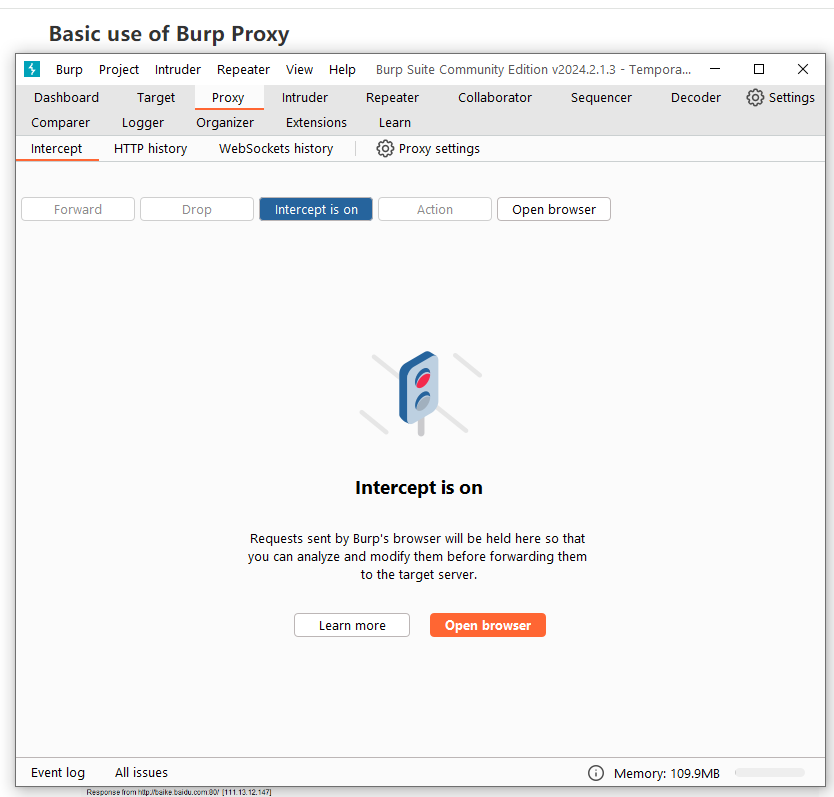
- Open the browser, enter the URL you need to access (take http://baike.baidu.com/ as an example) and press Enter At this time, you will see that the data traffic passes through Burp Proxy and is paused until you click [Forward] , will continue to transmit. If you click [Drop], the data passed this time will be lost and will not be processed further.
- When we click [Forward], we will see all the data returned by this request.
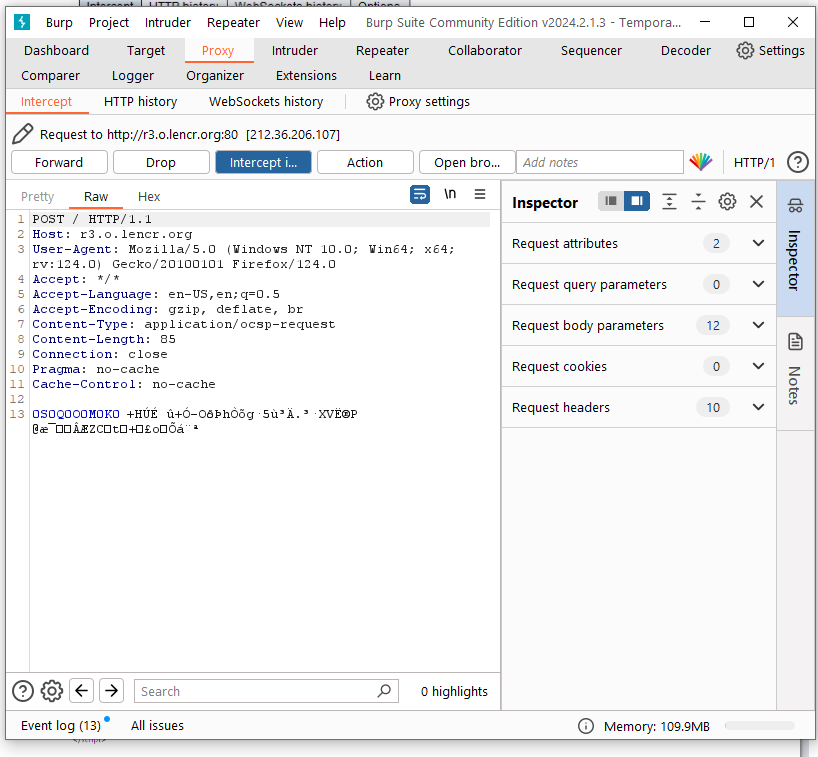
- After the client and server intercepted by Burp Suite interact, we can view the entity content, message headers, request parameters and other information of this request in the message analysis tab of Burp Suite. The message analysis options view mainly includes the following four items:

- Raw This view mainly displays the raw format of web requests, including request address, http protocol version, host header, browser information, Accept acceptable content type, character set, encoding method, cookie, etc. You can perform penetration testing on the server side by manually modifying this information.
- params This view mainly displays parameter information requested by the client, including parameters of GET or POST requests, and Cookie parameters. Penetration personnel can complete server-side penetration testing by modifying these request parameters.
- The information displayed in headers view is similar to the information in Raw, except that in this view, the display is more intuitive and friendly.
- Hex This view displays the binary content of Raw. You can modify the requested content through the hex editor.
By default, Burp Proxy only intercepts requested messages. Ordinary file requests such as css, js, and pictures will not be intercepted. You can modify the default interception options to intercept these static files. Of course, you can also modify the interception options. Scope, parameters, or keywords returned by the server to control Burp Proxy’s message interception.
We will learn more about these later. All messages flowing through Burp Proxy will be recorded in http history. We can view the transmitted data content through the history tab and test and verify the interactive data.
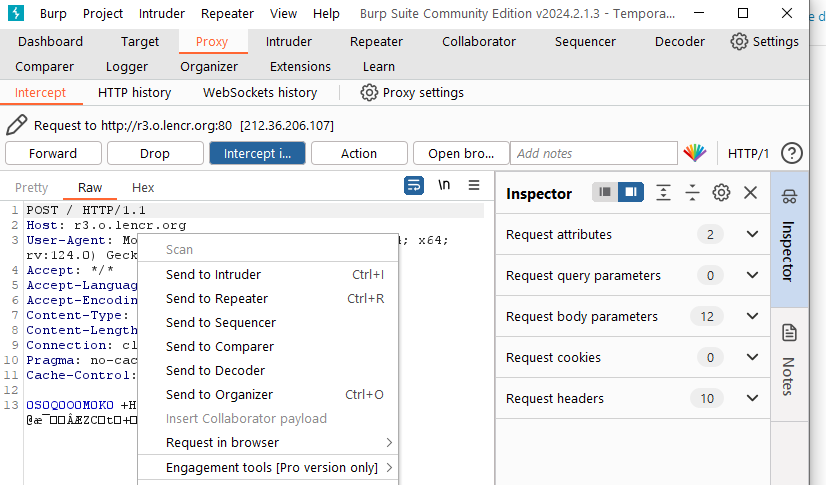
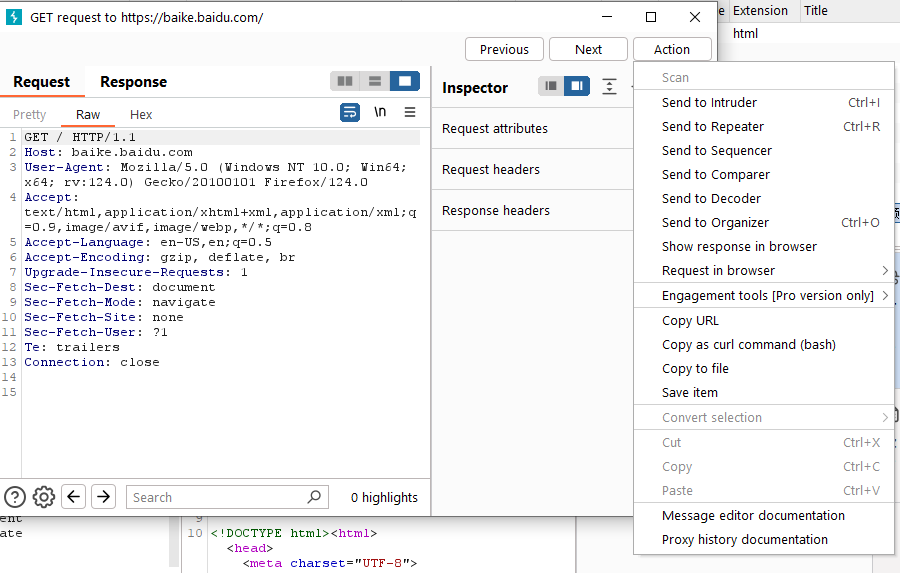
At the same time, intercepted messages and historical messages can be sent to other components of Burp through the right-click pop-up menu, such as Repeater, Intruder, Sequencer, Decoder, Comparer, and Organizer for further testing. As shown below:
Data interception and control
The interception function of Burp Proxy mainly consists of Forward, Drop, Interception is on/off, Action, Comment and Highlight in the Intercept tab.
- Interception is on means that the interception function is turned on, and all request data passing through Burp Proxy is intercepted;
- Interception is off means that the interception function is turned off, and all request data passing through Burp Proxy is no longer intercepted.
Their functions are:
- The function of Forward is after you have viewed the message or re-edited the message. , click this button to send a message to the server.
- The function of Drop is that you want to lose the currently intercepted messages and no longer forward them to the server.
- The function of Action is that in addition to passing the current request message to the , Repeater, Intruder, Sequencer, Decoder, and Comparer components, it can also make some modifications to the request message, such as changing the GET or POST request method, and changing the encoding of the request body.
you can also change the interception settings of request messages, such as no longer intercepting messages from this host, no longer intercepting messages from this IP address, no longer intercepting messages of this file type, no longer intercepting messages in this directory, you can also specify Intercept its server-side return message for this message.
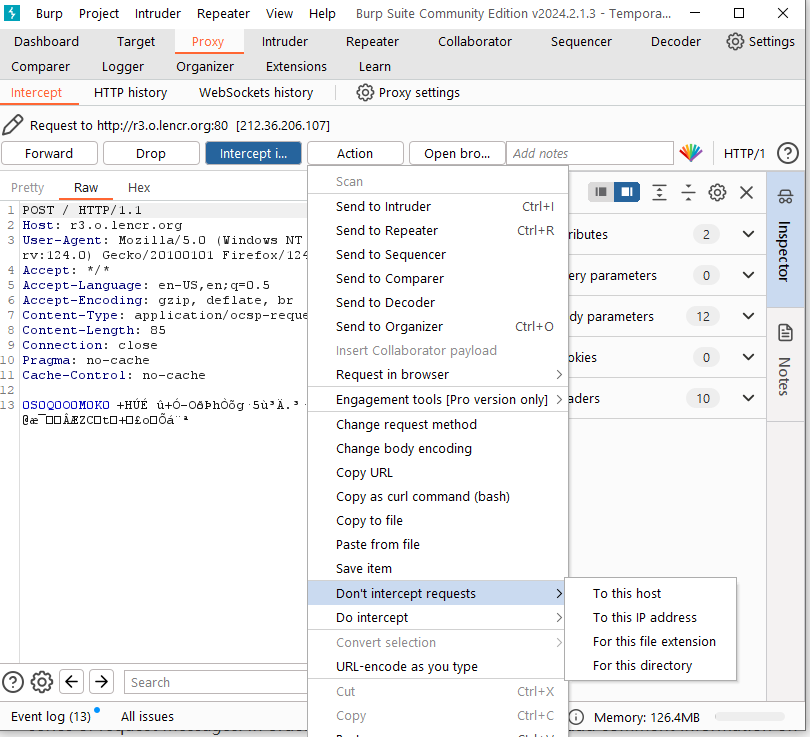
- The function of Comment is to add comments to intercepted messages. During a penetration test, you will usually encounter a series of request messages. In order to facilitate distinction, you can add comment information on a key request message.
- The function of Highlight is somewhat similar to that of Comment, which is to highlight the currently intercepted message so that other request messages can be distinguished.
In addition to the control of messages passing through the Proxy in Intercept, there are also many functional settings in the Options tab that can also control and process the messages flowing through.
Proxy settings
When we open the settings tab, from the interface display, it mainly includes the following major sections (functions involving https are not included in this section, and will be described in a separate section later):
- Proxy listeners
- Request interception rules
- Response interception rules
- WebSocket interception rules
- Response modification rules
- Match and replace rules
- TLS pass through
- Proxy history logging
- Default Proxy interception state
- Miscellaneous
Request interception rules
Request interception rules message interception refers to the relevant configuration options for intercepting messages sent from the client to the server. The interface is as follows: it
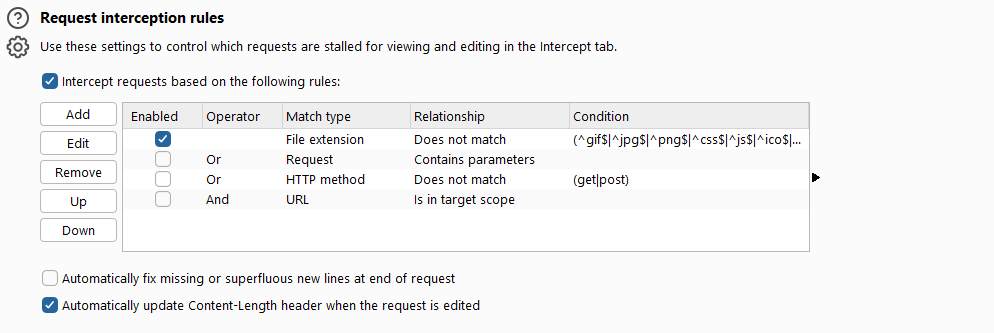
mainly includes three parts: interception rule configuration, automatic repair of error messages, and automatic update of the Content-Length message header.
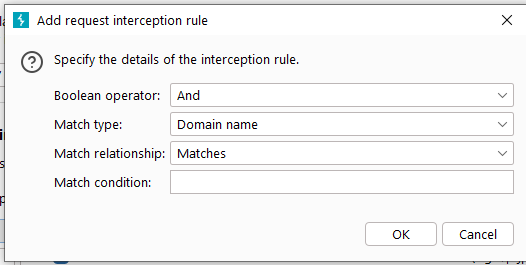
- If the checkbox of intercept request based on the follow rules is selected, all messages that match the request rules in the list below the check button will be intercepted. When intercepting, the rules are filtered from top to bottom. Of course, we can adjust the location and sorting of the rules through the [Up] and [Down] buttons according to our own needs. At the same time, we can click [Add] to add a rule, or we can select a rule and click [Edit] to edit it, or click [Remove] to delete it. When we click the [Add] button, the input dialog box for adding a rule will pop up, as shown below:
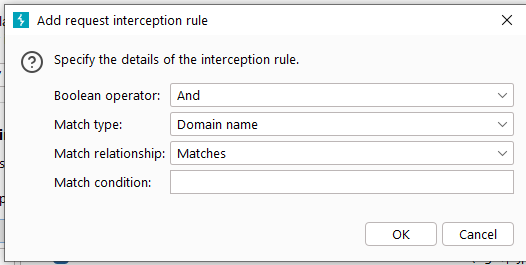
When adding an interception rule, it contains a total of 4 input items. Boolean opertor indicates whether the current rule coexists with other rules in an AND (And) or an OR (Or) manner; Match type indicates the matching type, where the matching type can be based on domain name, IP address, protocol, request method, URL, file Type, parameters, cookies, header or content, status code, MIME type, title of HTML page, etc. Match relationship indicates whether this rule matches or does not match the keyword entered by Match condition. When we enter this information and click the [OK] button, the rules will be saved.
- If the Automatically fix missing checkbox is selected, it means that Burp Suite will automatically fix missing or redundant new lines in a message transmission. For example, if a modified request message loses the blank line at the end of the header, Burp Suite will automatically add it; if the message body of a request contains any new line breaks in the URL-encoded parameters, Burp Suite will Remove. This function has a good protective effect to prevent errors when manually modifying request messages.
- If the Automatically update Content-Length checkbox is selected, when the requested message is modified, the Content-Length message header will also be automatically modified and replaced with the corresponding value.
Response interception rules
Response interception rules , as the name suggests, refers to the relevant configuration items for intercepting messages returned by the server. Its interface is as follows:
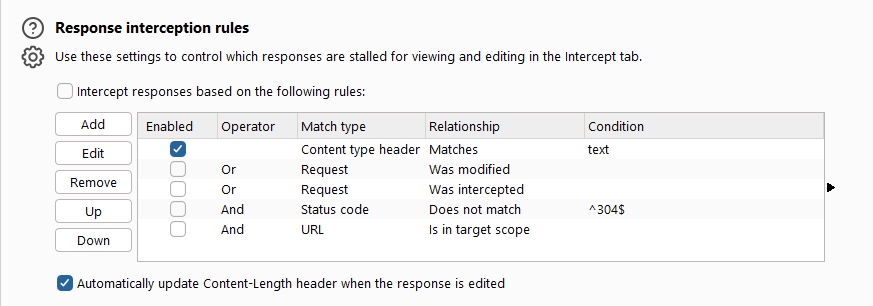
function mainly includes two options: intercept response based on the follow rules and Automatically update Content-Length header when the response edited. Its functions correspond to intercept request based on the follow rules and Automatically update Content-Length header when the request edited in client request message interception. They will not be described in detail. Please refer to the previous section.
Response modification rules
Modifying the message returned by the server refers to automatically modifying the relevant settings of the message returned by the server. The interface is as follows:
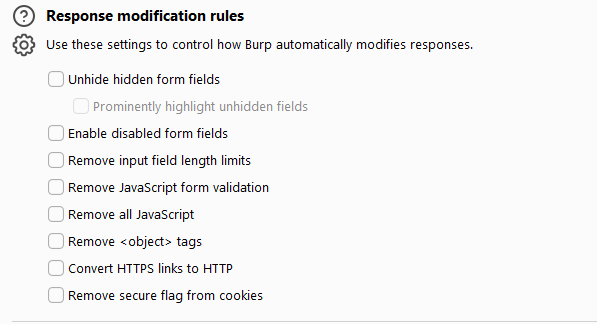
from top to bottom, the functions corresponding to each option are:
- Unhide hidden form fields
- Prominently highlight unhidden fields
- Enable disabled form fields
- Remove input field lenght limits
- Remove JavaScript form validation
- Remove all JavaScript
- Remove
Modifying the settings of optional items through the server return message can facilitate penetration testers to break through the original data limitations during the security assessment process and detect server-side security better and faster.
Match and replace rules
This configuration is mainly used to automatically replace certain values and text in request messages and server-side return messages. It is different from the previous rules in that it supports regular expression language.

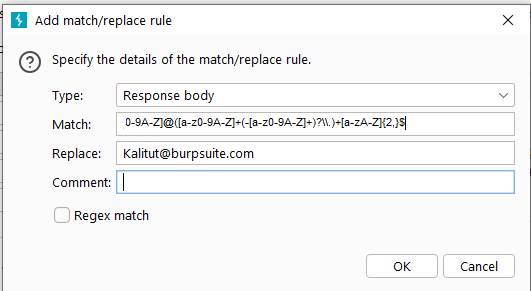
When clicking the [Add] button, we can see in the pop-up matching or replacement rule input dialog box that it can modify the message headers, message bodies, request parameter names, request parameter values, and the first character of the request and return messages. Lines are matched and replaced. For example, when we want to replace the email address in all returned messages with [email protected] , we can refer to the settings in the figure below to fill in the input items and save the verification.
Miscellaneous
Other configuration items are mainly miscellaneous settings. Its interface is as follows:
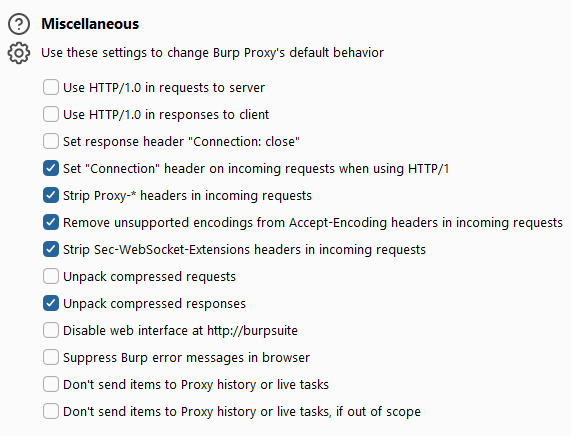
The functions of miscellaneous
- Specify the use of HTTP/1.0 protocol to communicate with the server. This setting is used to force the client to use the HTTP/1.0 protocol to communicate with the server. Generally, the HTTP protocol version used by the client depends on the client browser, but some servers or applications, The HTTP/1.0 protocol must be used, you can check this option at this time
- Specify the use of the HTTP/1.0 protocol to feedback messages to the client. Currently, all browsers support the HTTP/1.0 protocol and the HTTP/1.1 protocol. Forcibly specifying the HTTP/1.0 protocol is mainly used to display certain aspects of the browser’s characteristics, such as blocking. HTTP pipe attack.
- Setting “Connection: close” in the return message header can be used to prevent HTTP pipeline attacks in some cases.
- Remove Proxy-* from the request header. Browser request messages usually carry proxy server-related information. This option is mainly used to clear the proxy server information from the message header.
- Decompress the compressed file in the request message. Some applications will compress the message body when interacting with the server. Check this option and Burp Suite will automatically decompress the message body.
- Decompress the compressed file in the returned message. Most browsers support compressed message bodies. If this option is checked, Burp Suite will automatically decompress the message body compressed by the server.
- Disable http://burp
- Allowing access to the web interface via DNS and hostname allows access to Burp Suite via domain name or hostname
- Do not display Burp Suite errors in the browser. When we use Burp Suite, if an error occurs in Burp Suite itself, it will be displayed in the browser. If this option is checked, such errors will not be displayed in the browser.
- Disable logging to history and site map. This option prevents logging to history and site map. It may be useful in some cases, for example, when authenticating through an upstream server or doing regular expression replacement, in order to reduce memory usage. Consumption, reduce log storage, you can check this option.
- Intercept function start setting
This option is mainly used to configure the effective mode of the intercept function, which is divided into three methods: always effective, always invalid, and restoring settings from the last Burp Suite.
Burp Proxy Http History
The history of Burp Proxy consists of two parts: HTTP history and WebSockets history.
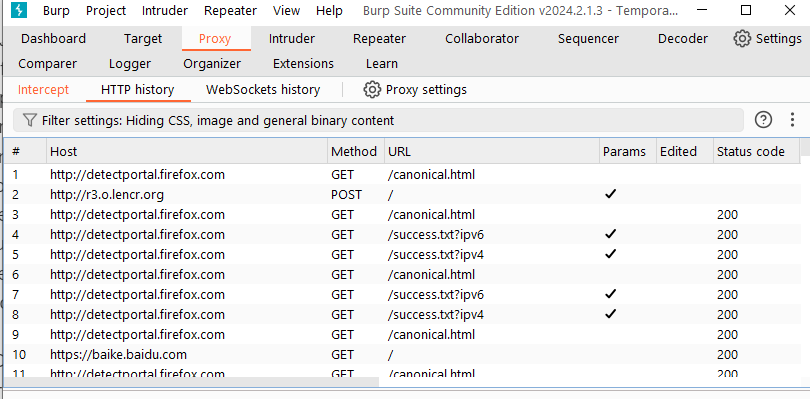
The HTTP history interface consists of three parts: filter, history list, and message details.
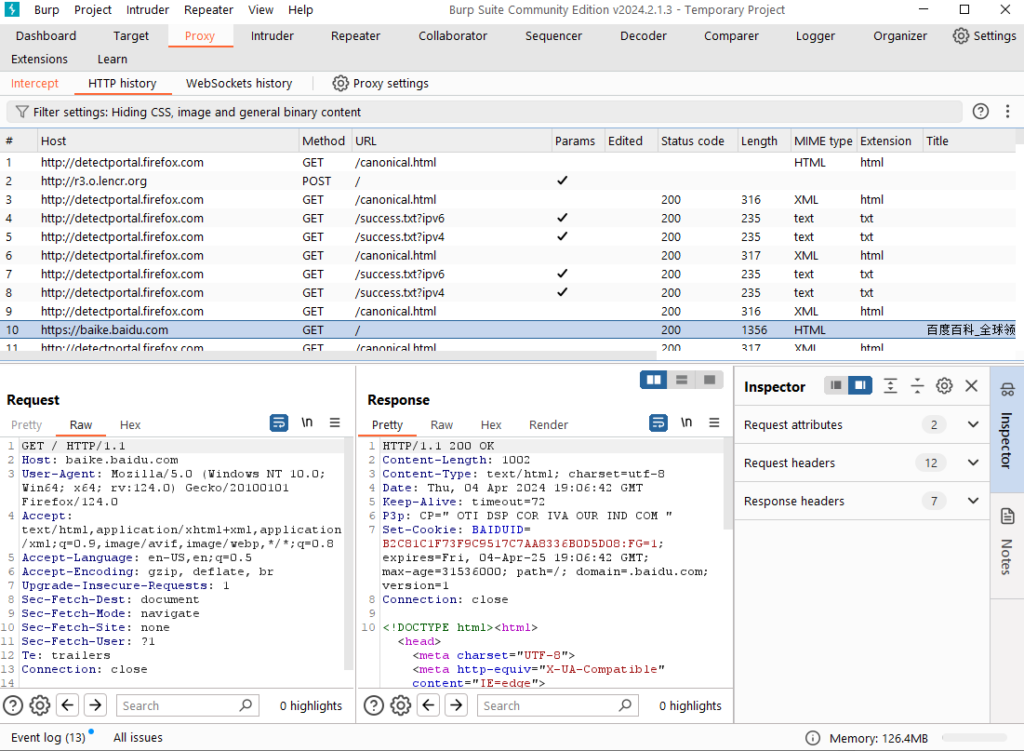
When we click on a historical record, the text details of this message will be displayed in the message details block below. When we double-click on a message, the detailed dialog box of this message will pop up.
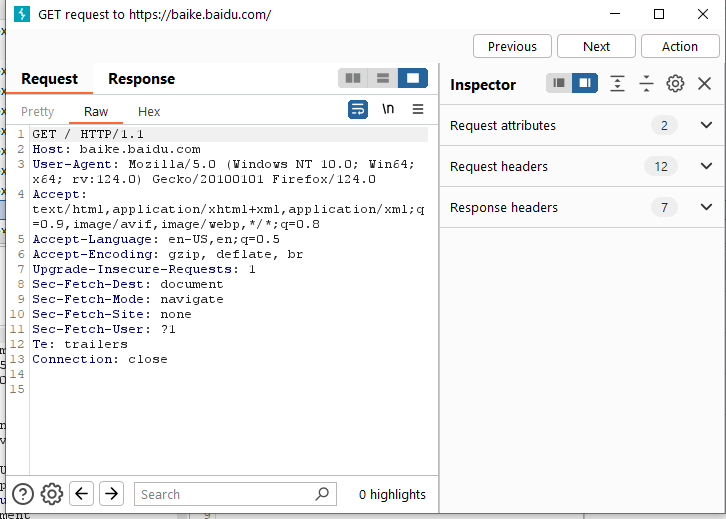
We can click the [Previous] and [Next] buttons on the upper right side of the dialog box to browse the content of the previous or next message, or modify the Raw request parameters, and then perform various [Action] operations.
The historical message list mainly includes information such as request sequence number, request protocol and host name, request method, URL path, request parameters, cookies, whether the user has edited the message, and the HTTP status code returned by the server. Through this information, we can make an accurate analysis of the HTTP message details of an interaction between the client and the server. At the same time, in the details view below, a matching search function based on regular expressions is also provided to better facilitate penetration. Testers look for relevant information in the message body.
When we are doing the security assessment of the product system, a large number of log records will be saved in the HTTP history. For more friendly message management, Burp provides a filter function. When we click the Filter issued by the HTTP history tag, the filter interface will pop up.
According to different filtering conditions, the filter is divided into 7 sub-sections, namely
- Filtering by request type You can choose to show only messages in the current scope, only messages with server-side responses, and only messages with request parameters. When you check “Only show the current scope”, this scope needs to be configured in the Scope option of Burp Target. Please read the relevant sections of Burp Target for details.
- Filtering by MIME type You can control whether to display messages of different file types returned by the server, such as only displaying HTML, CSS, or images. This filter currently supports 8 forms of HTML, Script, XML, CSS, other text, images, Flash, and binary files.
- Filter Burp according to the HTTP status code returned by the server. According to the status code of the server, Burp filters according to 2XX, 3XX, 4XX, and 5XX respectively. For example, if you only want to display the request success message with a return status code of 200, check 2XX.
- Filter according to the search conditions. This filter is based on the message content returned by the server and matches the entered keywords. For specific matching methods, you can choose from 3 methods: 1. Regular expression 2. Case sensitive 3. Negative search For any combination, the first two matching methods are easy to understand. The third matching method means that those matching the keyword will no longer be displayed.
- Filter by file type In the filter message list by file type, there are two options available. One is to only show which ones, and the other is to not show which ones. If you want to only display which file types, fill in the displayed file types in the show only input box. Similarly, if you do not want to display which file types, just fill in the file types that do not need to be displayed in the hide input box.
- Filtering by annotations The function of this filter is to control which messages are displayed in the history list based on the comments or whether they are highlighted when each message is intercepted as a filter condition.
- Filtering by listening port This filter is usually used when we have multiple listening ports in Proxy Listeners to only display messages communicated by a certain listening port. Under normal circumstances, we rarely use it.
Now, let’s take a look at the functions of the WebSockets history options. From the interface, we can see that the functions and options provided by the WebSockets history are a subset of the HTTP history. They are independent only because of the different communication methods used. A dedicated view. Its function is used in the same way as HTTP history, so I won’t go into details here.
Through the study of this section, you have a deeper understanding of the proxy mode of Burp Suite. You know that Burp Proxy, as the middleman, can make various modifications to the request message and response message during the message interception process, and can pass the message Perform further testing on other components of Burp. At the same time, Burp Proxy’s historical log function and various filters allow us to quickly find the data and key information we need during use. These greatly help you improve your work efficiency.
SSL and Proxy Advanced Options
In the previous section, we have learned how to intercept and process HTTP messages through Burp Proxy. In this section, we will continue to learn about the interception and processing of HTTPS protocol messages.
The HTTPS protocol is for data transmission security needs. On the basis of the original HTTP, the Secure Sockets Layer SSL protocol is added to verify the identity of the server through the CA certificate and encrypt communication messages. Based on these characteristics of the HTTPS protocol, when we use Burp Proxy, we need to add more settings to intercept HTTPS messages.
The main contents included in this section are
- Installation of CA certificate
- Uninstalling the CA certificate
- Proxy listening settings
- SSL direct connection and invisible proxy settings
We all know that in the HTTPS communication process, a very important medium is the CA certificate. Let’s take a look at the installation of the CA certificate in Burp Suite.
Installation of CA certificate
Generally speaking, the CA process in Burp Proxy is mainly divided into the following steps (taking Firefox as an example):
- First, based on what you have learned, you have configured the Burp Proxy listening port and IE’s/Firefox proxy server settings. Secondly, the CA certificate of Burp Suite has not been installed in your IE browser.
- Start Burp Suite
- As an administrator, start the Firefox browser, enter http://burpsuite/ in the address bar and press Enter to enter the certificate download page.

- Click the certificate shown in the picture above to download and save it to a local directory.
- Click the menu on the browser and open [settings].
- Search for Certificate
- click view Certificates
- click import
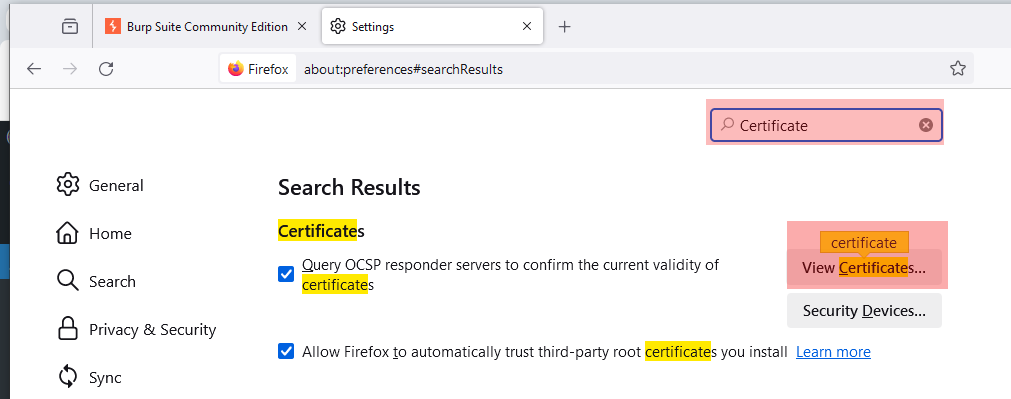
In the certificate dialog box that pops up, click [View Certificate].
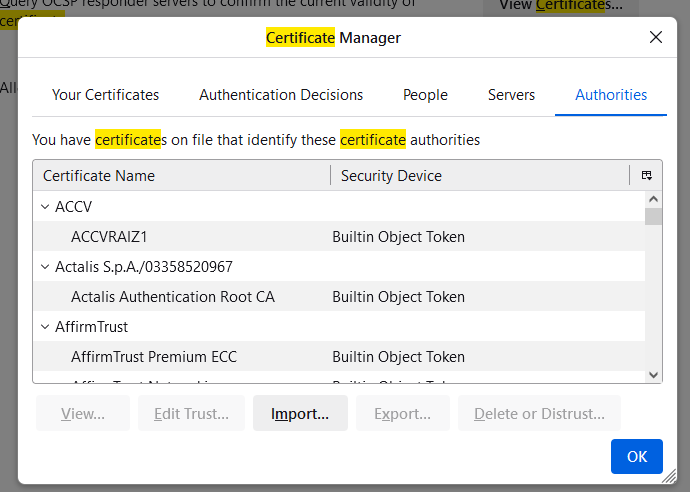
Click [Next], select the certificate file we saved before and proceed to the next step.
In the certificate dialog box that pops up, select [Trust this CA to identify websites.] and click [OK]
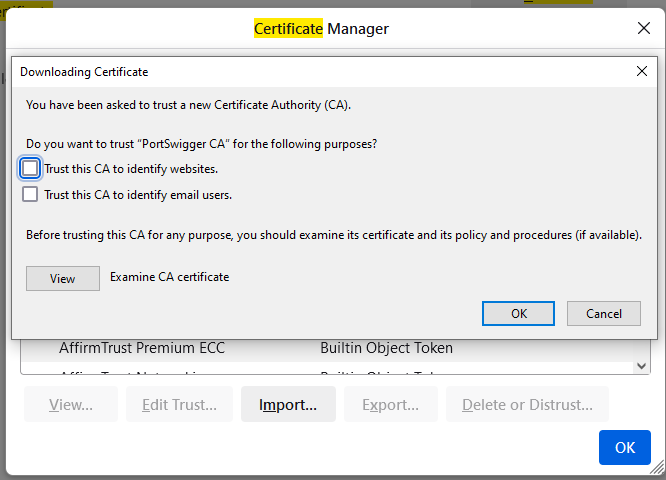
Restart the browser, and the CA certificate configuration is completed.
Proxy listening settings
When we start Burp Suite, it will listen to port 8080 of the local loop address by default. In addition, we can also freely set parameters such as the listening port and address based on our own needs based on the default listening. Especially when we test non-browser applications, we cannot use the browser proxy to intercept the data traffic between the client and the server. In this case, we will use our own Proxy listening settings instead of the default settings. .

When we may need to test different applications at the same time in actual use, we can distinguish different applications by setting different proxy ports. Proxy monitoring provides such function settings. Click the [Add] button in the picture, and the Proxy monitoring settings dialog box will pop up, which contains richer settings to meet our different testing needs.
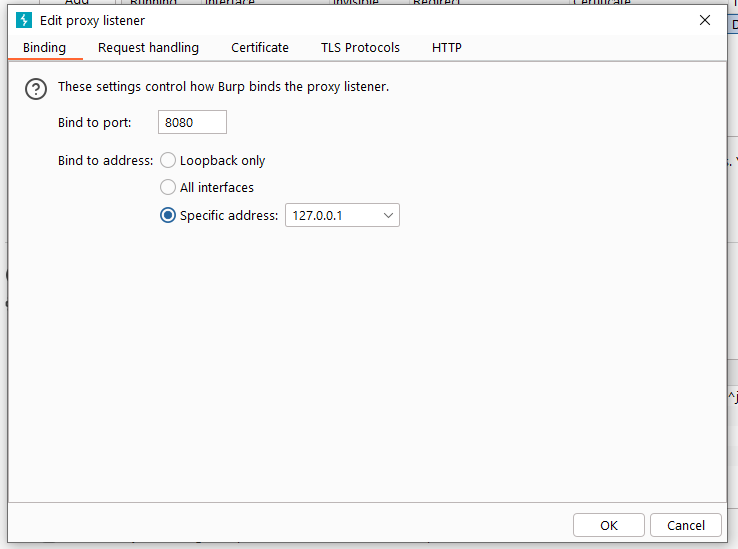
Monitoring settings mainly include 3 functions:
- Port and IP binding settings Binding The bound port port refers to the port monitored by the Burp Proxy proxy service. The bound IP address is divided into three modes: local loop only, all interfaces, and specified addresses. In penetration testing, no matter which one you choose mode, you need to understand that when you select a non-local loop IP address, other computers in the same LAN can also access your listening address.
- Request Handling Request Handling is mainly used to control how the request is processed after receiving a request from the Burp Proxy listening port.
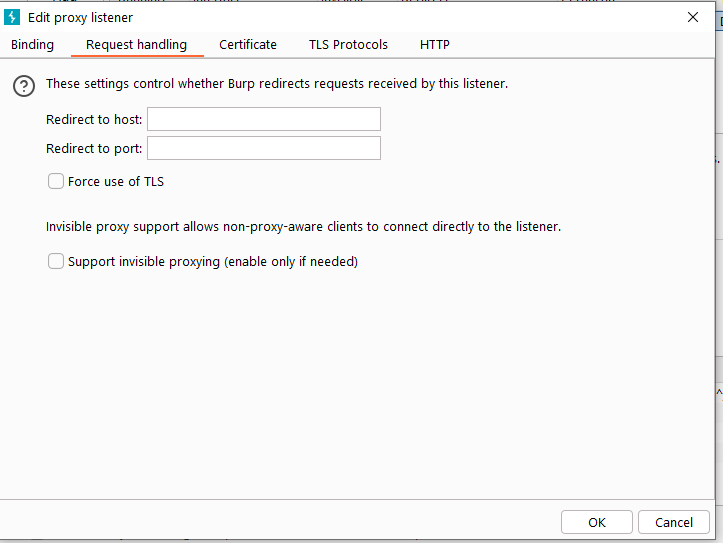
The specific configuration can be divided into four parts:
port forwarding, host name/domain name forwarding, forced use of SSL and invisible proxy. When we configure port forwarding, all requests will be forwarded to this port; if we configure host or domain name forwarding, all requests will be forwarded to the specified host or domain name.
At the same time, we can specify whether messages passing through Burp Proxy are forced to use SSL. If this is set, if the request is http protocol, it will be converted to https protocol after being proxied by Burp proxy.
The invisible proxy is mainly used to test rich client applications or non-browser proxy applications. When we set it up and access these applications, we will directly connect to the listening port of Burp Proxy through a non-proxy method.
- SSL Certificate These settings control the server SSL certificate presented to SSL clients. Some SSL issues that arise when using intercepting proxies can be solved: 1. You can eliminate your browser’s SSL alerts and require establishing SSL exceptions. Where web pages load SSL-protected items from other domains, you can ensure that these are loaded correctly into the browser without the need to manually accept proxy SSL certificates for each domain. 2. You can work with thick client applications that refuse invalid SSL certificates to connect to the server. It has the following options to set:
- Use a self-signed certificate – A simple self-signed SSL certificate presented to your browser will always result in an SSL warning.
- Generate CA-signed per-host certificates – This is the default option. Upon installation, Burp creates a unique self-signed Certificate Authority (CA) certificate and uses it on this computer. When your browser issues an SSL connection to a specified host, Burp generates an SSL certificate for that host, signed by the CA certificate. You can install Burp’s CA certificate as a trusted root in the browser, allowing each host certificate to be accepted without any alerts.
- Generate a CA-signed certificate with a specific hostname – is similar to the previous option; the difference is that Burp will generate a host certificate to use with every SSL connection, using The specified hostname.
- Use a custom certificate – This option loads a specific certificate (in PKCS#12 format) for presentation to the browser. Clients should use this option if the application uses one that requires a specific server certificate (for example, with a given serial number or certificate chain).
TLS pass through and invisible proxy
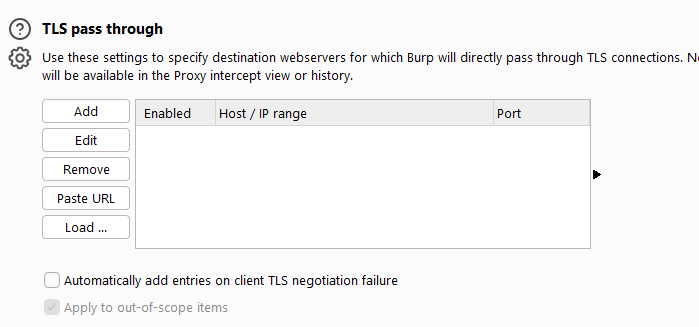
The setting of TLS direct connection is mainly used to connect the specified destination server directly through TLS, and any details of requests or responses through these connections will be visible in the Burp proxy interception view or history log. Passing through an TLS connection can be useful in situations other than simply eliminating TLS errors on the client machine.
For example, in a mobile application that implements an TLS certificate. If the application accesses multiple domains, or uses a mix of HTTP and HTTPS connections, then the issue of connecting to a specific host via TLS will still enable you to communicate in the normal way using Burp’s other means. If the option to automatically add clients on TLS negotiation failures is enabled, when a client fails TLS protocol detection (for example, due to not recognizing Burp’s CA certificate), the associated server will be automatically added to the TLS pass-through list. The setting interface is as shown below:
Sometimes, when blocking rich client software, we usually need to use a stealth proxy. Rich client software usually refers to client software that runs outside the browser, which means that it does not have the HTTP proxy attribute itself. While it is communicating over the network, the client will not be aware of or communicated by the proxy.
In Burp, we can use invisible proxy to proxy or intercept the communication content to analyze the communication request and response messages. Using a stealth proxy usually requires the following settings (take https://example.com as an example):
Configure the hosts file. The directory location under the Windows operating system is

add the following lines:
After the first step of setting is completed, we need to add a new listener to run on the default port 80 of HTTP. If the communication traffic uses the HTTPS protocol, the port is 443.
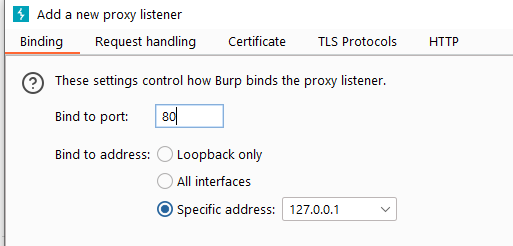
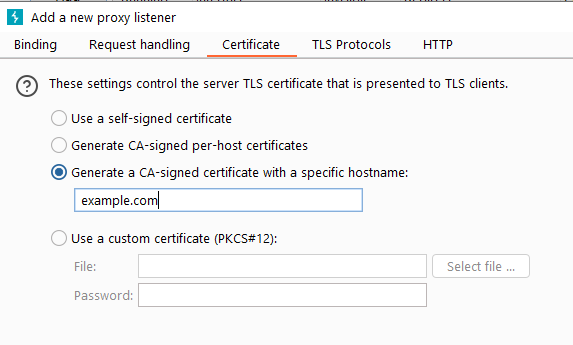
If the communication method is HTTPS protocol, we need a CA certificate with a specified domain name.
Next, we need to forward the traffic intercepted by Burp to the server of the original request. This needs to be set in Options->Connections->Hostname Resolution. Because we have told the operating system that the listening address of example.com is on 127.0.0.1, we must tell Burp to forward the example.com traffic to the real server.
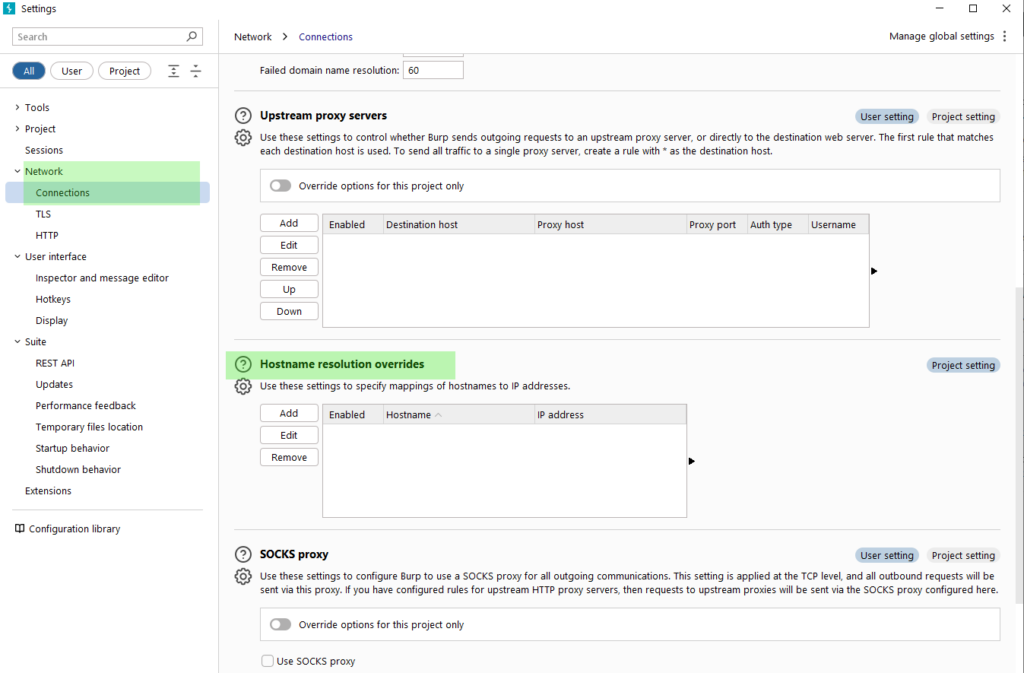
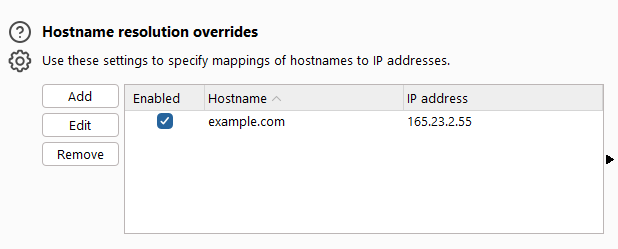
With this configuration, we can trick the rich client software into sending traffic to the port that Burp listens on, and then Burp forwards the traffic to the real server.
Overall, Burp Suite Proxy is a comprehensive tool for conducting security assessments of web applications, helping users identify and remediate vulnerabilities before they can be exploited by malicious actors. Its versatility, ease of use, and extensive feature set make it a favorite among security professionals and ethical hackers alike.
