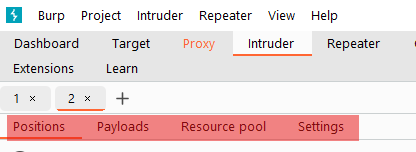
Burp Suite Intruder is a module within the Burp Suite toolkit that specializes in automated attacks against web applications. It’s the go-to tool for performing brute force attacks, fuzzing, and other types of automated testing to identify vulnerabilities and weaknesses in web applications.

This tool actually gives you attack requests, for example; If you have more than 20 payloads that you want to inject, instead of sending these payloads to the website one by one, Burp Intruder automatically sends these payloads to the web applications. And the payloads you send can actually identify security vulnerabilities in web applications.
Subtabs in Burp Suite Intruder
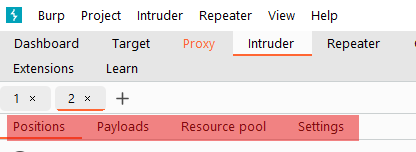
- Positions: This sub-tab allows us to select the attack type and configure where we want the payload to be inserted in the request template.
- Payloads: This subtab allows us to choose to insert the payload (payload) into each position we defined in the previous subtab. For example, we can choose to load items from the dictionary as the payload. As for how to insert the payload into the request template, depending on the attack type we selected in the Positions subtab; there are many payload types we can choose from (from a simple dictionary to a regular expression based on the server response), and the Payloads subtab also Allows us to change the behavior of the attacker (Intruder) and the payload. For example, we can define some preprocessing rules to apply to each payload. These preprocessing rules include – adding prefixes or suffixes, matching and replacing, or when If the payload matches a defined regular expression, it will be skipped, etc.
- Resource Pool: This sub-tab mainly allows us to allocate resources between tasks, which is not particularly useful for Burp Community Edition; Burp Suite Professional Edition allows us to run various types of automated tasks in the Burp background, and Resource Pool is Where we want to manually allocate available memory and computer processing power between these automated tasks and Intruder; if we can’t access the background automated tasks, there is little point in using the Resource Pool (this article uses the Burp Community Edition, so it does not No access to background automation tasks).
- Settings: Burp Suite Intruder allows us to configure attack behavior in the Settings subtab. The settings here mainly apply to how Burp handles the results and how Burp handles the attack itself; for example, we can choose to mark requests that contain specified text fragments, or define how Burp handles them. Redirect (3xx) response.
Tips: Fuzz testing means that we take a set of data and apply it to a parameter to test the target function or see if something exists; for example, we can choose to perform “endpoint fuzz testing” in a web application, which will Add each item in the dictionary to the end of the request message and send it multiple times and see how the web server responds
(for example http://MACHINE_IP/WORD_GOES_HERE).
Here’s what Burp Suite Intruder brings to the table:
- Customizable Attacks: With Burp Suite Intruder, users can customize and fine-tune their attacks to target specific parameters, headers, or parts of HTTP requests. This includes the ability to modify payloads, payloads positions, and attack configurations.
- Brute Force Attacks: Intruder excels at conducting brute force attacks, allowing users to systematically test for weak or guessable credentials, session tokens, and other sensitive information.
- Fuzzing: Users can leverage Burp Suite Intruder to perform fuzzing attacks, where variations of input data are systematically injected into parameters and fields to uncover unexpected behavior, vulnerabilities, or weaknesses.
- Cluster Bomb Attacks: Intruder supports cluster bomb attacks, where multiple payloads are tested against each position in the payload set. This allows for more comprehensive testing of different payload combinations.
- Response Handling: Intruder provides powerful response handling capabilities, allowing users to define custom rules for identifying and analyzing interesting responses, such as error messages, status codes, or application behavior.
A simple example of using Burp Suite Intruder to conduct a brute force attack against a login page:
- Configure Target: First, we need to configure Burp Suite to intercept traffic between our browser and the target login page. Set up Burp Suite’s proxy to intercept HTTP/S traffic and configure your browser to use Burp Suite as the proxy.
- Capture Login Request: Navigate to the login page of the target application and enter some arbitrary credentials. Ensure that Burp Suite intercepts the login request.
- Send to Intruder: Once the login request is intercepted, right-click on it in the Burp Suite Proxy history and select “Send to Intruder.”
- Configure Intruder: In Burp Suite Intruder, navigate to the “Positions” tab and specify the parameters you want to attack (e.g., username and password fields). You can use placeholders like § to mark positions for attack.
- Payloads: Go to the “Payloads” tab and configure your payload options. For a brute force attack, you might want to use a predefined wordlist or create a custom payload set with various combinations of usernames and passwords.
- Attack: After configuring payloads, navigate to the “Options” tab to configure any additional attack settings, such as request timing or attack concurrency. Once ready, click the “Start Attack” button to begin the brute force attack.
- Analyze Results: Burp Suite Intruder will automatically send the attack requests with different payloads and analyze the responses. Pay attention to any responses indicating successful login attempts or authentication failures.
- Exploit: If successful credentials are found, you can use them to gain unauthorized access to the target application, allowing you to further exploit vulnerabilities or access sensitive information.
How to use Burp Suite Intruder
Intruder is an extremely powerful automated testing tool in Burp Suite. It is usually used by system security penetration testers in various task testing scenarios. The main contents we learn here is:
- Intruder usage scenarios and operation steps
- Payload type and processing
- Payload location and attack type
- Options
- Intruder attack and result analysis
Make sure you read How to use Burp Suite proxy
Burp Suite Intruder usage scenarios
During the penetration testing process, we often use Burp Intruder. Its working principle is: Intruder modifies various request parameters based on the original request data to obtain different request responses. In each request, Intruder usually carries one or more effective attack loads (Payload), replays the attack at different locations, and obtains the required characteristic data through comparison and analysis of the response data. Burp Intruder is usually used in the following scenarios:
- Identifier enumeration Web applications often use identifiers to reference data information such as users, accounts, assets, etc. For example, username, file ID and account number.
- Extracting Useful Data In some scenarios, instead of simply identifying valid identifiers, you need to extract some other data via simple identifiers. For example, you want to obtain the standard nicknames and ages of all users in their personal space through the user’s personal space ID.
- Fuzz testing many input-based vulnerabilities such as SQL injection, cross-site scripting and file path traversal can detect applications by submitting various test strings through request parameters and analyzing error messages and other anomalies. Due to the size and complexity of the application, performing this testing manually is a time-consuming and tedious process. In such a scenario, you can set up the payload to automatically fuzz the web application through Burp Intruder.
Generally speaking, using Burp Intruder for testing mainly follows the following steps:
- Confirm that Burp Suite is installed correctly and starts normally, and the browser proxy settings are completed.
- Enter the Burp Proxy tab and turn off the proxy interception function.
- Go to the History subtab, find the request logs that may have problems, and send them to Intruder through the right-click menu.
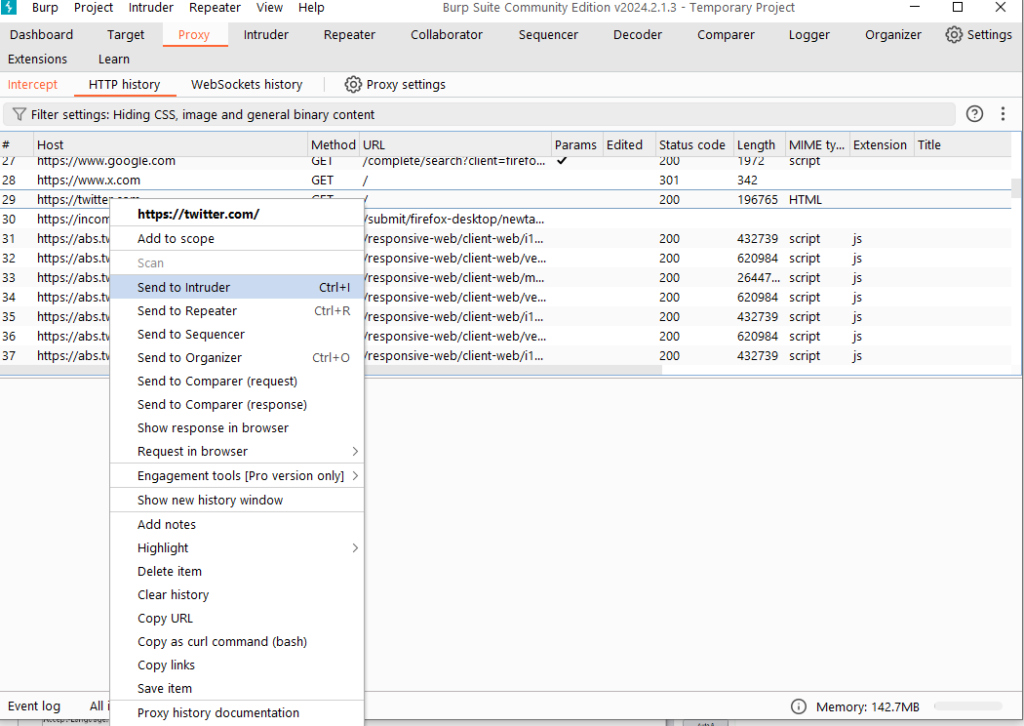
Go to the Intruder tab and open the Target and Positions sub-tabs. At this time, you will see the request message sent in the previous step.
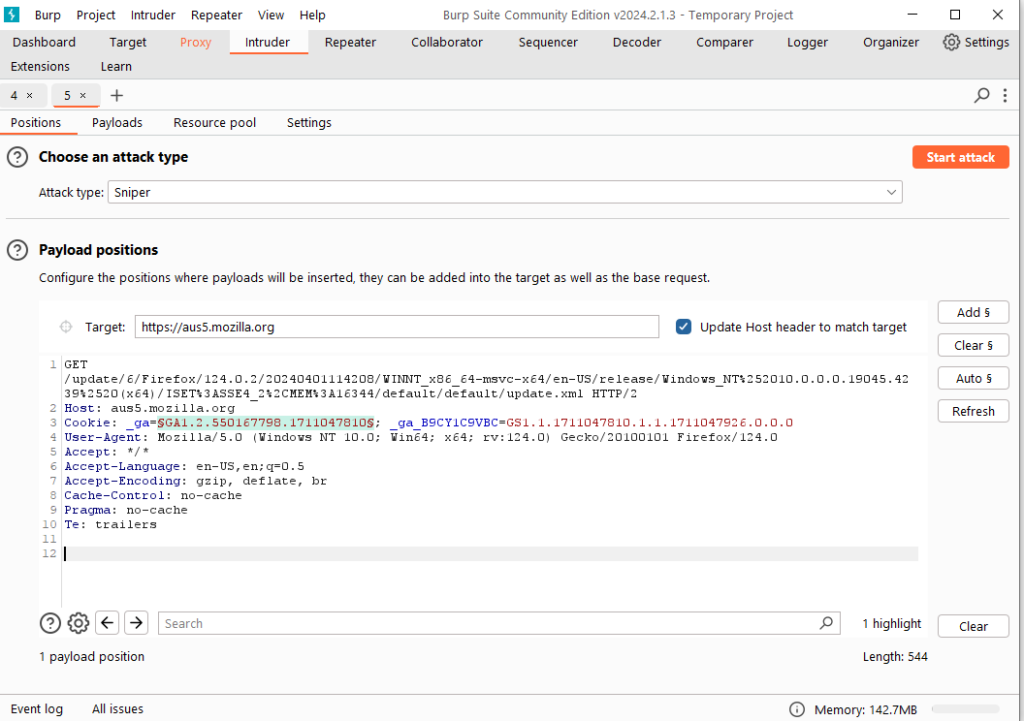
Because we understand that the basis of the Burp Intruder attack is to set a certain number of attack payloads at the location specified by the original request information just sent, and use the Payload to send a request to obtain the response message.
By default, Burp Intruder will set the request parameters and cookie parameters to Payload position, and add $ to the prefix, as shown in the red position in the figure above. When sending a request, the parameter identified by $ will be replaced with Payload.
On the right side of the Position interface, there are four buttons [Add $], [Clear $], [Auto $], and [Refresh $], which are used to control whether the parameters in the request message are replaced by the Payload during the sending process. If you do not want is replaced, select this parameter and click [Clear $] to remove the parameter prefix $.
When we open the Payload sub-tab, select Payload generation or selection strategy. By default, “Simple list” is selected. Of course, you can also select other Payload types through the drop-down or add them manually.
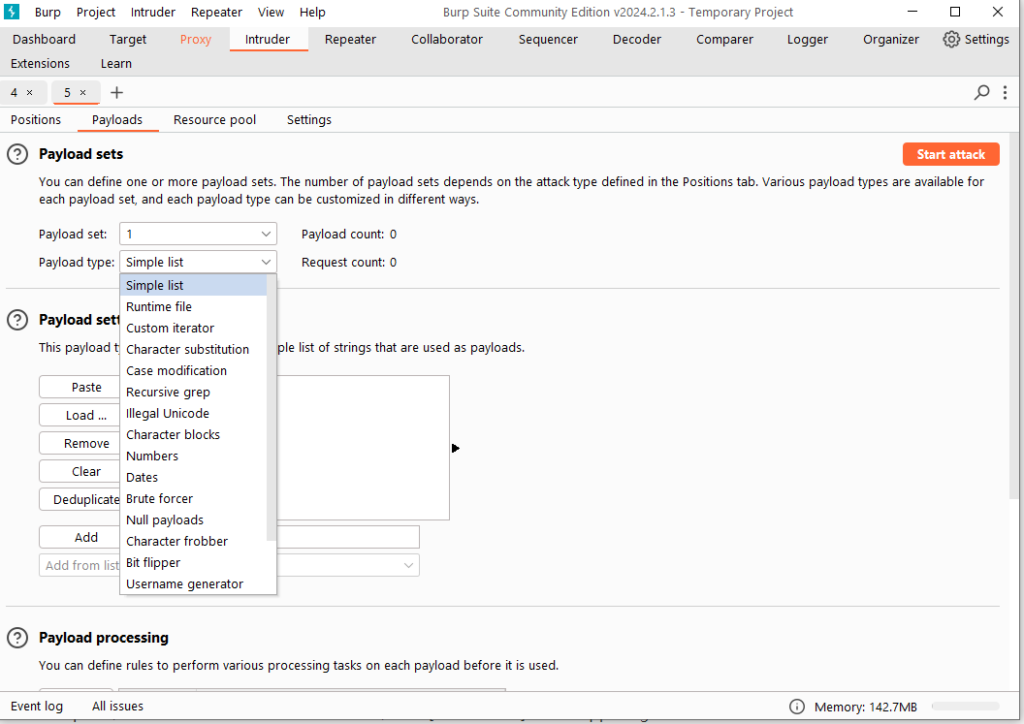
- At this point, we return to the Position interface, click [Start attack] in the upper right corner of the interface to launch the attack.
- Burp will automatically open a new interface, including the attack execution status, HTTP status code, length and other result information.

We can select one of the communication information to view the details of the request message and response message.
- Many times, in order to better indicate whether the response message contains the information we need, we usually configure the Options options before launching an attack. The most commonly used one is regular expression matching (Grep-Match).
- Alternatively, we can use the filters in the Results tab to filter the result information.
- At the same time, we can specify the columns displayed in the results tab, and we can set them in the menu Columns.
- Finally, select the column we need and click the [Save] button to save the attack results.
The above are the steps that Burp Suite Intruder completes once. In actual use, there will be more or less changes according to each person’s usage habits. The more detailed configuration involved in each link will be explained in more detail in the following chapters.
Payload type and processing
In the Payload tab of Burp Intruder, there are settings options for the Payload collection, including 18 commonly used Payload types.
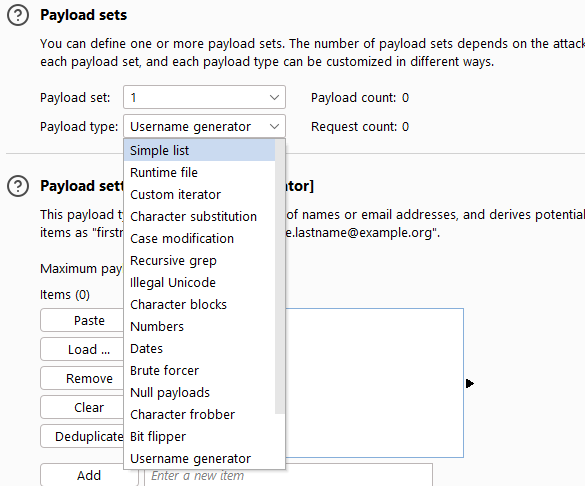
- Simple list – the simplest payload type. By configuring a string list as the payload, you can also add the string list manually or load the string list from a file.
- On this operation interface, in the selected Payload list, a set of simple Payload lists have been predefined, including XSS scripts, CGI scripts, SQL injection scripts, numbers, uppercase letters, lowercase letters, user names, and passwords. , field names of form fields, IIS file names and directory names, etc., which greatly facilitates the use of penetration testers.
- Runtime file – specifies the f
- When we specify the Payload type used in position 1 of the Payload set as Runtime file, the Payload Options below will automatically change to a file selection button and input box. When we click [select file] When selecting a file, the dialog box shown in the picture will pop up, select the specified Payload file. When running, Burp Intruder will read each line of the file as a payload.
- Custom iterator – This is a powerful Payload. It has a total of 8 placeholders. Each placeholder can specify the Payload type of a simple list, and then according to the number of placeholders, it is matched with each simple list. Cartesian product is performed on the Payload to generate the final Payload list.
- Character substitution – As the name suggests, this type of payload generates a new payload by replacing a predefined string. For example, if the predefined string is ABCD and is set according to the replacement rules, the values of AB will be enumerated and a new payload will be generated.
- Case modification—Replace predefined strings according to case rules. For example, if the predefined string is Peter Wiener, then a new Payload will be generated according to the settings you set.
- Recursive grep – This payload type is mainly used in scenarios where valid data is extracted from the server. It is necessary to first extract the data from the server’s response as the payload, and then replace the position of the payload to carry out the attack. Its data comes from the original response message. Based on the original response, Grep rules are configured in the Payload’s Options (Options), and then the data is extracted according to grep before the attack can occur.
- Illegal Unicode – Replace the characters themselves with the specified illegal Unicode encoding in payloads, and generate one or more payloads from these payload lists. This payload can be useful when trying to circumvent input validation based on pattern matching, for example when defending against directory traversal attacks by matching the expected encoding of ../ and .. sequences.
- Character blocks– This type of payload refers to using a given input string to generate character blocks of a specified size according to the specified settings, in the form of generating a string of a specified length. It usually uses bounds testing or buffer overflow.
- Number type– This type of payload refers to generating a series of numbers as payload according to the configuration.
- Date type (Dates) – This type of payload generates a series of dates based on configuration.
- Brute forcer – This type of payload generates a payload containing all permutations of a specified character set with a specific length. It is usually used to generate enumerated dictionaries.
- Null payloads – The payload generated by this payload type has an empty string value. During an attack, the same request needs to be executed repeatedly. This payload is very useful in scenarios where the original request is not modified in any way. It can be used for various attacks, such as cookie sequence analysis, application layer DoS, or keep-alive session tokens used in other intermittent experiments.
- Character frobber– The generation rule of this type of payload is: modify the value of each character position of the specified string in sequence, and each time the ASCII code of the character is incremented on the original character. It is typically used in testing systems that use complex session token components to track session state. When you modify the value of a single character in the session token and your session is still processed, it is likely that the token actually Your session is not being used to track it.
- Bit flipper – The generation rule of this type of Payload is: modify the preset Payload original value in sequence according to the bits.
- Username generator – This type of payload is mainly used for automatic generation of usernames and email accounts.
- ECB block shuffler – This type of payload is a payload generator based on the ECB encryption mode.
- You can click to read this article to learn more about the encryption mode. The principle is that each group of 64-bit data in the ECB encryption mode is independent of each other. By changing the position of the grouped data, it is possible to verify whether the application is vulnerable to attacks.
- Extension generated – This type of payload is based on the Burp plug-in to generate the payload value. Therefore, the Burp Payload generation plug-in must be installed and configured before use, and an Intruder payload generator must be registered in the plug-in for calling here.
- Copy other payload – This type of payload copies parameters from other locations to the payload location as a new payload value. It is usually suitable for request messages with multiple parameters.
- Its usage scenarios may be: 1. Two different parameters need to use the same value. For example, when a user registers, the password setting will be entered twice, and the value is exactly the same. This Payload type can be used. 2. In a request, the value of one parameter is a value generated by a script on the front end based on the value of another parameter. This Payload type can be used. Its setting interface and parameters are relatively simple, as shown in the figure below, where the index value of the Payload position points to the value of the Payload.
Payload location and attack type
First, let’s take a look at the setting interface of the Payload positions tab:
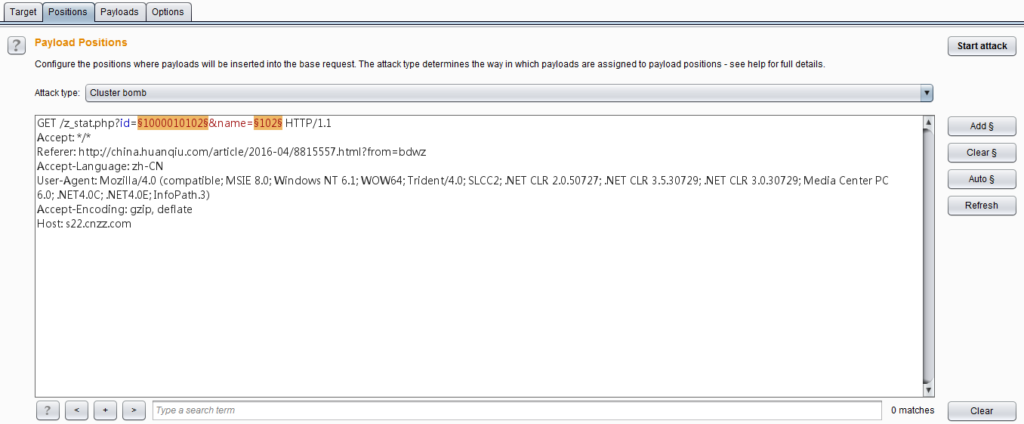
From the picture above, we can see that the setting of the Payload position is based on the original message of the HTTP request as the motherboard, using a pair of § characters to mark the Payload position, these two numbers directly contain the text content of the motherboard.
When we have marked a payload in a special position in the request message, when launching the attack, Burp Intruder will place a payload value in the given special position, replacing the entire position marked with the § symbol. As shown in the figure above, the § symbols after the parameter id indicate Payload position 1, and the § symbols after name indicate Payload position 2.
This value corresponds to the value of the Payload set in the Payload setting. We can edit the Payload location in the middle of the message editor, which is mainly controlled by the four buttons on the right.
- [Add §]——Add a Payload position mark at the current cursor position
- [Clear §]——Clear all Payload location flags or clear the selected Payload location flags
- [Auto §] – Make a guess about the parameters that may need to be marked in the message content. The mark is the Payload location. After the automatic setting, manual selection is made to determine which locations need to be passed in the Payload. Currently, Burp supports automatic selection of parameter types: 1. URL request parameters 2. Body parameters 3. Cookie parameters 4. Composite parameter attributes, such as file names when uploading files 5. XML data 6. JSON data Although Burp supports it by default These types of parameters are automatically marked as payload locations, but if they are for node attribute values like XML or JSON, they still need to be specified manually.
- [Refresh]——Refresh the colored part of the message content.
- [Clear]——Clear all contents in the message editor.
Above the message editor, there is a drop-down selection box, Attack Type. Burp Intruder supports multiple methods of simulated attacks using payload. Currently, there are only the following 4 types.
Sniper mode (Sniper) – It uses a set of Payload sets to replace the text marked by § in the Payload position (only one Payload position can be used in an attack) (and the text that is not marked by § will not be affected). The server makes a request, usually used to test whether there are vulnerabilities in the request parameters.
Battering ram mode (Battering ram) – It uses a single Payload set, replaces the text marked with § in the Payload position (and the text that is not marked with § will not be affected), makes a request to the server, and sniper The difference between the modes is that if there are multiple parameters and they are all Payload position flags, the Payload value used is the same, while the sniper mode can only use one Payload position flag.
Pitchfork mode (Pitchfork) – It can use multiple sets of payload sets to traverse all payloads at each different payload mark position (up to 20). For example, if there are two Payload flag positions, the first Payload value is A and B, and the second Payload value is C and D, then when an attack is launched, a total of two attacks will be launched, and the Payload used in the first time will be They are A and C respectively, and the payloads used for the second time are B and D respectively.
Cluster bomb mode (Cluster bomb) It can use multiple sets of payload sets to traverse all payloads in sequence at each different payload mark position (up to 20). The main difference from Pitchfork mode is that the payload data executed is the product of payload groups. For example, if there are two Payload flag positions, the first Payload value is A and B, and the second Payload value is C and D, then when an attack is launched, a total of four attacks will be launched, and the first Payload used will be They are A and C respectively, the payloads used for the second time are A and D respectively, the payloads used for the third time are B and C respectively, and the payloads used for the fourth time are B and D respectively.
Burp Suite Intruder Options
Optional settings mainly include request header settings, request engine settings, attack result settings, grep match, grep extract, grep payloads, and redirection settings. During use, you can make settings before attacking or adjust these options during the attack.
Request Headers – This setting is mainly used to control the header information of the request message. It consists of two options: Update Content-Length header and Set Connection: close . If the Update Content-Length header is selected, Burp Intruder adds or updates the Content-Length header in each request to the correct value for the length of the HTTP body of the request.
This feature is typically used for attacks that insert a variable-length payload into the body of a templated HTTP request. If the correct value is not specified, the target server may return an error and may respond with an incomplete request. Or it might wait indefinitely for a request to continue receiving data. Set Connection: close If selected, it means Burp Intruder adds or updates a connection header with a value of “close” in each request message, which will execute more quickly.
In some cases (when the server itself does not return a valid Content-Length or Transfer-Encoding header), checking this option may allow attacks.

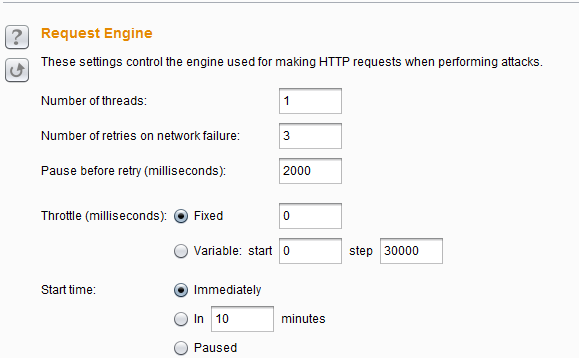
Request Engine Settings (Request Engine) – This setting is mainly used to control Burp Intruder attacks. Proper use of these parameters can complete the attack process more effectively.
It has the following parameters: Number of threads , Number of retries on network failure , number of retries when the network fails, Pause before retry, Pause interval before retry (milliseconds), Throttle between requests request delay (milliseconds), Start time, how long after launching the attack to start execution.
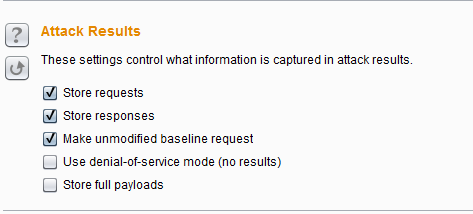
Attack Results Settings (Attack Results) – This setting is mainly used to control what information is captured from the attack results. Its parameters are: Store requests/responses to save request/response messages,
Make unmodified baseline to record the message content of the request motherboard, Use denial-of-service mode to use Dos mode, tore full payloads to store all Payload values.
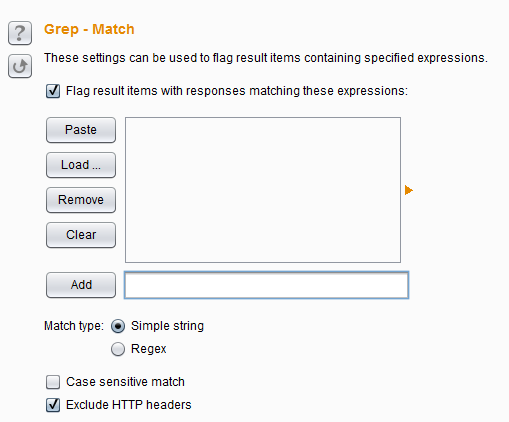
Grep Match – This setting is mainly used to extract the result items from the response message. If they match, they are marked in a new column added in the attack results to facilitate sorting and data extraction. For example, in password guessing attacks, scanning messages such as “Password Incorrect” or “Login Successful” can find successful logins; in testing SQL injection vulnerabilities, scanning messages containing “ODBC”, “Error”, etc. can identify vulnerable parameters.
Its options include Match type to indicate matching expressions or simple strings, Case sensitive match to indicate whether it is case sensitive, and Exclude HTTP headers to include HTTP headers when matching.
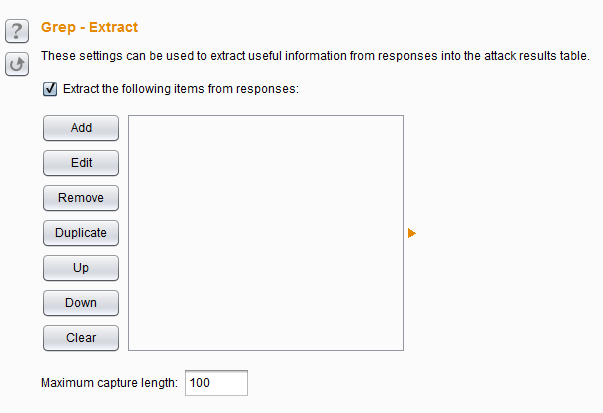
Grep Extract – These settings can be used to extract useful information from response messages. For each item configured in the list, Burp increments a new result column containing the text extracted from that item. You can then sort the data extracted by this column (by clicking the column header).
This option is useful from application data mining and can support a wide range of attacks. For example, if you are looping through a series of document IDs, you can extract the page titles of each document looking for interesting items. If you find a feature that returns user details for other applications, you can duplicate and retrieve the relevant user by user ID looking for administrative accounts and even passwords.
If the “Forgot Password” function takes a username as a parameter and returns a user-configured password prompt, you can run through a list of common usernames and harvest all relevant password prompts, then visually browse the list looking for easily guessed ones. to the password.
Grep Payloads – These settings can be used to extract whether the response message contains the Payload value. For example, if you want to verify whether the reflective XSS script is successful, you can set this item. When this is set, a new column will be added in the response result list based on the number of Payload groups to display matching results.
You can sort and search the result set by clicking on the column title.
The setting items are similar to the previous one. It should be noted that Match against pre-URL-encoded payloads . If you configure URL-encode payloads when requesting a message, this means matching the Payload value before encoding, not after transcoding. value.

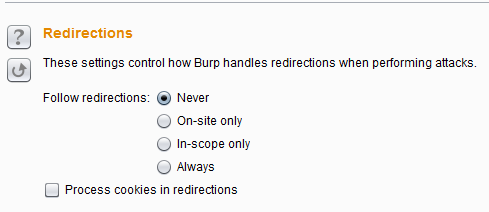
Redirections – These settings are mainly used to control how Burp handles redirections when executing attacks. In actual use, redirections must be followed to achieve the purpose of your attack.
For example, in a password guessing attack, the result of each attempt may be that a wrong password will redirect the response to an error message prompt page, and if the password is correct, it will redirect to the home page of the user center. But setting up redirects may also encounter other problems.
For example, in some cases, it may be necessary for the application to store the results of the initial request in your session and retrieve this value when providing the redirect response. Only use a single thread attack when redirecting. You may also encounter that when you set up a redirect, the application response will be redirected to the logout page. At this time, following the redirect may cause your session to be terminated. Because the setting options are basically the same as the redirection settings of other modules, they will not be repeated here.
Intruder attack and result analysis
There are usually two ways to launch an attack. One is that you set Target, Positions, Payloads and Options in Burp Intruder, and then click [Start attack] to start the attack; the other is that you open a previously saved pre-attack file, and then click [Start attack] to start the attack. No matter which method of attack is launched, Burp will pop up the attack result interface. During the attack, you can also modify the attack configuration or perform other operations. The attack result interface is shown in the figure below:
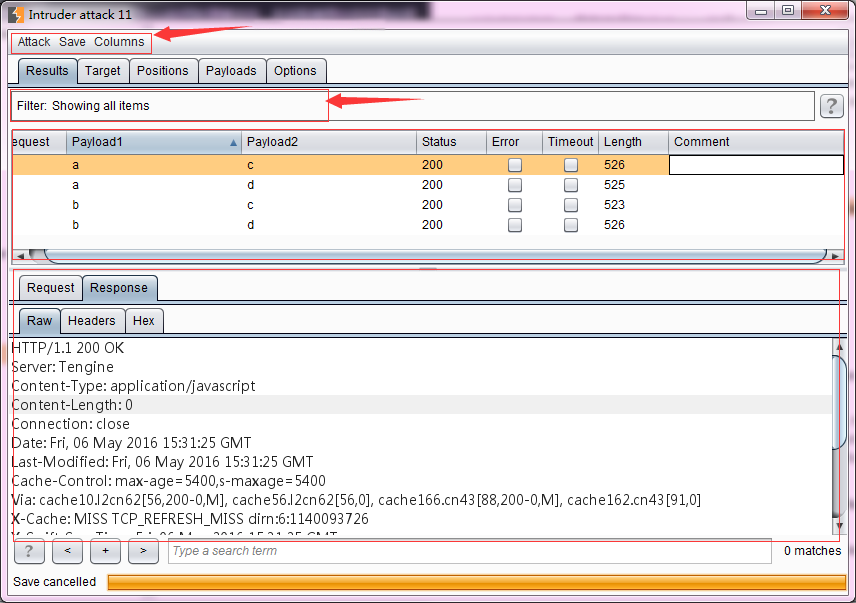
As we can see from the picture above, its interface mainly consists of four parts: menu area, filter, Payload execution result message recording area, and request/response message area.
- The menu area includes Attack menu, Save menu, and Columns menu. The Attack menu is mainly used to control attack behavior. You can pause the attack ( pause ), resume the attack ( resume ), and attack again ( repeat ). The Save menu is mainly used to save various data of the attack. Attack saves a copy of the current attack, and you can attack again from this file next time. The Results table saves the result list of the attack, which is equivalent to the data in the Payload execution result message recording area in the figure. Of course You can select rows and columns to save and export only the data you need; Server responses save all server response messages; Attack configuration saves the current attack configuration information. The Columns menu is mainly used to control the display columns of the message recording area. If a column is selected, it will be displayed in the Payload execution result message record area, otherwise it will not be displayed.
- Filter – You can filter by query conditions, server response status code, and information annotated in the Payload execution result message record area.
- The Payload execution result message recording area, also known as the Results Table, records all the information requested and responded when the Payload is executed. The columns it contains are: Request sequence – displays the sequence number of the request. If the record is not modified, it is configured. Requesting the message motherboard will be logged first. Payload location – Payload value will be recorded in sniper mode – if there are multiple Payloads, there will be multiple columns HTTP status code – server response status code Request time – the time to execute the attack Response time – start receiving the response Time in milliseconds. Response Completion Time – The time when the response is completed, in milliseconds. Network error – whether a network problem occurs when the payload is executed. Timeout – whether a network timeout occurs while waiting for a response. Length – the length of the response message . Cookie – any cookie information. Grep – if Grep matching and Grep extraction are set. , Grep Payload, there will be multiple columns showing matching information redirection – if redirection is configured, comments – the comment information of the message record will be displayed
- Request/response message area – refer to the relevant description in the Proxy chapter.
In the analysis of the attack results, you can reorder the contents of the table by clicking on any column header (clicking on the header cycles through ascending sorted, descending sorted and unsorted). A key part of effectively interpreting the results of an attack is locating valid or successful server responses and determining which requests generated these. Valid responses can usually differ by at least one of the following: 1. Different HTTP status codes 2. Responses of different lengths 3. The presence or absence of certain expressions 4. The occurrence of errors or timeouts 5. Used to receive or Differences in Completion Response Times For example, during a URL path scan, a request for a resource that does not exist may return a “404 Not Found” response, or the correct URL may return a “200 OK” response. Or in a password guessing attack, a failed login attempt might generate a “200 OK” response containing the “Login Failed” keyword, while a successful login might generate a “302 Object Moved” response, or a different “200 OK” “Response page.
Each penetration tester may analyze Burp Intruder attack results differently, mainly due to differences in personal level and experience. In actual combat, only by slowly trying and accumulating can you quickly analyze the attack results to obtain the important information you care about.
