
2024-6-12 23:43:53 Author: securityboulevard.com(查看原文) 阅读量:6 收藏
|
Pierre LalanneEngineering Manager at GitGuardian |

When building an application that requires user authentication, implementing a secure login flow is critical. In this article, we'll walk through how we created a robust OAuth login flow for ggshield, our Python-based command line tool, to streamline the onboarding process for our users.
The Challenge: Simplifying CLI Setup
GGshield is a powerful tool that allows developers to easily scan for secrets and vulnerabilities across a variety of sources, from git repositories to Docker images. However, before users can start leveraging its capabilities, they need to set it up with a GitGuardian API key.
Traditionally, this has been a multi-step process:
- Create a GitGuardian account
- Navigate to the dashboard to create an API key
- Make the key available to
ggshieldvia an environment variable (.envfile or shell)
For some users, especially when dealing with a large developer user base, this process can be cumbersome. Our goal was to simplify this to a single ggshield auth login command.
Our Solution: A CLI Authentication Web Flow
The key here is that we don’t want to manipulate credentials to access GitGuardian’s dashboard directly; we want the CLI to be safely granted a personal access token (PAT) to access GitGuardian’s API on behalf of the user instead. That’s a perfect use case for the OAuth2 Authorization Code flow.
Here, we won’t go into the details of each query and the reason behind each query parameter, but we recommend this excellent article to better understand the different steps of the authorization code flow.
To streamline the onboarding process, we implemented a web-based OAuth flow. Here's a high-level overview:
- The user enters
ggshield auth loginin their terminal - GGshield opens a web browser, directing the user to log in to their GitGuardian account (or create one)
- After successful login, an API key is generated and passed back to ggshield
- GGshield saves this key and uses it for future API requests
🔍
In this blog, we will focus only on the web flow, as opposed to the token flow, where the user directly inputs an existing API key in the CLI, and the config is then created and fine-tuned from there.
Let's dive into the technical details of how we implemented this in Python. Hopefully, we will share some tips we learned along the way!
Tech stack: GGShield is a Python client using click, a very helpful package for building nice command-line interfaces. The GitGuardian API is Django-based.
Step 1: Implementing Server-Side OAuth
The first step was to implement an OAuth interface on our backend server. It will be in charge of two key interactions:
- Generating an authorization code and redirecting the user to a specified URI after successful login
- Exchanging the authorization code (granted during the OAuth flow) for a Personal Access Token (PAT)
To handle each of these interactions, we implemented dedicated views with the help of the oauthlib library. This Python library provides a high-level interface for constructing OAuth 2.0-compliant queries, abstracting away much of the low-level complexity.
Step 2: Preparing the Local Web Server
We need to run a local HTTP server on the user’s machine to handle the callback from the application server. This local server will listen for a GET request on a specific URL after the user has logged in and the authorization code has been generated.
Implementation tip: The server should run on a port that is not already in use. Iterate through a range of port numbers until a free one is found:
for port in range(*USABLE_PORT_RANGE):
    try:
        self.server = HTTPServer(
            # Only allow requests from localhost
            ("127.0.0.1", port),
            # Attach the wrapped request handler
            self._handler_wrapper.request_handler,
        )
        self._port = port
        break
    except Exception:
        continue
else:
    raise click.ClickException("Could not find an unoccupied port.")
Note that the request_handler for the server will contain much of the important logic for the OAuth flow. We'll come back to this in Step 3.
Step 3: Directing the User to Log In
Next, we need to send the user to their web browser to actually log in and grant our application access. To do this, we'll construct a URL with the necessary parameters using the oauthlib library.
The key parameter is the redirect_uri, which tells the application server where to send the user after they log in. In this case, it will point to our local server from Step 2.
Implementation tip: The webbrowser module provides a convenient way to interact with the user's default browser. We simply pass it the constructed URL and it will open a new tab to that page. Here's what constructing the URL looks like:
import web-browser
from oauthlib.oauth2 import WebApplicationClient

CLIENT_ID = "ggshield_oauth"

request_uri = WebApplicationClient(CLIENT_ID).prepare_request_uri(
    uri=f"{DASHBOARD_URL}/auth/login",
    redirect_uri=f"http://localhost:29170",
    scope=[SCAN_SCOPE, *self._extra_scopes],
    code_challenge=CODE_CHALLENGE,
    code_challenge_method="S256",
    state=STATE,
    auth_mode="ggshield_login"
)

webbrowser.open_new_tab(request_uri)
Step 4: Handling the Callback
After the user logs in, the application server will redirect them back to the redirect_uri we specified, which points to our local server. The server will therefore receive a GET request that includes the authorization code as a query parameter. It will:
- Parse the callback URL to extract the authorization code
- Use the authorization code to claim an access token from the application server (that’s the second interaction mentioned in Step 1)
- Receive the granted access token
Once this succeeds, the client side receives a JSON response that holds a GitGuardian personal access token with the right scope (scan).
Implementation tip: The local server has a RequestHandler that inherits from BaseHTTPRequestHandler. This handler defines what the server should do when it receives a GET request, which is implemented in our do_get method.
Step 5: Saving the Access Token
The final step is to save the access token we received so that we can use it to make authenticated requests to the GitGuardian API in the future.
First, we validate the token against the GitGuardian API to ensure the OAuth flow was successful. Then the token is saved to an auth_config.yaml file in the user's config directory. Our design is inspired by and follows the same pattern as other widely used development tools like GitHub’s gh, GitLab’s glab, or HashiCorp’s vault.
Implementation tip: To reliably get the path to the user config directory across different operating systems, we can use the appdirs library:
from appdirs import user_cache_dir, user_config_dir

APPNAME = "ggshield"
APPAUTHOR = "GitGuardian"

config_dir = user_config_dir(appname=APPNAME, appauthor=APPAUTHOR)
This will resolve to the following paths:
- macOS:
~/Library/Application Support/ggshield - Unix:
~/.config/ggshield - Windows:
%LOCALAPPDATA%/GitGuardian/ggshield
Finally, we print a nice success message to the console to let the user know they are logged in 🎉
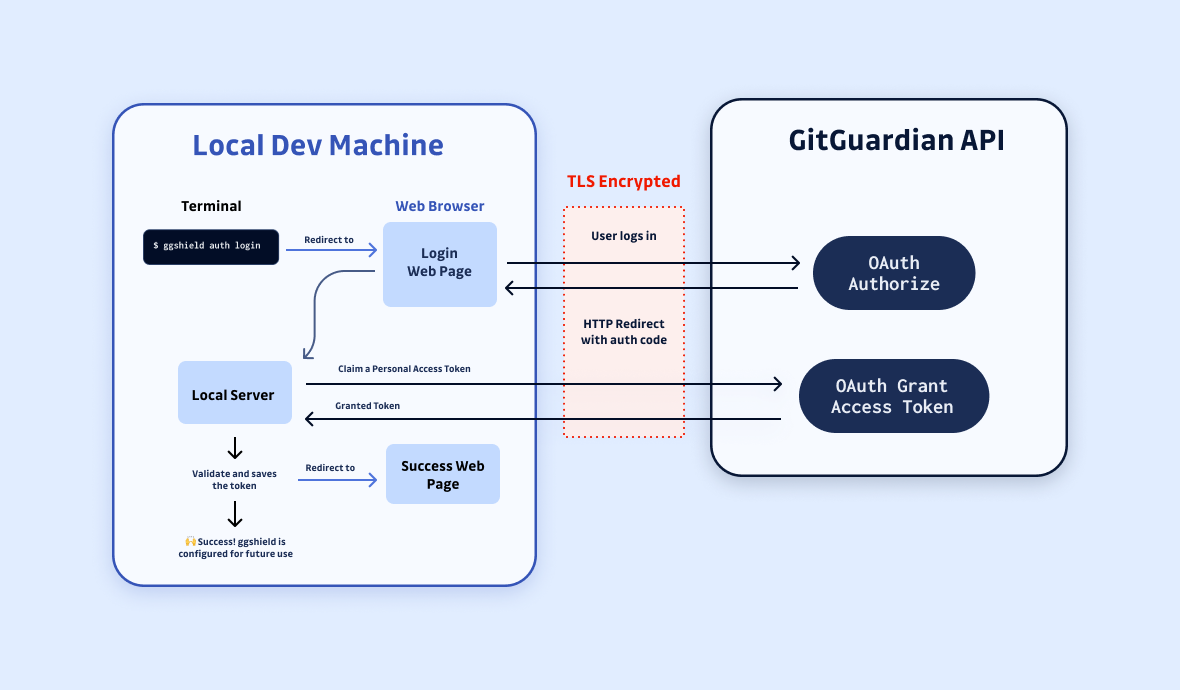
A Picture is Worth a Thousand Words
Here is the overall overview of how the flow looks like:
Security Considerations
Attentive readers may have noticed that our local server uses HTTP rather than HTTPS. Typically, OAuth flows should always use HTTPS to ensure the security of sensitive data like access tokens. However, in this specific case, there are a couple of reasons why using HTTP is acceptable.
- Locality: The first reason is what we might call "locality." The callback request containing the authorization code is sent from the user's web browser to the local server running on their own machine. This request never leaves the user's device or travels over the public Internet, so the risk of the request being intercepted by an attacker is very low.
- Ephemerality: The local server only runs for a matter of seconds during the OAuth flow. Once the access token is received, the server shuts down. This leaves a very narrow window for any potential attacks to occur, further reducing the risk.
⚠️ Important remark: this reasoning only applies to this specific use case. In a standard OAuth flow between two web applications, the callback would be sent over the public internet (no locality) to a server that is constantly running (no ephemerality). In most scenarios, using HTTPS is absolutely essential to protect user data.
Conclusion
The ggshield auth login flow provides a streamlined way for users to authenticate and generate API tokens. Offering a great developer experience (DX) is very important for security: developers, like most people, will always choose the most convenient path. Making sure this paved way is secure is the best way to encourage the adoption of secure practices and prevent insecure shortcuts.
As a security bonus, by implementing the OAuth authorization code grant type, ggshield ensures that the GitGuardian credentials are never exposed to the user's browser or device.
Ultimately, the auth login flow has had a significant impact on how ggshield users authenticate: roughly 40% were created using this flow! By providing a more convenient and secure login experience, ggshield makes it easier for users to get up and running with the API.
*** This is a Security Bloggers Network syndicated blog from GitGuardian Blog - Code Security for the DevOps generation authored by Guardians. Read the original post at: https://blog.gitguardian.com/ggshield-cli-authentication-oauth-python/
如有侵权请联系:admin#unsafe.sh