2024-6-20 09:19:16 Author: isc.sans.edu(查看原文) 阅读量:5 收藏
[This is a Guest Diary by Owen Slubowski, an ISC intern as part of the SANS.edu BACS program]
Over the past 20 weeks I have had the privilege to take part in the SANS Internet Storm Center Internship. This has been an awesome chance to deploy and monitor a honeypot to explore what must be the fate of so many unsecured devices on the internet. Over the tenure here the one thing that was so shocking to me was not only the amount of devices that are conducting password attacks, but also the damage they could have done if their malware had been successful. Over the 20 weeks of this internship, I had more than 16,790 unique devices attempt to gain unauthorized access to my honeypot over SSH and Telnet from 49 different countries!
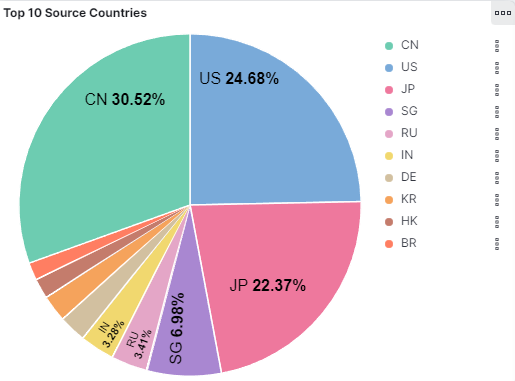
Figure1: DSheild SIEM graph displaying the different countries interacting with the honeypot
With the amount of threat actors out there it almost seems like a strong password policy isn’t enough on its own. And over the multitude of attack reports I wrote it always listed the same control that could have protected the system: MFA and filtering to protect the system. In my mind these solutions always imply a greater cost that is often outside of our reach as hobbyist and small organizations … Or are they? Over the course of the next few pages, I look to discuss different technical controls I was first introduced to during the internship that can be applied to Ubuntu Linux at no cost and how they can help protect against these attempts to login by various threat actors.
All the testing done below will be done with 3 Linux boxes: Ubuntu-Secure (192.168.137.133) the server, Ubuntu-Client (192.168.137.135) the legitimate user, and Kali (192.168.137.134) the attacker. Ubuntu-Secure has default SSH configurations and is easily guessed by the attacker using hydra and rockyou.txt in less than 2 minutes!

Figure2: Demonstration of successful password guessing attack against ubuntu-client
TCP Wrappers
One of the easiest ways to mitigate password attacks is to only allow legitimate IPs to access remote access protocols. This is usually done with either a host based firewall or a network firewall, but is there an easier and cheaper way? TCP Wrappers is a free tool that does just that. Like an ACL, TCP Wrapper allows us to specify what devices should and shouldn’t be allowed to access the service [1]!
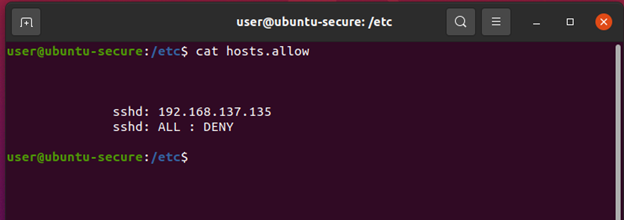
Figure3: The configurations added to host.allow
Above we see our hosts.allow configuration file. In the first line we defined that the SSH service should allow access to 192.168.137.135 (Ubuntu-Client), and the second line functions as a default deny since there are no other legitimate users for this service[1]. Please note that the “All:DENY” statement can alternatively be placed in the host.deny file. There is functionally no difference between the two locations however I find placing both allow and deny statements in the hosts.allow makes for easier reading and troubleshooting. Below we can see that while Ubuntu-Client’s access is unencumbered, the attacker’s attempt has been completely blocked!
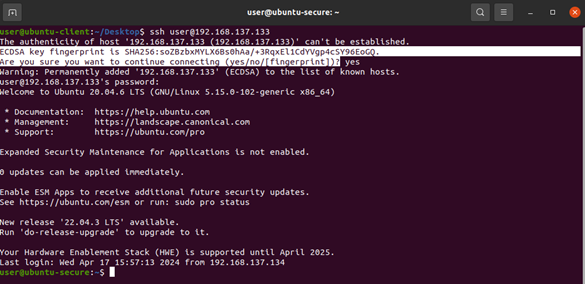
Figure4: Ubuntu-Client can successfully SSH to Ubuntu-Secure

Figure5: The attacker cannot connect!
Evidence of successful and refused connections can be found in /var/log/auth.log. This can be analyzed manually or ingested into a SIEM to assist in troubleshooting TCP wrapper rules, and to provide intelligence on adversaries attempting to access your device. Below we see an example log of Ubuntu-Client successfully connecting and evidence of the attacker Kali being refused.

Figure6: In green we see the successful connection and disconnect from Ubuntu-Client, and in red we see the blocked connection from the attacker Kali.
MFA for Ubuntu
MFA is the most secure method of authentication hands down. Instead of opting for a pricey enterprise MFA solution like RSA or DUO in this section we will cover how to use Google authenticator to provide MFA for free! This is a super simple process:
First: install the Google authenticator with “sudo apt-get install libpam-google-authenticator”[2]
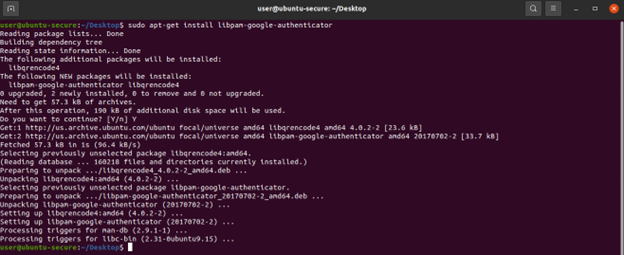
Figure7: Installation of Libpam-google-authenticator
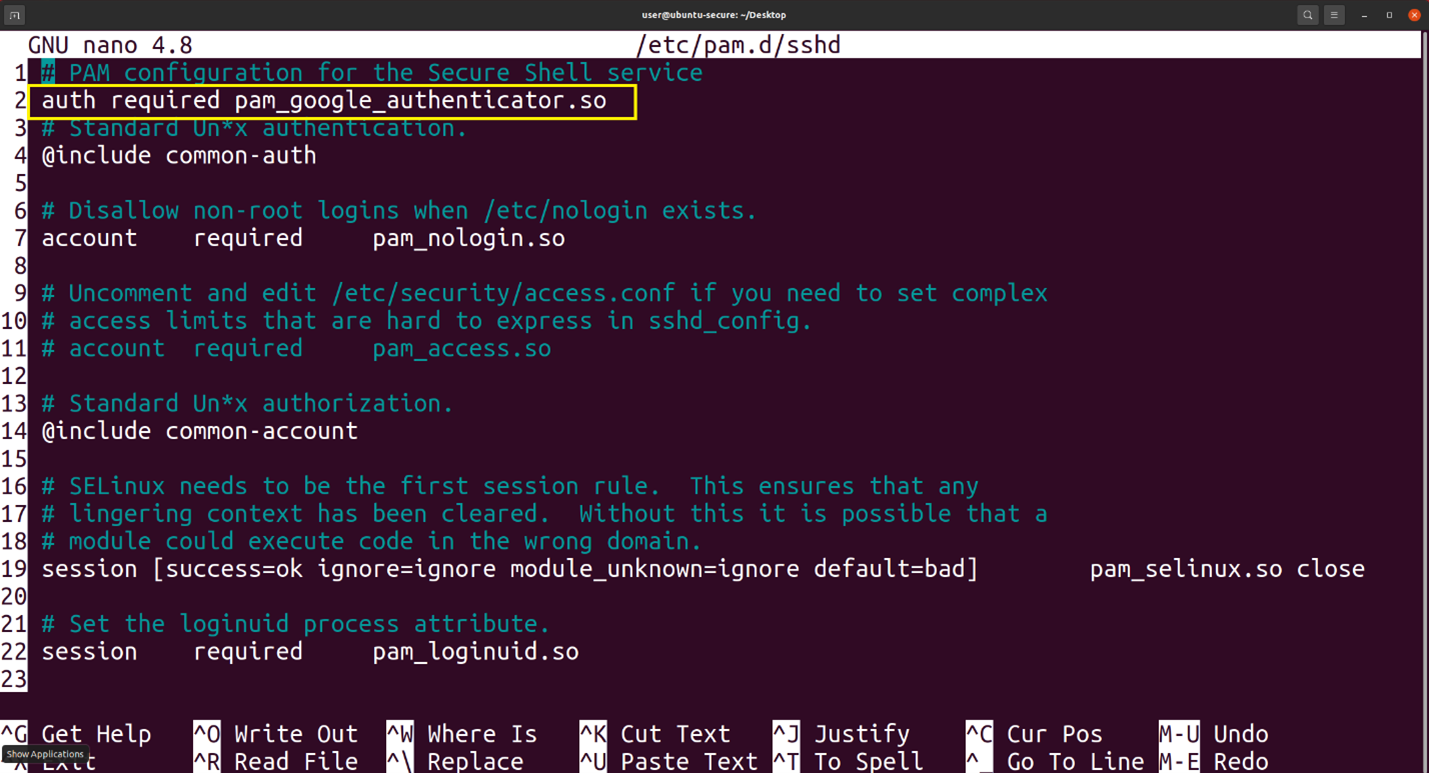
Next use your favorite text editor edit the file /etc/pam.d/sshd and on line 2 add the text “auth required pam_google_authenticator.so” to line 2 [2]. Then edit /etc/ssh/sshd_config and change the “ChallengeResponseAuthentication” to “yes” on line 63 [2].
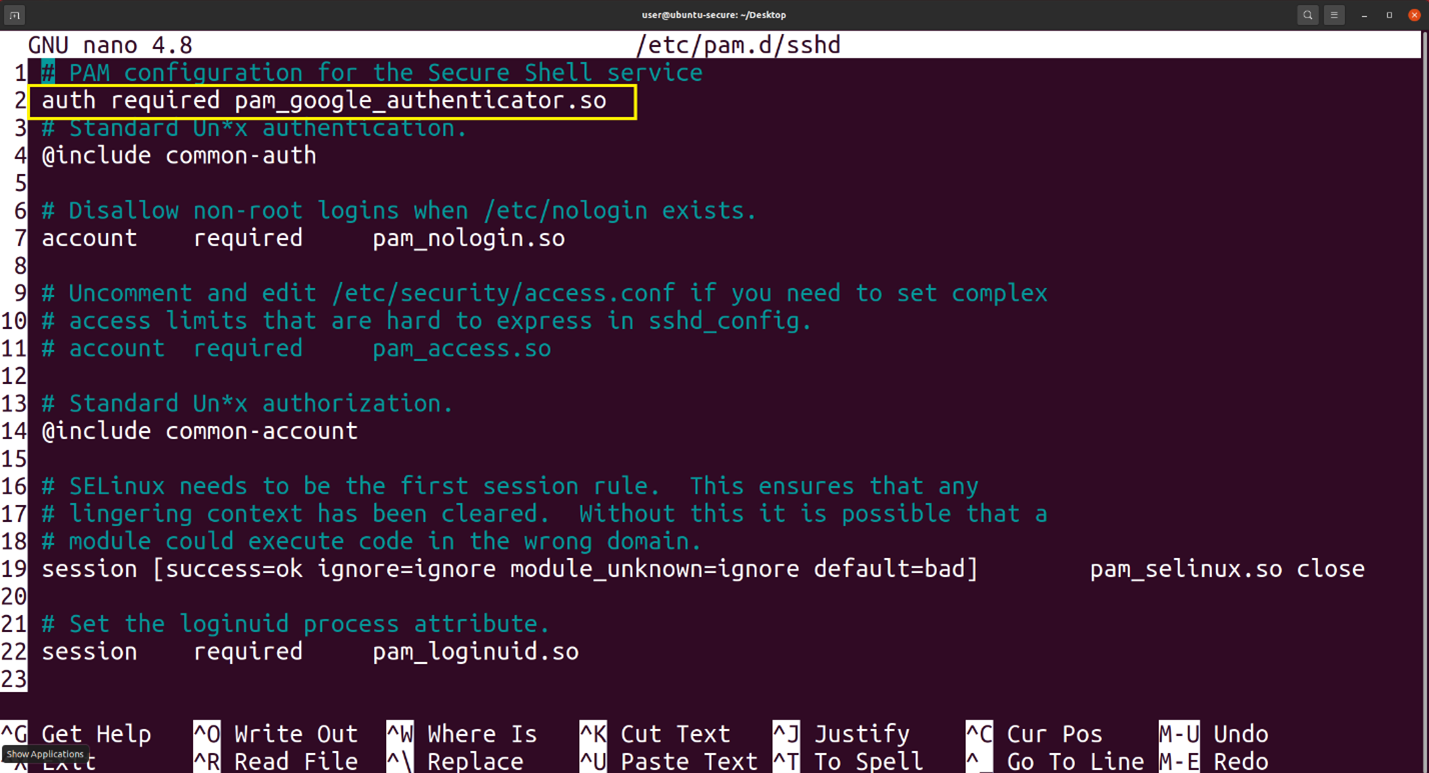 Figure8: Addition to /etc/pam.d/sshd line 2
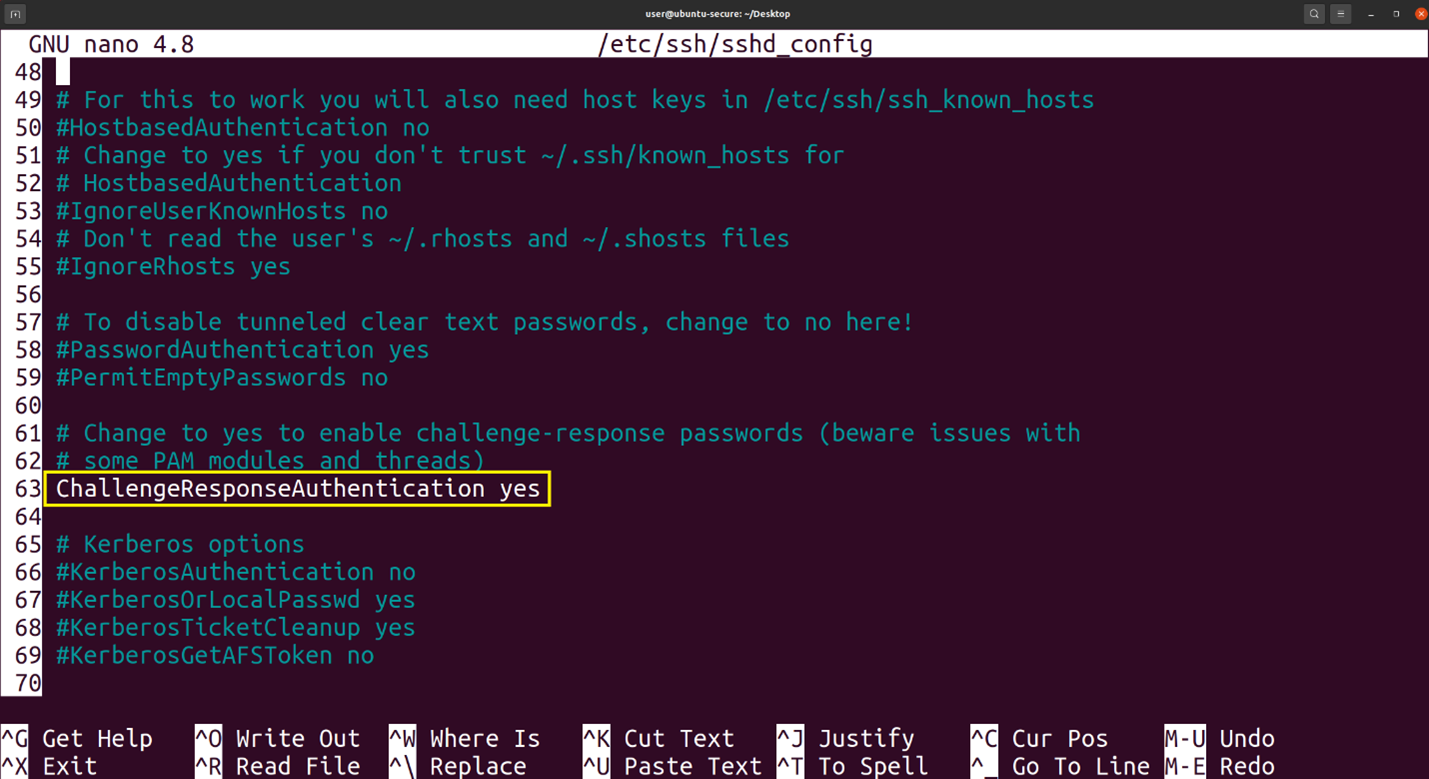 Figure9: Edit to line 63 in the /etc/ssh/sshd_config file
The final step is to run the command “google-authenticator” to finish setup [2]. This command will ask you five questions, and we answered them “yes, yes, yes, no, yes” as recommended by the Ubuntu.com tutorial [2]. There will also be a large QR code for you to scan to enroll the server into your Google authenticator app.

Figure10: The first lines of the google-authenticator command output with question 1
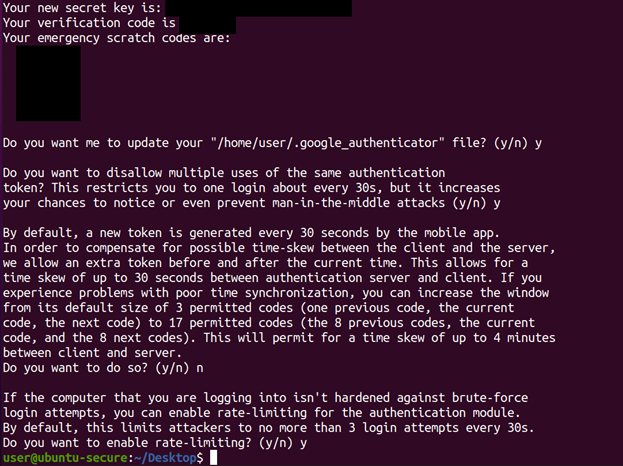
Figure11: The second half of the google-authenticator output with questions 2-5
Once enrolled restart the SSH service with “sudo systemctl restart sshd.service” then we are ready for a test!
When attempting to log into Ubuntu-Secure we now see the first prompt of “verification code” which is found in our Google authentication app, and this code changes every 30 seconds. If our code was correct, then we will be prompted for our password and we are in!
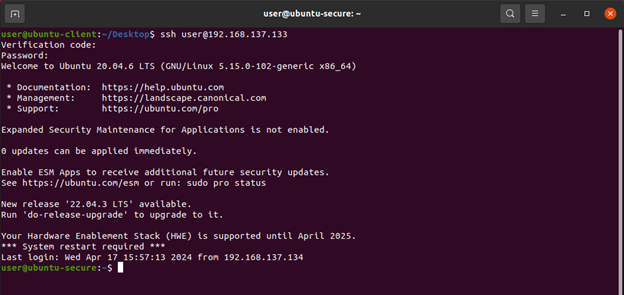
Figure12: Shows the new authentication workflow with Google authentication running
While the ever-changing Google authenticator application is going to be near impossible to guess for an attacker, let’s run hydra against it for good measure.

Figure13: The attacker can no longer brute force ubuntu-secure
After letting it run for a while, we can easily conclude that adding MFA thwarted this password guessing attack.
Being in the IT and cybersecurity world it seems the costs of controls keeps going up and up. With all the new flashy tools coming out daily it’s easy to forget that there are tons of free tools that can be just as effective at stopping attacks. With limited time in our day to secure our personal infrastructure it’s refreshing to see how both these tools can be effectively deployed easily and quickly improve security! There truly is no excuse for unsecure authentication in 2024!
[1] https://ostechnix.com/restrict-access-linux-servers-using-tcp-wrappers/
[2] https://ubuntu.com/tutorials/configure-ssh-2fa#2-installing-and-configuring-required-packages
[3] https://www.sans.edu/cyber-security-programs/bachelors-degree/
-----------
Guy Bruneau IPSS Inc.
My Handler Page
Twitter: GuyBruneau
gbruneau at isc dot sans dot edu
如有侵权请联系:admin#unsafe.sh