2024-7-2 08:52:45 Author: hackernoon.com(查看原文) 阅读量:4 收藏
Hi there, my name is Alex Nekrashenko; last time I told you about the basic things, what the Telegram API is, and how to create your instance bot, we chose the technologies for that and I showed you general things about my API. Let’s dig it deeply right now.
I just realized that I didn’t even tell you about what exactly Tot Bot is. Well, Tot bot is the Telegram bot which is obvious, but the main idea is to help people learn languages.
It works for teachers as well as for people who want to learn the language for themselves. I’ll give an example.
When you start using the bot, it will guide you on how to work with it. The first step is the same for everybody, just create the channel (I gave it the name “My German“, for example), then add a bot there and make it an administrator.
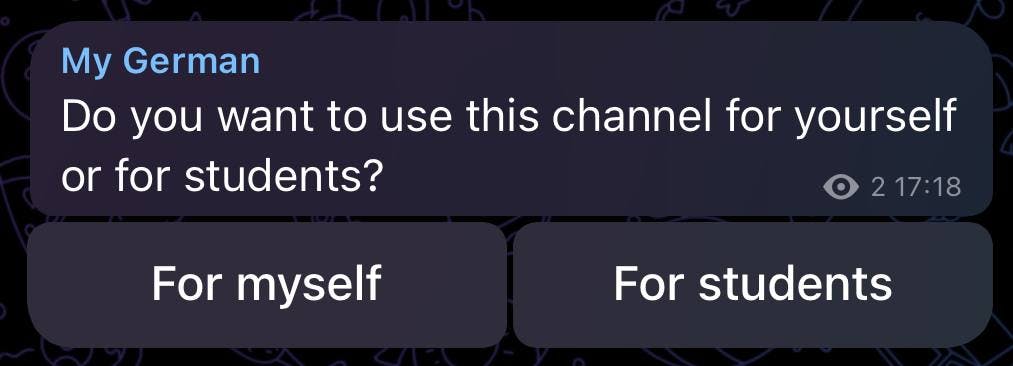
You’ll get the message in this chat.

Right now, you have to choose the button; I’ll make it for myself, so I click “For myself.“
Great! That’s it. You already can use it; just return to the bot, and click the one and only command /manage. The bot defines who is the user or who is the teacher by itself. That’s one of my favorites, really, you don’t have to do anything; the bot already knows all the information about you and your students.

Ok, afterward you can just set up your channel. Remember, it’s just an MVP. Right now, it has only one function and it is - the word repetition. You can add the words in the channel using the bot, with translation or not, and then the final step will be to set up an appearance time.
Sounds very easy, doesn’t it? Because it is.

As you can see, I chose 10 am and 3 pm every day, and added the words:
Guten Morgen - Good morning

That’s what I’ll get at this time.

The best thing is that the bot will transform your words into a special format and hide the translation. It will ask you if you have learned the words or not. Either if you remember the translation if that’s easy. Let’s check our assumption and click on the spoiler area.
As a user, you can choose one of the options, but the cool thing is, that then, the bot will have immediately reacted to it.
Take a look, I’ve chosen Not yet, so the bot just wished me luck, and tomorrow, I'll get these words again, but if I’d chosen, I learned the words, my words would be diactivated and I’d never see them again if I didn’t activate them in the bot.
So, that’s the point for many teachers who help their students to expand their language vocabulary. You can make them learn it every day five times in a row, but will they really learn them? The same, on the other hand, if the student has already learned the words from the first attempt. Let them choose! Let them track their own result; believe me, it will help them more.
Of course, teachers also can use the channel for their classes or track the student's pronunciation.
Ok, right now, you know what is actually Tot Bot, so we can get back to more tech things. Last time, I told you about the userState table, so, it will be fair if we continue from there. Unfortunately, Telegram still doesn’t provide the things that developers need, some of them are described as very foggy.
That’s why people like me have to develop their own ideas on how to transmit data, for example. I mean that, as you can see, all the actions that users do in my application are under control. I certainly know what am I sending and what I’ll get, because all actions are related to the buttons attached to the messages, with rare exceptions when the user sends something in input and where I exactly use userState to track this action.
Let’s talk about buttons; this mechanism in Telegram is called reply_markup. To be precise, I have too many logic around this field, so I created a separate file that describes exclusively this logic.
One more important thing was that we can have a lot of markups that users call. I took the best practices from other bots, to be honest, and I decided to remove markup after the user committed the event; thus, I protected my API from unwanted actions.

Some of the markups we still can’t remove because the user needs them, but you know what, I’ve already provided for events like this and left all of that stuff to the user. Lest you forget that’s not the full application, that is just the bot, and users can decide what to do with it by themselves. Clarification: you can clean the history and delete the messages that you want; I’m just controlling special events that are required for that.
That’s exactly how my application works when we are talking about the user events.

If you remember, I told you about the limit for the data, that’s what I was talking about.
const reply_markup = {
  inline_keyboard: [
    [
      {
        text: 'Button 1',
        callback_data: Your callback data,
      },
      {
        text: 'Button 2',
        callback_data: Your callback data,
      },
    ],
  ];
}
That is how the reply_markup looks like in the code, as you can see, inline_keyboard here is an array in an array; those buttons can appear vertically if you make them.
const reply_markup = {
  inline_keyboard: [
    [
      {
        text: 'Button 1',
        callback_data: Your callback data,
      },
    ],
    [
      {
        text: 'Button 2',
        callback_data: Your callback data,
      },
    ],
  ];
}
But it will be horizontal, in a row, if you keep them the same as in the first example, the most important part here is callback_data , because exactly here we have to transfer our user data to API. There are two reasons why this can be a little complicated; the first one is that as I told you, callback data must be only the string, and it has a length limit.
The second one is that you need to fit all your data in this limit, which is not that big. Imagine, you need to get what the event is, what exactly the user sent, and from what channel they sent it. There is already a lot of information, but we still need to get what words has the user learned, and the other things that concern that data.
I am writing about it, of course, in the 3rd part of this article. Right now, I want to say thank you for your attention!
If you want to know about the decisions that I made, like it, and subscribe to my blog!
如有侵权请联系:admin#unsafe.sh