
If you’ve ever had your website compromised by malware, you know the sheer panic it can cause. But don’t worry, you’re not alone. More importantly it’s something you can fix! In this guide, we’ll walk you through seven essential steps to remove malware from your WordPress site. From backing up your website to removing the last security warning, we’ll make sure you know exactly what to do to clean up and fortify your WordPress site.
Below is a quick overview, but for a more detailed walkthrough you can see our guide on this topic here.
Step 1: Back Up Your WordPress Website & Database
Removing malware can be messy and sometimes things can break in the process. For this reason we’ll want to make sure we have a backup to restore if something goes wrong.
To back up a WordPress site you will want to take a manual backup. Download all the files and folders from the root folder for your WordPress site using a file manager or FTP client, then export the WordPress database. You can also simply create a compressed archive (.zip) of your public_html or httpdocs directory directly from your cPanel file manager, depending on your hosting provider and package. You may also want to check to see if backups are already made available to you as a part of your hosting or security package.
If you have a clean, functional backup of your website, the path of least resistance may just be to simply restore it and skip the malware removal process altogether. However, if your website has a blog or is frequently updated with new content, this may not be a viable option.
Next we’ll go over how to backup your database. Once you have accessed your site’s phpMyAdmin or Adminer, follow these steps:
phpMyAdmin
- Access your phpMyAdmin panel and select the database for your WordPress site. This is the database you created when you installed WordPress.
- Click Export from the top menu and choose custom for the export method.
- Select SQL from the Format drop-down and select all of the tables.
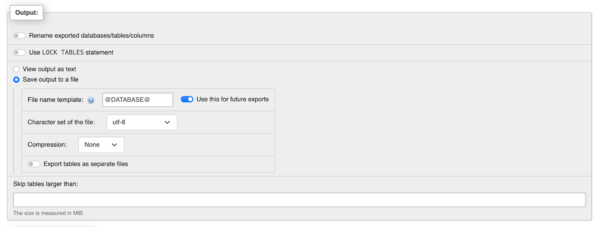
- In the Output section, check Save output to a file and select None for Compression if your site is standard size. If your site is large you will want to select a compression style.
- Select Export at the bottom and the database will be saved into your computer.
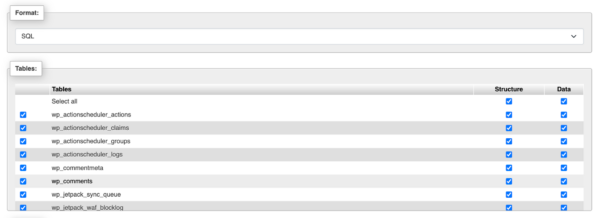
- In the Output section, check Save output to a file and select None for Compression if your site is standard size. If your site is large you will want to select a compression style.
Adminer
- Select the database that holds your WordPress data.
- Click Export at the top.
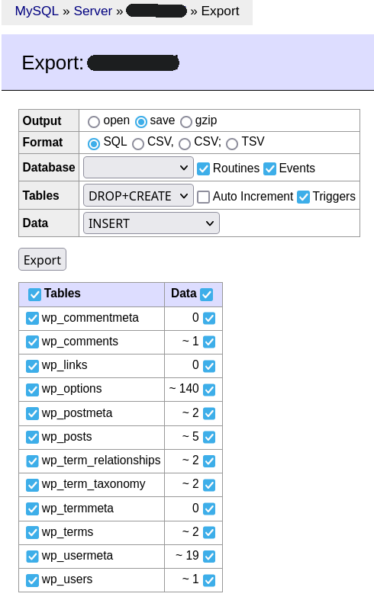
- In the Export section, leave all tables selected as they are by default.
- In the Output section check Save. Select None for Compression if your site is standard size, if your site is large you will want to select a compression style.
- Select SQL as the format.
- Ensure that data is selected to export both the structure and the data.
- Click Export and the backup will be saved as an .sql on your computer.
Step 2: Check for Recently Modified Files & Scan WordPress for Malware
There are several ways to check new or recently modified files to see if they may be part of the hack, like reviewing cPanel or SSH.
SSH: Check with the ls command
- Log into your server via SSH and navigate to your site’s home directory.
- Run the following command:
$ ls -1tlah | head -10 - Review the most recently modified files, starting at the top.
SSH: Check with the find command
- Log into your server via SSH and navigate to your site’s home directory.
- Run the following command:
$ find . -type f -mtime -90
- Results will show an output with files that were modified within the last 90 days.
- Review these files. Unfamiliar modifications within the last 90 days may be suspicious.
Check recently modified files from cPanel:
- Log into cPanel and navigate to File Manager.
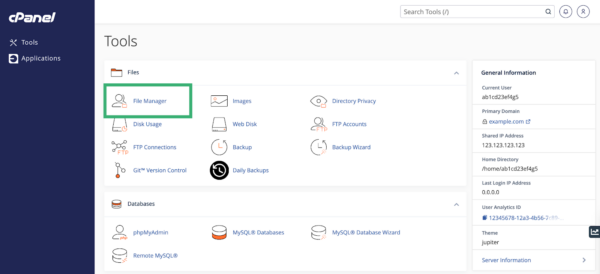
- Navigate to your site’s home directory and click Last Modified to view files with recently modified dates, starting at the top.
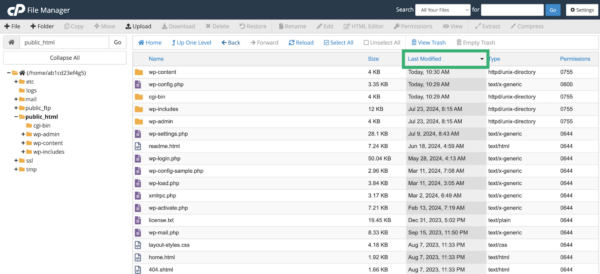
- Be sure to check the wp-content/plugins and wp-content/themes directories for any questionable or suspiciously generic titled plugins. Attackers love to upload these to compromised environments.
Check recently modified files with Filezilla:
- Open the FileZilla client and connect to your website through FTP or SFTP.
- In the top menu, select filename filters icon.
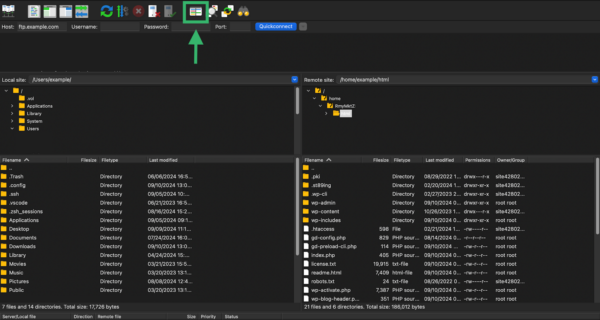
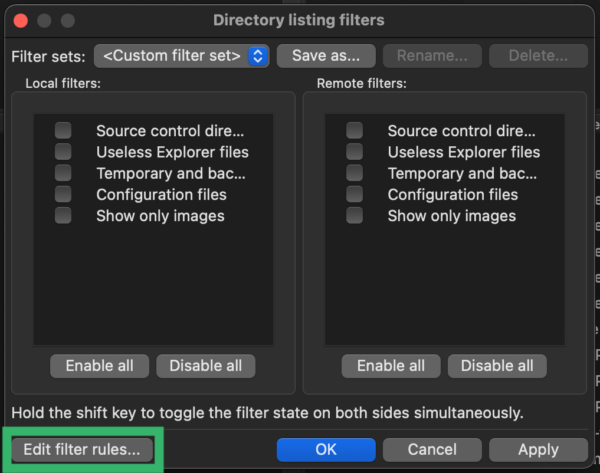
- On the popup menu, select Edit filter rules.
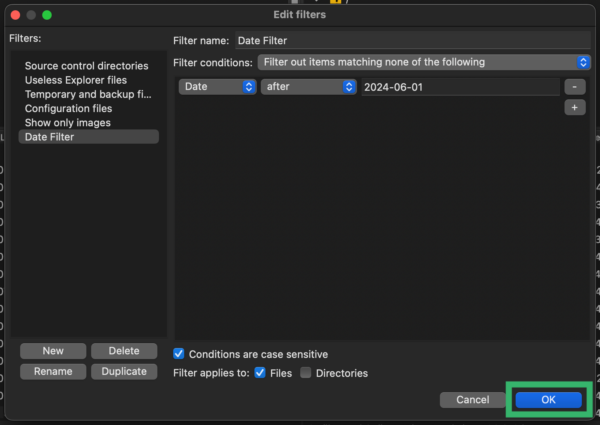
- Select New to create a new filter.
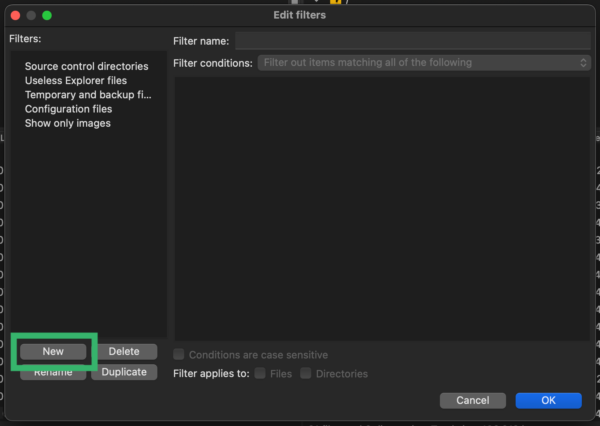
- Name your new filter how you will remember it, such as “Date Filter”.
- Add the filter criteria. For Filter conditions, select Filter out items matching none of the following.
- Select Date from the first drop down, after for the second, then enter the date that matches what you are looking for in the format “YYYY-MM-DD”. Uncheck the box that says Directories.
- Confirm your filter settings look as follows, then select OK.
- Check the box next to your newly created filter, select Apply, and then select OK to close the window.
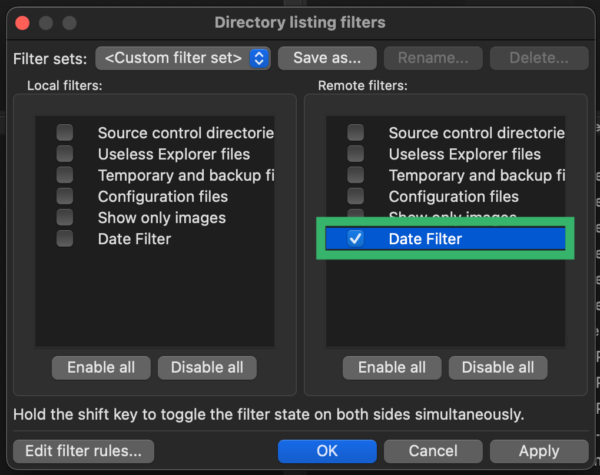
This filters out all files that weren’t modified within the specified timeframe, allowing you to quickly find what has been recently modified in each directory while searching for malware.
Step 3: Remove malware from your site’s files
If the infection is in your core files, download a fresh installation from the official WordPress site and use it to replace each compromised file.
Caution: Don’t overwrite any content within the wp-content directory or replace the wp-config.php file.
Clean hacked WordPress core files:
- Note down the version of your WordPress site by viewing the file wp-includes/version.php.
- Go to the official WordPress site and download the version that matches your site.
- Extract the WordPress installation on your computer.
- Access your site files either through sFTP/FTP or through your hosting account.
- Replace any infected core files with a clean copy.
Manually clean hacked WordPress plugin and theme files:
- Download a clean plugin/theme copy from a working backup, or from the official WordPress site.
- Extract the plugin/theme copy on your computer.
- Log into your file structure either through sFTP/FTP or through your hosting account.
- Replace the applicable plugin/theme folder within ./wp-content/plugins or ./wp-content/themes with the clean copy.
- Open any custom or premium files (not in the official repository) with a text editor.
- Remove any suspicious code from the custom files.
- Test to verify the site is still operational after changes.
Important: Avoid erasing any changes you’ve made to your theme or plugins by restoring from a clean backup.
Clean hacked WordPress plugins through the dashboard:
- Log into your WordPress dashboard and navigate to Plugins > Installed Plugins.
- Deactivate and delete the applicable plugins.
- Install & activate each plugin from the dashboard or upload a clean copy from a working backup.
Step 4: Remove malware from your site’s database
To manually clean your database look through the database tables for suspicious content. For example spam keywords and links. Some potentially harmful PHP functions include base64_decode, gzinflate, error_reporting(0), and shell_exec.
After removing any suspicious content test if the website is still working. If not, you can reupload your database from the backup or ask for assistance from your webmaster or security provider.
It’s important that the database is clean before proceeding to the next step.
Step 5: Remove Warnings from your WordPress Website
After your WordPress site has been cleaned and the hack is fixed, request a review if you were blocklisted by Google, McAfee, Yandex (or any other vendor). A review request form will need to be submitted for each blocklisting authority.
- If your website has been suspended by your hosting provider, you’ll need to contact them directly to request that they lift the suspension. In most cases, you’ll need to provide details about how you removed the malware.
- Submit a review request for each blocklisting authority. We have useful guides on how to remove Google warnings or fix McAfee SiteAdvisor warnings, but you’ll also want to check other popular search authorities like Bing, Norton, and Yandex.
Step 6: Patch CMS core files, Plugins & Themes
To update Core files in the dashboard, go to the “Updates” option from the sidebar. This takes you to the WordPress Updates page. If you see the ‘An updated version of WordPress is available’, click on “Update Now”.
To update Plugins on the WordPress dashboard of the website, go to Plugins and click on “Installed plugins”. This takes you to the Plugins page where you can see all the plugins installed on your website. If there is a new version available for a plugin you will see a notification. Click on “Update now” to update your plugin.
To update Themes go to “Appearance” and click on “Themes”. Like the plugins if there is a new version available for a plugin you will see a notification. Click on “Update now” to update your theme. If you have any custom code present in your theme files make sure to have a backup of that before updating.
Step 7: Harden Your WordPress Environment
Keep WordPress Updated
Sucuri hides the WordPress version to help protect your site from attacks, but an attacker could still try to exploit older, vulnerable versions of WordPress, so it’s important to keep your site updated to the latest version.
Install the Sucuri Security Plugin
A fully configured Sucuri Security plugin allows you to seamlessly apply additional hardening options to your site:
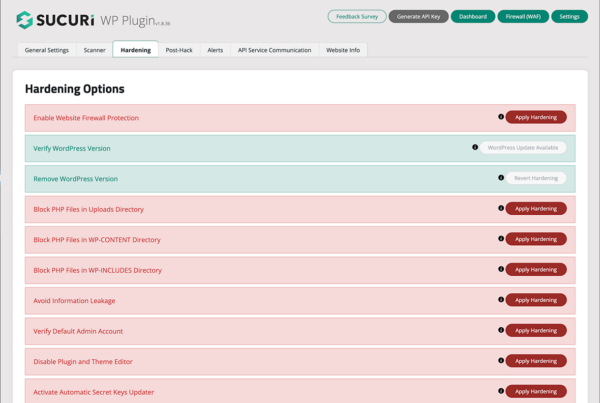
- Website Firewall Protection — If you are a Sucuri customer, you can link to your firewall account to view statistics in WordPress.
- Verify WordPress Version — Checks when your website, or any of its components are not up to date, this section will warn you with a prompt to the newest version.
- Verify PHP version — Checks whether your server is running the latest version of PHP.
- Remove WordPress Version — Allows you to remove the version of your CMS from being publicly displayed.
- Block PHP Files in Upload Directory — Disables the execution of PHP files inside your uploads directory. This can break certain plugins so test beforehand.
- Block PHP Files in WP-CONTENT Directory — Places a .htaccess file inside the wp-content to prevent external access.
- Block PHP Files in WP-INCLUDES Directory — The same as above but for wp-includes.
- Information Leakage — Checks for the presence of a readme.html file on your site, which contains your WordPress version and deletes it.
- Default Admin Account — Checks for the admin user. This used to be standard in former times and is a favorite target for hackers.
- Plugin and Theme Editor – This will disable editing of your plugin in themes from unwanted changes.
Learn how to take care of some of these items manually in our post on hardening your wp-config.
By now, your WordPress site should be free of malware and running smoothly. More importantly, you’ve fortified it against future threats. Regular backups, updates, and a keen eye on security will go a long way in keeping your site safe. For more advanced protection, we encourage you to explore our Website Security Platform.
Kyle Knight is a Senior Technical Writer who joined the company in 2013. His responsibilities include managing our knowledge base, blog, and social media channels. With over a decade of experience in the web industry, Kyle has supported a variety of products including domain, hosting, email, and SaaS solutions. He excels at bringing clarity to complex topics, ensuring users have the information they need. In his free time, Kyle enjoys playing basketball, video games, riding motorcycles, and staying current with the latest tech trends.
