In this article, we’ll explore the most common types of protectors—packers and crypters—along with simple ways to detect and remove them.
We’ll also introduce some useful tools to simplify the process and improve your malware analysis skills.
What Are Protectors and What Types Are There?
Protectors are tools designed to complicate code analysis, making it harder to detect and examine malware. Two of the most common types of protectors are packers and crypters.
1. Packers
Packers are utilities that package one or more files into a single executable, often adding compression. This process makes static and dynamic detection more difficult, a tactic many types of malware exploit.
Certain malware, like those written in scripting languages (e.g., Python or JavaScript) or relying on non-standard libraries, require packing to function properly by including interpreters and necessary libraries.
Classic examples of packers include installers like NSI and MSI, UPX, MPress, and self-extracting archives (SFX) made with tools like 7zip or WinRAR.
Packers generally don’t protect application data, making it relatively easy to extract them at runtime in a sandbox or remove the packer using static tools.
2. Crypters
Crypters take protection a step further by encrypting the executable’s contents, often adding layers of packing and obfuscation. Designed to obscure code, crypters make analysis more complex and time-consuming. Examples of crypters include NetReactor, Themida, and VmProtect.
Main Protection Methods of Crypters:
- Dynamic unpacking in memory to avoid leaving any disk trace.
- Encryption of files, data, and code, with decryption at runtime.
- Code Obfuscation: Changes the structure and sequence of instructions, transforming (meta)data into unreadable or meaningless characters.
- Virtualization: Transforms code into pseudo-instructions that are either regenerated or interpreted at runtime.
Note that without virtualization, code is usually weakly protected and can often be restored to its original or near-original state.
Identifying Packers: Simple Techniques and Useful Tools
Detecting packers can be simplified with a few straightforward techniques and specialized tools like DiE (Detect It Easy). DiE notifies users when a packer is detected, making it a quick solution for initial identification.
Let’s consider the following sample. When analyzing it with DiE v3.10, we can observe the presence of the MPRESS packer.

Opening the sample in DiE reveals section names that indicate packing.

Packers like UPX and MPRESS often create sections with distinctive names, such as MPRESS1 and MPRESS2, which help analysts identify their usage.
We can also examine PE (Portable Executable) information in the Static Discovering window inside ANY.RUN sandbox. This provides further details to help identify these packers and their specific characteristics.
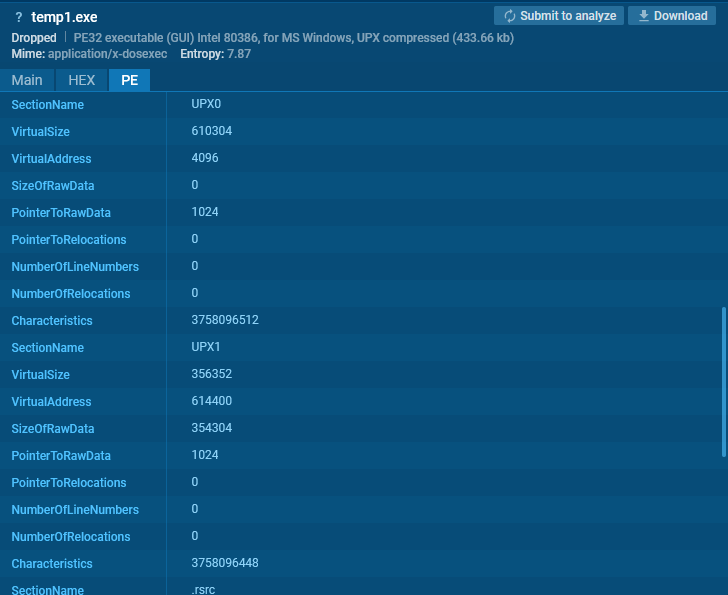
Analysis of a sample with UPX sections

We can identify UPX through section names. In certain cases, packers like VMProtect and Themida can also be identified by their distinct section names.

Sections, such as .vmp0, indicate VMProtect (see example).

Sections, such as .themida or .taggant, signal the presence of Themida (see example).
Common Indicators of Packers
The most common indicators for packers include:
Unusual Section Names and Placement
For instance, packers like Themida/Winlicense often have sections with random names or blank spaces as section names (example). The image below shows that Sections #4 and #5 have random names, while sections #0 and #3 contain blank spaces instead of names.

In VMProtect, the section addresses in the file (specifically the PointerToRawData field) are often set to zero (example).

In the image above, for sections #0 through #5, PointerToRawData is set to zero, which suggests that unpacking occurs dynamically at runtime.
Unusual Imports
The absence or minimal number of imports suggests that libraries are loaded, and their function addresses are acquired dynamically at runtime.
For .NET applications, a single import (mscoree.dll:: _CorExeMain) is typical. In some cases, a unique mix of functions can reveal the application’s intentions.
For instance, let’s open the Static Discovering window inside the ANY.RUN sandbox for this UPX sample and go to the Imports section.
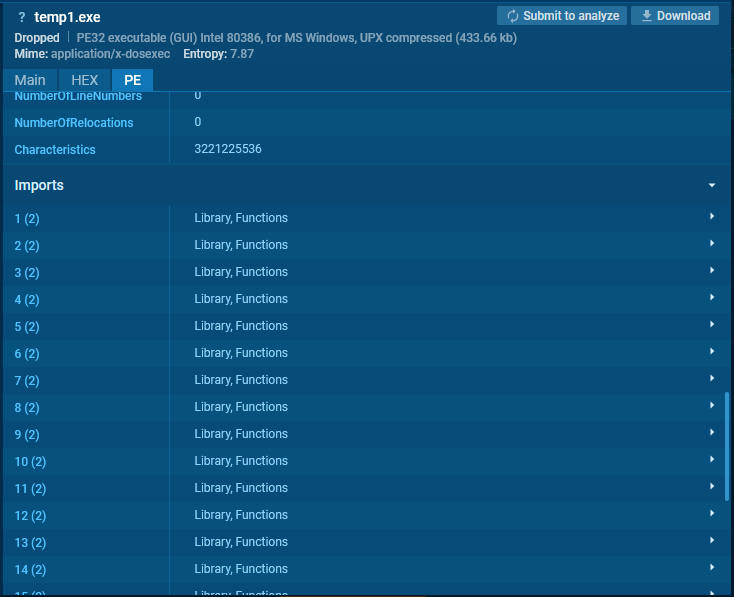
Then, let’s search for KERNEL32.DLL.

The combination of LoadLibraryA and GetProcAddress indicates dynamic library loading, while VirtualProtect may suggest an intention to change memory page protection to executable.
Since only four functions are present here, this combination is unlikely to be coincidental and can signal intentional manipulation for code execution.
High Entropy
For unpacked files, the overall entropy typically ranges from 5 to 6.5. Packed files, however, often exhibit entropy levels above 7, approaching 8 (the maximum entropy for 8-bit data).
High entropy values can indicate packing or encryption, as they suggest a lack of readable patterns within the file.
This entropy level can be checked using tools like DiE (Detect it Easy).

You can also check it right inside the ANY.RUN sandbox.
Unpacking Different Types of Packers
There are two main types of unpacking:
- Static unpacking: The code is processed by the unpacker but not executed. This method relies on analyzing the packed file without running it, allowing for a safer examination.
- Dynamic unpacking: The code is executed and preserved by the unpacker in memory. This approach involves running the packed malware in a controlled environment, often in a sandbox, to observe the unpacked code in action.
Dynamic unpacking is the most challenging type of unpacking, as it often requires the use of a debugger and capturing memory dumps.
This approach allows analysts to observe how the code behaves at runtime, but it demands a controlled environment and more advanced tools to monitor and extract the unpacked code accurately.
To make the process of the analysis easier and faster, you can utilize ANY.RUN’s Interactive Sandbox. It provides memory dumps of unpacked and decrypted data, including the decrypted executable payload.
The sandbox generates memory dumps for various processes and makes them available for download, saving analysts significant time and simplifying the analysis process. You can download these memory dumps and analyze them locally.
There are two options for accessing memory dumps generated inside ANY.RUN’s sandbox.

You can access them by clicking on the DMP button in the process tree section.

Alternatively, you can go to “Advanced Details” of a process that has the DMP icon next to it and navigate to the “Process dump” section, where you can download the dumps.
Let’s now see how you can address different types of packers.
SFX Installers
SFX (Self-Extracting Archives) is an archive format that, when executed, extracts files and can perform specific actions. In most cases, these archives can be unpacked statically with utilities like 7zip or WinRAR.
To see a typical SFX in action, let’s consider the following sample.
Such archives often have a distinctive icon, indicating they are self-extracting executables:

Use WinRAR to open the archive and view the extraction settings and packed files within the SFX.

After opening the file, on the right side, you’ll find extraction parameters, file paths, and the primary executable file. On the left, you can view all files packed within the archive.

MSI Files
To unpack MSI files, a common method is using the command line with msiexec /a. However, this method may not work for every file and can sometimes result in errors.
For instance, with the following sample, attempting this command in a sandbox triggers an error (see sandbox example).

An alternative solution is LessMSI, a specialized tool for extracting files from MSI packages.
Let’s see how it works this using the following sample.

Upload the LessMSI archive to a virtual machine in ANY.RUN via the upload button.

Launch the GUI version of LessMSI and select the MSI file. Next, the program will display a list of files and their paths for extraction.
Nullsoft Installer
Nullsoft installers are often straightforward to unpack using 7zip. By opening these files with 7zip, you can directly access the contents of the installer.
Let’s examine this sample for more details.
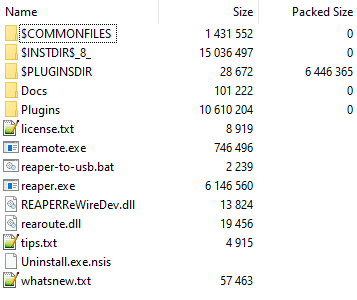
Opening the archive in 7zip reveals the files packed within it, including special directories that typically start with the $ symbol.
This approach allows you to explore the installer’s files easily. However, a limitation is that it doesn’t reveal the initial installation parameters, which may be necessary for deeper analysis.
InnoSetup
Unpacking InnoSetup installers requires specialized tools. The unpacking becomes more challenging because these files often contain embedded scripts that control the installation process.
In this case, 2 useful tools can be used:
- innoextract: A command-line tool designed to extract files from InnoSetup packages.
- innounp: Another tool that offers similar functionality, supporting various versions of InnoSetup.
Let’s consider this sample.
Start a virtual machine with the necessary utilities and unpack innoextract.

As a result, we’ll obtain several directories. The main one is app\Redist, which contains the executable file.
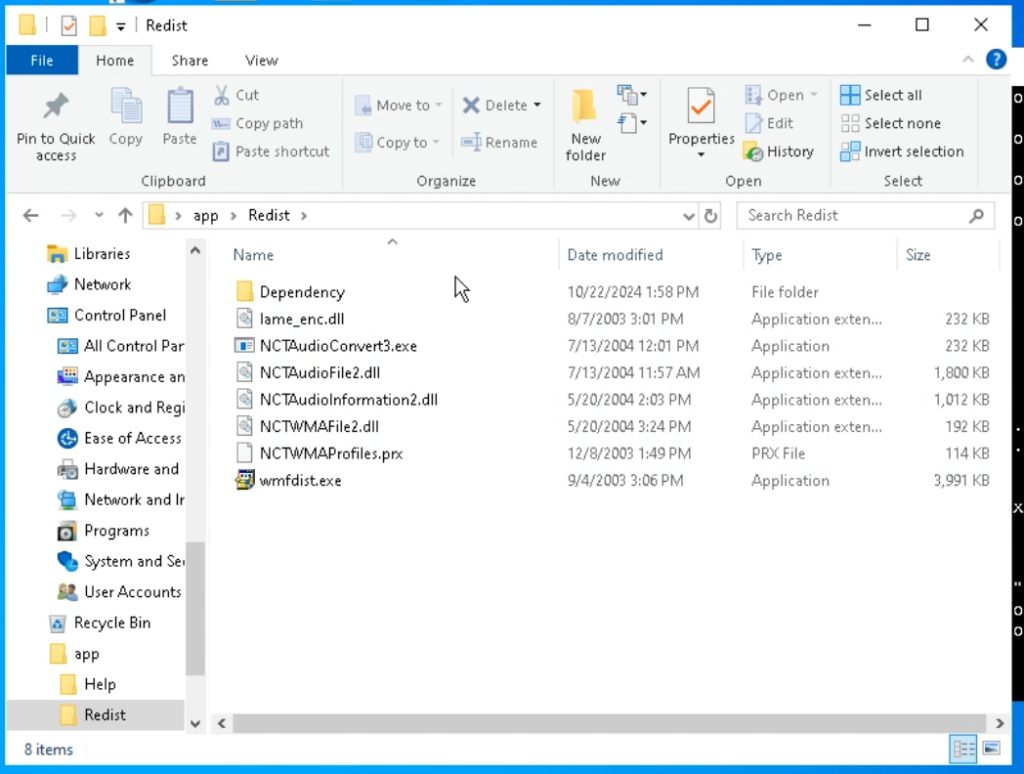
Additionally, files such as help documents, libraries, samples, and other related resources are extracted.
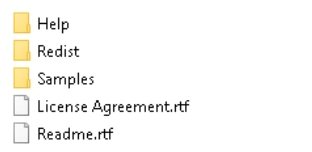
Registry data entries are extracted separately as well.

The app directory contains files unpacked by the installer.
The reg$HKCU directory contains data entries that are added to the registry under CURRENT_USER.
Innounp works in a similar way.

As a result, application and registry data are extracted.
The advantage of this utility is that it restores the installation script and saves it in a file.

We can open this file in a notepad.

The [Run] section contains information about the files that will be executed after unpacking.

NSIS + ASAR
It’s worth mentioning the SFX archives used by Electron.js.
Let’s consider this example.
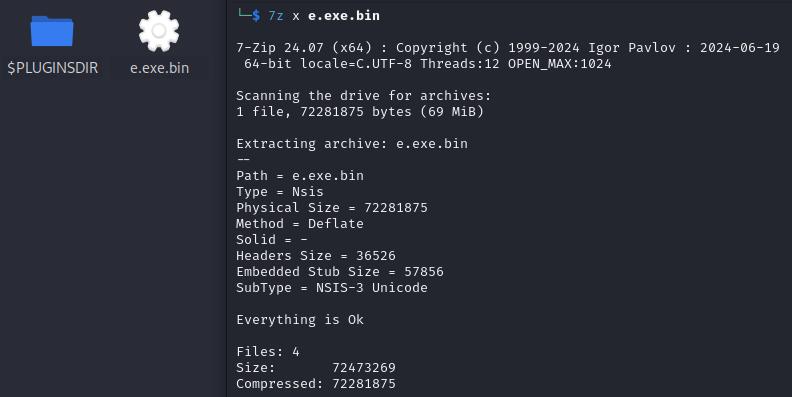
Download the EXE file and start the unpacking process.
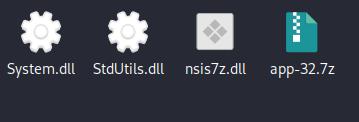
When extracting with 7zip, we obtain a folder containing various files, including an archive with a renamed Chromium executable (in this case, Runtime Broker.exe) and its libraries.

The Electron.js application data is stored in the resources directory.

The app.asar file is an archive containing the Electron.js application data.
To unpack it, you’ll need an npm module.
- Install npm: sudo apt install npm
- Run the following command to extract the archive: npx @electron/asar extract app.asar extracted
- If the asar module isn’t already installed, npm will prompt you to install it.
As a result of running the command, the archive will be unpacked into the extracted folder.

The node_modules folder contains the Node.js packages, and index.js is the initial script of the application.
UPX
UPX (Ultimate Packer for eXecutables) is a packer for executable files.
- Compatibility: It supports only native PE (Portable Executable) applications.
- Unpacking: UPX-packed files are often easy to unpack statically using the same UPX utility.
To unpack a UPX-packed file, you only need to use a single command:
upx –d <file> UPX can be identified by the presence of sections named UPX0 and UPX1 in the file.
Let’s observe it with the following sample.
First, download the sample and open it in DiE (version 3.10). DiE will indicate the presence of UPX, listing specific indicators.
Some malware samples use older versions of UPX. In such cases, you’ll need the corresponding version to unpack them. DiE suggests the recommended version, which, in this example, is 3.96.

To analyze a sample like this, it’s essential to remove the UPX compression; otherwise, the disassembler won’t be able to interpret the code correctly.
For instance, Ghidra—a free disassembler and decompiler—will display multiple errors when importing a compressed file.

During analysis, Ghidra will detect only a single function. The built-in decompiler will report the incorrect code.

In the image above, on the left side, there is a Listing displaying the single function, while on the right side, the Decompiler window shows an error message.
To conduct analysis, download the latest release of UPX from GitHub.
Next, upload the sample along with the upx.exe file (it’s not necessary to upload the entire archive) to the virtual machine.

To do this, switch to the Pro mode in the sandbox and select Tools collection. Here, you can either use previously uploaded tools or upload new ones.
Before starting the analysis, enter the “cmd” command in the Command line field. This will prevent the sample from running automatically and will open the console at the start of the session.
All further steps are carried out in the following analysis session.
Unpack the UPX archive and enter the following command in the console:
<path_to_upx>\upx.exe -d <filename> As a result of the command execution, the file will be overwritten with the decompressed version.

To ensure the unpacked sample is functioning correctly, let‘s run it in a sandbox.

When clicking the PE button, the Static Discovering window opens, where we can observe a different hash.
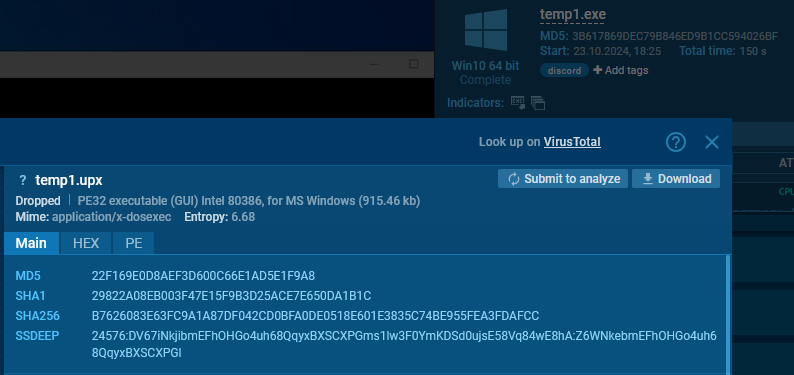
The Static Discovering window for the unpacked file, shows the name under which it was saved to disk. We can see a decrease in entropy, an increase in file size, and a different hash value.
Now, Ghidra can handle this file without any issues.
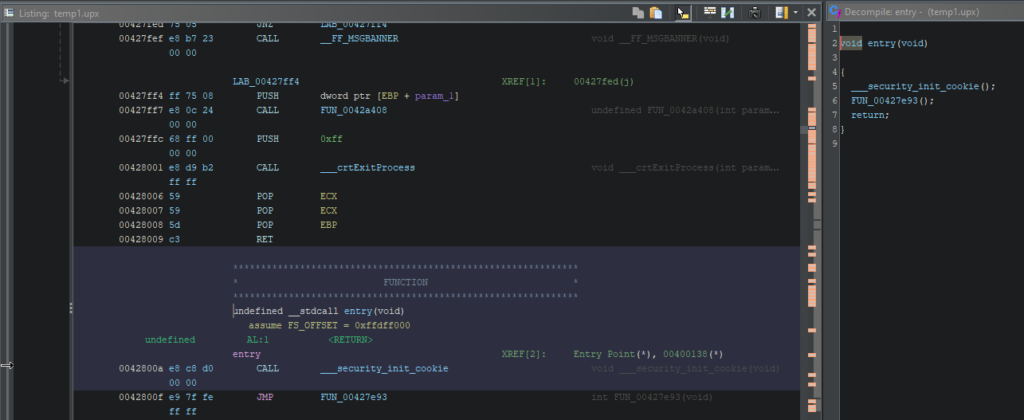
In the Listing section, we see numerous references and functions, and the Decompiler window displays the correct code.
The same process can be done on a physical machine, as UPX does not execute code during unpacking.

Learn to analyze cyber threats
See a detailed guide to using ANY.RUN’s Interactive Sandbox for malware and phishing analysis
Read full guide
AutoIt
AutoIt is often used as a crypter. The simplest way to detect AutoIt is by checking the file description. To do this, go to the Main tab in the Static Discovering window inside ANY.RUN and scroll down.
You may find different mentions of AutoIt in the description.
Let’s consider the following sample.
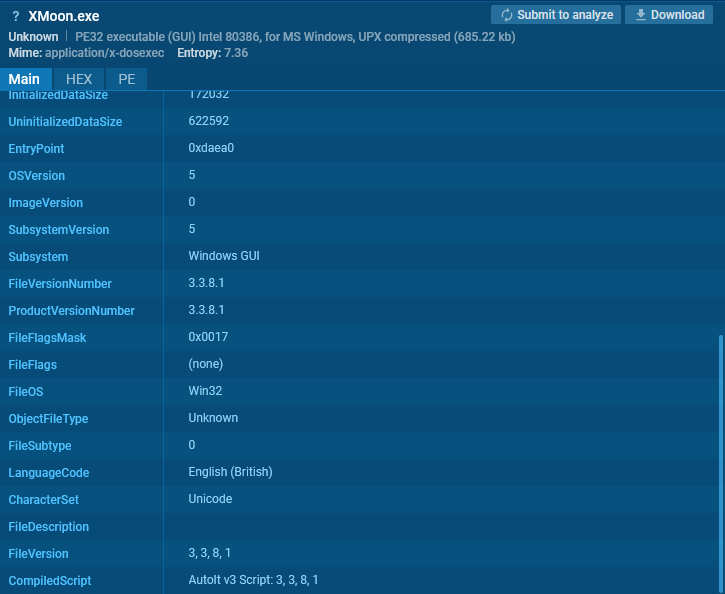
Here is another example. Usually, such a file is an AutoIt interpreter bundled with a script.

In some cases, a deeper examination is required. Let’s look at the following example.

In this example, AutoIt was detected by ANY.RUN’s sandbox. Let’s confirm this in DiE.

To extract and decompile the script, we can use AutoIt-Ripper.
Let’s install it using pip install autoit-ripper.
The latter is quite easy to use:
autoit-ripper <file> <output_dir> 
As a result of running the command, the restored script is saved to a file named script.au3. Besides, all the associated files were detected and saved.
Now it’s possible to analyze the script’s actions by opening it in a text editor.
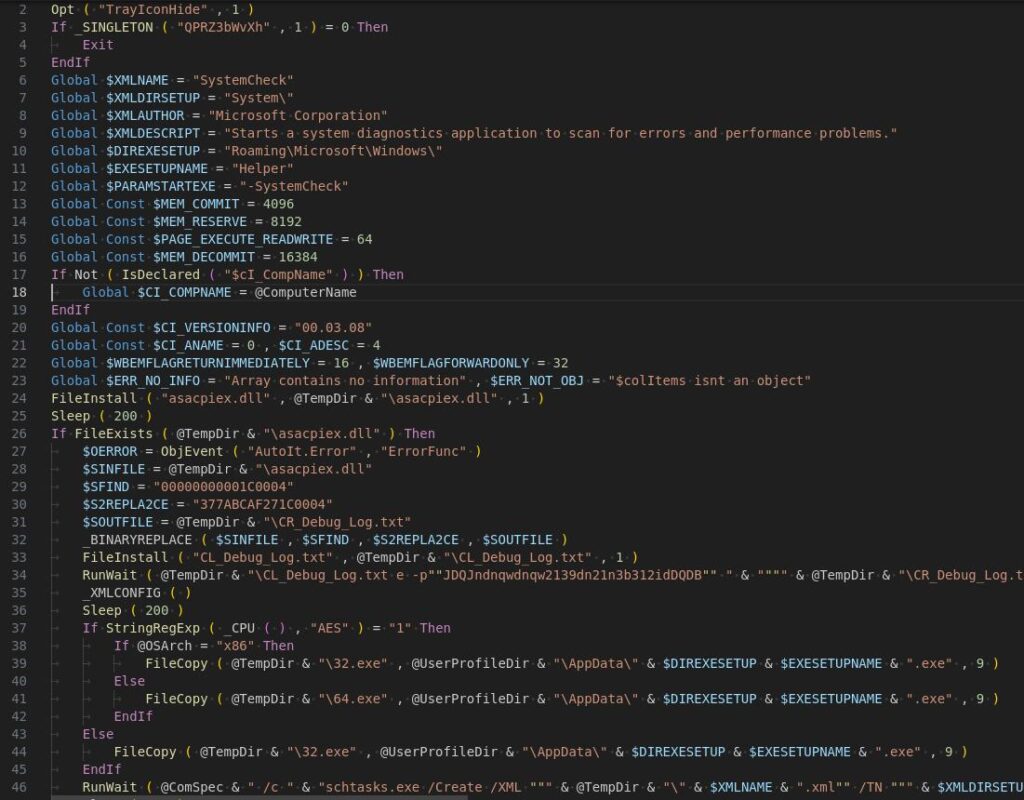
In this example, we see the execution of CL_Debug_Log.txt with specific parameters.

Opening CL_Debug_Log.txt in DiE reveals that it is a standalone version of 7zip.

In this way, the malware unpacks the files necessary for its operation. In addition, the script contains checks for execution in a virtual environment.

It also includes checks for the presence of antivirus software.

NetReactor
NetReactor is a packer and obfuscator for applications written in .NET.
- Supports code virtualization.
- Files and libraries are not saved to disk but are loaded directly into memory.
- Changes the structure of the code, making analysis more difficult.
Most files can be successfully unpacked using NetReactorSlayer, but for the best results, dynamic unpacking is recommended. This method executes the code within the operating system, allowing system functions to be called as needed for a more accurate unpacking process.
Let’s look at an example with the PureHVNC payload.
Next, run the analysis session using dnSpy and NetReactorSlayer.
dnSpy is no longer maintained; however, you can download a forked version.
Then, open the sample in dnSpy.
Before processing, you can see numerous namespaces.
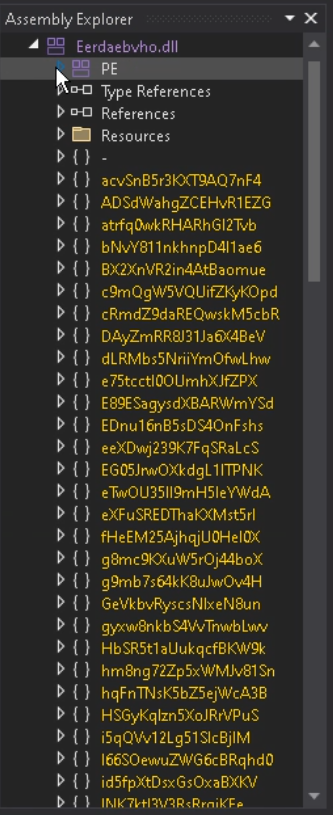
Let’s locate the configuration class.
Open Type References and locate the IPAddress class.
Right-click on it and select Analyze.

In the opened window, click on Used by to find the method where this class is used.

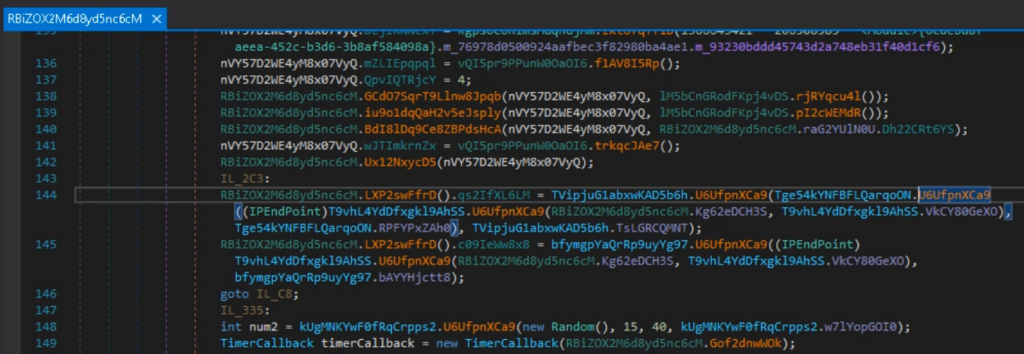
Now, open NetReactorSlayer and select the sample.
There are multiple settings available; the default settings work well for this purpose.
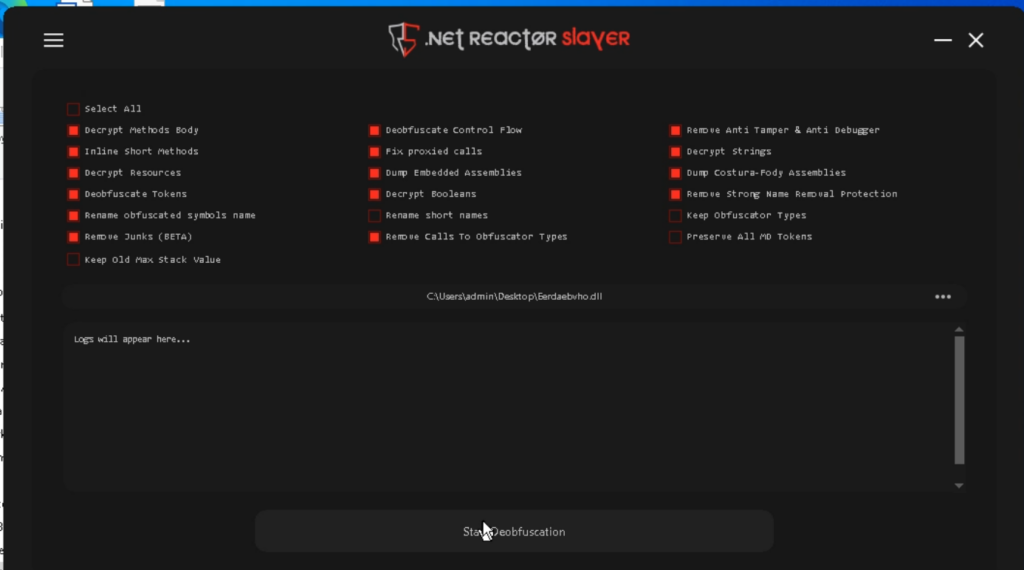
Click Start Deobfuscation and wait for the process to complete.
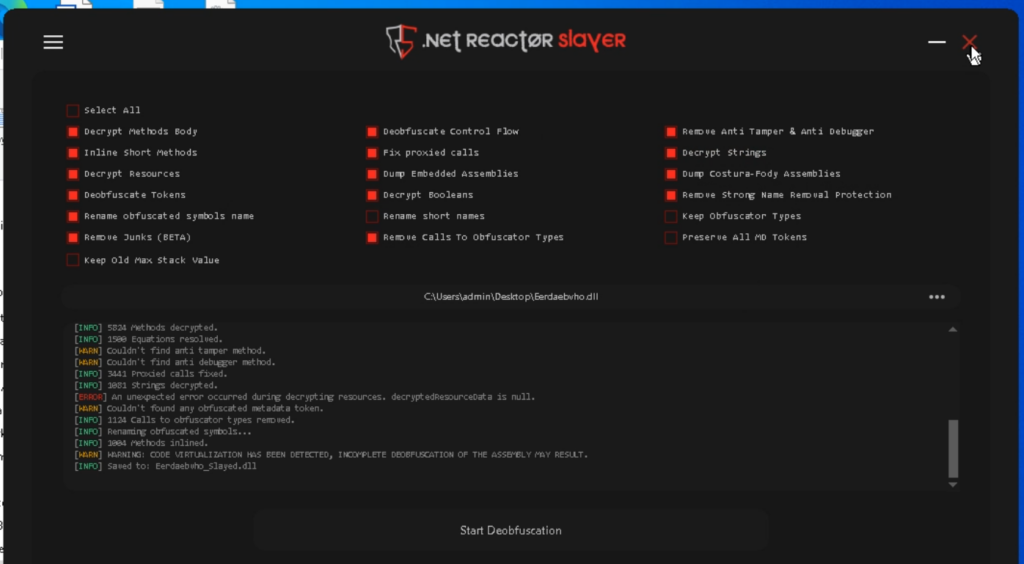
The program decrypts strings, simplifies the code, and even attempts to remove virtualization.
The file is saved with the suffix _Slayed.
Now, open the received file in dnSpy. As a result, the unnecessary namespaces have been removed.

The classes have been renamed too.

Next, let’s look for the usage of IPAddress as well.
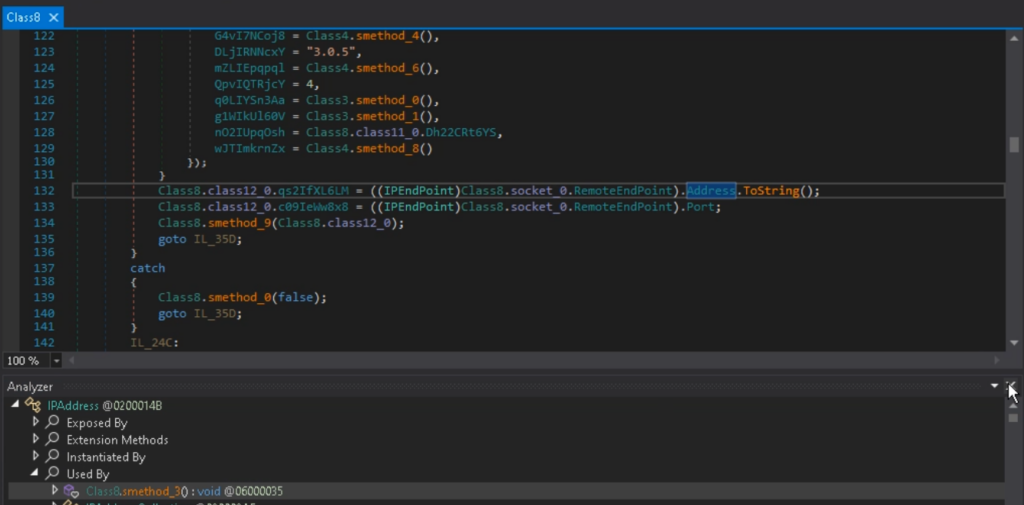
The lengthy class names have been shortened, and the fields have been renamed according to their respective values. The code has become easier to analyze, and string literals are now included.
Often, in addition to being packed, malware is stored in an encrypted form within a special loader (crypter).
This analysis demonstrates the process of extracting the payload using dnSpy.
After execution, the crypter decrypts the payload and performs an injection into the target process.
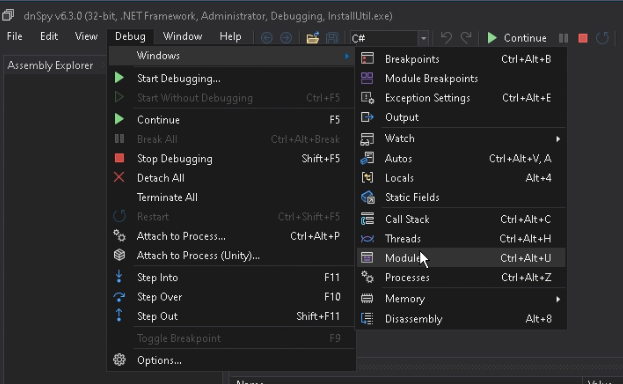
With the help of dnSpy, let’s attach the debugger to the process. To do this, go to the Debug tab and click on Attach to Process.

Then, choose the process you want.

Note that to debug 32-bit processes, you should run dnSpy x86, and for 64-bit processes, use dnSpy x64.
Pause the process and open the Modules window.
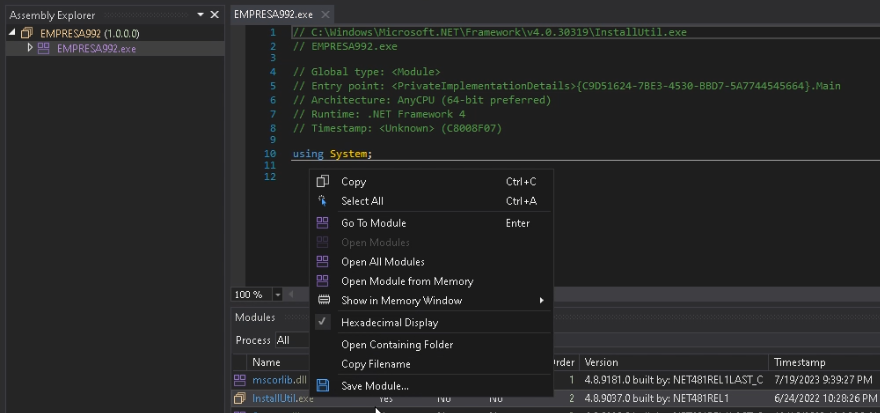
Right-click on the main module, then select Open Module from Memory.
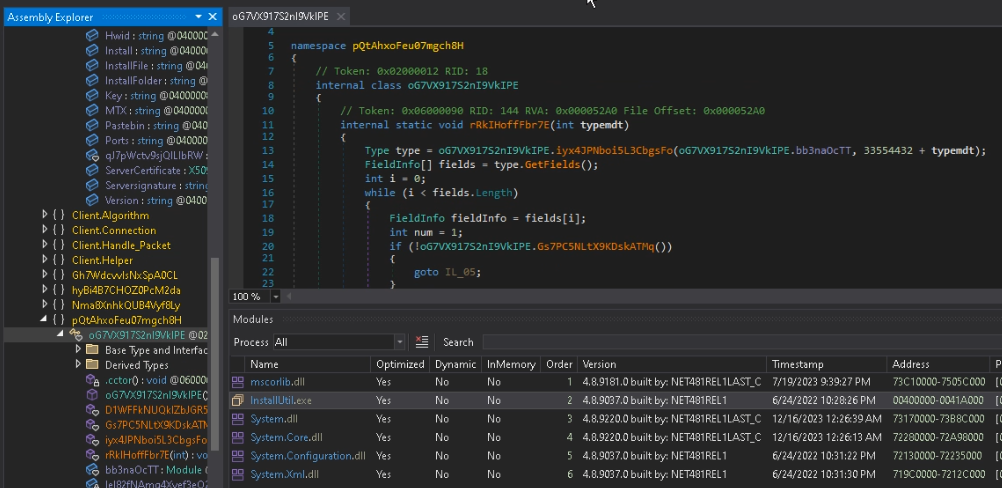
After opening the module, obfuscation can be observed.
Click Save Module and transfer the saved file to the console version of NetReactorSlayer.
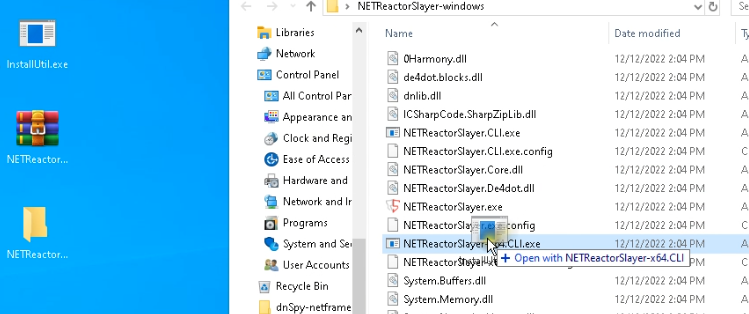
As a result, we get the following output.
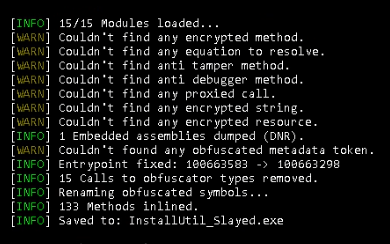
NetReactorSlayer corrected the entry point, removed unnecessary code, and saved result to disk as InstallUtil_Slayed.exe.
The associated library MessagePack.dll has been saved as a separate file.

Now, the payload InstallUtil_Slayed.exe can be run separately and analyzed through debugging (See sample analysis).
SmartAssembly and Other .NET Packers
Another popular packer for .NET applications is SmartAssembly.
Check out this example.
Besides obfuscating the code (which makes the execution order unclear and renames identifiers to unreadable terms), SmartAssembly complicates analysis with a large number of delegates that are resolved at runtime, including those used for decrypting strings.
Let’s open the sample in DiE and confirm the presence of the protector.
We can see how DiE detects Protector Smart Assembly.

In the US (User Strings) tab, there is an abnormally small number of strings.

Let’s switch to dnSpy.
Upon opening the sample, you will immediately notice an attribute indicating the presence of the SmartAssembly protector.

You will also notice the characteristic namespaces associated with SmartAssembly.

These artifacts are quite common among protectors, particularly in .NET applications.
Next, click on Go to Entry Point.

In this case, while the code (control flow) is not obfuscated, the strings are obtained through a delegate call with a numeric argument.

Earlier, we used NetReactorSlayer to remove the protector.
While it is a specialized tool, it can also be used for general purposes, such as simplifying code, though with some limitations.

Let’s try to simplify the code using NetReactorSlayer.

While this tool simplified the code readability, it was unable to decrypt the strings.

Now, let’s use another tool—de4dot—which is also part of what NetReactorSlayer uses for code simplification. You can also utilize de4dot-cex, which is the improved version of de4dot.
For this case, we will use de4dot to remove SmartAssembly.

As a result, the file is processed in a similar way.

However, the string encryption has also been removed.
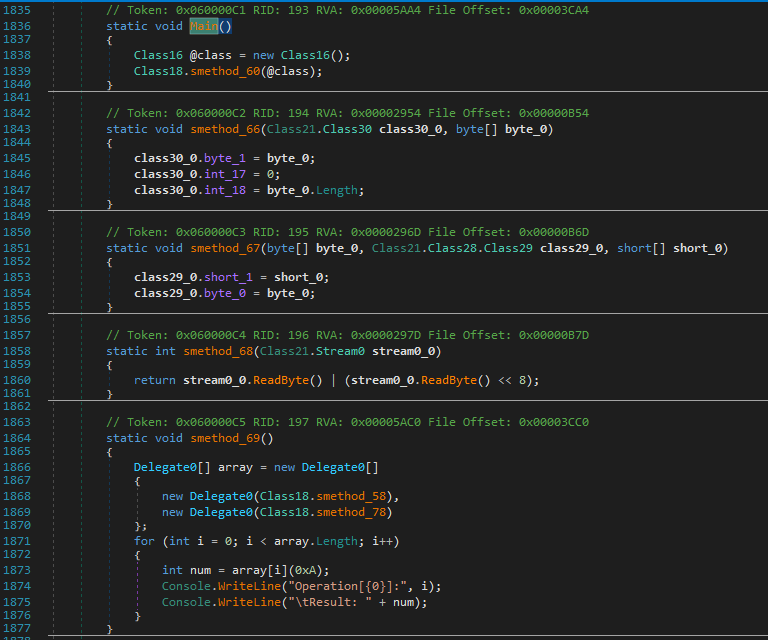
The GetString delegates have been replaced with string literals.
In DiE, you can view all the decrypted strings.
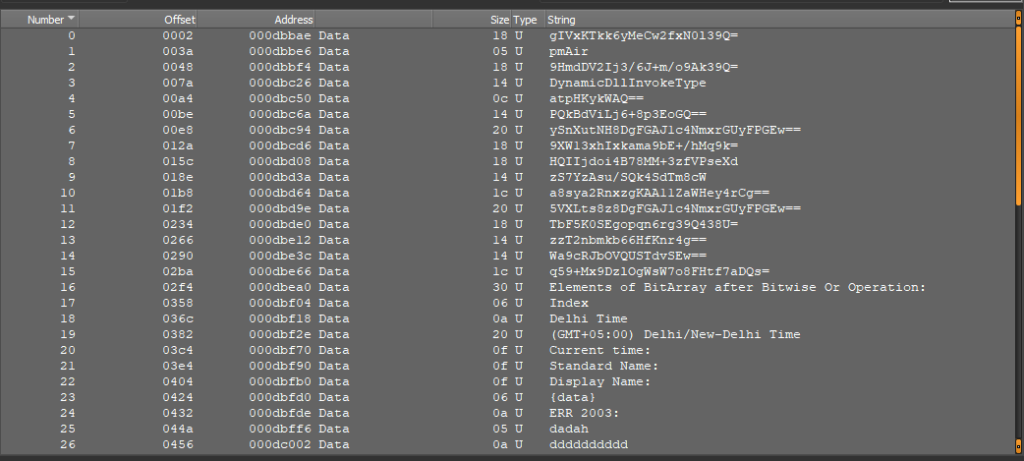
The processed file often retains functionality and can make runtime analysis easier.
de4dot works with many other protectors and can simplify code analysis.
If de4dot doesn’t succeed, try using NetReactorSlayer, which may be more effective at further simplifying complex code.
However, for older versions of NetReactor (below 6.0), de4dot remains the preferred option.
Themida, VMProtect
Themida and VMProtect are packers and obfuscators for applications that support virtualization and code mutation.
- Virtualization: This feature protects the malware code at runtime, not just in static analysis.
- Extracting Samples: In most cases, virtualization is not applied, allowing an unpacked sample to be extracted from memory, though it may be partially modified.
- Static Unpacking: This is generally unlikely, as these commercial packers adapt quickly to new analysis methods.
For a more detailed analysis, refer to our article: VMProtect and Themida Malware Analysis.
About ANY.RUN
ANY.RUN helps more than 500,000 cybersecurity professionals worldwide. Our interactive sandbox simplifies malware analysis of threats that target both Windows and Linux systems. Our threat intelligence products, TI Lookup, YARA Search and Feeds, help you find IOCs or files to learn more about the threats and respond to incidents faster.
With ANY.RUN you can:
- Detect malware in seconds.
- Interact with samples in real time.
- Save time and money on sandbox setup and maintenance
- Record and study all aspects of malware behavior.
- Collaborate with your team
- Scale as you need.
Maksim Mikhailov
Malware Analyst at ANY.RUN at ANY.RUN | + posts
Maksim is a malware analyst at ANY.RUN.
Maksim is a malware analyst at ANY.RUN.
