2020-07-23 01:40:00 Author: www.hahwul.com(查看原文) 阅读量:93 收藏
Hi hackers and bugbounty hunters. today I'm going to talk about findomain monitor options. Since the config option has been added, it is very simple to configure the monitoring environment. Speed, usability, everything => findomain
찾다보니 findomain에 monitor 옵션이 있어서.. 한번 적용해볼꼄 테스트하고 글로 작성합니다. findomain 초기부터 있던 옵션인데 불편한 사용방법(config 옵션이 없어서 host / user / pw 를 직접 넣어줘야했었죠..)으로 인해 사용하지 않다가 최근에 2.0 버전대로 올라오면서 config가 생겨서 겸사겸사 테스트 해봅시다.
Personally I like using amass / subfinder / findomain :D
Findomain Monitor option
If you look at the main options for today... -m -c option. The -m option is notify for you when you discover a new subdomain. The -c option is an option that you can use by saving several options as a setup file. Toml / json / hjson etc.
오늘 할 내용의 주요 옵션을 보면.. -m -c 옵션입니다. -m 옵션을 사용하면 새로운 subdomain을 발견할 때 노티를 줄 수 있습니다. -c 옵션은 여러가지 옵션을 설정 파일로 저장하여 사용할 수 있는 옵션입니다. toml / json / hjson 등을 지원합니다.
-m, --monitoring-flag Activate Findomain monitoring mode.
-c, --config <config-file> Use a configuration file. The default configuration file is findomain and the format can be toml, json, hjson, ini or yml.
(yeah! tttoml!!! I like this!)
Setup postgresql
Install postgresql
$ brew install postgresql
$ postgres --version
postgres (PostgreSQL) 12.3
Init postgresql
$ initdb /usr/local/var/postgres -E utf8
Start service
$ pg_ctl -D /usr/local/var/postgres start && brew services start postgresql
I had a version-related problem setting. It's a problem that I've been using postgresql for a long time. Please refer to
다만 전 문제가 발생했었는데요.. 혹시나 비슷한 케이스가 나온다면 참고하셔서 진행해주세요.
2020-07-23 00:42:38.908 KST [96367] DETAIL:  The data directory was initialized by PostgreSQL version 11, which is not compatible with this version 12.3.=> 원인(Why?): 예전에 11버전때에서 init 해둔게 있어서, 충돌
=> 해결(Solution): $ rm -rf /usr/local/var/postgres ; initdb /usr/local/var/postgres -E utf8
Create database
$ createdb findomain
$ psql findomain
Findomain Config
You can connect to the DB using the options below. Even if you process alias or snippets such as profile or pet, it doesn't look very good to have many options. So let's solve it easily with config file.
아래와 같은 옵션들로 DB 연결을 할 수 있습니다. profile이나 pet 등 alias or snippet 처리를해도 옵션이 많은건 영 좋지 않은 모습입니다. 그래서 config 파일로 쉽게 해결해봅시다.
        --postgres-database <postgres-database>       Postgresql database.
        --postgres-host <postgres-host>               Postgresql host.
        --postgres-password <postgres-password>       Postgresql password.
        --postgres-port <postgres-port>               Postgresql port.
        --postgres-user <postgres-user>               Postgresql username.
(config 옵션은 상대적으로 최신버전에서 제공하는 기능입니다. 전 작년인가부터 findomain을 사용했는데 그땐 없었네요. 오랜만에 업데이트..)
I just made a config.toml file and path under .config. You can just do it however you like.
요즘 대다수 도구들의 config 경로로 자주 사용되는 경로에 구색만 맞춰서 넣어줍시다.
~/.config/findomain/config.toml
# Findomain configuration file. The following listed values are all the possible values you can set at the moment.
# IF YOU ARE NOT USING ONE OF THEM PLEASE LEAVE THIS EMPTY OR DELETE IT FROM THE FILEpostgres_connection = "Your postgres connection URI here in the following format: postgresql://user:password@host:port/database"
virustotal_token = "Your VirusTotal token here"
fb_token = "Your Facebook token here"
securitytrails_token = "Your SecurityTrails token here"
spyse_token = "Your Spyse token here"
c99_api_key = "Your C99.nl API Key here"
telegrambot_token = "Your Telegram bot token here"
telegram_chat_id = "Your Telegram chat ID here"
slack_webhook = "Your Slack webhook URL here"
discord_webhook = "Your Discord webhook URL here"
set postgres_connection and slack_webhook !
이번 작업에서 실제로 필요한건 postgres_connection 과 slack_webhook 정도니 필요하신 것들만 세팅합시다.
# findomain
postgres_connection = "postgresql://user:password@localhost:5432/findomain"
slack_webhook = "https://hooks.slack.com/services/~~~"
Testing
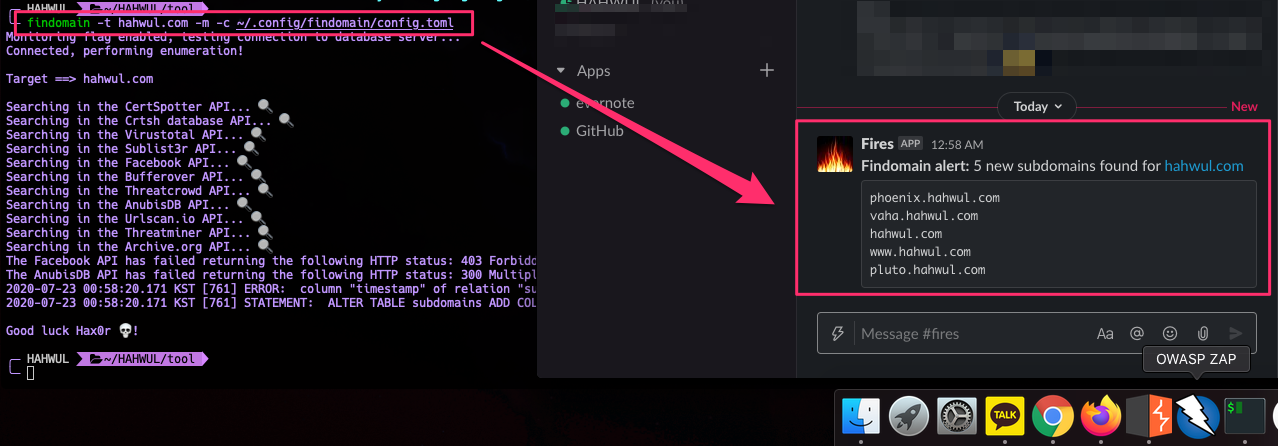
이제 subdomain scanning을 해보면, 결과가 slack으로 넘어가는걸 확인할 수 있습니다.
$ findomain -t hahwul.com -m -c ~/.config/findomain/config.toml
And you can see that it's stored in the DB :D
그리고 스캔한 이력은 postgresql에 저장되며 신규 도메인이 잡혔을 때만 slack으로 웹훅이 전달됩니다. db에는 간단하게만 저장되네요. id name timestamp
如有侵权请联系:admin#unsafe.sh


