2020-07-04 03:30:00 Author: www.hahwul.com(查看原文) 阅读量:79 收藏
I use both Burp pro/ZAP/Cli base proxy. When it comes to simply testing the web, it doesn't come as big, but when testing mobile, the certificate is quite annoying. (Especially the test phones that are temporarily used..)
So, starting this year, we have created a custom certificate rather than the default certificate for each tool and applied it to various tools. Today I am writing as a way to create a custom certificate and apply it to various devices and tools.
저는 Burp pro / ZAP / Cli base proxy 3가지 모두를 사용합니다. 단순히 웹만 테스팅할 땐 크게 와닿지 않지만, 모바일을 테스트할 땐 인증서가 상당히 귀찮습니다. (특히 임시로 사용하는 폰들은..)
그래서 올해부터 Burp / ZAP 등의 기본 인증서가 아닌 별도로 인증서를 생성해서 모든 테스팅 기기가 공유 하면서 사용하고 있는데요. 최근에 회사 맥북을 변경 하면서 다시 세팅이 필요해서 겸사겸사 메모 했던 걸 글로 풀어 봅니다.
TL;DR
# make key
openssl genrsa -out ca.key 2048# make cert
openssl req -days 365 -key ca.key -x509 -new -nodes -sha256 -out ca.pem
# make PKCS#12 file
openssl pkcs12 -out ca.p12 -inkey ca.key -export -in ca.pem
# on burp
# Proxy > Options > Import / export CA Certificate > Add ca.p12
# on ZAP
# Options > Dynamic SSL Certificate > Load > Add ca.p12
# on iOS
# Settings > General > Profile & Device Management > Installation
# Settings > General > Information > Certificate trust settings > Trust the registered certificate
# on Mac
# double click pem file > Add system keychain > Set trust all this pem
Make you custom certificate file
First, create a key file
먼저 키 파일을 생성 해줍니다.
openssl genrsa -out ca.key 2048
Next, let's create an x509 certificate with the generated key file. Importantly, -days options.
Due to the iOS policy, certificates created after September 2020 cannot have an expire time of 368 days or more. So I set it to 365 days.
그다음 생성된 키 파일로 x509 인증서를 만들어 줍시다. 여기서 중요한 건 -days 옵션으로 유효 기간을 1년으로 지정해 주었는데, 이는 iOS쪽 인증서 정책으로 인해 1년 이상의 인증서는 유효하지 않게 보기 때문에 1년으로 주었습니다.
openssl req -days 365 -key ca.key -x509 -new -nodes -sha256 -out ca.pem
https://support.apple.com/en-us/HT211025
What's changing
TLS server certificates issued on or after September 1, 2020 00:00 GMT/UTC must not have a validity period greater than 398 days.This change will affect only TLS server certificates issued from the Root CAs preinstalled with iOS, iPadOS, macOS, watchOS, and tvOS. Additionally, this change will affect only TLS server certificates issued on or after September 1, 2020; any certificates issued prior to that date will not be affected by this change.
Connections to TLS servers violating these new requirements will fail. This might cause network and app failures and prevent websites from loading.
2020.09.01 이후 생성된 인증서 부터 적용이라 기존에 쓰시는 건 크게 지장 없을 순 있는데요, 요즘 GTS(Google Trust Services) 인증서도 갱신 주기를 짧게 가져가고 있어서, 어찌보면 구글도 비슷한 정책을 적용할 수도 있다고 생각이 드네요. (다만 COVID19로 인해 모든게 딜레이 되었으니 당분간은 괜찮을 거에요)
 |
| GTS... 3month?? |
Next, it is created with PKCS#12. This supports DER and PKCS#12, #11 for both Burp / ZAP. Just make it according to your personal preference.
다음으론 PKCS#12 로 생성해줍니다. 이는 Burp / ZAP 모두 DER과 PKCS#12, #11을 지원하는데요. 그냥 개인의 기호에 따라 만들어주시면 됩니다.
p12 파일 생성
openssl pkcs12 -out ca.p12 -inkey ca.key -export -in ca.pem
The difference is that PKCS#12 has both the certificate/private key in the file.
다른 점은 PKCS#12가 파일 내 인증서/개인키를 모두 가지고 있다는 점입니다.
p12 / pem summary
[ Add pkcs12 ]
on Burp
on ZAP[ Add pem file ]
Android
iOS
Mac Application
Etc..
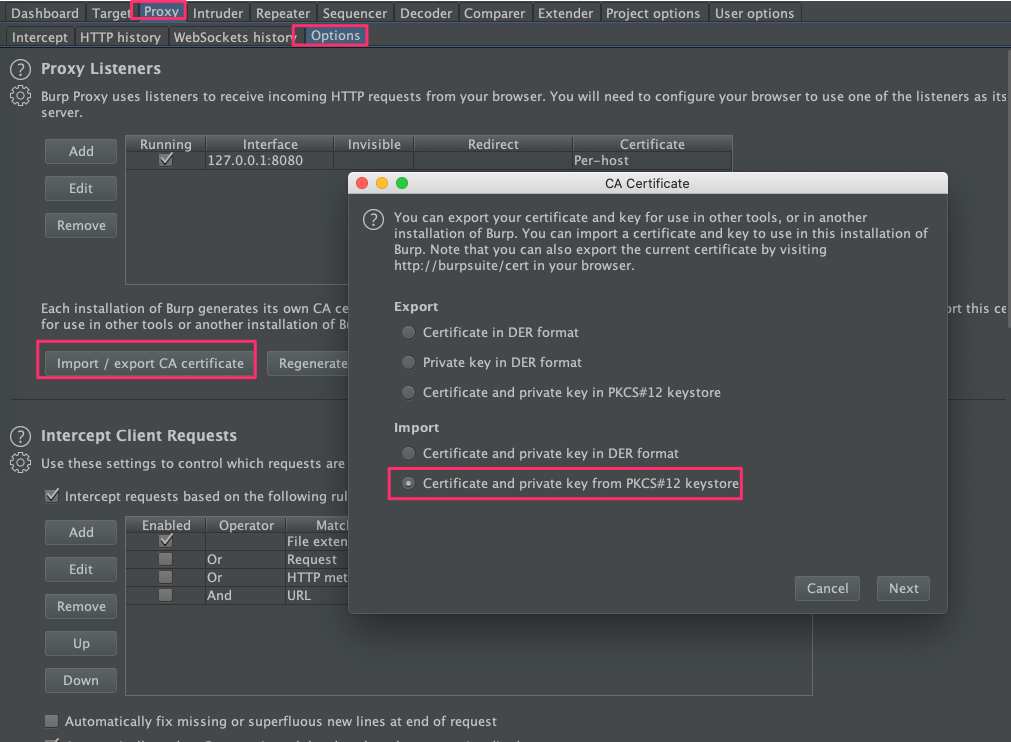
on Burpsuite
Proxy > Options > Import / export CA Certificate > Add ca.p12
At this time, it asks for the password. Enter the password used to create p12 (pkcs12).
이 때 패스워드를 물어보는데, p12(pkcs12) 생성 시 사용한 패스워드를 넣어 줍니다.
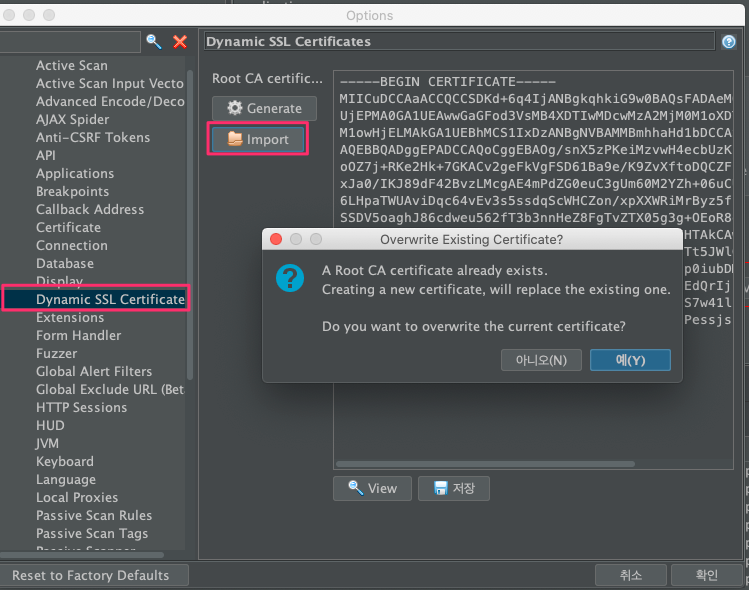
on ZAP
Options > Dynamic SSL Certificate > Load > Add ca.p12
p12 password, same here
Burp와 동일하게 p12 파일 만들 때 사용한 패스워드를 같이 입력해 줍니다.
for MAC Application
When testing PC applications such as Mac/Windows, a lot of local proxies are used. At this time, it is convenient to register a certificate and set trust in each OS. I only have a Mac environment, so I only write on a Mac basis.
Open the ca.pem file you just created in finder. Then, it will be registered directly in the keychain. At this time, you can always set it to Trusted by double click pem file > Add system keychain > Set trust all this pem
Mac/Windows 등 PC application을 테스트할 땐 로컬 프록시를 많이 이용하는데요,이때 각 OS에도 인증서를 등록하고 신뢰설정 해두면 편리합니다. 저는 Mac 환경만 있으니 Mac 기준으로만 작성합니다.
아까 만든 ca.pem 파일을 finder에서 열어줍니다. 그러면 키체인에 바로 등록이 되는데요, 이 때 인증서 클릭 > 정보보기 > 신뢰설정에서 모두 항상 신뢰함으로 설정해 주시면 됩니다.
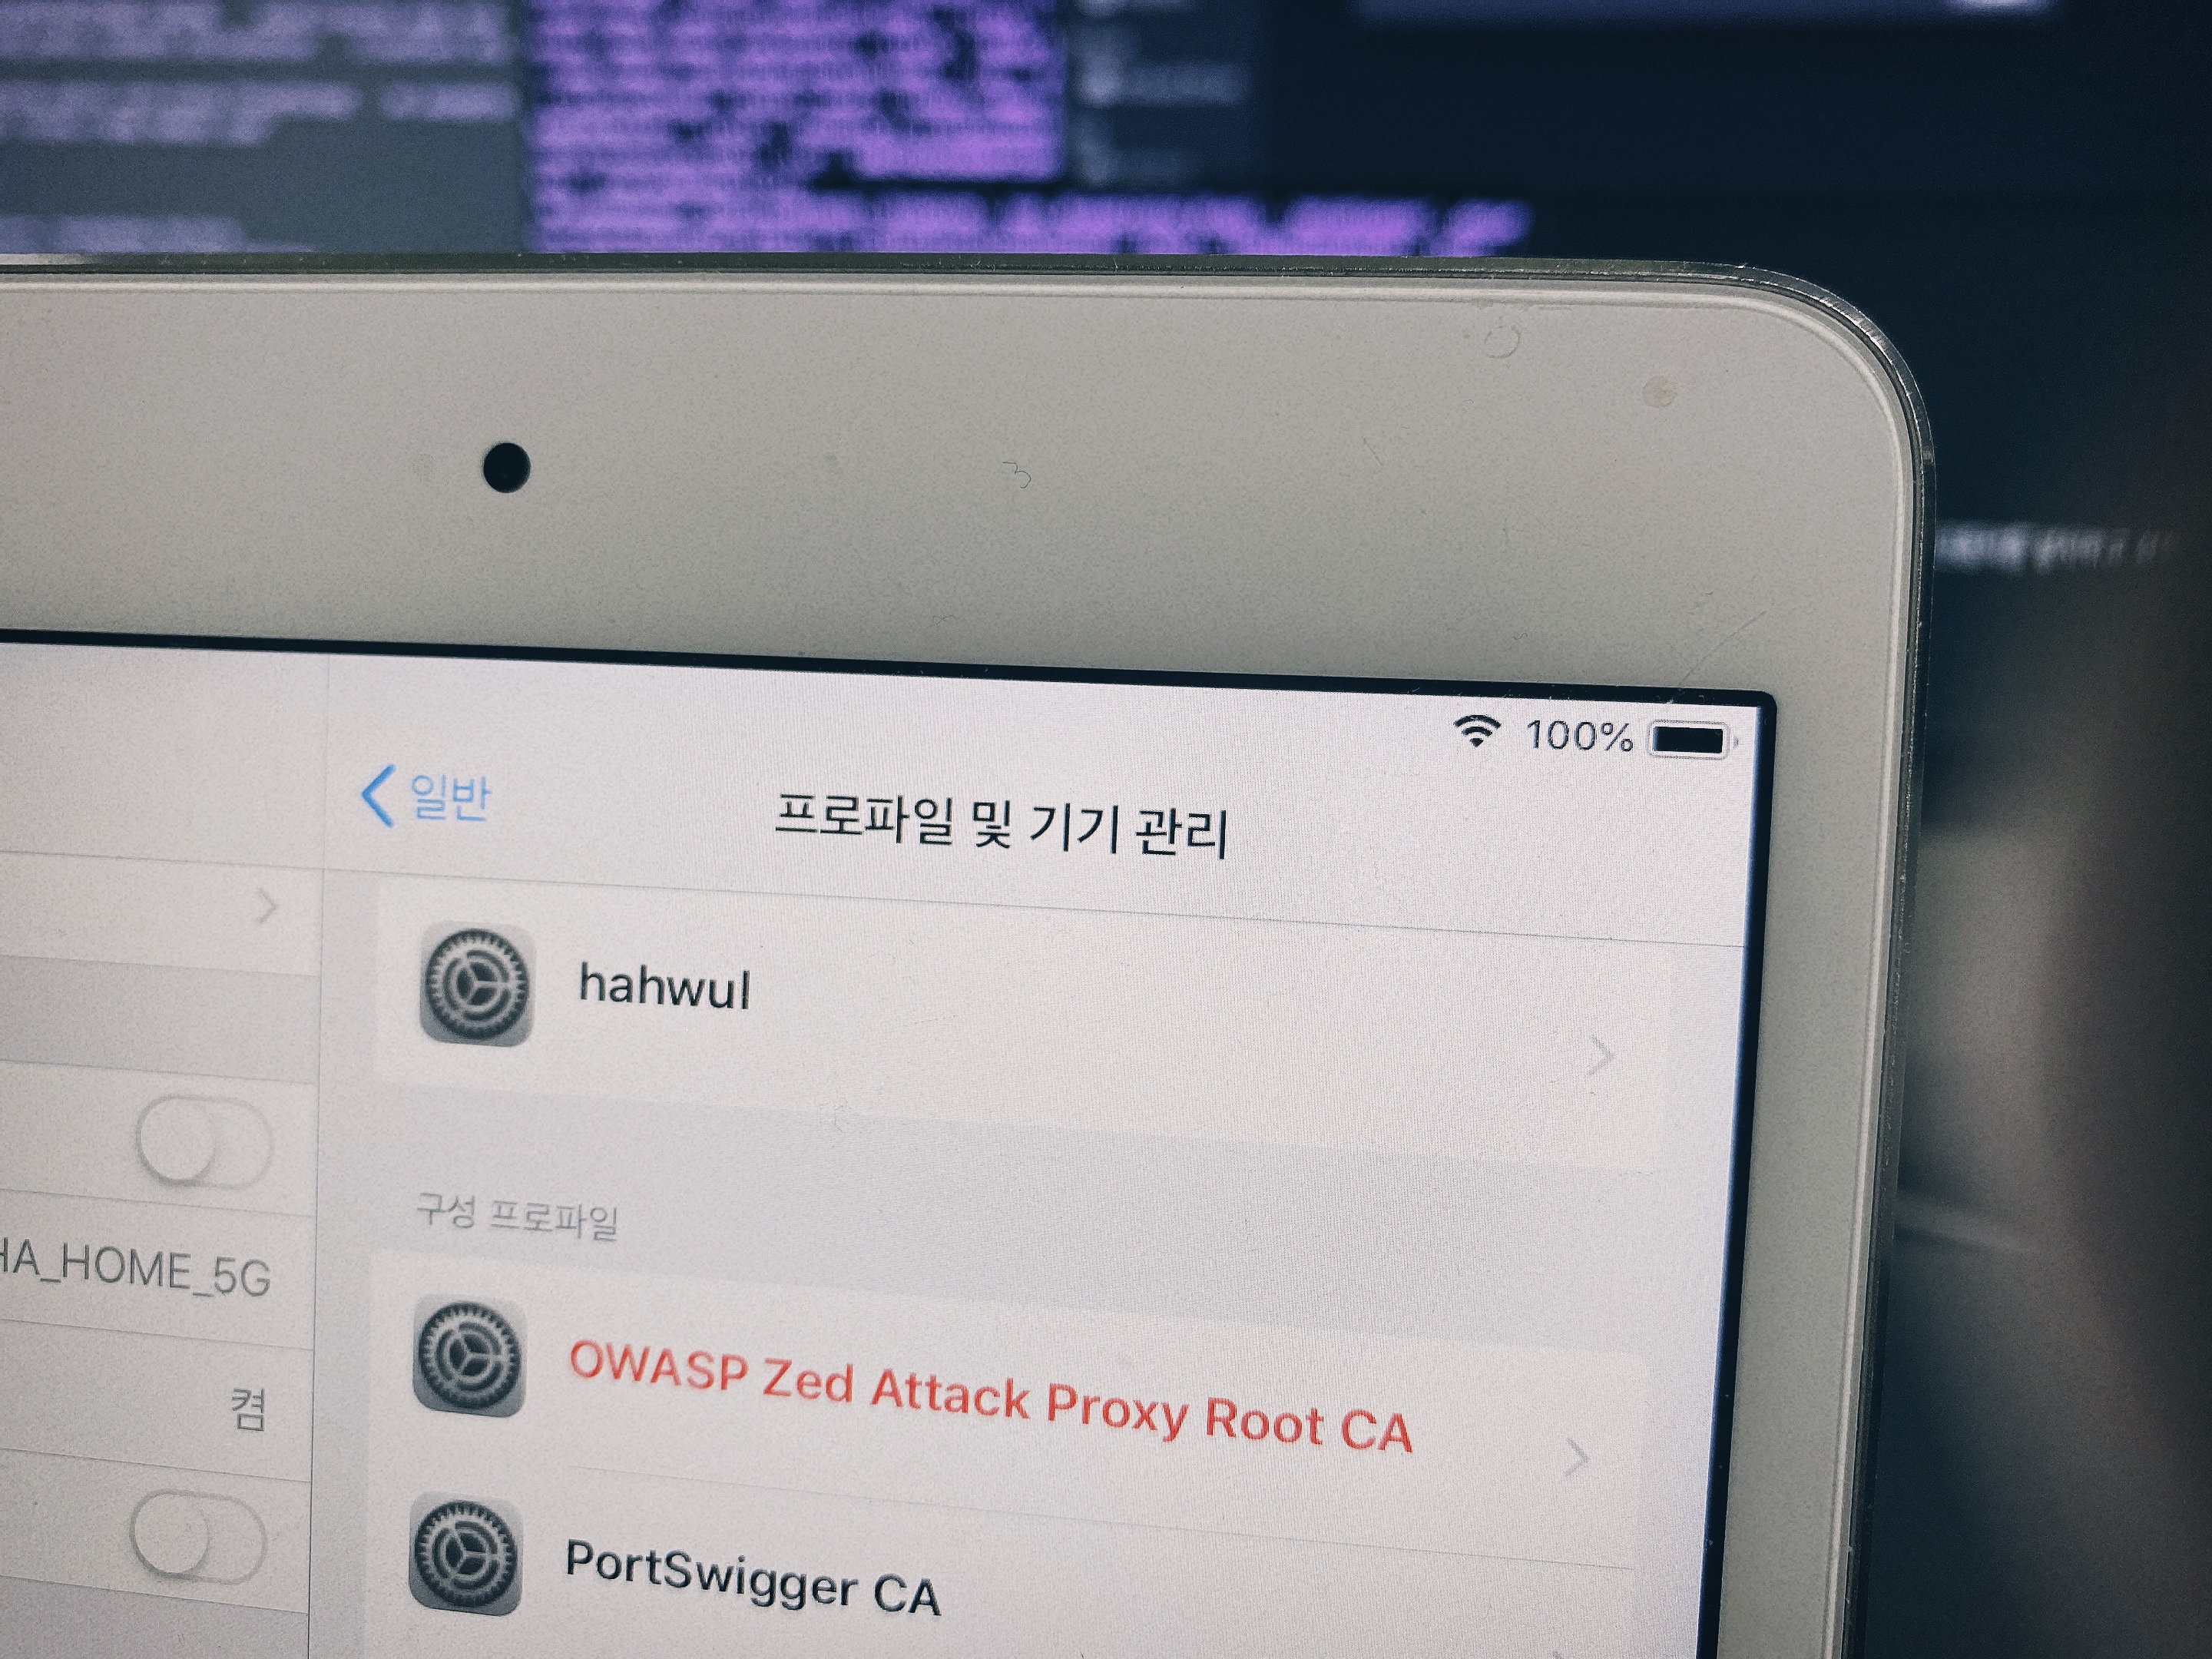
for iOS Devices
Download pem file on iOS devices and install it. I just moved the file to Airdrop and installed it.
Settings > General > Profile & Device Management > Installation
After that, you need to set the trust of the certificate for not problem.
Settings > General > Information > Certificate trust settings (at the bottom) > Trust the registered certificate
pem 파일 받아서 설치해주시면 됩니다. 저는 그냥 Airdrop으로 파일 이동 후 설치했습니다.
설정 > 일반 > 프로파일 및 기기 관리 > 설치
이후에 인증서 신뢰설정을 해줘야 문제없이 사용이 가능합니다.
설정 > 일반 > 정보 > 인증서 신뢰설정(맨 아래) > 등록한 인증서 신뢰처리
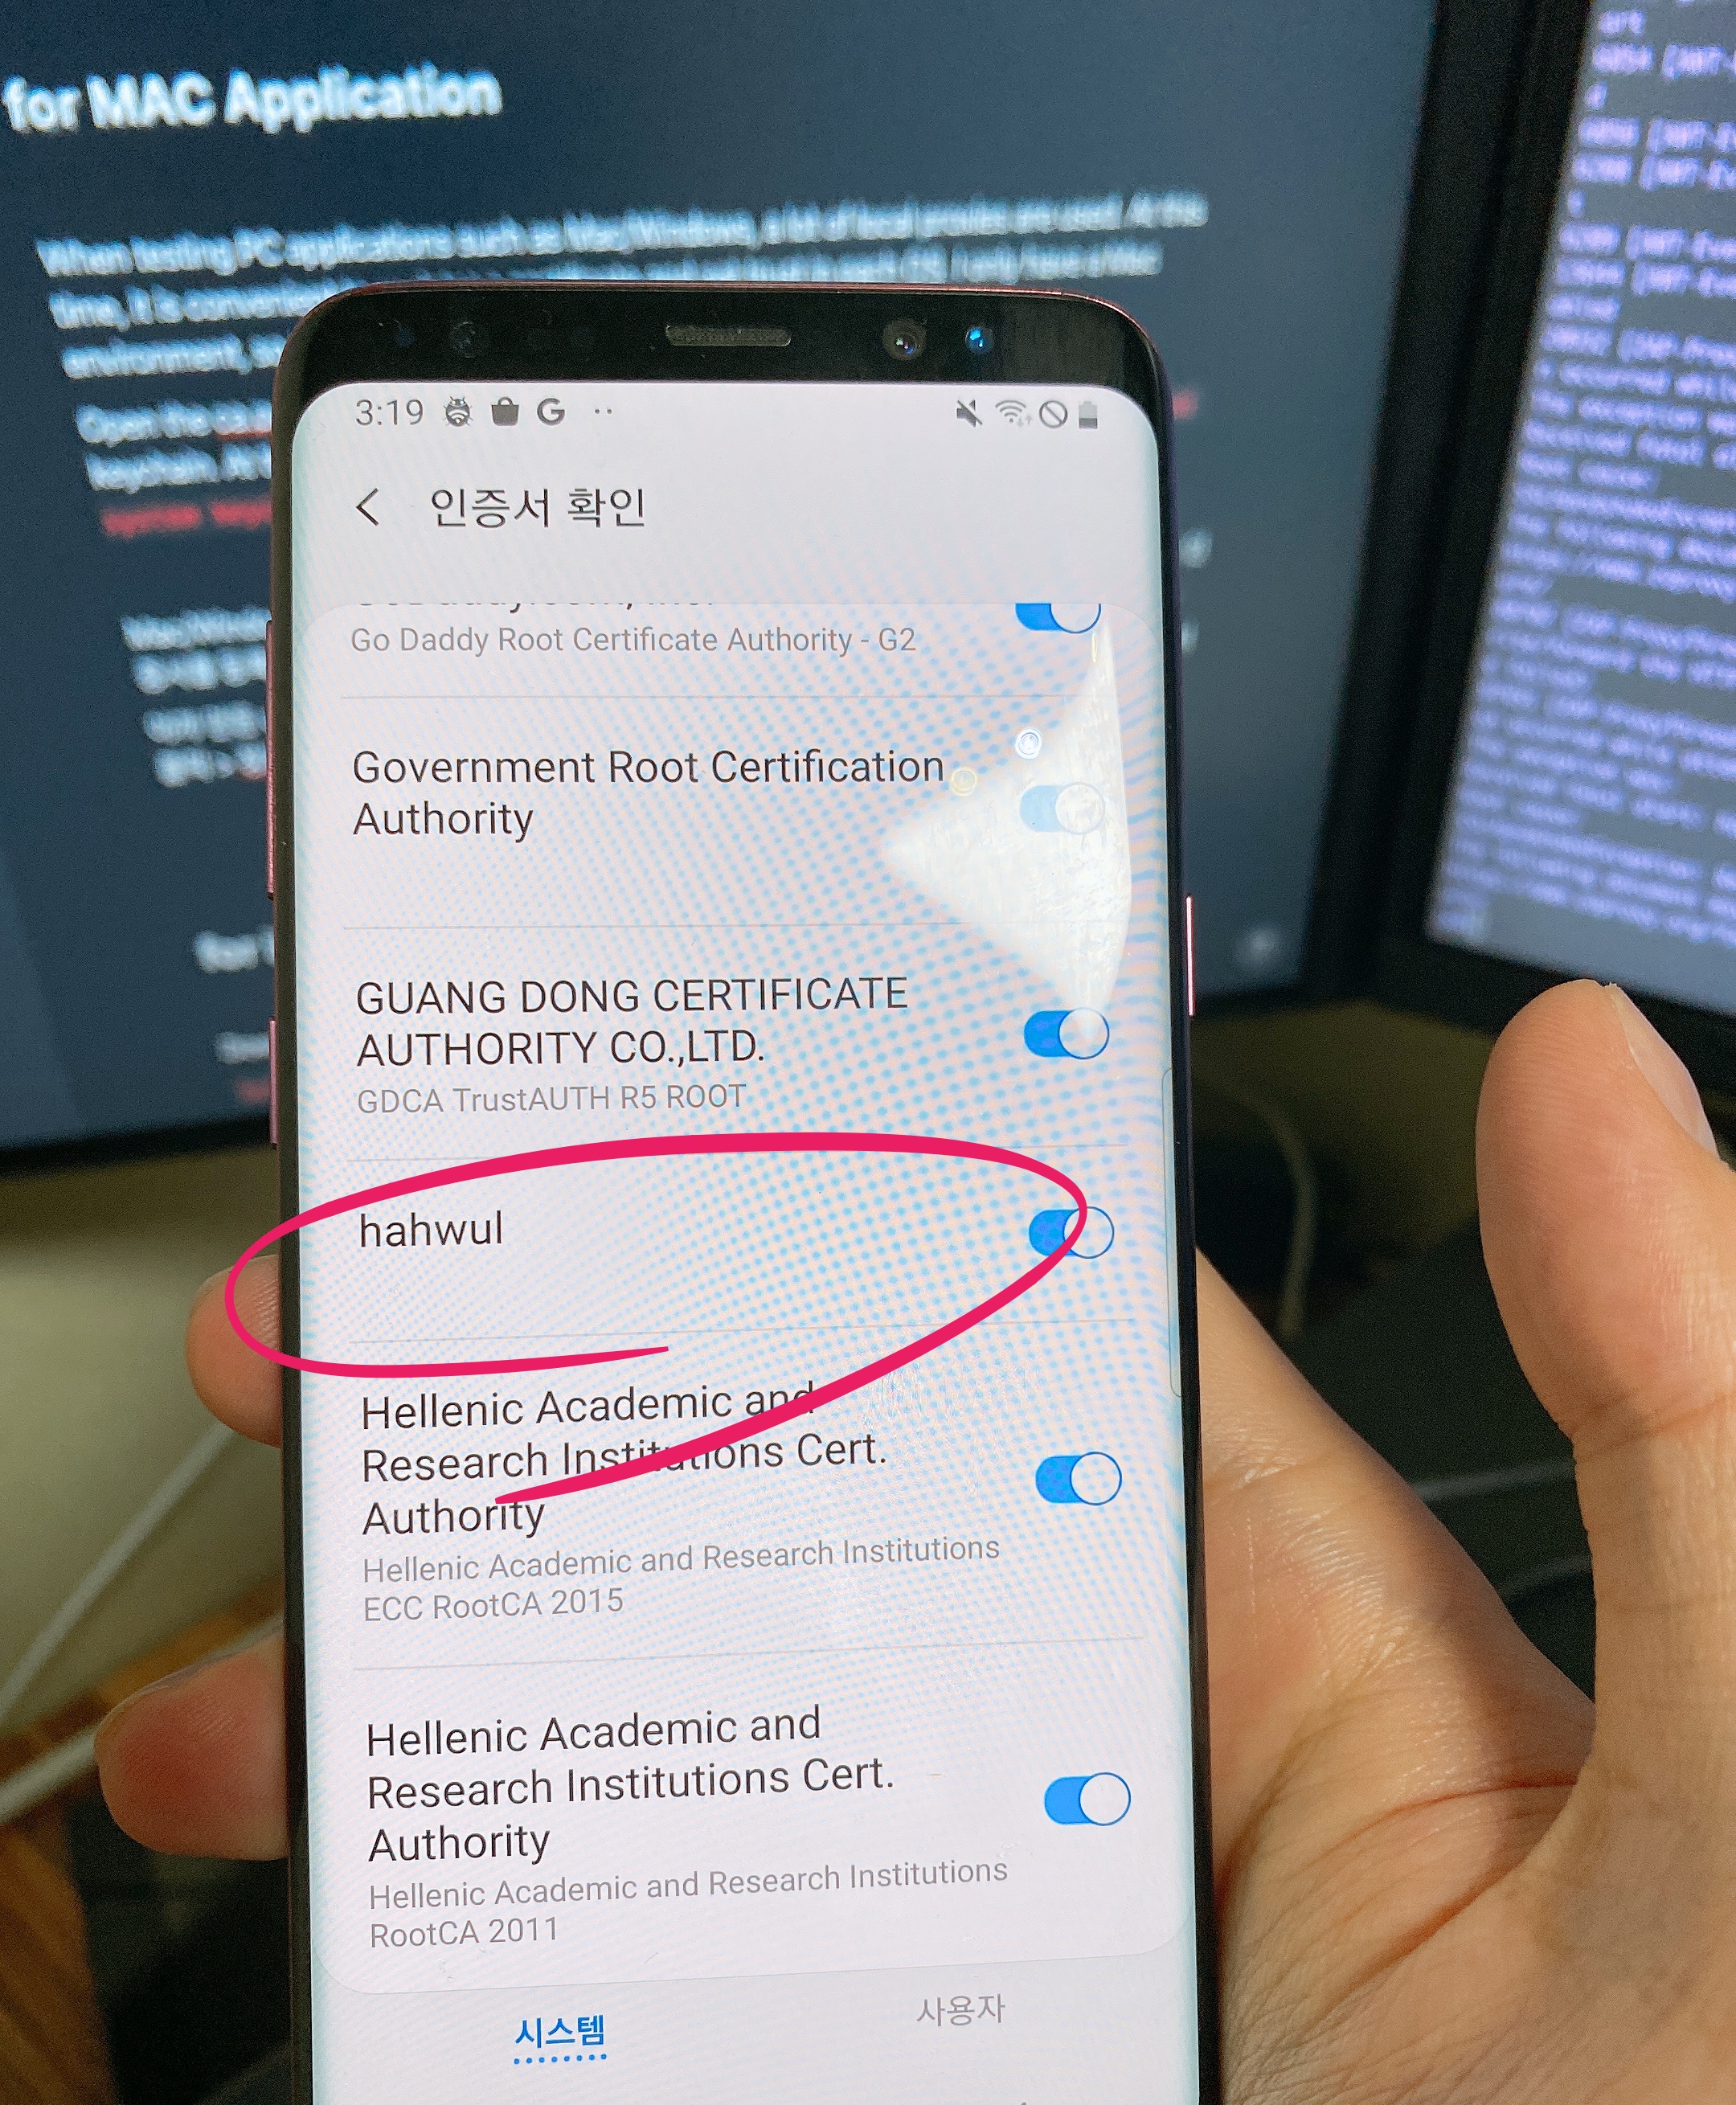
for Android Devices
Since Android 7, the difference in user/system certificate authority, simply put it into the sdcard and install it, all traffic is not caught. So I need to put the PEM file in the system certificate path. (If you did the above using DER format, you must create a pem file by format conversion. openssl x509 -inform DER -in "cacert.der" -out burp.pem)
안드로이드는 7 이후부터 사용자/시스템 인증서 권한 차이로 단순하게 sdcard에 넣어서 설치하는 방법으론 모든 트래픽이 잡히지 않습니다. 그래서 PEM 파일을 system 인증서 경로에 넣어줘야합니다.
(만약 위 과정을 DER로 하셨다면 포맷 변환으로 pem 파일을 만들어줘야합니다 openssl x509 -inform DER -in "cacert.der" -out burp.pem)
First, look at the subject hash of the pem certificate file with openssl. The 8-character hash value is displayed.
먼저 openssl로 pem 인증서 파일의 subject hash를 봅니다. 8글자의 해쉬값이 나타닙니다.
openssl x509 -inform PEM -subject_hash_old -in ca.pem0bcb8637
-----BEGIN CERTIFICATE-----
MIICuDCCAaACC
Now rename the pem file to hash + .0. The reason for this change is that it is the format used by the Android system.
이제 pem 파일의 이름을 hash + .0 로 바꿔줍시다. 이렇게 변경하는 이유는 안드로이드 시스템에서 사용하는 포맷이기 때문이에요.
cp ca.pem 0bcb8637.0
Then, put the file as /sdcard as adb and remount the android system to grant write permission.
그다음 adb로 파일을 /sdcard로 넣어준 후 android system을 remount 하여 쓰기 권한을 부여합니다. (기본적으론 readonly)
adb push 0bcb8637.0 /sdcard
adb shell
$ su
$ mount -o remount,rw /system
$ cp /sdcard/0bcb8637.0 /system/etc/security/cacerts/
$ chmod 644 /system/etc/security/cacerts/0bcb8637.0
Then, put the file as /sdcard as adb and remount the android system to grant write permission.
그다음 위와 같이 system 인증서 경로(/system/etc/security/cacerts/) 에 넣어 주시고 권한 설정만 해주시면 끝납니다.
如有侵权请联系:admin#unsafe.sh


