
Flare-On 6
Flare-On Challenge is an annual competition organized by FireEye (the FLARE team). It is like a marathon of reverse engineering. Each year we get 12 crackmes of increasing difficulty to solve. You can download the tasks here.
This year I finished as 106.
In this post I will describe the last 3 tasks of the competition:
WARNING: Work in progress. I will be adding more details to this post.
Task 10 – “Mugatu”
[Mugatu.7z; password: flare]
In this task we get an EXE (Mugatu.exe) and two encrypted GIFs: best.gif.Mugatu, the_key_to_success_0000.gif.Mugatu.

The EXE is a ransomware, and the two GIFs are encrypted by it. We are supposed to decrypt one of those GIFs (best.gif.Mugatu) in order to get the flag.
The EXE is slightly obfuscated. For example, the Imports are replaced at runtime by some other imports. So, analyzing it statically we may get confused. In order to analyze it statically with a valid result, we should recover its real imports first. In order to do this, we can just dump it from memory once it is run by any dumper that can reconstruct the imports. In my opinion, the best for this task is Scylla. Once we have the main exe dumped with proper imports reconstructed, it becomes much more readable.
Inside the main executable there is a payload, that is the core of the ransomware. It is manually loaded by the main EXE. We can unpack this DLL statically in the following way:
However, it is not that simple. If we extracted the DLL statically, we will find that its imports don’t make much sense. It is because the main EXE replaces them on load. So, we need to find the valid imports for this DLL.
We can see the fragment of EXE’s code where the DLL is manually loaded.

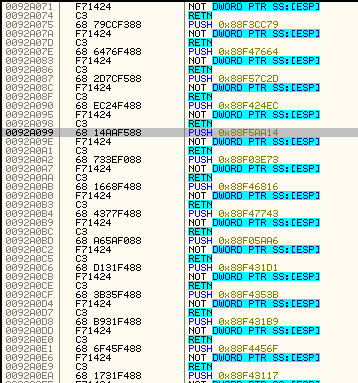
The imports are loaded in an obfuscated way, that makes them quite difficult to reconstruct. They are not filled directly to the thunks, but into a proxy list, that looks in the following way:
Due to the used import obfuscation, the previous simple trick of running it and dumping won’t work again. We could try to deobfuscate them from the memory, but the better approach is to patch the loader, and just prevent the obfuscation from being applied.
Let’s take a look at the function that do the import loading. Just after the Import address is fetched, it is obfuscated:
It is being filled in the chunk of the emitted code:

In order to prevent the obfuscation, I applied some patches in the loader:
1) do not obfuscate the import address
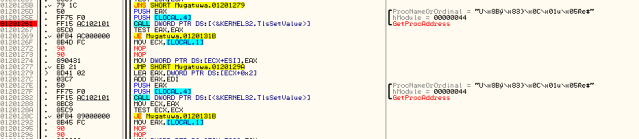
2) write the import address directly to the thunk, not to the proxy

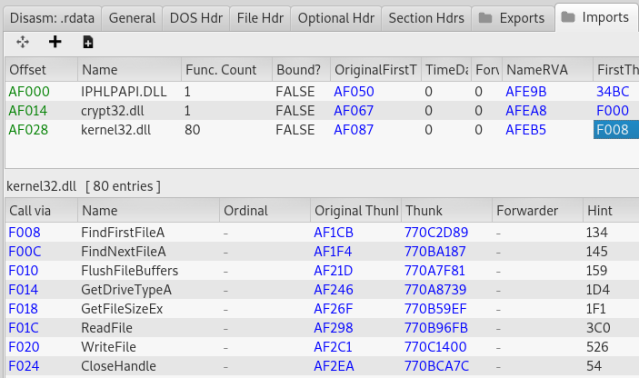
Then I dumped it with PE-sieve with option imp 3 (complete Import Table reconstruction). As a result I got a valid DLL that I could easily analyze statically. The import table reconstructed by PE-sieve:
After the DLL is manually loaded within the main EXE, it’s Entry Point (the DllMain function) is being called:

Then, an exported function is being called, with a parameter “CrazyPills!!!”:

Once we follow this function in a DLL, we will see the logic responsible for encrypting files.
The function that does the encryption is not called directly, but via obfuscated callback:
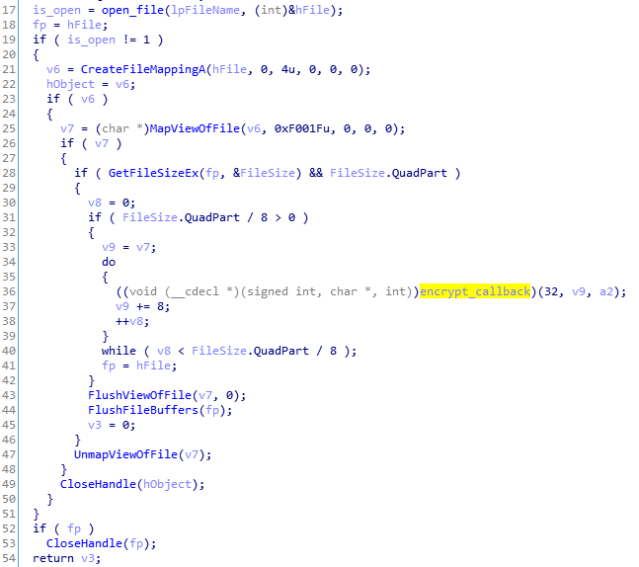
This callback is deobfuscated by XOR with the argument supplied to the function:

By following it in the debugger to the place where the deobfuscation is done, we can see the address of the callback function:
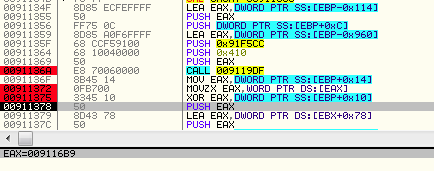
The callback is the function at RVA = 0x16b9.
We can follow it in IDA:
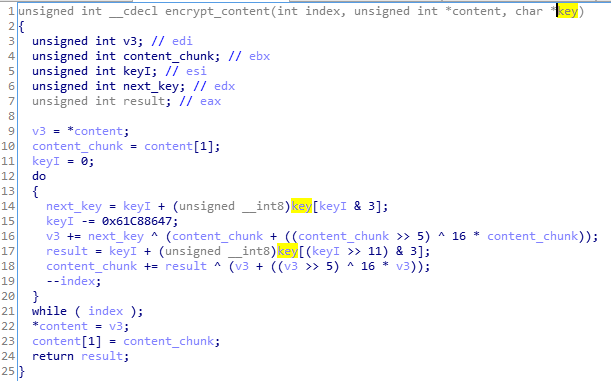
If we analyze it closer, we will find that it is an XTEA algorithm, but with few modifications. First we need to write a decrypting function for it.
I found this implementation very helpful to base my decryptor upon. The few things that are changed comparing to this implementation are: the delta, and the key buffer type (in the original implementation the key is an array of DWORDs). The second modification makes the strength of the crypto significantly lower: the key has only 4 BYTEs, not 4 DWORDs as in the valid implementation, so it is easy to be bruteforced.
The solution to this task:
https://github.com/hasherezade/flareon2019/blob/master/task10/task10_sol.cpp

Task 11 – “vv_max”
[vv_max.7z; password: flare]
In this task we are facing a Virtual Machine, using AVX2 instructions. That’s why it will not work on some older processors which have no AVX2 support. If we try to run it on such processor we get the following message: “Your processor/OS is ‘too old'”.

If the machine supports AVX2, it passes the verification, and prints “Nope!” in case of a wrong input.
Overview of the main function responsible for verifying the arguments.

The function that I renamed to “vm_process_bytecode” is responsible for calculating some “hash” from the input. Then in the function “vm_check_flag” this “hash” is being compared to a hardcoded one.
Inside this function “vm_check_flag”:
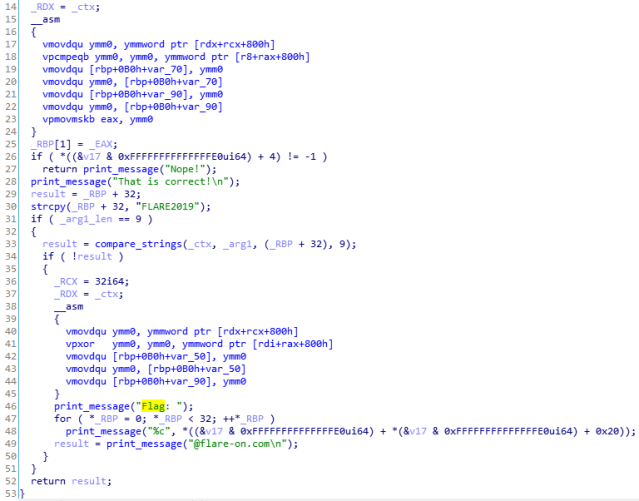
At this moment we know that the crackme expects 2 commandline arguments. The first one must be “FLARE2019”, the second: a 32 bit long string. The second argument is processed by a function implemented by the VM, and the result is compared with a hardcoded “hash” that is 24 bytes long.
The fragment of code responsible for making the comparison:

The valid “hash”:
70 70 B2 AC 01 D2 5E 61 0A A7 2A A8 08 1C 86 1A E8 45 C8 29 B2 F3 A1 1E
Rather than analyzing the functionality in the details, I decided to treat the VM as a black-box, and make some tests, checking how the output changes depending on the given input.
I noticed that the input is processed in chunks. A single chunk of 4 bytes gives 3 bytes of the output. Also, I understood that it is not a hash, but rather some encoding, because a change in a single byte of the the chunk content was not fully changing the output content.
At this moment I decided that I will try to brutforce the solution, by finding appropriate chunk of the input for each chunk of the output. Yet, I wanted to avoid re-implementing the full VM, so I decided to go for some sort of instrumentation of the original code.
After trying various options, I decided to use the patched version of the original sample. I patched in this way that the returned value (DWORD) will contain the selected bytes of the output.
The modified version of the “vm_check_flag” function:
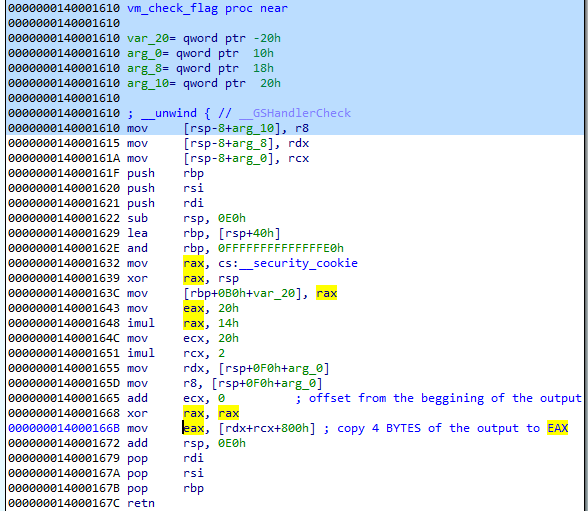
I removed the part responsible for comparing the “hash” calculated from the input with the hardcoded one. Instead, we will just copy its chunk into EAX register. Then, we need to NOP out the code that sets the EAX register to 0.

Let’s test the prepared sample using one of the saved input-output sets. We will be checking the output chunk with the help of a command:
echo %errorlevel%
Example:
Input: "01111111111111111111111111111119"
Output: D3 5D 75 D7 5D 75 D7 5D 75 D7 5D 75 D7 5D 75 D7 5D 75 D7 5D 75 D7 5D 7D

DWORD=-680174125 -> D7755DD3 (little endian) -> D3 5D 75 D7
As we can see, the returned value is valid.
Now we just need to write a brutforcing application that will integrate the patched module, and crack the full value, chunk by chunk. After each iteration we need to patch the app again and change the ECX value, in order to advance to the next chunk. So, in the first round ECX = 0.

Since each output chunk is 3 bytes long, we will use only 3 bytes from the returned DWORD. Also, the value of the ECX will be advancing in the increments of 3.
During the tests with the brutforcer I noticed, that rather than trying to crack the 4 byte long input chunk as a whole, I should crack it by finding:
- 1-st byte of the input that gives the 1-st byte of the output
- 4-th (last) byte of the output hat gives the 3-rd (last) byte of the output
- two middle values of the input (2nd and 3rd) that gives middle (3rd) value of the output
Finding this was able to speed up the cracking time a lot. I also automated the process of patching the ECX in the modified vv_max executable.
This is the complete solution:
https://github.com/hasherezade/flareon2019/tree/master/task11

During the process of cracking I started to notice that the output looks like something familiar… Yes, it is Base64! I noticed it too late – but from the other hand side it was so much fun to write this crazy bruteforcer for it!

Task 12 – “help”
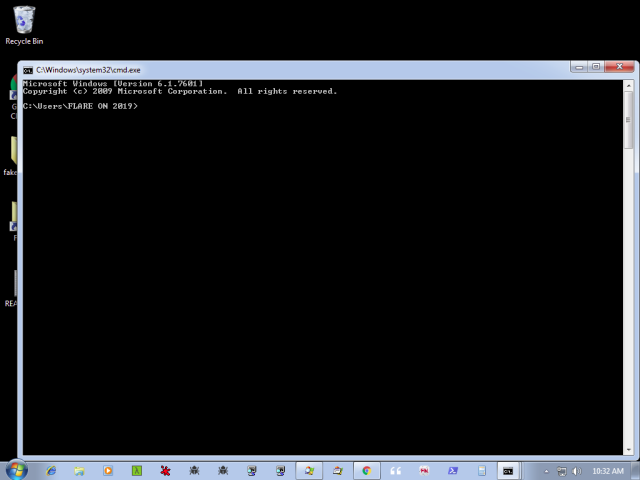
In this task we receive a memory dump: help.dmp, along with a pcap: help.pcap. Both have been captured on the infected system. Our task is to analyze the infection.
I started by using volatility. First, I found what was the profile appropriate to analyze the given OS. For some reason volatility detected it as Windows 10 64 bit. However, loading the dump with this profile resulted in errors. Most of the volatility functions were not working. It turned the OS is just detected wrongly. If we open the same dump in WinDbg, we see that in reality it is Windows 7 SP1 64bit. We needed to manually find the appropriate volatility profile. The one that turned out to be valid is:
Win7SP1x64_23418
Finally, after this change, we could see a significant improvement, and volatility started to work as it was supposed to.
I poked around, listing processes, network connections, drivers… One thing that drawn my attention was a driver man.sys, with a path containing “Flare On 2019” keywords.
volatility -f help.dmp --profile=Win7SP1x64_23418 modules

Volatility Foundation Volatility Framework 2.6
Offset(V)          Name                 Base                             Size File
------------------ -------------------- ------------------ ------------------ ----
0xfffffa800183e890 ntoskrnl.exe         0xfffff80002a49000           0x5e7000 \SystemRoot\system32\ntoskrnl.exe
0xfffffa800183e7a0 hal.dll              0xfffff80002a00000            0x49000 \SystemRoot\system32\hal.dll
0xfffffa800183e6c0 kdcom.dll            0xfffff80000bac000            0x2a000 \SystemRoot\system32\kdcom.dll
...
0xfffffa80039c4630 bthpan.sys           0xfffff880032c8000            0x20000 \SystemRoot\system32\DRIVERS\bthpan.sys
0xfffffa800428ff30 man.sys              0xfffff880033bc000             0xf000 \??\C:\Users\FLARE ON 2019\Desktop\man.sys
Unfortunately we cannot dump it by volatility, because its header is erased. So, I loaded the same dump to WinDbg and dumped it using .writemem:
.writemem C:\dumps\man1.bin fffff880`033bc000 fffff880`033cb000
Since the driver has no header, we need to reconstruct it manually. We don’t need to get all the sections right – we need just basic things to make it suitable for static analysis. The most important is to get the imports right.
First, I copied the PE-header from another driver – I used it as a base on which I started to rebuild. Then, I reviewed the file in a hexeditor, in search for familiar patterns. I could distinguish two sections, so I added their headers:

I noticed where the list of the imported DLLs is located, and tried to find the beginning of the structure, in order to fill it in the Data Directory.
My final version of Data Directory has the following form:

Now we can open the file in IDA, just like any other PE. We still need to find the Entry Point (DriverEntry), and fill it in the header. I found some unreferenced function it at RVA 0x5110 – it is very likely to be the Entry Point:

The full reconstructed Optional Header:

Let’s open the driver in IDA again, and analyze what is going on in DriverEntry. We can see that the driver injected something in the process 876:

Let’s dump this full process using volatility, so that we can see what was injected there:
volatility -f help.dmp --profile=Win7SP1x64_23418 memdump -p 876 -D mem_dumps/
Indeed – this element contains other pieces of the “malware”. I carved them out using a hexeditor.
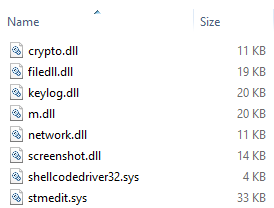
Most of the strings used in the “malware” are encrypted with RC4 – each using a different, hardcoded key. The same obfuscation method is used in each module. So, it is useful to make a decoder that would be able to statically deobfuscate it.
We are also given a PCAP file. So, we need to somehow make sense out of the network traffic, and what is its relationship with the found “malware”. The volatility will also be helpful in seeing which process was responsible for what part of the traffic. We can see it using the command:
volatility -f help.dmp --profile=Win7SP1x64_23418 netscan
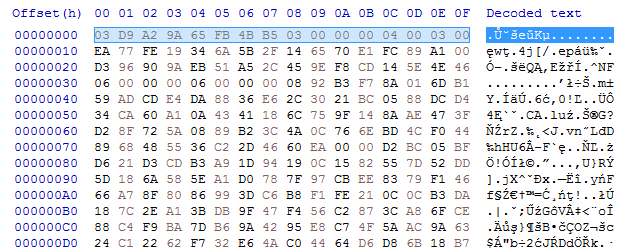
We can correlate the traffic generated by the svchost (PID 876) with the traffic recorded in the PCAP. Let’s dump the packages and try to decode them. There is a huge amount of the traffic on the port 7777. When we dump those packages, we can see inside some repeating patterns. I visualized one of the dumps (using file2png.py) to get an idea what can possibly be hidden inside. This is the result:
Looking at the visualization we can guess, that it is not a PE file encoded, but rather a bitmap. (If it was a PE the patterns inside would look very different: in that image there is a lot of content that looks to be filled by the same characters – and in PE we would not have so much padding between the sections.)
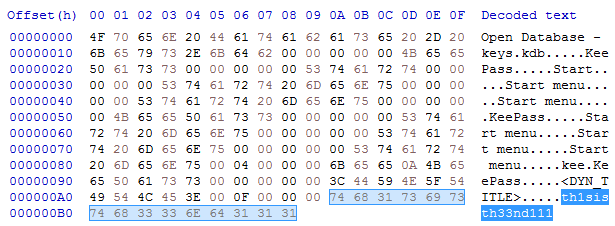
After finding the proper XOR key (thanks to Mark Lechtik), I got the decoded content, that was indeed a series of bitmaps. As it turned out: screenshots from the infected system.


The screenshots give some very important hints on how is the flag stored. As we can see, it is in the KeyPass database. The masterkey is covered, but we know that it is typed on the screen, so we can suspect that the keylogger component should have caught it. It will probably be sent in some other part of the traffic.
I decided to find the KeyPass database first. I needed to check what exactly was the version of KeyPass. In order to do this, I dumped the KeyPass process. It turned out to be KeyPass 1.37. I installed the same version and checked what is the header for this format. Then, I carved out the valid file with this header.
The next step is to find the password! I confirmed that crypto.dll is the layer that decrypts that part of the traffic (thanks to Alex Polyakov and Alex Skalozub for answering my questions and confirming that this is the good direction to follow). I analyzed the crypto.dll and made a decryptor for the packets.
https://github.com/hasherezade/flareon2019/tree/master/task12
The traffic at the port 8888 contained the keylogged content (captured by keylog.dll), and the traffic on the port 6666 – the stolen files (fetched by filedll.dll). It turned out that the uploded file was keys.kdb – the same file that I carved out from the disk – so it was another way of retrieving this piece. I found that the hashes of both match, so I confirmed that I have the valid kdb. I found also something that looked like the key to the database: “th1sisth33nd111”.
Yet, this key didn’t work!
At this point I wasn’t sure if I went in a good direction, so I asked Alex Polyakov for the hint. He confirmed that this is indeed the key captured by the keylogger, but it is in a bit different form than the key that was typed… I tried to find something similar but yet different recorded in the memory, by grepping through the strings of the main dump (help.dmp). After many failed attempts, I got an idea that the number ‘1’ at the end can be in reality ‘!’. And I tried the following command:
cat help_strings.txt | grep -i 3nd!
I found the following string:
!s_iS_th3_3Nd!!!
Still, it didn’t work… But I noticed that the first characters are missing, so I tried:
Th!s_iS_th3_3Nd!!!
And finally it worked, I got the kdb unlocked and the flag has shown up!

That’s all! I hope you enjoyed my writeup. Sourcodes of all my Flare-On solutions are available here: https://github.com/hasherezade/flareon2019
Thanks to the Flare team for the great contest!
Appendix
FlareOn6 Write-Up of Write-Ups – aggregator and summary of varorious solutions
View at Medium.com
如有侵权请联系:admin#unsafe.sh