
After the SigRed (CVE-2020-1350) write-up was published by Check Point, there was enough deta 2020-07-20 23:01:31 Author: sensepost.com(查看原文) 阅读量:112 收藏
After the SigRed (CVE-2020-1350) write-up was published by Check Point, there was enough detailed information for the smart people, like Hector and others of the Twitterverse (careful with the fake PoC!), to swiftly write a proof of concept to crash Windows DNS. CP did not publish enough details about how to convert this into an RCE, so it looks like a PoC to execute code is still going to take some time to surface. In this post I will describe how I created a Suricata rule to detect exploitation attempts of CVE-2020-1350.
As Windows exploitation and debugging is not my strong point, I decided to jump onto the defensive side of the vulnerability to help blue teams and sysadmins detect the attack before their Domain Controllers catch fire.
I started by reading the Check Point post, and others, detailing the vulnerability to get as much detail as possible to create a Suricata IDS signature with which to detect exploitation attempts on your network. I chose Suricata because it is a highly popular network IDS solution, its open source and it is easy to install and configure.
This post will not describe the details of the vulnerability itself, as the original Check Point post and all the subsequent articles published on the Internet should be sufficient for anyone to understand the inner workings of it. Thus, I will assume you have read the details and understand the exploitation vector.
Suricata Rules Syntax
Before delving into the details, we should first understand the syntax of a Suricata rule. This is an example extracted from their documentation:
drop tcp $HOME_NET any -> $EXTERNAL_NET any (msg:”ET TROJAN Likely Bot Nick in IRC (USA +..)”; flow:established,to_server; flowbits:isset,is_proto_irc; content:”NICK “; pcre:”/NICK .*USA.*[0-9]{3,}/i”; reference:url,doc.emergingthreats.net/2008124; classtype:trojan-activity; sid:2008124; rev:2;)
In this example, red is the action, green is the header and blue are the options.
- The action determines what happens when the signature matches and can be “pass”,”drop”,”reject” or “alert”. Check here for more information about the behaviour of each one.
- The header defines the protocol, IP addresses, ports and direction of the rule.
- The options section defines the specifics of the rule.
To detect SigRed, we are going to work primarily with the last two sections of the rule, the header and the options, leaving the action fixed as an “alert“. Bear in mind that Suricata can be configured as an in-line IPS, so you can also specify the “drop” action to protect your corporate Windows DNS servers from SigRed attacks.
Creating the Rules
Reading the original blog post describing the vulnerability, one could infer the following properties that a malicious DNS connection will have:
- First suspicious packet:
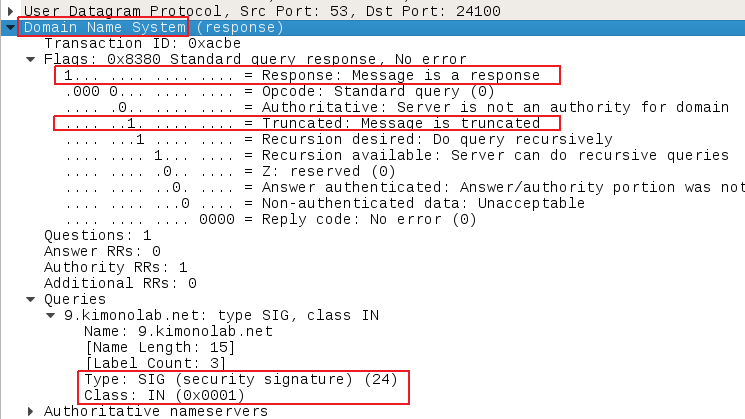
- Description: As DNS answers over UDP have a 512 byte limit for the length of the payload, the malicious DNS server would need to initiate the conversation over TCP. This is indicated by the DNS flag TC. Therefore, the first suspicious packet will be a SIG answer, coming from the external network (i.e. Internet) directed to your corporate DNS servers with the “answer” and “TC” flags set.
- Protocol/Layer: DNS over UDP.
- Source: Coming from port 53 (DNS answer) for an IP on the external network
- Destination: To any port of any of our Windows DNS servers.
- Flow: Communications established and flowing from the malicious DNS (server) to the victim DNS (client).
- DNS Flags: ANSWER (bit 1) and TC (bit 6) flags enabled.
- Answer Type: A SIG (0x18) IN (0x01) answer.
Viewing this in wireshark may look as follows:
- Second (more) suspicious packet:
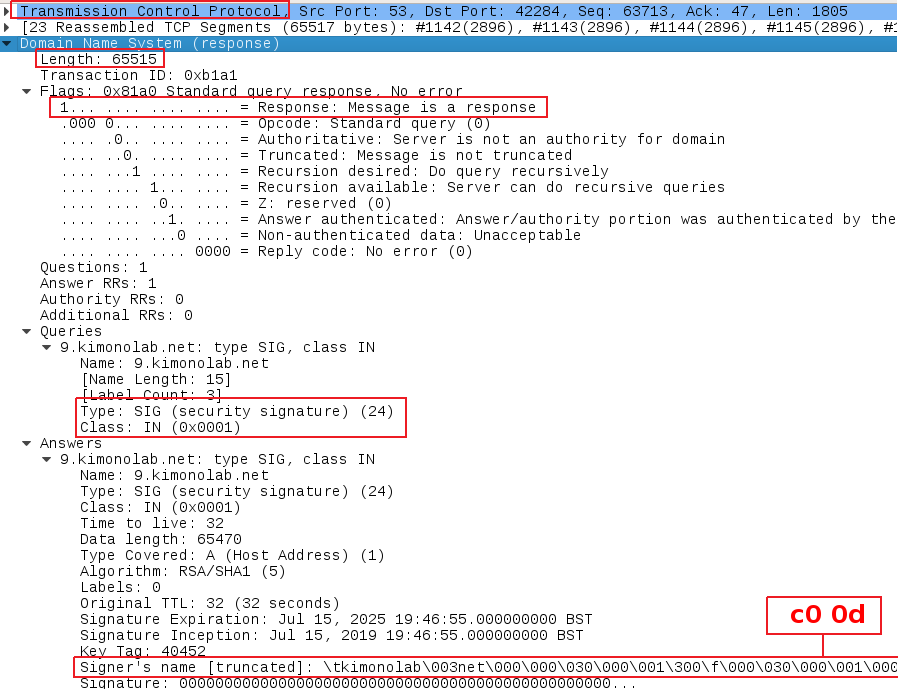
- Description: A DNS SIG IN answer over TCP packet with an excessive packet length and a compressed signer name pointing to the following byte coming from the external network (i.e. Internet) directed to your corporate DNS servers.
- Protocol/Layer: DNS over TCP.
- Source: Coming from port 53 (DNS answer) of an IP on the external network.
- Destination: To any port of any of our Windows DNS servers.
- Flow: Communications established and flowing from the malicious DNS (server) to the victim DNS (client).
- DNS Flags: ANSWER (bit 1) enabled.
- Answer Type: A SIG (0x18) IN (0x01) answer.
- Packet Length: Greater than 65280 bytes (0xFF00).
- Compressed Signer Name: Pointer to the first character of the queried domain name which is usually the byte 0xC00D, or any other value greater than 0x0D pointing to other characters of the queried domain name. Hint: Take a look here to understand how message compression works on DNS to understand why it specifically has to be this value.
Again, within wireshark that may look as follows:
Knowing what the suspicious packets may look like. we can translate this into Suricata syntax. (This is a process that took me a while, as it was the first time I was dealing with these kind of rules and I had to make my way around the Suricata documentation).
In summary for the first approach, the rules for the two packets could be translated into the following (note the corresponding colours of the rule to the description above):
First Rule:
alert dns $EXTERNAL_NET 53 -> $DNS_SERVERS any (msg:”Windows DNS Exploit (TC header)”;flow:established,to_client;classtype:denial-of-service;byte_test:2,&,0x82,2;content: “|00 00 18 00 01|”;within: 120;reference:cve,2020-1350;sid:666661;rev:1;)
Second Rule:
alert tcp $EXTERNAL_NET 53 -> $DNS_SERVERS any (msg:”Windows DNS Exploit (Compressed SIG record)”;flow:established,to_client;classtype:denial-of-service;byte_test:2,>,0xFF00,0;byte_test:2,&,0x80,4;content: “|00 00 18 00 01|”;within: 120;content:”|c0 0d|”;reference:cve,2020-1350;sid:666662;rev:2;)
For these rules to work in your environment, you will need to open your “suricata.yaml” configuration file and add an array with your corporate DNS IP addresses in the variable $DNS_SERVERS:

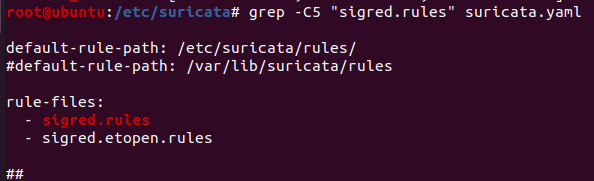
After adding your DNS IP addresses here, save these two rules in a text file called “sigred.rules”, save them in the default “rules” folder usually located at “/etc/suricata/rules” and enable them in the “suricata.yaml” configuration file under the “rule-files” section:
To test whether the rules are working or not, one can run the Suricata client against PoC traffic captures. I tested these rules against three different traffic captures. The first one was the PCAP found in the first PoC written by Maxploit, the second one was the PoC written by Hector (thank you for the pcap), and the third one was the traffic capture I grabbed myself from one of our Jumpboxes. To test your rules against a PCAP, execute the following command on your Suricata box:
suricata -r /home/user/sigred-dos-poc.pcapng -l /var/log/suricata/

I noticed two limitations in this first approach when writing the Suricata rules.
The first limitation was that the first rule alone will trigger a fair amount of false positives on the network, as transitioning to DNS over TCP with SIG requests is not uncommon. So, the rule should be useful when triggered with the second one. If you only have the first rule triggered in your Suricata setup it may be worth it to investigate this as a potential incident (especially in the first weeks since the publication of the vulnerability), but if you have both rules configured you can be almost sure someone is doing nasty things in your corporate network.
The second limitation is that we are making our rule to search for a hard-coded compressed Signer’s name with the value “0xC00D“. This compressed signer’s name is pointing to the first character of the queried domain – this is, the “9” in the domain name “9.ibrokethe.net” – to trigger the heap overflow (see “DNS Pointer Compression – Less is More” on the CP blog post). This is the value hard-coded in the Check Point blog post and the Maxpl0it PoC, but in reality you can point to other characters in the string and the exploit will work and not be detected by our Suricata rule.

To tackle the first limitation, we can make a link between our two rules for Suricata IDS. To do so, we can introduce a new rule option called xbits. With this option, we set a flag (tc_requested) when the first rule is triggered. This flag can then later be queried by the second rule with the “isset” operator. If the flag is set, then the second rule will trigger an alert. If the flag is not set, the second rule will not trigger an alert. Introducing the xbits option we make our rules tightly coupled with each other, and the degree of certainty that we are facing the SigRed exploit is significantly increased.
To tackle the second limitation, we should make our Suricata rule aware of other valid compressed names that will trigger the vulnerability, such as “0xC00E”, “0xC00F”, “0xC010”, etc. Thus, we can add a byte_test comparison to look for greater values than “0x0c” in the second byte of the compressed name.
After addressing these two limitations, we end up with the following rules (note the red colour part of the rule to address the false positive limitation by combining the rules and the blue colour part of the rule to address other valid values of compressed names):
alert dns $EXTERNAL_NET 53 -> $DNS_SERVERS any (msg:”Windows DNS Exploit (TC header)”;flow:established,to_client;classtype:denial-of-service;byte_test:2,&,0x82,2;content: “|00 00 18 00 01|”;within: 120;xbits:set,tc_requested,track ip_pair;noalert;reference:cve,2020-1350;sid:666661;rev:2;)
alert tcp $EXTERNAL_NET 53 -> $DNS_SERVERS any (msg:”Windows DNS SigRed Exploit (Compressed SIG record)”;flow:established,to_client;classtype:denial-of-service;byte_test:2,>,0xFF00,0;byte_test:2,&,0x80,4;content:”|00 00 18 00 01|”;within:120;content:”|c0|”;within:31;byte_test:1,>,0x0c,0,relative;xbits:isset,tc_requested,track ip_pair;reference:cve,2020-1350;sid:666662;rev:3;)
With these two rules, you would learn about the victim DNS server being targeted in the attack and the external malicious DNS server sending the payload. Once you have this information you would be able to take further incident response measures, such as blocking the malicious domain on your perimeter.
With these two rules you will not get information about how your internal DNS got targeted by this exploit. Assuming we have already detected with the two previous rules the malicious domain name, e.g. “ibrokethe.net”, we could identify the attacker or victim of the attack by tweaking two more Suricata rules as follows:
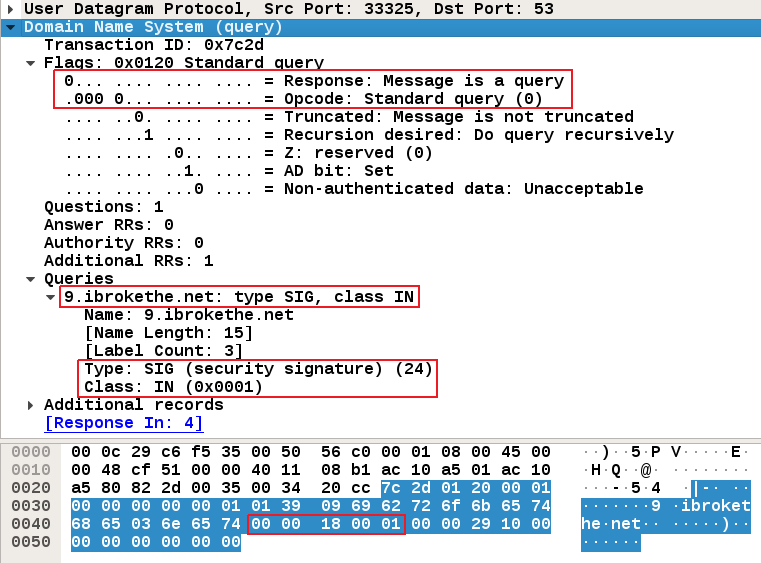
- The first one to see if an insider is manually trying to attack corporate DNS servers, that is, manually executing a query to the malicious DNS server using something like nslookup or dig. In this case, one would see a DNS query packet trying to resolve the SIG (0X18) IN (0x01) entry of a malicious domain (ibrokethe.net), directed to our corporate DNS server:
- The second to see if an employee has been a target of an attack like the one described in the original Check Point post by smuggling DNS data inside of the HTTP protocol (see “Triggering From the Browser” section of the CP post). In this case, one would see a malformed DNS packet as follows :
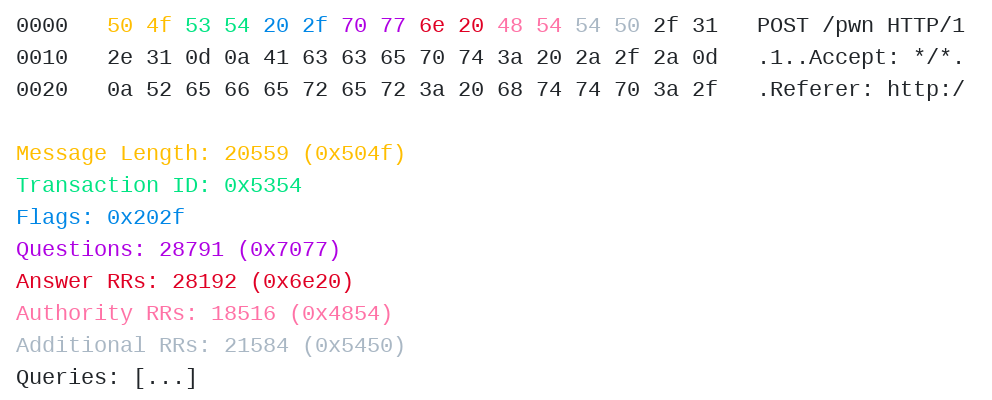
After identifying all of the relevant properties that a malicious DNS packet could have, we can create the following two rules to detect the insider or victim of this attack to a specific domain that you have detected (note the corresponding explanatory colours in the rule):
alert dns $HOME_NET any -> $DNS_SERVERS 53 (msg:”Windows SigRed DNS Exploit (Insider Identification)”;classtype:denial-of-service;flow:to_server;byte_test:1,!&,0xF8,2;content:”|09|ibrokethe|03|net”;content:”|00 00 18 00 01|”;within: 5;reference:cve,2020-1350;sid:666663;rev:1;)
alert tcp $HOME_NET any -> $DNS_SERVERS 53 (msg:”Windows SigRed DNS Exploit (Victim Identification)”;classtype:denial-of-service;flow:to_server;byte_test:1,!&,0xF8,4;content:”|50 4f 53 54 20 2f|”;offset:0;depth:6;content:”|09|ibrokethe|03|net”;distance:20567;within:100;content:”|00 00 18 00 01|”;within:5;reference:cve,2020-1350,sid:666664;rev:1;)
With these four rules we would be able to identify a SigRed attack on a network and obtain the following details:
- The source IP address where the attack originated from and potentially whether it was a victim of the attack (rule 666664) or was active part in the attack (rule 666663).
- The target DNS name for the attack (rules 666661 and 666662)
- The malicious domain (rules 666661 and 666662).
- The malicious external DNS server (rules 666661 and 666662).
I hope these rules are useful for someone out there and helps protect your corporate networks. Good luck catching the bad guy!
Bibliography & Resources
- https://research.checkpoint.com/2020/resolving-your-way-into-domain-admin-exploiting-a-17-year-old-bug-in-windows-dns-servers/
- https://www.ietf.org/rfc/rfc1035.txt
- http://www.tcpipguide.com/free/t_DNSNameNotationandMessageCompressionTechnique-2.htm
- https://github.com/maxpl0it/CVE-2020-1350-DoS
- https://www.immagic.com/eLibrary/ARCHIVES/GENERAL/WIKIPEDI/W120423L.pdf
- https://suricata.readthedocs.io/en/suricata-5.0.3/
- https://www.securityartwork.es/2013/02/21/snort-byte_test-for-dummies-2/
如有侵权请联系:admin#unsafe.sh