· 13 min read

I attended and spoke at BSides Leeds last weekend and one of the cool things they had was an electronic badge, nothing new as DEF CON have them every other year but still cool to look at. Often during DEF CON I never have a chance to look at the badge because I'm busy working with SOC and helping people enjoy their nights safely.
That said, reverse engineering isn't something I do very often but with my RE pipeline being hooked up for CVE hunting and having access to the firmware for the badge I decided to go down a rabbit hole and tear it apart then use the source to match up findings against what I could see in the bin walks.
If you want to work out the problems in the badge yourself and don't want it spoiled, look no further into this post because it has a deep code walk of everything that the badge does and what different functions do.
The BSides Leeds 2026 badge(helpfully created by Punk Security) is "Artie the Owl": an ATtiny814, eighteen RGB LEDs making up two eyes, and six capacitive touch pads. The firmware looks like a few LED animations, but most of it is three games and an unlock system that keeps the rest hidden. This is how I took it apart and what's inside.
Tools used: file, strings, and radare2 (or Ghidra) for static analysis; arduino-cli with megaTinyCore to rebuild; pymcuprog over UPDI to read and write the chip. The firmware, both source and the compiled .bin/.hex, ships in the badge repo.
Here is the badge running, two LED-ring eyes and the touch pads on the wings:
0:00
/0:09

The hardware
Start with the BOM (BOM.csv). It lists:
- ATtiny814 (
ATTINY814-SSF): the MCU. 8 KB flash, 512 B SRAM, a modern tinyAVR. - 18x SK6812SIDE: addressable side-view RGB LEDs (WS2812-style), wired as two eyes of nine.
- A tactile switch (the wake button), a 6-pin debug header (GND, RxD, TxD, UPDI, 3v3, GND), and two coin cells.
There's no character display, only the 18 LEDs, so any text the badge shows has to be blinked out. The firmware targets megaTinyCore, which matters later when rebuilding it.
Getting the firmware
The repo ships the source (firmware.ino) and the build (compiled/firmware.bin and .hex). I worked from the binary and used the source to check my reading.
file and strings
$ file compiled/firmware.bin
compiled/firmware.bin: AVR firmware, reset at 0x0037
AVR, as expected. strings turns up nothing useful:
$ strings -n 3 compiled/firmware.bin | head
>3#a
$g/4
...
No text means no menus, version banners, or URLs to grep for. The logic is all code and LED tables.
radare2
radare2 handles AVR. Load the raw image with the architecture set:
$ r2 -a avr compiled/firmware.bin
[0x00000000]> iI
arch     avr
bits     8
machine  ATmel
endian   little
binsz    8060
The vector table is at 0x0000, one 2-byte relative jump per interrupt:
[0x00000000]> pd 8 @ 0x0
        0x00000000      37c0    rjmp entry0            ; reset
        0x00000002      67c0    rjmp sym.syscall.int0
        0x00000004      66c0    rjmp sym.syscall.int0
        0x00000006      53c9    rjmp 0xfffff2ae
        0x00000008      64c0    rjmp sym.syscall.int0
        0x0000000a      63c0    rjmp sym.syscall.int0
        0x0000000c      62c0    rjmp sym.syscall.int0
        0x0000000e      51c8    rjmp 0xfffff0b2
Most entries jump to the same syscall.int0 stub, which is the shared unused-vector handler. The few that go somewhere else (here 0x06 and 0x0e) are the interrupts the firmware actually uses: the port interrupt for the wake button and the RTC periodic interrupt for capacitive touch. entry0 runs the C runtime init and falls into main.
You can trace main by hand to recover the animation switch and the LED bit-bang routine, or use the source to confirm it. Either way, pull the flash usage out of the hex:
$ python3 - <<'EOF'
m=0
for L in open('compiled/firmware.hex'):
    if L[7:9]=='00':
        a=int(L[3:7],16); n=int(L[1:3],16); m=max(m,a+n)
print(f"0x{m:04x} ({m} of 8192 bytes)")
EOF
0x1f7c (8060 of 8192 bytes)
8060 of 8192 bytes, 98% full. That number drives everything about modifying the badge later.
Ghidra works too: import as raw AVR8, load address 0, run auto-analysis. For 8 KB radare2 is quicker to poke at, but Ghidra's decompiler reads the game logic better.
A walk through the code
With the source open beside the disassembly, here is how the firmware is put together.
setup() configures the pins, powers the LEDs, starts the RTC, registers the six PTC touch nodes, and reads the unlock byte (state = EEPROM.read(0)). loop() is then one endless animation loop:
int intervalMs = runAnimationMode(animationMode, animationStep);
if (intervalMs == 0) animationMode++;                 // a locked mode: skip to the next
if (intervalMs < 0) { animationMode = 0; continue; }  // unknown mode: wrap to 0
++animationStep;
while (intervalMs > 0) {                               // spend the delay in 10 ms slices
  showTouchedPads();
  delay(TOUCH_POLL_MS);
  intervalMs -= TOUCH_POLL_MS;
  uint16_t low = measureWakeButtonLowTime(MAX_BUTTON_HOLD_MS);
  if (low > SHORT_PRESS_THRESHOLD_MS) handleWakeButtonPress(low, /* ... */);
}
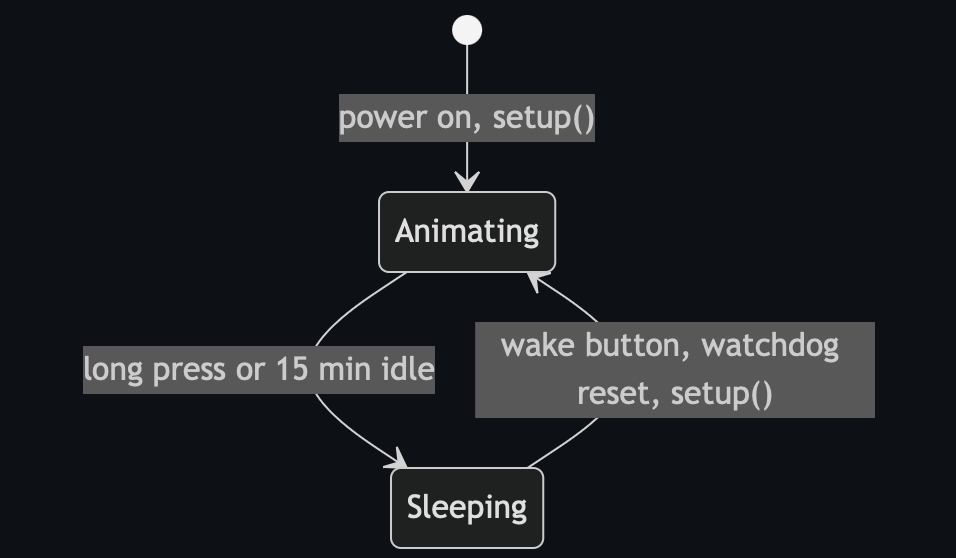
runAnimationMode(mode, step) draws one frame and returns how long to wait before the next. The loop burns that delay in 10 ms slices, showing live touch feedback and sampling the wake button in each one, so a press is caught within about 10 ms even mid-frame. After fifteen minutes idle it calls enterSleep().

The LEDs use tinyNeoPixel_Static, the variant that takes a buffer you own (pixelBuffer, 54 bytes) instead of allocating one, which matters on 512 bytes of RAM. The strip is one chain of 18: left eye is indices 0 to 8, right eye 9 to 17, and setRightEyeLed() remaps a logical index (0 becomes 17, otherwise it adds 8) because of how that eye is wired. Worth knowing if you write your own animation and the right eye comes out mirrored.

Touch runs in the background. setupTouchButtons() registers each pad as a self-capacitance PTC node, and getPressedTouchMask() returns a six-bit mask of what is held. The scanning is kept alive by an interrupt.
Two interrupts do the work. The RTC periodic interrupt fires every ~16 ms and calls ptc_process(), so touch keeps measuring while the main loop animates. The port interrupt on the wake button, when armed, triggers a watchdog reset:
ISR(PORTA_PORT_vect) {
  PORTA.INTFLAGS = PORT_INT3_bm;
  if (rebootOnButtonPress) {
    _PROTECTED_WRITE(WDT.CTRLA, WDT_PERIOD_8CLK_gc);   // kick the watchdog -> reset
    while (true) {}
  }
}
Rebooting is how the badge quits a game or wakes from sleep, rather than saving and restoring state, which suits a chip with very little RAM. enterSleep() cuts LED power, disables the ADC, and powers the chip down with the button armed; the next press just resets it.

Randomness is a 16-bit Galois LFSR. nextRandomByte() shifts and conditionally XORs the tap mask, and seedGameRandom() mixes in millis() when a game starts, so the only entropy is the timing of your button press:
uint8_t nextRandomByte() {
  const bool bit = randomState & 1;
  randomState >>= 1;
  if (bit) randomState ^= 0xB400u;   // Galois tap
  return (uint8_t)randomState;
}
Wrappers shape that into a colour (0-2), an LED index (0-8), or 0-7 for the games. The wake button is timed by measureWakeButtonLowTime(), which debounces and measures how long the button is held, so the loop can tell a tap, a pad-plus-tap, and a long hold apart.
The animations
Each animation is a small function that draws one frame and returns the delay before the next:
loopingEyes(step, r,g,b): lights LEDstep % 9and its mirror17 - (step%9), so a dot chases around each eye.knightRider(step, r,g,b): a Cylon bounce, using theKNIGHT_RIDER_LEDStable to map a position that ping-pongs0..10..0to the LED(s) to light.breath(step, r,g,b): a 0-30-0 triangle scaling the colour, for a breathing fade.policeMode(step): a red base with every other LED blue, the offset toggling each frame.devsecopsMode(step): walks theINFINITI_LEDSfigure-eight path without clearing, so a trail fills both eyes and the colour steps through five laps.nuclearMode(...): a base colour with every Nth LED a second colour, parameterised so two modes reuse it.spinMode(...): a comet with a brightness ramp spinning around both eyes.timer(step): a nine-minute countdown, then both eyes go green.
The ones on a fresh badge are the plain ones (knight rider, breath, looping eyes, spin, timer). Several cases in the dispatch are guarded:
case 8:
  if ((state & 0b00000001) != 0) { return 0; }   // skipped unless the bit is clear
  return policeMode(step);
A guarded mode returns 0 and the loop skips it, so police, the two nuclear variants, and the DevSecOps loop stay hidden until something clears the matching bit in state.
The games
state is one EEPROM byte, read at boot. A fresh chip reads 0xFF, so every bit is set and every guarded animation is hidden. The bits are cleared by winning the games, which launch from handleWakeButtonPress(): it reads the touch mask at the moment you tap the wake button and dispatches on it.
switch (pressedMask) {
  case 0:                ++animationMode; break;      // no pad: next animation
  case LEFT_BLUE_MASK:   playStopTheLight(); break;
  case LEFT_RED_MASK:    playFindTheSequence(); break;
  case LEFT_GREEN_MASK:  playFollowTheSequence(); break;
  case RIGHT_BLUE_MASK:  playStopTheLightTwoPlayer(); break;
  case RIGHT_RED_MASK:   playFindTheSequenceTwoPlayer(); break;
  case RIGHT_GREEN_MASK: playFollowTheSequenceTwoPlayer(); break;
}
A bare tap advances the animation; holding a pad while tapping launches its game (left-eye single-player, right-eye two-player, pad colour picking which game).
Stop the Light fixes a random green target and sweeps a red runner around the eye; pressing any pad passes the level only if the runner is on the target, and the interval shrinks each level. A full clear clears its bit:
for (uint8_t intervalMs = 200; intervalMs > 50; intervalMs -= 20) {   // 8 levels
  if (!playStopTheLightLevel(intervalMs)) { showFailure(); return false; }
}
state = state & B11111110;   // clear bit 0
showSuccess();
Follow the Sequence is Simon (levels 3 to 9, repeat a growing colour sequence), and Find the Sequence previews a seven-colour sequence for three seconds then has you enter it from memory with ten lives. Each clears its own bit on a win. The two-player variants split the eyes and show a green/red result but never call showSuccess(), so they do not change the unlock state. showSuccess() is what makes a win stick: it does EEPROM.update(0, state) before flashing green, so unlocks survive reboots and sleep.
The unlock state
Winning a single-player game clears its bit and writes state back to EEPROM, so unlocks survive reboots and sleep:
| Win | Bit cleared | Unlocks |
|---|---|---|
| Stop the Light | 0 | police-lights animation |
| Follow the Sequence | 1 | a "nuclear" sweep |
| Find the Sequence | 2 | a second "nuclear" / York rose variant |
| all three | bits 0-2 | the DevSecOps infinity-loop animation |

Two-player wins don't touch state. Clear all three single-player games and bits 0-2 are clear, which reveals the last animation: a colour wiping around a figure-eight across both eyes. The dispatcher makes the gating concrete:
int runAnimationMode(uint8_t mode, uint16_t step) {
  switch (mode) {
    case 0: return knightRider(step, 0, 10, 0);
    // ... modes 1-4 always run ...
    case 5: if ((state & B00000111) != 0) return 0; return devsecopsMode(step);  // all three games
    case 6: if ((state & B00000010) != 0) return 0; return nuclearMode(/* ... */);  // Follow
    case 7: if ((state & B00000100) != 0) return 0; return nuclearMode(/* ... */);  // Find (York rose)
    case 8: if ((state & B00000001) != 0) return 0; return policeMode(step);        // Stop
    // ... modes 9-10 ...
    default: return -1;   // unknown mode: the loop wraps back to 0
  }
}

The gate in the binary
You don't have to take the source's word for it. Disassemble the image and the guarded animations show up as bit tests on the state byte. This is the combined gate that keeps the DevSecOps loop hidden until all three single-player games are done:
0x0000092a  c82f  mov   r28, r24    ; r28 = state
0x0000092c  8770  andi  r24, 0x07   ; state & 0b00000111
0x0000092e  c9f0  breq  0x962       ; all three game bits clear -> draw the locked mode
0x00000930  e12c  mov   r14, r1
0x00000932  c0ff  sbrs  r28, 0      ; otherwise test bit 0 (Stop the Light) on the saved copy
andi r24, 0x07 is state & 0b00000111, and breq only falls through to draw the animation when those three bits are clear. The single-mode gates are the same idea with one-bit sbrs/sbrc skips (bit 0 here, for the police lights). It lines up with the guarded cases exactly.
Walkthrough: unlocking everything
How to clear all three games and reveal every animation.
To launch a game, hold one of the six coloured pads and tap the wake button, and keep holding the pad as the game starts. Left-eye pads are the single-player games that unlock animations; right-eye pads are the two-player versions. During a game, enter a colour by pressing a pad of that colour (either eye). The wake button quits.
Stop the Light (left blue) to police lights
Hold the left blue pad and tap wake. One LED is the green target; a red runner sweeps the eye. Tap any pad when the runner lands on the target. It speeds up each level, eight in total, and one miss ends the run, so you clear them back to back. Watch the target rather than the runner, and tap slightly early as it gets faster. Winning clears bit 0 and adds the red/blue police animation.
Follow the Sequence (left green) to nuclear sweep
Hold the left green pad and tap wake. Simon: the badge plays a colour sequence, you repeat it, and it grows each round from three up to nine. One wrong colour ends it. Saying the colours out loud and chunking them in threes helps. Winning clears bit 1 and unlocks the nuclear sweep.
Find the Sequence (left red) to York rose
Hold the left red pad and tap wake. A seven-colour sequence previews for about three seconds, then you enter it from memory. You get ten lives; a wrong colour costs one and resets you to the start of the same sequence, so there is room for trial and error. Once you are sure of the early colours you can guess the later ones across attempts. Winning clears bit 2 and unlocks the York rose variant.
Result
Progress is saved to EEPROM, so you can spread the games across several sittings. With all three single-player games cleared, bits 0-2 are clear and the DevSecOps infinity loop appears. To check progress, cycle the animations with the wake button and no pad held; each game you have beaten adds its animation, and the infinity loop only shows up once all three are done.
Skipping the games over UPDI
The unlock is just one EEPROM byte, so if you have a UPDI programmer you can set it directly instead of playing. The ATtiny814 programs over UPDI through the debug header (the UPDI, 3v3, and GND pins); pymcuprog talks to it through a serial adapter (see megaTinyCore's SerialUPDI notes for the wiring).
Read the current state byte at EEPROM offset 0:
pymcuprog read -d attiny814 -t uart -u /dev/ttyUSB0 -m eeprom -o 0 -b 1
A fresh badge reads 0xFF (nothing unlocked). The animations are gated on bits 0 to 2 being clear, so writing 0xF8 clears those three bits and unlocks everything:
pymcuprog write -d attiny814 -t uart -u /dev/ttyUSB0 -m eeprom -o 0 -l 0xF8
Reboot and all four hidden animations are in the cycle, including the infinity loop, without touching the games. Write 0xFF back to relock and replay them. It is a nice illustration of the design: the games are the intended path, but the gate is one byte of persistent memory you can reach over the programming header.
Rebuilding
It's megaTinyCore, so arduino-cli and the core are enough:
arduino-cli config add board_manager.additional_urls \
  http://drazzy.com/package_drazzy.com_index.json
arduino-cli core install megaTinyCore:megaavr

# the sketch's filename must match its folder
mkdir -p build/firmware && cp firmware.ino build/firmware/
arduino-cli compile --fqbn megaTinyCore:megaavr:atxy4:chip=814 build/firmware
The compile ends with the line that matters:
Sketch uses 8158 bytes (99%) of program storage space. Maximum is 8192 bytes.
That is a little above the 8060 in the shipped image (this is a fresh build with the current megaTinyCore), and it leaves about 34 bytes free, so you can't add a feature without removing another. A new animation is a function that takes the frame counter and returns a delay:
uint8_t myMode(uint16_t step)
{
  setAllLeds(0, 0, 0);
  ledStrip.setPixelColor(step % NUM_LEDS, 20, 0, 30);  // one purple LED, moving
  ledStrip.show();
  return 100;                                          // ms until next frame
}
Then add a case to runAnimationMode. Paying for the bytes is the harder part. When I added a Morse-code signature animation and an animated pride rainbow, each overflowed the 8 KB by about 100 bytes, so I dropped some stock animations to fit. To measure what an animation costs, replace its case body with return 0;, let the linker drop the now-unused function and tables, and diff the size.
To flash your build you go in over UPDI through the badge's debug header, the 6-pin breakout of GND, RxD, TxD, UPDI, 3v3, GND. Wire a UPDI programmer (or a SerialUPDI adapter) to the UPDI, 3v3, and GND pins; the RxD/TxD pins are a serial console if you want one. pymcuprog writes the hex straight to flash:
pymcuprog write -d attiny814 -t uart -u /dev/ttyUSB0 -f firmware.ino.hex
megaTinyCore can also upload through arduino-cli with a SerialUPDI programmer. During the con the organisers will flash a forked firmware onto your badge for you, but with the debug header you can also do it yourself.
My firmware
My fork is at github.com/ZephrFish/bsides-leeds-2026-badge; the build lives in the zephrfish/ folder and a compiled image is on the releases page.
0:00
/0:03
My firmware running on the badge thanks to Punk who flashed on the day!
The changes are all cosmetic LED work on top of the stock firmware, with the games and unlock logic left alone:
- ZephrFish Morse (shown at startup): blinks
ZEPHRFISHin Morse, cyan dots and purple dashes, driven by a 29-byte packed table where each byte holds an element's on-time and the gap after it. - Pride rainbow: a six-stripe rainbow copied straight into the LED buffer and rotated each frame so it flows around both eyes.
- Split: each eye red on one half, blue on the other, purple in the middle where they meet.
- Recoloured the stock knight-rider, breath, and looping-eyes animations to purple, cyan, and orange.
To make room in the 8 KB I dropped the stock devsecops, police, and spin animations and the duplicate red recolours. The result is 8094 of 8192 bytes.
CI
I also added CI on my fork; this is mine, not part of the stock badge. A GitHub Actions workflow installs arduino-cli and megaTinyCore, compiles each firmware, parses the size line to report free flash, and fails if it overflows 8192 bytes. With the flash this full that turns "will it fit" into a check on every push, and it attaches the built .hex to a release. It builds every per-author folder too, so anyone can drop in their own firmware and get the same flash check.
Wrapping up
The badge fits a touch UI, three games with two-player modes, a persistent unlock system, and a set of animations into 8 KB on a chip with 512 bytes of RAM. The reverse engineering is short: identify the chip from the BOM, confirm AVR with file, rule out strings, find structure in radare2, and read the guarded switch to see how the unlocks work. The nicest detail is that the whole unlock system is one byte of EEPROM, which you can read or write straight over the debug header.
Credit where it's due: Artie the Owl is the work of Punk Security for BSides Leeds 2026, built on SpenceKonde's megaTinyCore, and it was a genuinely fun board to pull apart. If you have one, fork it and flash something of your own; the CI on the fork will tell you whether it still fits in the 8 KB.