2020-05-10 05:01:59 Author: parsiya.net(查看原文) 阅读量:148 收藏
Welcome to the 10th installment of
Thick Client Proxying.
A series running since 2016. Woot! Today I will talk about traffic redirection
using the hosts file.
Yeah! I realized I have talked about it in 19 different posts but never explicitly wrote about it. I just assumed readers would know this.
If you are already familiar with these concepts please directly go to the How Do We Proxy With This? section.
The hosts file is located at C:\Windows\System32\Drivers\etc\hosts. Each
line in the file looks like this:
IP-Address domain.127.0.0.1 google.com
Any change in this file results in a change in the Windows DNS cache. Note that you need admin access to edit this file.
On nix-based operating systems (e.g., GNU/Linux1 and Apple stuff) the
hosts file has the same format and functionality. BUT there is no local DNS
cache on Linux (not sure about Apple operating systems). The OS checks this file
before making a DNS request. You could say this file IS the DNS cache. See the
hosts manual page for more information.
For the rest of the blog I am going to talk about Windows but the same principle applies to others.
The complete name for this entity is local DNS resolver cache but I will just
call it the Windows DNS cache. When the OS wants to resolve a domain, it will
first look in this cache to see if it's already been resolved. If the entry has
expired or an entry for that domain does not exist the OS will do a lookup.
Windows DNS Cache in Action
Start your favorite Windows VM (also works on your host) and start doing things.
Note for Hyper-V Users
For some reason, Hyper-V Windows VMs do not update their local DNS cache. It remains empty. I do not know the reason but the solution is to manually configure a DNS server in the VM.
Control Panel > Network and Internet > Network Connectionsin the VM.- Right click on the
Ethernet Adapterand selectProperties. - Select
Internet Protocol Version 4 (TCP/IPv4)and click thePropertiesbutton. - Select the
Use the following DNS server addressesradio button. - Enter
8.8.8.8(or your preferred DNS server like1.1.1.1).
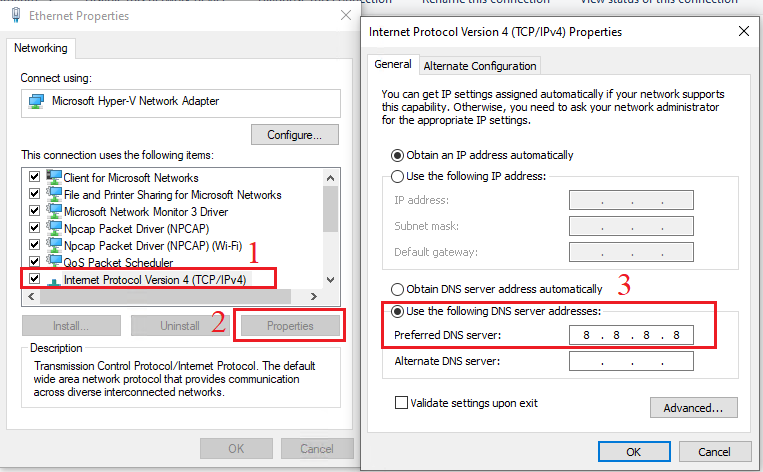 Hyper-V guest with manual DNS server
Useful Commands
- View the Windows DNS cache:
ipconfig /displaydnsorGet-DnsClientCache. - Clear the cache:
ipconfig /flushdnsorClear-DnsClientCache- In my Hyper-V guest
ipconfig /flushdnsasks for elevation butClear-DnsClientCacheworks in a non-elevated PowerShell prompt. - In my host both work without elevation.
- In my Hyper-V guest
View the DNS Cache
No we can see the DNS cache in our VM.
- Clear the DNS cache.
ping example.netornslookup example.net- View the DNS cache.
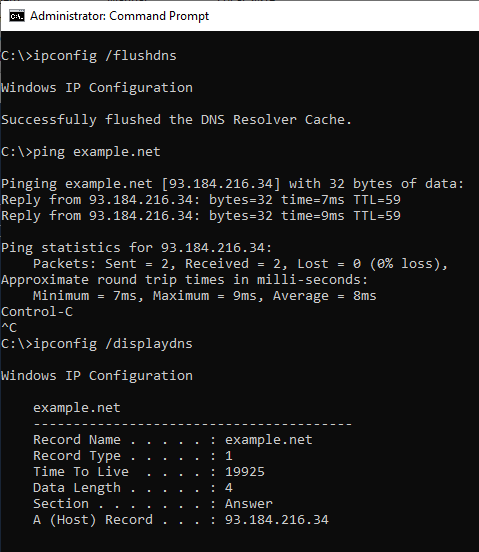 DNS cache after resolving example.net
The Relation Between the hosts File and the DNS Cache
Each line in the hosts file becomes an entry in the DNS cache. Do some experiments:
- Open the
hostsfile in an elevated editor (e.g., notepad as admin). - Add the following entry:
127.0.0.1 example.net.
- Save the file.
- Clear the DNS cache.
- This removes the extra entries that have been cached.
- View the DNS cache.
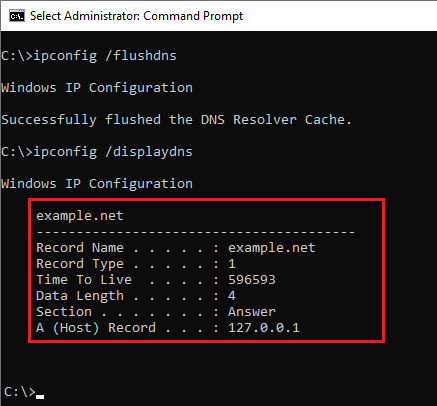 example.net entry from the hosts file
I have two proxy usecases for the Windows DNS cache.
- We can use it to discover endpoints. Read Thick Client Proxying - Part 9 - The Windows DNS Cache.
- We can redirect domains to our proxy.
How Do We Proxy With This?
If your application is using HTTP but is not proxy-aware then you can redirect its endpoints to your proxy listener.
PortSwigger has a great page on invisible proxying. Be sure to read it:
Generic Steps
- Identify the endpoints. E.g.,
example.net:443. - Ping the endpoint to get its IP address. Do this before the next step.
93.184.216.34.
- Redirect them to Burp (e.g.,
localhost) using the hosts file.- We already did it with
127.0.0.1 example.net.
- We already did it with
- Start a Burp proxy listener on
localhost:443. The hosts file does not change the destination port so the Burp listener should be on the same port. - Enable
invisible proxyingfor the Burp listener above.Proxy > Option > Select the listener > Edit > Request Handling > Check 'Support invisible ....
- Add the endpoint's IP address and domain to
Project Options > Connections > Hostname Resolution.- This tells Burp use that IP address directly instead of looking up the domain.
- Profit.
Now we can open our browser and go to http://example.net.
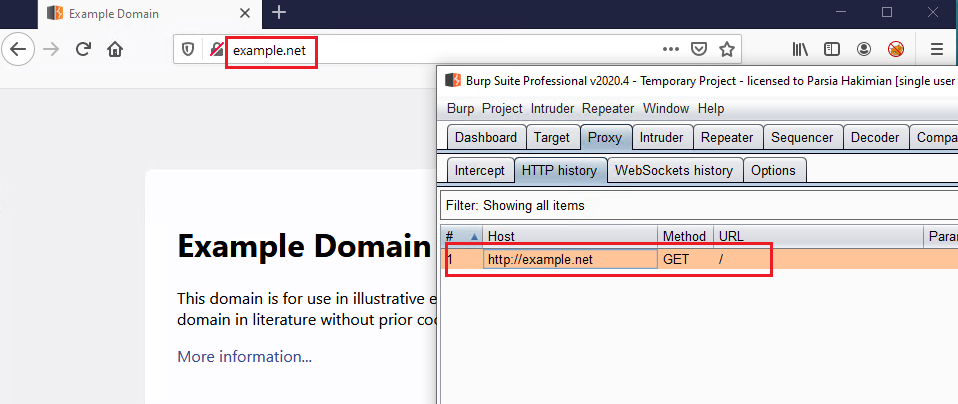 example.net proxied in Burp
What If We Are Not Using HTTP?
If your application is not using HTTP then Burp's invisible proxying does not
work. It relies on the Host header in the request to identify the endpoint.
There are some cases where the application uses a text-based protocol that can be proxied with Burp.
If there is only one endpoint, then we can use the Request Handling tab of the
proxy listener (where invisible proxying was). It has a redirection setting. You
can redirect everything that comes to a specific listener to a specific host and
port. Checking Force use of TLS just automatically populates the port field
with 443.
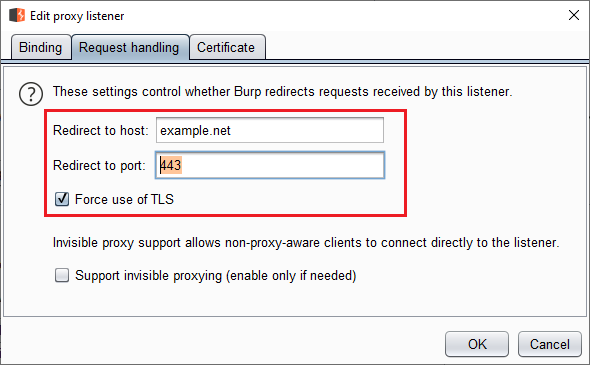 Request Handling tab
If we have multiple endpoints but each use a different port then our work is still easy. We create one listener for each port and use the same technique.
Then tough luck. I mean, yeah. This is commonly the case where the thickclient
talks to several endpoints over TLS on port 443. The problem is that we have no
way of telling Burp to differentiate between traffic going to example.net and
ea.com without the Host header.
In these cases I usually just proxied one endpoint at a time to see the traffic.
The Burp documentation for invisible proxying (linked above) has a section named
Redirecting outbound requests (the page does not have anchors so I cannot
directly link to the section). It says:
- Create a network interface for each endpoint.
- Redirect one endpoint to one interface.
- Create a separate listener on each interface for each endpoint.
- Now each listener only gets one endpoint's traffic.
- Use the
Request Handlingtab above to redirect it to the endpoint.
It's a pain to accomplish as you can imagine. This works if you have a couple of endpoints.
It's not always easy like our example.net example. In fact, it's never easy
like this. This section discusses the issues I have usually seen.
I See the Burp Interface Instead of example.net
After browsing to http://example.net the Burp's web interface shows up or it
does not connect.
- Have you added the domain in
Hostname Resolution?- Burp is asking the OS to resolve domains for it so it's using the hosts
file. This means the traffic leaving Burp is redirected back to
localhost:443which is the proxy listener.
- Burp is asking the OS to resolve domains for it so it's using the hosts
file. This means the traffic leaving Burp is redirected back to
Proxy Server is Refusing Connection Error Message
- Have you set the Firefox or Windows proxy settings to some another value?
- Is your Burp listener listening on port
443(or whatever port the application is trying to connect to)?
The Connection times out after a Long Time
- Have you enabled "invisible proxying"?
TLS Certificate Issues
- Have you added Burp to the operating system's certificate store?
- Is the app using a separate certificate store (bundled JVM keystore)?
- Is there certificate pinning?
- Is the app looking for a specific Common Name in the generated certificate?
This method has a few limitations:
- Doesn't work if your application contacts the endpoint by IP (happens in internal applications) or does its own DNS lookup (very rare as in I have never seen one).
- Does not scale. If there are multiple endpoints we have to make one interface per endpoint.
- We can proxy using the
hostsfile. - Be sure to somehow tell Burp (or your proxy) where to send the requests.
- Having multiple endpoints on one port (which is common) is an open problem.
如有侵权请联系:admin#unsafe.sh