What is a Content Security Policy (CSP)?
A CSP is a policy that uses headers or meta elements to restrict or greenlight what content loads onto your website. It is a widely-supported security standard recommended to anyone who operates a website.
Why do you Need it ?
Using a CSP adds a layer of protection to your website by stating rules of what is or isn’t allowed. These rules help to defend against content injections and cross-site-scripting (XSS) attacks, two of OWASP’s top 10 Web Application Security Risks.
A XSS attack is what happens when an attacker is able to compromise an unprotected website by injecting malicious code. When a user tries to interact with the site, the malicious script executes in the user’s browser, giving the attacker access to the victim’s interactions with the site, like login information etc.
A CSP will prevent most script-injection attacks from occurring because it can be set up to limit JavaScript to loading only from trusted places.
A strict policy can prevent a myriad of issues that stem from loading scripts from unauthorized locations, be it XSS or content injections.
Follow along for a quick overview of Content Security Policies, how to write them, and how they get implemented.
How do I set one up?
1 – First, Define your CSP
Make a list of policies or directives and source values that state which resources your site will allow or restrict. We’ve provided a list of common CSP Directives and source values for you to mix and match.
Common CSP Directives
| Directive | Example | Description |
| default-src | default-src ‘self’ cdn.example.com; | Default policy, used in any case (JavaScript, Fonts, CSS, Frames etc.) except if overridden by a more precise directive. |
| Script-src | script-src ‘self’ js.example.com; | Defines authorized sources for scripts |
| Style-src | style-src ‘self’ css.example.com; | Defines authorized sources for stylesheets (CSS) |
| Object-src | object-src ‘self’; | Defines authorized sources for plugins (ex: <object> or <embed>) |
| img-src | img-src ‘self’ img.example.com; | Defines authorized sources for images, or link element related to an image type (ex: rel=”icon”) |
| media-src | media-src media.example.com; | Defines authorized sources for media elements (ex: <video>, <audio>) |
| frame-src | frame-src ‘self’; | Defines authorized sources for loading frames (iframe or frame) |
| font-src | font-src font.example.com; | Defines authorized sources where fonts files can be loaded from |
| connect-src | connect-src ‘self’; | Policy applies to connections from a XMLHttpRequest (AJAX) or a WebSocket |
| report-uri | report-uri /some-report-uri; | Instructs a browser to create a report of policy failures. If a piece of content is blocked, the browser will send a report of the information to this URI.
Alternatively, you can use Content-Security-Policy-Report-Only as the HTTP header name to receive the reports without blocking anything. |
| add-header |
Source: content-security-policy.com
Common Source Values for -src Directives
| Value | Example | Description |
| * | img-src * | Wildcard, allows any URL except data: blob: filesystem: schemes. |
| ‘none’ | object-src ‘none’ | Prevents loading resources from any source. |
| ‘self’ | script-src ‘self’ | Allows loading resources from the same origin (same scheme and domain name). |
| data: | img-src ‘self’ data: | Allows loading resources via the data scheme (eg Base64 encoded images). |
| domain.example.com | img-src domain.example.com | Allows loading resources from the specified domain name. |
| *.example.com | img-src *.example.com | Allows loading resources from any subdomain under example.com |
| https://cdn.com | img-src https://cdn.com | Allows loading resources only over HTTPS matching the given domain |
| https: | img-src https: | Allows loading resources only over HTTPS on any domain. |
| ‘unsafe-inline’ | script-src ‘unsafe-inline’ | Allows use of inline source elements such as style attribute, onclick, or script tag
bodies and javascript: URIs |
| ‘unsafe-eval’ | script-src ‘unsafe-eval’ | Allows use of unsafe dynamic code evaluation like JavaScript eval() |
Source: content-security-policy.com
Content Security Policy Examples
Now let’s mix and match some common directives and source values and to address a few common scenarios.
Tip: When making a CSP, be sure to separate multiple directives with a semicolon
SCENARIO 1 :
You want to prevent iFrames from loading on your site.
Content-Security-Policy:frame-src ‘none’
SCENARIO 2 :
You want to prevent JavaScript from loading on your site.
Content-Security Policy:script-src ‘none’
SCENARIO 3 :
You want to allow images to load from any domain, but want to restrict other content from loading except that from your own website.
Content-Security-Policy: default-src ‘self’; img-src *;
Tip: It is important to set the default-src to ‘self’ or ‘none’ (and explicitly list the allowed resources), otherwise it will default to allowing all.
Note that ‘self’ does not include any of your sub-domains.
SCENARIO 4:
You only want to allow content to load from the same origin, your website, and its subdomains.
Content-Security-Policy: default-src ‘self’ *.sucuri.net;
Note: Because the content that will be loaded from sucuri.net is not specifically mentioned in the CSP, default-src will allow all content in.
SCENARIO 5:
You want to allow images to load from anywhere but only want to allow media or executable scripts that come from the same origin.
Content-Security-Policy: default-src ‘self’; img-src *; media-src sucuri.net; script-src sucuri.net;
Tip: This is a kind of rule you would need if you had a CDN or a media sub-domain from where you serve all your media.
SCENARIO 6:
You want to allow images, scripts, form actions, and CSS from the same origin, but nothing else to load.
default-src ‘none’; script-src ‘self’; img-src ‘self’; style-src ‘self’;base-uri ‘self’;form-action ‘self’
2 – Test your CSP before implementing it
Test out your CSP to make sure you didn’t forget to include any trusted domain origins your site needs.
- You can receive alerts of violations to your policy without blocking the content, by setting the HTTP Response header to Content-Security-Policy-Report-Only .
- You can also add the directive report-uri with a URL where you would like to see reports about CSP violations.
Where to set the HTTP Response Header
Most modifications to your HTTP Response header will happen in the configuration file.
- Find out what server your website is running on. You can also log into your cPanel and check under the Server Information interface to find out. This will show the server that hosts your account.
- Once you know your server, set your HTTP response header within the corresponding configuration file as detailed below. We have also linked additional resources for greater detail.
IIS (Internet Information Services)
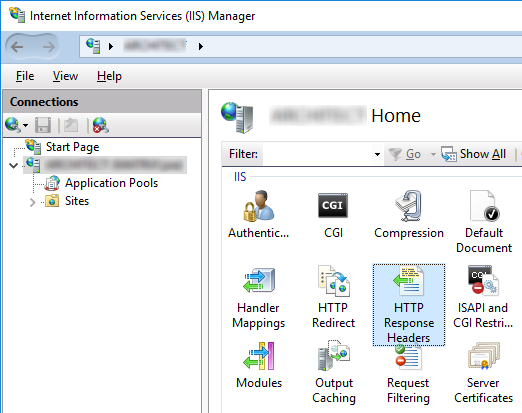
- Open the IIS manager

Media source: docubrain.com
- On the left select the website that you want to set the HTTP Response Header for
- Select the HTTP Response Headers icon.
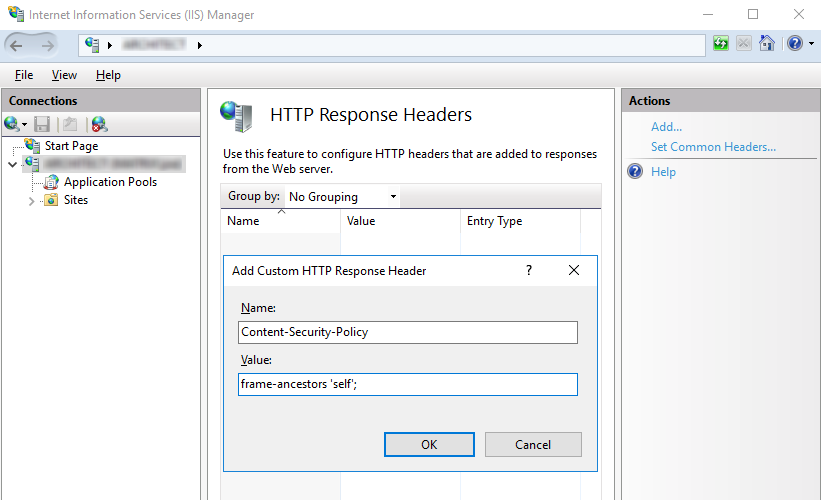
- Select “add” and enter your name and value for the header

Media source: docubrain.com
Alternatively, if you don’t want to open the IIS manager you can add your policy to the web.config file. It will look something like this depending on the directives you chose:
<system.webServer>
<httpProtocol>
<customHeaders>
<add name=”Content-Security-Policy” value=”default-src ‘self’; img-src*” />
</customHeaders>
</httpProtocol>
</system.webServer>
More information at Modifying HTTP Response Headers
Apache
If you have an Apache web server, you will define the CSP in the .htaccess file of your site, VirtualHost, or in the httpd.conf
It will look something like this depending on what directives you chose:
Header set Content-Security-Policy-Report-Only “default-src ‘self’; img-src *”
More information at Apache HTTP Server Tutuorial. Note: mod_headers is required to inject headers in Apache.
Nginx
The HTTP response header is modified through the corresponding config files within the server blocks. By adding an [add_header]directive, you set the response header.
In Nginx, it looks like this:
add_header Content-Security-Policy”default-src ‘self’; img-src *”
More information here.
Now that you’ve tested out your CSP it’s time to implement
3 – Time to Implement your CSP
There are two ways to configure your system to start enforcing your CSP. The first option works on all browsers, but is less popular. The second option is the same way we tested our Content-Security-Policy-Report-Only, we set the HTTP Response Header
- Meta Tags: If you do not have access to your web server’s configuration, you can use the HTML tag to enable your CSP inside the page’s HTML. Set the <meta> in the <head> so it begins working ASAP.
<head>
<meta http-equiv=“Content-Security-Policy”
content=”default-src ‘self’; img-src *”>
</head>
- CSP HTTP Response Header: This is the recommended way to implement a CSP by W3. Most browsers (except Internet Explorer and some older browser versions) support using a CSP HTTP Response header, but you can double check here at Can I Use.
Refer back to Set the HTTP Response Header for details to the software you use for your web server, but this time you will use Content-Security-Policy without the Report-Only piece.
For more information on browser compatibility, policy testing and examples check out MDN Web Docs
Well done!
Now that I have a CSP, does that mean I am safe?
Not quite, but it certainly helps. CSP can block malicious script injections from the server side and XSS from the client side. Having a CSP is critical to keep your website from being blocklisted. When Google identifies malicious code, your website gets blocklisted, blocking clients from access.
Although CSP is a critical piece of any website security solution, it does not provide comprehensive protection. Our free website scan can help you identify other vulnerabilities that your site may be facing. Talk to our team about your security strategy, and we can point you in the right direction.
